

 The Ultimate Boat Tool Emergency Kit for the Holidays – Essential Gear &">

thats the core: keep a compact, waterproof multi-tool and a roll of marine tape onboard. This combo handles most quick repairs, saves you from expensive shore runs, and prevents small issues from hanging you up within distance of the helm. If something hangs, you fix it fast. This isnt about flashy gadgets; it’s about dependable gear. Modern gear, designed to resist salt and spray, takes less space and stays reliable when the boat rocks.
Beyond the core, assemble a kit with two hammers for light taps, a set of hose clamps in several diameters, spare O-rings and seals, repair putty, electrical tape, and zip ties. Add a compact flashlight, spare batteries, and a small battery pack so there is power for night fixes. Keep a clean spare bag that seals watertight, and 设计的 to stay organized even when the deck down. 包括 fixing supplies so you can handle most clogs, leaks, and loose fittings without rushing.
For holidays, you need items needed to manage common failures: a broken hose, loose clamps, or corroded terminals. A portable air pump, spare terminals, and a few extra boat-friendly connectors keep you afloat while the weather or guests stay warm. This kit is 相对地 compact, yet modern enough to be trusted, and it takes only a few minutes to verify each item before a trip. Store them in a dry pouch so nothing sits around.
Turn the setup into an army of quick fixes by teaching family members where each tool lives. A husky rope for line repairs, a small saw for trim work, and a couple of spare fuses prevent a minor incident from turning into a big delay. The kit itself should be 设计的 to stay compact and work there when it matters, and it should keep the boat clean and safe, not clutter the cabin. This kind approach ensures that even if something breaks, you can restore control fast.
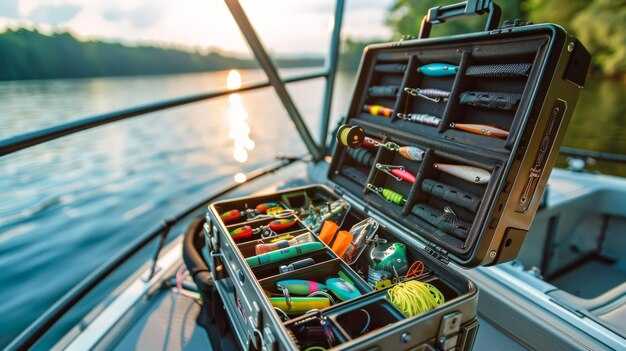
Boat Tool Emergency Kit for the Holidays
Get a compact marine-grade multi-tool with corrosion-resistant blades. This kind tool handles most on-deck repairs. For example, look for a model with 14–20 functions, a solid carrying case, and better corrosion-resistant blades. A little planning now saves time on deck when a fast fix is needed, and it frees room for a spare part in the kit.
Keep the kit organized with a layout that separates tools between the deck and the electrical box. Pair the multi-tool with a weatherproof box that holds spare fuses, a length of marine wire, crimp connectors, heat-shrink tubing, and tape. If you need to splice, the little wire helps; else keep a backup spare. It takes only a few minutes to replace a blown fuse or a damaged connector when you have the right components.
For rigging and deck gear, pack spare clamps, shackles, small spools of line, and a compact rigging knife. This setup gives you fast repairs between runs and reduces the need to improvise elsewhere. Label the components so you can grab what you need in a hurry and avoid mixing up sizes during a rush.
Stock a small block of parts that tend to wear first: O-rings, gaskets, hose clamps, thread seal tape, and patches for leaks. When items show wear, replace them before they fail; a little proactive replacement saves bigger hassles when seas are rough. Choose parts with a true marine-grade finish and a precise grade tolerance.
Carry the kit in a sturdy case and keep it within easy reach under a seat or in a dedicated locker. A compact screwdrivers set, spare screws in a labeled wallet, and a small tape measure improve reliability during repairs. A quality carrying solution helps you keep everything together, from fuses to rigging hardware, so you never search room for the wrong part.
Whether you sail near home or across a weekend cruise, limit content to what you actually use. Since space is limited during holidays, prioritize items with multi-function uses and quick-access pockets. Between electrical and rigging needs, ensure your system looks organized and ready, then do a quick test at the dock to confirm everything is secure and ready for the next leg.
When you are done packing, review the list and note any gaps for the next trip.
The Ultimate Boat Tool Emergency Kit for the Holidays: Glue and Sealants
Keep a compact two‑part marine epoxy kit and a neutral‑cure silicone sealant in a waterproof case. This pairing covers emergencies, from small hull cracks to deck leaks, delivering a strong bond and a flexible seal in salt water and sun.
Choose the right sizes: epoxy resin and hardener tubes in the 10–20 ml range provide enough material for little repairs, while a 30–50 ml tube of silicone or polyurethane sealant handles deck seams and fittings. For fabric work on sails or covers, add marine fabric glue designed for sailcloth and a seam sealant to protect stitching lines.
Electrical fixes need careful materials: include a small epoxy kit to secure loose terminals and a fast‑setting cyanoacrylate glue for tiny plastic components. Add heat‑shrink tubing in two sizes to wrap wire splices and protect connections during motion and vibration.
Fabric and sail repairs deserve dedicated glue: use marine fabric glue or contact cement for canvas and sailcloth, plus a seam sealant to weatherproof stitched areas. Always test on a scrap piece first to verify adhesion, flexibility, and color match before applying to the real fabric.
Application tips and curing times help you plan during emergencies: epoxy becomes tack‑free in roughly 20–60 minutes and reaches full strength in 6–24 hours depending on temperature; silicone cures slower but remains flexible, with tack‑free time around 1–2 hours and full cure in 24–48 hours. Use a small mixing tray and spread thinly to minimize squeeze‑out and skin formation.
Case placement and storage matter: keep the kit in a little waterproof box inside a cockpit locker or head cabinet, clearly labeling each item with its size and purpose. Store in a cool, dry area and check expiration dates seasonally to ensure it’s ready when needed, especially during holidays when cruising crowds and weather shifts demand quick repairs.
Boater guidance for cruisers: this article focuses on the selection of glue and sealants your boat can rely on during the holidays. Think about your sail size, fabric types, and typical repairs you encounter, so you can tailor the kit to your needs and have the right items ready there, when emergencies arise.
Quick-Access Adhesives for Onboard Repairs
Keep a compact kit with three go-to adhesives: marine epoxy, CA glue, and silicone sealant. For boating on a sailboat or any craft, this setup covers most fix-it jobs between checks and keeps the hull tight, thats why sailors rely on it.
For hull leaks and patching small punctures, mix a two-part marine epoxy and apply a patch flush with the surface. Clamp coverage with a ratchet strap or bar clamps until set. Working time runs about 5–15 minutes; handling in 2–4 hours; full cure in 12–24 hours depending on temperature.
Small electrical fixes, moisture seals around connectors, and cap repairs benefit from CA glue on clean, dry surfaces. Use a thin bead and hold for 30–60 seconds. Pair CA with a light mechanical hold if the area bears vibration, but reserve structural tasks for epoxy or silicone.
Silicone sealant offers flexible, waterproof joints for hatches, drains, and electronics enclosures. Apply, then cure for 24 hours; avoid oil-soaked surfaces that can degrade silicone bonding.
Epoxy putty fills gaps and serves as a quick hull patch or mounting pad when nothing else fits. Shape the putty, press it into place, and let it cure; this keeps bearings and small brackets stable on a rough sea. A husky epoxy putty tends to stay non-shrinking under load.
Store these adhesives in their labeled pockets of your gear bag and keep a log in your files after each fix, noting what was done, which materials were used, and cure times. That way, nothing gets missed if a towing call drags you toward port. Avoid pounding with hammers–use clamps or a ratchet to apply even pressure while curing. Keeping this setup simple helps corrosion stay at bay and ensures your equipment stays good for the next trip.
Marine-Grade Sealants for Deck, Hull, and Fittings

Use a polyurethane sealant for deck seams and a neutral-cure silicone for fittings to cover most tasks and environments in saltwater conditions.
Polyurethane seals deck seams, hull joints, cockpit profiles, and companionways; it tolerates movement, resists abrasion, and forms a tough, flexible film. Expect tack-free in 6–12 hours and full cure in 3–7 days at typical cabin humidity. If a job is expensive or critical, apply a larger bead and let it cure undisturbed for best protection. This ultimate approach will deliver reliable protection for many seasons.
Silicone-based sealants excel around through-hulls, head fittings, hoses, and deck access gates where long-term saltwater exposure occurs. They stay flexible, resist UV, and maintain watertight seals even as fittings flex. Handling time is shorter under dry conditions; full cure occurs in 48–72 hours at 20–25 C and moderate humidity.
Surface prep matters: remove old sealant, clean with a wire brush where needed, wash and dry thoroughly, then wipe with isopropyl alcohol before applying. Use a backer rod for joints deeper than 6 mm, and mask edges to keep lines clean. For wiring penetrations, seal around the wire with a continuous bead and then tool for a smooth edge.
注意填缝剂的涂布:在每个接缝处均匀涂布,然后用湿手指或三角形工具抹平。不要涂得太厚,因为这会减慢固化速度,并可能滞留水分,从而增加停机时间以及在海浪飞溅中发生泄漏的可能性。.
在存储方面,将滤芯保存在原包装中,放置在阴凉、干燥的舱室或背包口袋中,并在有效期前使用。如果您在使用过一个旺季的盐水后更换了滤芯,请确保新滤芯在有效期内。.
维护:在恶劣海况后或维修期间检查密封件;如果接头开始失效或出现裂纹,则移除损坏的材料并重新密封。如果密封件发生故障,计划一次快速维修并更换新的密封筒以恢复保护。.
在你的背包里携带一个小型工具包,确保你为船舱任务做好准备;合适的密封剂可以让你免于昂贵的停机时间和防止在盐水环境中泄漏。在某些情况下,你可能需要同时使用这两种类型来处理不同的头部配件和甲板接缝,并混合使用遮蔽胶带、湿巾和钢丝刷来准备表面。.
修补方案:胶带、环氧腻子和快干型补丁
在船舱里准备好防水胶带、环氧腻子和快速修补工具包,以便在恶劣条件下处理从小滴水到较大船体划痕的各种问题。.
选择包含三种组件的紧凑型套装:胶带、腻子和补片。 在亚马逊上购买包含多种尺寸、一把基本刀具和砂纸的工具包,可确保维修工作顺利进行,而不会延误工作。.
大卫是个周末水手,他把补丁工具包放在船舱储物柜后面一个坚固的防水盒子里。他依靠这些材料来修补各种问题,从细小的裂缝到较大的穿孔,经常可以因此省去一趟岸上,直到可以进行适当的维修。.
需包含的关键组件:
- 防水胶带:2 至 4 英寸宽,船用级和织物增强型,长度足以覆盖损坏区域并超出边缘。.
- 环氧腻子:船用级双组份腻子,固化快,与玻璃纤维、金属和复合材料表面粘合良好;按照包装说明混合并涂抹于准备好的区域。.
- 快速固化补片:玻璃纤维布或带有树脂或粘合剂背衬的塑料补片;尺寸适合覆盖几英寸以内的孔洞,并且能够弯曲以适应曲面。.
- 工具和硬件:紧凑型多功能工具、锋利的刀、砂纸、夹具或可调节绑带,以及用于在硫化过程中固定补丁的备用卸扣。.
- 存储:船舱内或甲板上的一个小型防水容器,以便心爱的装备保持干燥且易于取用。.
申请步骤:
- 评估损伤并决定修补方案;对于船体破洞,如果可能,从内部修补,以获得更强的密封性。.
- 准备表面:干燥区域,清除松动物质,并使边缘粗糙以提高附着力。.
- 贴胶带:裁剪至合适大小,重叠覆盖破损处,用力按压以密封;至少超出破损边缘 1 英寸。.
- 混合环氧树脂腻子:揉捏至颜色均匀,在贴好胶带的补丁上涂抹厚厚的一层,并平滑边缘以与周围表面融合。.
- 安装快速安装贴片:将贴片覆盖在固化的腻子上,按压使其贴合曲线,如果需要,用额外的腻子密封边缘。.
- 固定并测试:在修补剂固化时,用夹子或带子固定;固化后,用温和的渗水测试进行测试,观察是否有渗漏,如有必要,用更大的修补剂重新修补。.
这种方法既支持小修,也支持对船体或甲板重大损坏进行更严格的修复,在您远离海岸的情况下,保持您的工作设置随时可用且可靠。.
工具与技巧:安全地使用胶水和密封剂
选择船用级、低VOC密封胶,并使用可调节填缝枪进行施工,以控制胶珠大小。如果无法找到首选产品,则可选用聚氨酯密封胶代替,该密封胶固化后具有柔韧性,且与玻璃纤维、金属和木材的粘合性良好。.
用异丙醇清洁区域,使其完全干燥,并遮蔽边缘,以此来准备区域。这能保持部件整洁,并减少周末改装期间清理的需求。对于周末水手来说,一个随时可用的工具包可以加快改装速度并最大限度地减少遗漏的步骤。这种方法也有助于木制滑轮和甲板接缝,在这些地方,紧密的密封至关重要。.
根据工作需要选择合适的产品:密封胶用于吸收移动和填充缝隙,而胶水则提供粘合。对于承受承载负荷或振动的接缝,选择柔性密封胶;对于零件之间的永久性粘合,则使用强力粘合剂;切勿在单个接缝中混合使用产品。.
方法:将胶筒装入手动枪;以 45 度角切割喷嘴;刺穿密封;平稳、连续地施涂,匀速移动以避免停顿。使用可调节的填缝枪,以保持胶条均匀。完成后,用湿手指或塑料刮刀抹平。.
安全和处理:通风区域;佩戴手套和护目镜;避免皮肤接触。用推荐的溶剂擦拭未固化的材料,并储存在经济实惠的容器中。 远离儿童和宠物。.
特别提示:深缝隙处使用背衬棒;对于穿 hull 部件或翻新工作,先用合适的钻头钻孔,然后用孔锯扩大空间,并在边缘周围密封。预处理过的表面所需固化时间较短;如果需要重新拧紧硬件,请根据需要重新安装和密封。.
| Task | 胶粘剂/密封剂类型 | Tools | 说明 |
|---|---|---|---|
| 接缝和接合处 | 船用硅胶或聚氨酯密封胶 | 填缝枪,可调节 | 单珠施用;大缝隙使用背衬材料 |
| 接合硬件 | 刚性粘合剂(环氧树脂或聚氨酯) | 甲板刀,手套 | 充分固化;固化期间避免移动 |
| 通海阀与管件 | 与金属和玻璃相容的密封剂 | 孔锯,钻头 | 保持表面预备状态;遮盖边缘 |
| 深渊 | 填缝棒+密封胶 | 填缝枪,垫片 | 防止三点粘合 |
| 清理和存储 | Remaining sealant | Rags, solvent as per manufacturer | Keep in budget-friendly container |