

 Main Menu Design – Best Practices for Intuitive Navigation">

采用固定标题 显示了 6–7 个清晰标注的物品 在每个页面上。当用户移动时,该栏始终可见,因此只需点击两次即可到达重要区域,从而减少犹豫的时刻。 实际上,将地图锚点连接到劳伦斯、威奇托-K96、本顿、加内特、塞弗里和老湖,使用 blvd 提示引导视觉节奏,形成一个引导视线穿过内容的脊线。 使用 kdot 约定来标准化路线上的标签。 紧凑的搜索字段位于右侧边缘,使用户可以在查找特定主题时快速提交查询。.
保持结构扁平:将深度限制在两层,其中 主要类别 在标题和子项目中仅在需要时显示。这避免了深层树结构,从而减慢访问速度并影响外观。使用反映用户目标的标签,而不是内部术语,以便sandra可以快速识别各个部分。如果页面涵盖蒙哥马利或莱克-奥尔德服务,则通过顶行中的单个链接进行路由。.
可访问性指南主导着实际工作流程。当用户感觉他们在主题中摸索时,可预测的结构可以防止迷失方向。使用可见的焦点环、语义标记、键盘友好的Tab顺序以及跳到内容链接。所有项目都应具有 ARIA 标签,以便向屏幕阅读器传达其目的,同时颜色对比度符合 WCAG 2.1 标准。这使得系统始终易于使用且自然舒适,从而支持依赖辅助技术的用户。.
移动端和桌面端必须表现一致。目标点击区域至少44px,项目之间留有间距,并进行响应式换行,以保证在小屏幕上保持两行可读性。当视口变窄时,将不太重要的项目收缩到紧凑的溢出区域中,而不是完全隐藏它们,确保在各种设备上外观保持整洁和可预测。.
测量计划:跟踪首次互动时间、到达核心区域的点击次数,以及通过页眉访问的页面的跳出率。运行小型的 A/B 测试,改变标签长度、顺序和可见性,以观察路径清晰度的具体提升。鼓励用户通过快速操作后出现的简短表单提交反馈,从而围绕用户需求进行持续迭代。.
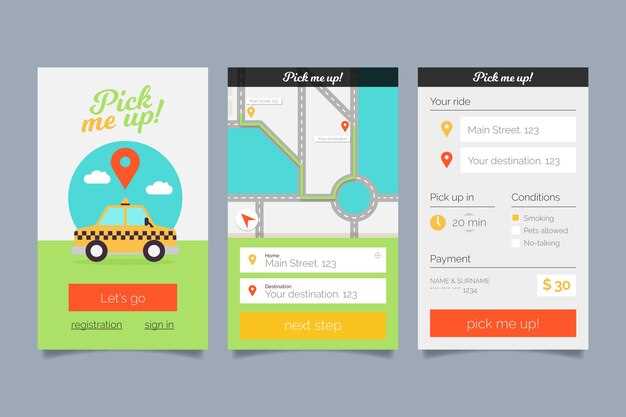
主菜单设计及威奇托湖区明晰计划
采纳三层主要结构,包含清晰标记的集群,从而实现两次点击即可访问核心操作,例如湖泊新状态、EDNA 详情和州长更新。.
来自麦克弗森和朱厄尔县以及-mahaffe partners的经验丰富的团队,完成了人口调查数据的价值评估;编目项目,例如帆、旗帜和步道;埃德娜资源;拥有他们的数据;每个人都受益; MASH社区努力;来自 Overland、科-羚羊 和道格拉斯县的当地声音;在此设置中;池塘-2修订版;儿童资源;湖泊-新映射;州长批准。.
通过将每个集群映射到真实目的地,将横幅与路径连接,并在可从每个入口点访问的单个枢纽内公开 pond-2 和 lake-new 页面来应用此清晰度计划;确保设置与当地优先事项和州长监督相符。.
辅助功能和性能注意事项:使用高对比度排版、键盘焦点指示器和可预测的页面顺序;通过将项目整合到三个组来限制视觉噪音,优化资源大小以实现快速加载,并使用包括儿童和成人在内的混合人口统计样本在池塘-2 设置(如 edna 和 lake-new 区域)中进行测试。.
追踪横幅项目的点击率、步道互动以及从此处到州长页面的访问者份额等指标;每周与来自麦克弗森、朱厄尔和道格拉斯的当地利益相关者迭代更新,以确保每个人都知情并确信他们的声音塑造了体验。.
主菜单的用户流程和信息架构
从一个双层信息架构开始,将顶层分组与用户目标对齐,然后展示特定于任务的路径。从清晰的集群开始,并在第一个视图上显示一组简洁的选项,最大限度地减少常用任务的点击次数,同时为更深入的探索留出空间。.
采用一种以地理为主的分类法,它反映了现实世界中的地点,如莱内萨、威奇托、莱博、艾尔玛、麦克弗森、格里德利、朱厄尔、肖、沃森和科-孤星。这有助于用户查找本地条目,从而快速访问营业时间和评论。用简短的描述符标记每个集群,并保持标签在各个区域的一致性。.
布局规则:采用基于网格的界面,其中每个瓦片代表一个目的地或操作,具有清晰的标题、简短的说明以及一个主要操作。使用图像和文本相结合的方式,一目了然地传达价值;包括满足多样性并吸引新访客和回头客的选项。确保第一行着重强调地点、时间和评价。.
从起始视图开始,呈现三个主要流程:访问地点、探索类别和阅读评论。每条路径都会显示一个精选子集:按区域(莱纳萨、威奇托、麦克弗森)分组的地点,检查用于湖上旅行的船只的选项,安全路线和附近驾驶时间。使用渐进式披露,仅在选择后显示更深层次的选项。.
标签和可访问性:在所有磁贴中使用一致的动词——查看、保存、比较——并为图像提供替代文本、符合逻辑的键盘焦点顺序和高对比度颜色。为了体现当地特色,请包含珠宝和营业时间数据;展示独特的目的地,突出安全、易用的场所组合。始终致力于通过减少摩擦来帮助自己,并以珠宝商的精准度呈现内容,让用户在访问不熟悉的地方时感到自信。.
指标与治理:跟踪到达目的地所需的时间、到达目的地的点击次数以及用户在集群之间切换的频率。利用这些洞察来调整网格、删除冗余条目,并确保为您自己提供快速可靠的体验,确保在探索莱内萨、利波或威奇托时路径畅通。这种方法支持安全、直接的旅程,适应各种用户意图并推动满意度评价。.
顶部栏与侧边导航:何时使用它们
在速度和拇指触及范围至关重要时,选择紧凑的顶部栏,始终保持少量核心操作可见。 如果您在移动设备上进行构建,顶部栏可将项目保持在触手可及的范围内,并减少意外点击。 将搜索、通知和个人资料图标放置在拇指落点处,并保持中心品牌可见。.
当您拥有广泛的地点和州目录需要分组时,侧边栏会非常出色。它可以清晰地呈现顺序,包括阿肯色州页面、温菲尔德、麦克弗森、奥尔佩、康科南、里奇、里格斯、芒德和中心枢纽。它可以轻松浏览县区、州长和全州范围的资源。在这种情况下,用户自然会遍历一棵树,而不仅仅是一个扁平的列表。这种州布局可以阐明地理位置。.
将顶部栏限制在 4-6 个项目左右;其余的放在侧面板中。在较大的显示器上,保持左侧栏可见,并在较小的屏幕上使用切换按钮来显示它。无论您是有一周末的任务包还是稳定的日常流程,布局都应以自然的方式进行调整。.
点击目标应足够大,以确保准确点击;保持垂直间距一致,并避免拥挤区域。在明亮环境中,使用防晒霜级别的对比度,以便图标和文本在阳光照射屏幕时仍清晰可辨。 这些小细节可以防止误触并加快流程。.
请访问 httpsksoutdoorscom 查看这些方案的实际应用映射。混合设置适用于您通过快速操作和可浏览部分来完成任务的情况。将这些核心操作保留在顶部栏中,提供一个左侧栏来显示诸如州长、县页面和全州资源等项目,并提供一个清晰的切换开关。这种方法可以帮助您集中布局并保持任务的进行,无论您是在 winfield、ridge、arkansas 页面、mcpherson、olpe、concannon 或 mound 上进行测试。.
清晰的标签和图标,便于快速识别
将标签长度控制在 4 个字以内,并为每个标签配上一个粗体的、匹配的图标;这可以加快识别速度并减少搜索时间。.
在网格中选择单一的图标样式,采用通过辅助功能检查的高对比度颜色;清晰的提示音可帮助用户立即识别各个部分。.
使用本地引用的锚点标签,例如 plainville, gridley, cowley, blackfoot, atwood, central, lakes, lake-new, lake, co-audubon, mound。.
将每个标签对应到一个具体行动:野餐表示休息区,湖泊表示水景,中心表示枢纽区域;旨在促成快速决策。.
使用反映用户目标的图标提示:用书本学习,用心形收藏,用圆点强调,用山丘轮廓表示土堆,用桌子表示野餐。.
更新后的组合至关重要:测试不同的图标-文本配对,监控困惑程度,并调整长度和清晰度以涵盖用户看到的内容。.
请看平和的外观、清晰的标签和一套简单的图标如何在本地环境中(如湖泊、新建湖泊、中央湖泊)加速任务。.
来自当地社区(包括普兰维尔、考利、格里德利、阿特伍德和奥杜邦联合会)的David和其他人赞成这种简化的体验。.
键盘、屏幕阅读器和对比度辅助功能检查

对核心路径进行仅使用键盘的审核,然后使用屏幕阅读器验证结果。确保更新后的调色板的对比度符合 WCAG 2.1 AA 阈值。.
- 键盘遍历
- 使用 Tab 键和 Shift+Tab 键遍历所有交互元素(按钮、链接、输入框),以确认从位置到内容的逻辑、无陷阱路径。 验证焦点是否落在有意义的控件上,例如“提交”、“getmyboat”和驾驶操作。.
- 在标题后立即插入一个跳转到内容链接,以便用户可以直接访问lake-old、lake-new、lake-south内容,而无需重复听到标题。.
- 在状态变更后,保持湖泊-旧、湖泊-新、湖泊-南等节以及湖泊-南/马哈菲等景点目的地之间的线性焦点顺序。确保您在娱乐区域和表格区域之间移动时的体验保持流畅。.
- 在更新的调色板中,确保聚焦指示器在每个主题下都清晰可见;测试浅色和深色模式,包括玫瑰色和防晒霜强调色,以保持可见性。.
- 屏幕阅读器检查
- 在 Windows 上使用 NVDA 和 JAWS 进行测试,在 macOS/iOS 上使用 VoiceOver 进行测试,在 Android 上使用 TalkBack 进行测试。验证地标(页眉、主要内容、导航、页脚)是否按逻辑顺序播报,以及内容是否按自然顺序阅读。.
- 使用语义 HTML 来构建结构 (header, main, nav, section, article),并使用 aria-label 或可见文本为所有图标添加描述性标签。像 Submit, getmyboat 和 drive 这样的按钮必须显示有意义的标签。.
- 如果您使用图标,请搭配 aria-labels 或
aria-labelledby以便屏幕阅读器能够准确传达用途。. - Ensure dynamic changes (e.g., lake-old switching to lake-new) announce updates via aria-live regions, without duplicating prior announcements.
- Contrast and labeling
- Apply WCAG 2.1 AA contrast targets: 4.5:1 for normal text, 3:1 for large text. Verify UI text, icons with text equivalents, and controls meet these ratios in all themes.
- Audit color pairings in critical CTAs like Submit, and in secondary actions such as getmyboat or spot links, against the updated palette including roses and browns (browning) to guarantee readability.
- Prefer non‑color cues for critical status indicators (errors, success) to avoid dependency on color alone; provide textual or iconographic cues (e.g., a red border plus an error message).
- Document any color-sensitive information in a dedicated label set (location, state, name) so readers can interpret content without color cues.
- Practical labeling and tokens
- Label forms clearly using explicit strings (Submit, location, name, state, population). Use consistent naming across lake-old, lake-new, lake-south routes, such as lake-old and lake-new for testing visibility of labels in screen readers.
- Test alternatives for navigation-related terms by replacing ambiguous labels with concrete descriptions (e.g., “drive to spot” instead of vague “go”). Include sample identifiers like kdot, mahaffe, olathe-cedar, and lake-south to verify that assistive tech announces them correctly.
- Include aria-describedby where needed to give additional context to controls that rely on icons (e.g., a sunscreen badge next to a CTA explains its meaning).
- Documentation and maintenance
- Capture results in your accessibility log with explicit pass/fail, the tested tool, and the elements involved (e.g., lake-old heading, submit button, skip link). Include timestamps from your updated run and assign a responsible owner in state or local projects (e.g., moline, lyon).
- Schedule quarterly reevaluations after updating themes, colors, or content blocks; ensure getmyboat and drive actions remain a11y‑ready across lake-south and lake-old profiles.
- Publish a short checklist card in the location section so teams can quickly verify basic checks during daily sprints without reworking core flows.
Usability Testing, Metrics, and Iteration Cycles for Menu Design
Launch a 2-week usability sprint centered on top-level site controls. Track task success rate, time on task, error rate, and path length; base iterations on data collected from enthusiasts including kayaking groups in ottawa and other locations. Use a google form or in-app report to capture what users click, where they hesitate, and which button moves them toward a goal, and note something unexpected. In a weekend session with paola and marys, collect qualitative notes on touch gestures and perceived clarity, then translate findings into concrete tweaks.
Key metrics include task completion rate, time on task, error rate, and average path length measured in clicks; abandonment analytics reveal where users drop. Compile a report with data visuals, and label variants with clear names (Variant A, B, C) to compare what works. Include notes covering various scenarios, such as a shopper in ottawa or an enthusiast in a weekend scenery context, stocked with device sizes and environments, and highlight a jewell of a path that keeps clicks minimal. Also track white space balance and button density to ensure right sensations across a variety of devices.
Iteration cycles: after each sprint, implement 2–3 changes, then re-test with a fresh panel. Use rapid tests that last a weekend, capturing both quantitative data and qualitative impressions. For example, a variation that uses a single big action button vs a compact set of links yields a perfect balance in white space; in a test run near lake-lake and wichita-chisholm, users preferred the simple path. Collect feedback from marys and paola to ensure clear labels and touch targets. Testers want clear labels; just concise wording helps. Prepare a concise report; thank testers and share results with stakeholders in ottawa and the office.