

 10 Tips for Choosing a Wakeboard – The Ultimate Guide">

Begin with soft, ,134–139 厘米板;它适合 young 渴望精通的骑手 过渡.
耐用性至关重要;; arms 拥有力量,, hands, ,和手腕吸收冲击力,因此选择一个具有加强芯和坚固甲板的模型来支持表演。.
使用 maddox sizes 图表位于 centre 帮助选择长度;典型选项包括 132、135、139 厘米,其中 135–139 厘米适合身高约 155–175 厘米的骑手。.
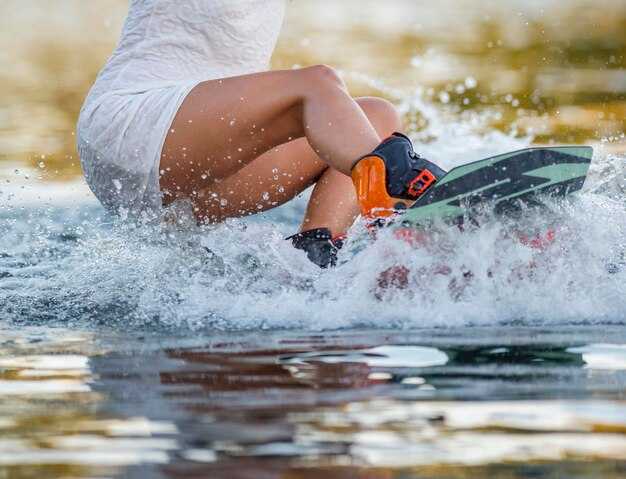
In cable 公园,可拆卸 fins 帮助稳定;这样的设置有助于早期的按压,帮助过渡,并减少磨损。.
骑手明白他们不只是装备;进步造就技能,由站姿驱动,一个稳定的基础。 centre, ,并且受控 force, while looking 进入每个弯道都会加速表现。.
尾波滑水板选择和维护:实用技巧
从一块双向板开始,135–139 厘米,重量范围 60–95 公斤。这个尺寸能提供均衡的操控性、更容易的刻滑和更平稳的起步。体重较重的骑手选择大 2–4 厘米的板;成为一个自信的骑手和滑板者,始于正确的尺寸、圆润的边缘和宽容的板面。中段的摇杆轮廓有助于水上起步和跳跃,当你投入到尾浪中时感觉很棒。虽然进步是循序渐进的,但合适的板子能加速学习。.
- 板型:双向板头,圆头圆尾,支持大多数滑行风格,减少早期刻滑时的卡刃,同时保持您最需要的平衡。.
- 尺码建议:按体重选择尺码,而非身高;大多数骑手适合 135–139 厘米;如果您接近该范围的上限或下限,则调整 2–4 厘米。.
- 固定器和设置:选择适合靴子尺寸的固定器,并采用直接安装的方式来最大限度地减少板面晃动;选择较软的固定器,以便于穿脱和减少脚踝磨损。.
- 站姿考量:从自然站姿开始,然后微调前倾角(0–15 度)和宽度(18–22 英寸)以匹配舒适性和刻滑感。.
维护工作能保护您的投资。每次在水中结束后,用淡水冲洗板子并彻底干燥。如果长期存放,请拆下固定器,以避免压缩和带子的磨损;在最初几次骑行后以及每个季度开始时,重新拧紧固定器螺丝。检查板刃和鳍是否有缺口或裂缝;在再次骑行前更换损坏的部件。存放在阴凉、通风的地方,避免阳光直射;放在带衬垫的袋子中,以防止碰撞。.
- 清洁计划:盐水或氯水浸泡后冲洗,然后干燥;避免潮湿存放。.
- 硬件检查:将固定螺丝拧紧至出厂扭矩;更换剥落的螺丝。.
- 刃缘维护:检查斜面和鳍片;如有崩缺,锉修或更换。.
- 储存条件:避光,平放或在有支撑的架子上直立存放。.
- 站姿设置:宽度 18–22 英寸;内八字角度 0–15 度;臀部与尾浪对齐,以提高转弯时的平衡性。.
- 刻划技巧:起初用轻微的刃,然后加深以将速度带入尾浪;同时转动臀部和肩膀来引导板子,并刻划入尾浪。.
- 跳跃准备:在直线滑行时保持平衡,然后加入一个可控的跳跃进入尾浪;保持膝盖微屈,并流畅地抛出,以平稳地落在脚掌上。.
- 风格和进展:大部分进步源于在不同环境中练习向前冲的动能;根据公园、缆绳或湖面滑水调整站姿。.
买家应检查保修范围、维修便利性和零件供应情况。寻找可靠选择的信号:持续支持、清晰的尺寸和摇杆规格以及可靠的更换零件历史。如果滑水板感觉尺寸偏小、过于僵硬或在您的体重下缺乏信心,请切换到适合您的技能水平、水况和成长轨迹的装备。尾波滑水是在船后拖曳,因此请与操作员协调信号;通过正确的组合,您将迅速达到出色的平衡和信心。.
骑行风格和骑手指标定义,以选择滑雪板长度
选择合适的长度始于对骑行风格和骑手数据的精确评估。初学者可以从较短的板中获得额外的稳定性,而更有信心的骑手则会寻求不同的长度。这里的关键是在主要稳定性和操控性之间取得平衡。.
- 体重和身高:映射到长度范围。125–131 厘米(<60 千克);130–136 厘米(60–75 千克);134–140 厘米(75–90 千克);139–145 厘米(90+ 千克)。身高超过 188 厘米者往往倾向于上限。.
- 技能水平:初学者和学习者受益于较长的长度,因为这能增加稳定性;当您感到舒适时,请选择该范围内较短的长度,以获得更快的刃缘控制。.
- 骑行风格和环境:在浅水中巡航并采用倾斜姿势时,较长的板身能提供主要的稳定性;跳跃和技巧动作则需要较短的板身(在范围内)以增加旋转。具有柔软边缘加上硬度评级的板子与骑手的偏好相符。.
- 起滑和高度:更长的长度增加了表面积,有助于起滑;水深较浅时,水下的断裂高度很重要,使得长度成为关键的稳定因素。.
- 可用选项和评级:评估您体重范围内提供不同硬度和弧形设计的型号;注意表明容错度和耐用性的评级。.
- 理想且具体的指导:如果您坐在乐队之间,选择较长的一端以保持学习的连续性;尽管快速开始很有吸引力,但主要优先事项仍然是平衡和控制。.
- 进阶路径:随着骑手越来越适应,转向频带内更短的范围,以提高控制和转换;真正有助于刃的精确度。.
- 骑手站姿和坐姿对齐:偏好的站姿宽度会影响长度。较长的滑雪板在较宽的站姿下能稳固地坐落;较短的滑雪板在较窄的站姿下坐姿更高。.
选择摇杆轮廓和甲板形状以匹配您的目标
Pick a 三段式摇臂 为了在学习新技巧时最大程度地增加跳跃次数并保持平稳着陆。这种设置可以在转弯时提供更强的控制力,并且这些功能可以转化为更稳定的水上滑行。有价格范围可以比较,并且此选择可以在您的船后提供持久的可靠性。.
通常,角度很重要:低角度的滑板能快速滑行并保持速度,而较高的角度则能提供更多的升力,从而支持更大的跳跃。如果正在学习刃位控制,请选择边缘容错性更高的软板;手臂保持放松,并在转弯时保持平衡。.
板面形状的统一性:结合圆润板头和更柔和的板边等特点,提高了在船后的稳定性,尤其是在你保持手臂靠近身体和手腕放松时。在使用滑水塔的设置中,稳定的板头有助于在转弯时保持滑水绳的拉力,从而提高整体控制力。.
规划你的优先事项:操控性、速度、爆发力和学习曲线;有许多摇杆和板型可供比较,因此选择一个型号变得切实可行。考虑价格、重量以及这些摇杆在浪涌中的表现;软板通常比硬木复合材料的重量更轻且成本更低,但许多组合选项都能提供耐用的寿命。.
来自滑水者的故事表明,带有适度三段摇板的柔软板面适合初学者,而较硬的组合则以牺牲平衡为代价来提供速度;一旦你知道你的目标,你就可以在适合你技能路径的型号之间进行选择。.
固定器:雪鞋尺寸、固定器类型、站姿宽度和后移量
雪鞋大小必须与你的脚匹配;系紧扣环以确保脚后跟锁定,系紧后前脚掌留有1-2毫米的余量。这种设置可确保滑水者在起步和陆地上保持稳定,避免在滑行过程中发生移动。.
Binding type options include closed-toe, open-toe, and hybrid designs. Closed-toe bindings deliver consistent control during starts, with features such as secure ankle straps; open-toe bindings offer growth room for junior riders, featuring adjustable lacing to fit various widths. Such designs based on foot shape give riders precise fit and feel.
Stance width affects balance across area of motion. Practical range is 18–22 inches (46–56 cm) for most riders; taller athletes may push toward 23–24 inches (58–61 cm). Start near shoulder width, test in 1 cm increments. A wider stance means more stability during pulls and side-to-edge moves; a narrower stance improves edge control on jumps and flat-water rides.
Setback means binding center behind midline. A neutral setup sits at 0 inches; moving to 1–2 inches toward tail shifts weight toward rear foot, influencing where land and how you handle edge transitions on side. This balance resembles two wheels under load, keeping stability through turns.
Consideration involves weight, height, and skill; youve got to tailor gear to ride style, whether you chase jumps, rides, or quick starts. This involves signals from body and gear: check boot tightness, binding tension, and stance comfort after each session. Keeping notes helps; some wakeboarders adjust boot size, binding type, setback, and stance width to match their area of movement, like a sport based system designed to ensure control during starts and landings.
Board materials and hardware: core type, fins, edges, and durability
Choose a wood-core board with high-density composite and reinforced bottom; this choice increases weight distribution consistency, improves landing stability, and offers long-term durability. although heavier, wood-core delivers trusted feel and resilience under stress. Vertex geometry paired with a dense outer skin boosts durability and helps communication between rider input and board response.
Types of cores influence riding vibe: this kind of info helps riders pick; wood cores offer forward pop and stiffness; foam keeps weight down but wears quicker; some hybrids blend a wood veneer with foam to balance weight, safety, and durability. sizing should match weight and riding style; bigger boards stabilise while smaller ones respond faster. This isnt a must to pick wood; foam has its place, and thats why hybrid options exist.
Removable fins attach with simple hardware, offering quick tuning between sessions. youve got options to dial grip or looseness depending on water condition. Edge design matters: straight rails deliver forward bite and quick edge setup; rounded edges soften contact on landings; bevels can increase safety and early release. Vertex contour along midsection and bottom channels improve stability during riding and reduce unwanted catch at the water’s surface. When hardware is attached firmly and sized to board width, safety rises and maintenance becomes completed with minimal effort.
| Core type | Pros | Cons |
|---|---|---|
| Wood | durable, strong energy transfer, predictable response | heavier, higher cost |
| Foam | lightweight, low cost, easy molding | lower resilience, faster wear |
| Hybrid | balanced weight, solid feel, good durability | higher price, more complex build |
Post-ride care and storage: rinse, dry, inspection, and protection
Rinse wakeboards with fresh water within 15 minutes after every boating session to remove salt, sand, and chlorine. Hold board by the center, support nose and tail, and spray with a gentle stream; which lets residual droplets run free before drying.
Dry thoroughly with a microfiber towel, then air-dry in a shaded, well-ventilated area. Ensure bindings and padding are completely dry; avoid leaving damp straps or liner behind, as mildew can form during season-long use. These steps help beginners keep glide consistent and reduce hold loss as speed varies during jumping sequences.
Inspect common issues: edge nicks, cracks in decking, soft spots near inserts, or delamination signs around rails. Run a quick series of checks along back edge for wear; ensure screws and binding hardware are secure; replace missing or stripped fasteners. Run a quick glide check by resting a finger along a rail to detect any hollow feel indicating core damage. If findings indicate damage, do not ride the board; arrange professional assessment to determine repair needs.
Protection and storage guidelines: rinse and dry are complete, then place wakeboards in a cool, dry place away from direct sun. Use a padded bag or cover to guard against dust and dings; set on a rack or stand so weight does not press into a single spot. Keep room temperature steady; avoid extreme heat or cold, which can affect resin and shapes. Seasoned riders, as well as beginners, benefit from these measures to maintain a board’s speed, glide, and hold during next season. When stacking, separate boards with soft spacers to prevent back-to-back contact; if using multiple boards, rotate positions so rounder noses or tails do not stay pressed against each other for long stretches.