

 Top 6 Anchoring Accessories for Boats – Essential Gear for Secure Mooring">

Choose robust, load-rated ropes and keep them storagesomewhat organized in a bin near the helm. On smaller craft, 12–14 mm nylon lines work well; on larger hulls, 16–20 mm delivers much margin. Regular inspections every week cut inaccuracies in handling, prevent wear from heat or salt, and keep the load more predictable in gusts. This setup is known among crews to reduce delays and keeps part of the dock routine together with a simple card that tracks wear.
1) Docking lines – two or three high-tensile ropes with protective sleeves create a flexible bridge between vessel and pier. Choose lengths to cover different types of berths; cleats can be reached without over-tension, this reduces swings and load peaks. Use a spare set stored in a water-resistant pouch; many crews label by needs, leggi, preferenze, and requests. When you connect, you work together with the wind and current to minimize risk of a quick snap.
2) Snubbers – elastic devices placed between line and dock fittings absorb swings, keeping the load from surging during gusts. Snubbers are especially helpful on longer berths and in calmer seas they remain idle but ready; check known load ratings and replace after signs of wear to avoid fire risk from overheated hardware.
3) Fenders and edge guards – contoured foam fenders aligned with hull curves, plus edge sleeves to reduce abrasion. This part of berthing protects hull finishes and fixtures and keeps requests from crew to relocate lines minimal.
4) Deck fittings, cleats, and bollards – verify deck hardware is robust, known to withstand load, and backed by corrosion-resistant fasteners. Place several cleats at strategic points so lines can be anchored away from metal fixtures; ensure pieces sit together and maintain slack that accommodates movement during wind shifts.
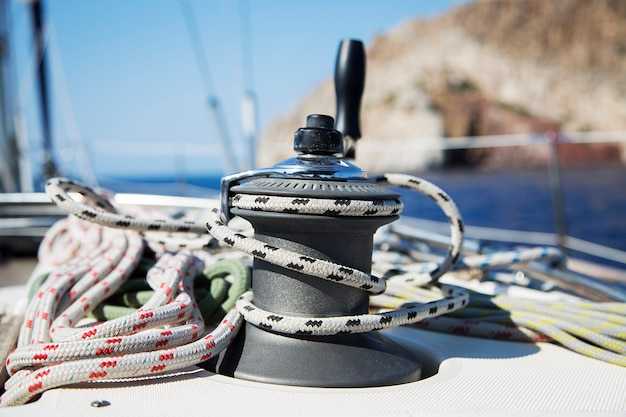
5) Capstan, windlass, or ratchet systems – mechanical tensioning helps manage heavy lines, especially during docking in gusts. Route lines to avoid kinks, minimize friction, and keep heat under control. These devices support steady load management while berthing; ensure power supply and battery protection to prevent fire hazards.
6) Storage, labeling, and maintenance tracking – a compact, labeled card helps identify line type, diameter, length, and last inspection; maintain a log and mark when replacements are needed. This supports many experiences and reduces mistakes when swapping gear during seas or at night; store away worn pieces in a dedicated bag to prevent confusion and ensure compliance with leggi and preferenze while sailing.
Top 6 Anchoring Accessories for Boats
Recommendation: invest in a complete mooring setup that pairs a 50 m nylon line with 6 m of 8 mm galvanised chain, connected through a heavy-duty shackle to ground tackle, designed to suit a medium-sized craft. This design usually delivers adequate hold between gusts, which keeps your vessel steady and reduces instructions sent during a breeze, just enough to keep your crew calm.
Line-and-Chain Assembly: 50 m nylon line (12 mm) paired with 6 m galvanised chain (8 mm), joined through a 3/8 in shackle. This pairing improves shock absorption and hold, between gusts it stays stable, and you can keep it ready for a quick setup.
Primary ground tackle: Danforth-style anchor 16–22 kg, well-suited to a medium-sized craft; pair with line and chain to achieve deep-set holds. Adequate selection depends on bottom soilslightweight and water depth; australias coastlines this option is widely used.
Electric winches: 1000–1500 W, 12 V, remote control; handle line up to 12 mm; able to pull strong loads; add a weatherproof enclosure. Shopping note: choose a model with reliable service in australias and a spare battery option; this gear reduces time spent on deck and keeps you in control as wind ramps up.
Deck hardware: stainless shackles and swivels; 1/2 inch screw-pin shackles; corrosion-resistant; setup through deck fittings to secure lines and chain; ensures easy releases.
Protection kit: chafe guards, rope sleeves, fenders; length 1.8 m; plugs integrated into deck drains; soilslightweight sleeve reduces abrasion; stored when not in use.
Maintenance plan: spare plugs, spare rope, quick-connects, and a simple service schedule; keep in your kit and run a maintenance program that includes recommendations to improve readiness, with enough spare parts stored and ready, some improvements added over time.
| Item | Specs | Примітки | Cost Range |
|---|---|---|---|
| Line-and-Chain Assembly | 50 m nylon line (12 mm) + 6 m galvanised chain (8 mm); 3/8 in shackle | Shock absorption; hold improves; easily stored | $60–$120 |
| Primary Ground Tackle | Danforth-style anchor 16–22 kg | Adequate selection depends on soil; best in australias coastlines | $100–$180 |
| Electric Winches | 1000–1500 W; 12 V; remote control; handles up to 12 mm line | Able to pull strong loads; service in australias preferred | $350–$800 |
| Deck Hardware | Stainless shackles 1/2 in; screw-pin; swivels | Corrosion-resistant; setup through deck fittings | $8–$25 per shackle |
| Protection Kit | Chafe guards; rope sleeves; length 1.8 m; deck plugs | Plugs protect deck; soilslightweight sleeve reduces abrasion | $15–$40 |
| Maintenance Plan | Spare plugs; spare rope; quick-connects; tool kit | Keep ready; maintenance program with recommendations to improve readiness | $20–$60 |
2 Boat Fenders Included: Practical Guide to Mooring Gear
Recommendation: Install two fenders as the initial setup; they absorb contact and protect the hull when lines swing against pilings or docks. Two fenders included in the kit provide immediate protection on arrival; choose models made from soft closed-cell foam, with folding designs that store flat when not in use. The right size matches vessel length; if it isnt correct, cushion protection declines and swings may contact the hull. Place one at the bow and one midships on the outboard side to achieve even hold during approach. This known arrangement minimizes scuffs and keeps their contact surface where it matters. A compact, portable option lets you access them quickly from the home hatch; folding variants save space on small decks. The idea, newspaper noted, is that simple equipment improves berthing safety.
- Materials and weight: made from soft closed-cell foam; soilslightweight core keeps setup manageable and accessible; folding and portable designs reduce bulk.
- Placement: keep each fender at the bow and midship on the outboard side; this known practice ensures a stable hold when a dock or piling pushes the hull.
- Inflation and maintenance: maintain 12-20 psi; check monthly; overinflation reduces cushion; underinflation reduces protection. This is the required range across many models.
- Storage and access: use a folding bag; access remains easy from the cockpit; home storage location is recommended for quick deployment.
- Communication and safety: wireless alerts to crew via messaging when deploying from a portable device; messaging keeps requests concise; role of the crew is to respond quickly to requests and adjust position as needed.
- Regional guidance: australias assistance programs and marine authorities emphasize a simple setup that reduces incidents in home marinas or in remote harbours; this help is known to many skippers.
источник: this guideline emphasizes the role of redundancy in hull protection during close-quarters handling.
Anche compact fenders remain popular among sailors with limited space; they add versatility to any docking plan and support a smooth, confident routine when returning home after a day on the water. This relates to the role of simple equipment in maritime practice and supports clearer messaging between crew and shore assistance teams. Requests from crew arrive via concise messages, and wireless notices help keep everyone aligned, which keeps more attention on safety and ship handling. When prepared, the setup also allows vest-wearing crew to move with confidence, keeping access to parts and that equipment straightforward and ready.
Anchor Type Selection Based on Boat Size and Bottom Conditions
Recommendation: Boats up to 16 ft benefit from a Danforth-style anchor (3–7 lb) or compact grapnel, with 6–9 m nylon rode and 0.6–1.0 m chain when available. Mud or sand bottoms yield reliable bite; retrieval remains straightforward as winds shift. Shopping recommendations from maffioli confirm this size matches needs and practicality, keeping lines tight and landing opportunities clear. Will usually see quick setup when depths are shallow, and this choice appears in editorial briefs and product pages. Bottoms utilizzato in catalogs include mud, clay, sand.
Crafts 16–26 ft benefit from a 7–15 lb Danforth or 15–25 lb plow anchor on sand or mud bottoms. Rode consists of 9–15 m nylon lines with 1–2 m chain. Rope options include nylon rope in spare lengths for backup or topping up the main line. In rocky or weeded zones, a longer rode improves set and reduces drag. Editorial notes from a provider highlight this size handles moderate seas, with practicality in mind. The record shows this combination yields dependable stays; you can click to compare models online during landing checks.
Vessels longer than 26 ft usually need a 25–60 lb plow or Bruce-type anchor, with 20–30 m nylon line and 3–6 m chain. Bottoms soft mud or clay yield best hold from fluke-rich designs; sandy patches favor deeper bite from plows; rocky sites benefit from a stout grapnel as a secondary option. Always ensure enough rode to reach a secure setting in expected depth; retrieval practice builds confidence. Contact editorial staff; recommendations come from the shopping provider. This section includes landing plans and a quick link to compare options. The potential setup leads to a clean, together with practice, and isnt dependent on a single model.
Rode Length: How Much Line Do You Need in Typical Depths
Recommendation: Use a rode length 7–10 times the measured depth, following widely accepted recommendations. In practice: at 5 m depth, 35–50 m; at 8 m depth, 56–80 m; at 12 m depth, 84–120 m. The exact number depends on wind, current, and bottom type.
Dedicated recommendations from licensed captains show a rode length of 7:1–10:1 as baseline. There isnt a universal value; consenso among boaters varies with conditions. When wind and current increase, keep toward the upper end. If bottoms are soft or submerged features exist, consider extending to 10:1. Always monitor line tension to improve stability. Olympic clubs also use this approach to train consistency.
Storage and handling: keep the line in a portable case with folding plugs, and maintain a back-up length so youre not caught short. This dedicated setup helps you stay prepared and properly organized. In bottoms that are soft or contain submerged hazards, having extra length reduces snag risk and improves positioning. esclusivamente in heavy weather, consider adding length if conditions indicate deeper water. Licensed crews, including olympic teams, have consenso that consistent line management minimizes potential failures.
Chain vs Rope: Choosing the Right Mooring Line for Your Setup
Opt a steel dock line in exposed areas with large vessels and heavy surge; in sheltered coves, braided nylon rope delivers safer handling and flexibility.
Consider these factors when selecting the berthing line: load behavior, stretch, weight, maintenance, and area conditions along australias coastlines. Different types exist, each with distinct strengths and weaknesses.
- Chain: high strength, minimal elongation under load, excellent abrasion resistance when misalignment occurs on rocky entries; heavier to handle; needs proper storage, corrosion prevention, and occasional replacement; recommended diameters typically range from 10 to 20 mm depending on boat size; expect rough service in large tidal areas and during gusts; installation requires a winch or cleat system; scheduled inspections catch pitting and wear early; a solid choice in high-risk berthing zones.
- Rope: elasticity cushions shocks, reduces peak loads on fittings, easier to manage and stow; susceptible to UV, chemical exposure, and rot over time; lifespan depends on material: nylon (high stretch, good grip in wet conditions), polyester (low stretch, better UV resistance), polypropylene (floats, lower strength). Typical diameters span 8–25 mm based on vessel length; replace when fraying or hardening appears; proper storage away from direct sun extends life.
- Area and weather: in exposed zones with strong surge and rocky entries, chain excels; in sheltered coves with gentle winds, rope suffices.
- Vessel size: larger craft demand heavier diameters; smaller craft operate with lighter lines.
- Handling capacity: rope is easier to coil and deploy; chain adds weight and rigging needs.
- Maintenance and safety: inspect regularly; document inspections with date; keep an account; a digital subscription to reminders helps; include lifesaver and extinguisher in safety kit; consider wireless monitoring or indicators where available.
- Code and local requirements: some jurisdictions require certain materials; subject to regulations; check ahead.
Recommendations by scenario include: big boats along australias coastlines near rocky shorelines; use chain 12–16 mm with protection sleeves; length around 2–3 times waterline; ensure line is stored with a gear bag; on angler boats in calm bays, a polyester line 10–16 mm provides reliable control and long service life; ensure routine inspection date logs and subscription reminders; record removal dates and renewal dates; avoid oversized lengths which create slack and tripping hazards. In daily practice, keep a lifesaver device and a small extinguisher in the cabin; wireless models can help monitor loads. These measures reduce inaccuracies in handling and improve safety in emergencies and daily operations.
On allocation of time, apply this rule: chain in harsh settings; rope when crew wants easy management; always verify the requirements of the locale, area, and subject of the craft’s operations; maintain clear comunicazione with crew to ensure safe berthing.
Swivels, Shackles, and Quick Links to Stop Line Twist
Buy a marine-grade 316 stainless swivel with a high working load limit, then pair it with a forged shackle and a robust quick link to prevent line twist and wear.
Position the assembly so the swivel can rotate freely during swings, supporting load shifts without binding; this arrangement reduces twists near cleats and along the rode, and can make handling smoother to the crew.
Size parts to match the line diameter; choose a shackle with a required WLL well above expected peak loads; ensure the pin seats properly and the throat opening matches the rope or chain; this properly configured setup minimizes pin creep and dont risk a flunk under load.
Maintain a portable quick-links card with example part numbers, material notes, and WLL; content can be accessed in a browser bookmark and also shared via services; agree on content with the crew; below is a short reference text that matches term specs and supports setup, anche in supplier notes, where viene often used to describe components.
Keep them clean and dry between uses; store them in a portable case and in a storagesomewhat labeled area; dont leave damp hardware on deck; youll want short inspection cycles and record the results for trend reporting via the sailing services network.
When a Danforth anchor is deployed, route the rode through a swivel and a quick link to limit swings and reduce wear in the line; this keeps setup aligned with the term and helps the crew avoid wrap issues. Sent notes via comunicazione channel to document changes, and youll want to record any pin that flunked or showed fatigue.
Regularly inspect anchors and related hardware; replace worn parts promptly to maintain dependable mooring performance.
2 Boat Fenders: Size, Placement, and Inflation Strategy

Recommendation: mount two fenders sized to your vessel length: up to 25 ft use two 6×18 in cylinders; 26–40 ft use two 8×24 in; 40+ ft use two 10×30 in. This matches hull curvature and weight distribution, delivering helpful protection against hull contact and dock rubs, and supporting emergencies in tight slips.
Placement strategy: whether docking in a marina or remote harbor, position fenders at the bow and stern or midship, depending on swing patterns and where lines approach the hull. Align fenders with typical contact zones so the load is even; use ropes to secure the fenders to rails or cleats. Keep fenders within reach of mooring lines, including a dedicated deck pocket.
Inflation strategy: use a pump with a gauge and inflate until the fender is firm yet compressible. Target approximately 60–80% of the maximum rating printed on the tag, and test by a light press; there should be 1–2 inches of give against the hull. Small fenders: 3–4 psi; medium: 5–7 psi; large: 7–9 psi. Never exceed the mark on the label; range of sizes should be matched to the hull shape and anticipated strain. In emergencies, adjust pressure after tide or wind changes to keep weight distribution even.
Storage and maintenance: when not deployed, stow two fenders in a dedicated laccesso compartment or bag; keep away from sun and solvents; check valves and seams seasonally and replace if faulty. Known parts and wear indicate replacement; stored properly, they stay supple and meet repeated berthing needs. Use printed guidelines from a trusted provider to meet the range of operating conditions.
Safety and versatility: maintain a throwable buoyant device within reach and keep an extinguisher accessible on deck; fenders help reduce contact but do not replace safety gear. Whether docking near a vessel or near a danforth anchor, ensure loads stay balanced and avoid excess strain on lines. If you need assistance, rely on a dedicated provider; consenso among captains suggests two fenders meet every common mooring scenario. Known practices emphasize keeping lines aligned with hull contours; there, adjust as conditions change.