

 10 Tips for Choosing a Wakeboard – The Ultimate Guide">

Begin with soft, 134–139 cm board; it suits young Riders looking to master transitions.
Durability matters; arms 'ave strength, hands, and wrists absorb impact, so choose a model with a reinforced core and rugged decking to support performing.
Using maddox sizes chart at centre helps pick length; typical options include 132, 135, 139 cm, with 135–139 cm fitting riders around 155–175 cm tall.
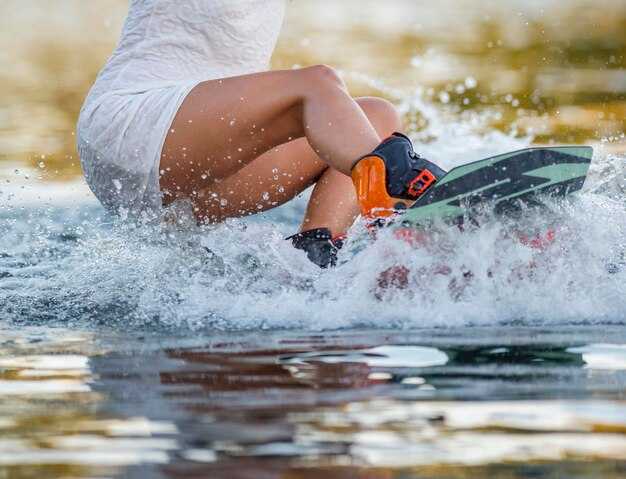
In кабель parks, removable fins help stability; such a setup aids early presses, helping transitions, and reducing grinds.
Riders understand they're not merely gear; progress makes skill, driven by stance, a stable. centre, and controlled force, while looking into each bend accelerates performing.
Wakeboard Selection and Maintenance: Practical Tips
Begin with a twin-tip board, 135–139 cm, weight range 60–95 kg. This sizing yields balanced handling, easier carving, and steadier starts. Heavier riders step up 2–4 cm; becoming a confident rider and boarder begins with correct sizing, rounded edges, and a forgiving deck. A rockered profile in the mid range helps water starts and jumps, and feels great when you throw into the wake. Although progress is gradual, the right board speeds learning.
- Board shape: twin-tip with round nose and tail supports most styles and reduces catching during early carves, whilst keeping balance where you need it most.
- Sizing guidance: use weight-based sizing, not height; most riders fit 135–139 cm; adjust by 2–4 cm if you’re toward the upper or lower end of the range.
- Bindings and setup: bindings suited to boot size, with direct mounting to minimise deck play; choose softer bindings for ease of entry and less ankle wear.
- Stance considerations: start with a neutral stance, then fine-tune toe-in (0–15 degrees) and width (18–22 inches) to match comfort and carving feel.
A maintenance routine protects this investment. After sessions on the water, rinse the board with fresh water and dry completely. Remove bindings if storing long term to avoid compression and strap wear; re-torque binding screws after initial rides and at the start of each season. Inspect edges and fins for chips or cracks; replace damaged parts before riding again. Store away from direct sunlight in a cool, ventilated area; keep in a padded bag to prevent dings.
- Cleaning schedule: rinse after salt water or chlorinated water, then dry; avoid leaving damp in storage.
- Hardware check: tighten binding screws to factory torque; replace stripped screws.
- Edge care: inspect bevels and fins; file or replace if chipped.
- Storage conditions: keep out of direct sunlight, lay flat or store upright in a supported rack.
- Stance setup: width 18–22 inches; toe-in degrees 0–15; hips aligned with the wake to improve balance during turns.
- Carve technique: start with a light edge, then deepen to carry speed into the wake; rotate hips and shoulders together to direct the board and carve into the wake.
- Jump readiness: gain balance on straight runs, then add a controlled jump into the wake; maintain soft knees and a smooth throw to land softly on the balls of your feet.
- Styles and progression: most progress comes from practising forward momentum across different environments; adapt stance to park, cable or lake riding as needed.
Buyers should check warranty coverage, service access, and parts availability. Look for signals of a solid choice: consistent support, clear specs on sizing and rocker, and a history of reliable replacement parts. If a board feels undersized, overly stiff, or lacks confidence under your weight, switch to a setup suited to your skill level, water conditions, and growth trajectory. Wakeboarding is towed behind a boat, so coordinate signals with the operator; with the right combination, you’ll reach great balance and confidence quickly.
Riding style and rider metrics are used to determine appropriate snowboard length.
Picking the right length begins with a precise view of riding style and rider metrics available. Beginner riders learning gain extra stability, while riders becoming more confident seek different lengths. The thing here is balancing main stability with control.
- Weight and height: map to length ranges. 125–131 cm (<60 kg); 130–136 cm (60–75 kg); 134–140 cm (75–90 kg); 139–145 cm (90+ kg). Heights above 188 cm tend towards upper end of bands.
- Skill level: beginner and learning benefit from longer length, which increases stability; as you become comfortable, pick shorter ones within the band to gain quicker edge control.
- Riding style and environment: cruising in shallow water with angled stance benefits from longer length offering main stability; jumps and tricks demand shorter length within band to increase rotations. Boards featuring soft edges plus stiffness ratings align with rider preference.
- Starts and height: a longer length increases surface area, aiding starts; break height underfoot matters in shallow water, making length a key stability factor.
- Available options and ratings: review models offering different stiffness and rocker shapes within your weight range; pay attention to ratings indicating forgiveness and durability.
- Ideal and specific guidance: if you sit between bands, choose the longer end to maintain learning continuity; although quick starts appeal, main priority remains balance and control.
- Progression path: as rider becomes more comfortable, shift towards shorter within band to improve control and transitions; really helps edging precision.
- Rider stance and sit alignment: preferred stance width influences length. A longer board sits securely under a wide stance; a shorter board sits higher under a narrow stance.
Choose rocker profile and deck shape to match your goals
Pick a three-stage rocker to maximise jumps and keep landings soft while learning new tricks. That setup delivers stronger control through turns, and these features translate into steadier passes through water. There are price ranges to compare, and this selection can give lasting reliability behind your boat.
Typically, degrees matter: a low-degree rocker planes quickly and maintains speed, while higher degrees push more lift, supporting bigger jumps. If learning edge control, pick a softer deck with forgiving edges; arms stay relaxed, and you retain balance through turns.
Deck shape parity: combined features such as rounded tips and softer rails increase stability behind the boat, especially when you keep arms close and wrists loose. In setups with a tower, stable rods help maintain line through turns, boosting overall control.
Chart your priorities: control, speed, pop, and learning curve; there are many rockers and deck shapes to compare, so picking a model becomes practical. Consider price, weight and how these rockers perform through chop; a soft deck typically weighs less and costs less than stiff wood composites, yet many combined options deliver durable life.
Історії від райдерів показують, як м’яка дека з помірним триступінчастим рокером підходить для початківців, а більш жорсткі комбінації забезпечують швидкість за рахунок балансу; як тільки ви знаєте свої цілі, ви можете обирати між моделями, які відповідають вашому рівню навичок.
Кріплення: розмір черевика, тип кріплення, ширина стійки та відносне зміщення
Розмір черевика повинен відповідати розміру вашої стопи; щільно застібніть, щоб надійно зафіксувати п'яту, залишаючи 1–2 мм вільного простору в передній частині стопи, коли черевик застібнутий. Така настройка забезпечує стабільність вейкбордистів під час старту та на суші, запобігаючи змінам під час їзди.
Типи варіанти кріплень включають закриті, відкриті та гібридні конструкції. Закриті кріплення забезпечують стабільний контроль під час старту, з такими функціями, як надійні ремінці на щиколотці; відкриті кріплення пропонують простір для росту молодшим райдерам, оснащені регульованими шнурівками для різних ширин. Такі конструкції, засновані на формі стопи, забезпечують райдерам точну посадку та відчуття.
Ширина стійки впливає на баланс протягом усього діапазону руху. Практичний діапазон становить 18–22 дюйми (46–56 см) для більшості райдерів; більш високі спортсмени можуть збільшити до 23–24 дюймів (58–61 см). Почніть майже на ширині плечей, тестуйте з кроком в 1 см. Ширша стійка означає більше стабільності під час тяги та рухів з боку на край; вужча стійка покращує контроль над краєм під час стрибків і катання по рівній воді.
Setback means binding center behind midline. A neutral setup sits at 0 inches; moving to 1–2 inches toward tail shifts weight toward rear foot, influencing where land and how you handle edge transitions on side. This balance resembles two wheels under load, keeping stability through turns.
Розгляд включає вагу, висоту та навички; вам потрібно адаптувати спорядження до стилю катання, незалежно від того, чи ви женетеся за стрибками, поїздками, чи швидкими стартами. Це передбачає сигнали від тіла та спорядження: перевіряйте щільність черевиків, натяг кріплень і комфорт стійки після кожної сесії. Ведення нотаток допомагає; деякі вейкбордисти регулюють розмір черевиків, тип кріплень, відступ і ширину стійки, щоб відповідати своїй зоні руху, як спортивна система, розроблена для забезпечення контролю під час стартів та приземлень.
Матеріали та фурнітура дошки: тип сердечника, плавники, краї та довговічність
Обирайте дерев’яний сердечник із щільним композитним матеріалом і посиленим дном; цей вибір збільшує консистенцію розподілу ваги, покращує стабільність при приземленні та забезпечує довготривалість. Хоча він і важчий, дерев’яний сердечник забезпечує надійне відчуття та стійкість під навантаженням. Вершинна геометрія в поєднанні з щільною зовнішньою оболонкою підвищує міцність і допомагає у спілкуванні між вхідними даними райдера та реакцією дошки.
Types of cores influence riding vibe: this kind of info helps riders pick; wood cores offer forward pop and stiffness; foam keeps weight down but wears quicker; some hybrids blend a wood veneer with foam to balance weight, safety, and durability. sizing should match weight and riding style; bigger boards stabilise while smaller ones respond faster. This isnt a must to pick wood; foam has its place, and thats why hybrid options exist.
Знімні плавники кріпляться за допомогою простого обладнання, що забезпечує швидке налаштування між сеансами. У вас є варіанти налаштувати зчеплення або вільність залежно від стану води. Конструкція країв має значення: прямі рейли забезпечують передню тягу та швидку установку краю; заокруглені краї пом’якшують контакт при приземленнях; фаски можуть підвищити безпеку та раннє вивільнення. Топографія контуру вздовж середньої частини та нижніх каналів покращує стабільність під час катання та зменшує небажане захоплення на поверхні води. Коли обладнання надійно закріплене та відповідає ширині дошки, безпека зростає, а обслуговування завершується з мінімальними зусиллями.
| Core type | Pros | Cons |
|---|---|---|
| Wood | міцний, сильний перенос енергії, передбачувана реакція | важчий, вища вартість |
| Піна | легкий, недорогий, легко формується | нижча стійкість, швидший знос |
| Hybrid | збалансована вага, щільне відчуття, хороша довговічність | вища ціна, складніша конструкція |
Догляд та зберігання після поїздки: промивання, сушіння, огляд і захист
Промивайте вейкборди прісною водою протягом 15 хвилин після кожної поїздки на човні, щоб видалити сіль, пісок і хлор. Тримайте дошку в центрі, підтримуйте ніс і хвіст, і розпорошуйте легкою струєю; що дозволяє залишковим краплям вільно стікати перед висиханням.
Ретельно висушіть мікрофібровою ганчіркою, потім висушіть на повітрі в затіненому, добре провітрюваному місці. Переконайтеся, що переплетення та підкладка повністю висохли; уникайте залишення вологих ременів або підкладки, оскільки під час сезонного використання може утворитися цвіль. Ці кроки допомагають новачкам підтримувати стабільне ковзання та зменшувати втрату хвату, коли швидкість змінюється під час стрибкових послідовностей.
Перевірте поширені проблеми: сколи на краях, тріщини в настилі, м'які місця біля вкладок або ознаки розшарування навколо перил. Проведіть швидку серію перевірок вздовж заднього краю на предмет зносу; переконайтеся, що гвинти та кріплення надійні; замініть відсутні або зношені кріплення. Проведіть швидку перевірку, поклавши палець уздовж перил, щоб виявити будь-яке порожнечу, що свідчить про пошкодження основи. Якщо виявлено пошкодження, не катайтеся на дошці; домовтеся про професійну оцінку для визначення потреб у ремонті.
Вказівки щодо захисту та зберігання: після ополіскування та висушування розмістіть вейкборди в прохолодному, сухому місці, подалі від прямих сонячних променів. Використовуйте м’який мішок або чохол, щоб захистити від пилу та подряпин; встановіть на стійку або підставку, щоб вага не тиснула в одне місце. Підтримуйте стабільну температуру в приміщенні; уникайте екстремального тепла або холоду, що може вплинути на смолу та форму. Досвідчені райдери, а також новачки, отримують користь від цих заходів для підтримки швидкості, ковзання та утримання дошки наступного сезону. При укладанні розділяйте дошки м’якими прокладками, щоб запобігти контакту спина до спини; якщо ви використовуєте кілька дощок, міняйте їхні позиції, щоб округлі носові частини або хвостові частини не тиснули одна на одну протягом тривалого часу.