

 River Tubing 101 – Everything You Need to Know Before You Go">

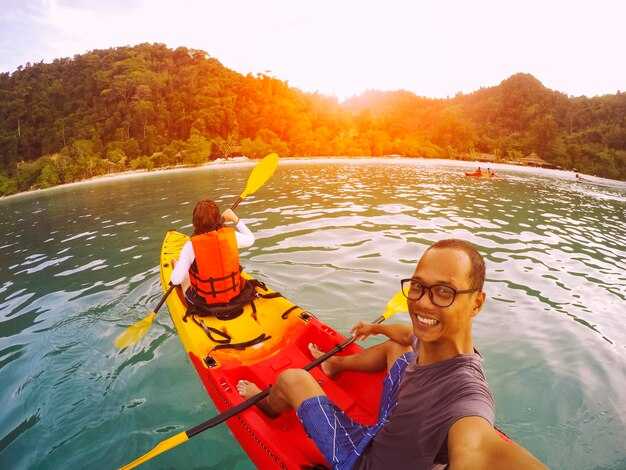
Get a properly sized PFD and a reliable tube from a licensed outfitter, then book your shuttle in advance to lock in a spot. This concrete step sets the day for a smooth float and saves time at the launch.
Check river levels and weather before you go. If gauges show rising currents, switch to a calmer stretch or postpone the float. Always wear a PFD and keep essentials in a waterproof pouch. For a first-timer, pick a gentle, shaded outdoor segment with easy shore access and a short float time, using the источник for latest notices.
For families, choose routes with a gentle current where adults supervise children closely. They should wear PFDs and stay within arm’s reach. A single-file line helps keep everyone on the same pace and reduces collisions near obstacles.
Pack light but practical: water, sunscreen, a light snack, and a dry bag for keys or phone. On white water or mixed outdoor sections, stay in the middle of the tube and use small, deliberate movements to stay upright. The shuttle will bring you back to parking, so keep valuables together in a waterproof source bag for easy pickup.
Practice a safe float: sit back, relax your shoulders, and keep feet pointed downstream. If you meet a driftwood pile or a shallow riffle, stay firmly on your tube and take a controlled push toward the bank. They can use a line to help self-rescue if needed, and always stay within sight of your group.
Route length varies from short jaunts to multi-hour floats; heres a quick planning tip: start with a 1–2 hour stretch and gradually extend as you gain comfort. If you’re new to this outdoor activity, choose a calm start and add 30–60 minutes on subsequent trips as you gain confidence.
Eğer bir abone to these tips, download a printable checklist and share it with friends. every trip improves with preparation, and after one calm run you’ll be ready to try a slightly longer route on a nearby river.
Gear and Clothing Basics for a Safe Float
Put on a properly fitted PFD for all riders before mounting your inflatable tube; adults and anyone else should verify straps and buckles to stay safer through turns.
Choose quick-dry, synthetic clothing over cotton, and wear durable water shoes with a closed toe plus a sunhat; layers let you adjust to changing river temperatures.
Protect your eyes and skin: apply broad-spectrum sunscreen, carry lip balm, and wear sunglasses with a retainer; these keep you comfortable while you enjoy the scenic surroundings and beauty.
Pack a dry bag with food, water, a compact first-aid kit, and a basic repair kit for your inflatable; for example, use several small bags to keep items dry and organized.
For beginners, if youre new to river tubing, follow your guide hannah for route choices and mounting spots; experienced riders can handle longer stretches but still keep to flat, calm sections to build confidence.
Inspect gear before the float: durable seams on inflatable tubes, a working valve, a pump, and a patch kit; for safety purposes, this reduces risk of leaks and delays.
Before you go, read the river forecast; check clear water levels and scenic views; choose routes with several exits and a plan to regroup if anyone drifts.
Maintain a steady pace, stay in contact with your group, and take breaks soon when fatigue hits; a prepared kit and correct clothing make the experience safer for anyone.
Understanding the Orange Flag System and River Classifications
The staff is here to help. Since orange flags accompany higher water, faster current, or debris, use the signal to choose a calmer option or postpone the run. For a good, safe float, the staff will tailor tips for a boater and any fisher along the river, thatll keep the ride adventurous and avoid a common mistake. If you see orange, dont rush; keep weight low and centered for better control. A short board check and a quick safety briefing from the guide make the trip safer and more wonderful. This approach is common on many rivers and can lead to an unforgettable outing. Written weather and water checks help everyone prepare. theres a north shore section with calmer water, a clear reminder to stay on permitted routes.
Orange flag ties to river classifications used by outfitters: Class I is easy, smooth water; Class II features gentle riffles and obvious rocks; Class III has rapid moves requiring quick decisions; Class IV involves long, steep rapids with powerful hydraulics; Class V demands advanced control; Class VI is not recommended. For tubing, most runs are Class I–II, with Class III appearing on higher-water days. theres enough time to read the water and decide if a line on the left or right will minimize risk; on calm moments, the surface can feel like a rink. If the orange flag is raised, respect the cue and consider safer, shorter routes. theres a north bank option to access easier sections. Safety notes from staff remind you that challenge can be managed with preparation and teamwork.
Tips to stay safer: choose a short ride if you’re new; dont overfill with gear. Distribute weight evenly to keep the tube stable; keep heavier items low and centered on the board. Wear a properly fitted PFD and keep a whistle handy; follow the written instructions from staff. If you’re adventurous, ask for a guided option; many were surprised at how manageable a Class II float is with a clear plan, which makes the north bank feel like a pause thatll ease nerves and boost confidence, keeping the group accommodating to beginners, turning a good, unforgettable afternoon into a wonderful memory.
Pre-Trip Safety Checklist and Planning
Pack a dry bag with extra clothes and a compact first-aid kit before you launch, and test everyone’s life jacket for snug fit.
Draft a simple float plan: put-in and take-out points on the riverfront, estimate travel time based on current conditions, note water level, and list emergency contacts. Share it with friends for view and awareness, then review it as a group.
Gear checklist: every tuber wears a USCG-approved PFD; bring a helmet for rapid sections; wear water shoes with closed toes; pack a dry change of clothes, a towel, and a lightweight rain layer. If you have a board to help stabilize, keep it accessible for loading and unloading near shore.
Carry a throw rope with 40–60 feet of line, a small repair kit, and a signaling whistle; practice using standard signals for communication. Keep a compact waterproof map and a headlamp for low-light exits and if plans shift after dusk.
Know at least two knots–bowline and figure-eight on a bight–and keep a quick knot card in your dry bag so you can teach them quickly. They help in self-rescue and tying loads while pulling toward shore without tangling.
Weather and river conditions: check the forecast, river gauge if available, and water temperature; evaluate your group’s limits and experience. Usually, verify two forecast sources and compare them. If anyone feels unsafe, pause and reassess rather than rush; more time on shore beats a risky ride.
Dress for comfort and safety: avoid cotton, layer with moisture-wicking fabrics, and bring extra clothes; consider a light rain shell and sun protection. A well-dressed crew stays warmer, stays drier, and stays more confident on the water.
Route and environment: identify riverfront access points, potential pull-out spots, and safe crossings; heed sign markers and obey rules posted by the company. Coordinate with other groups in crowded sections to maintain spacing and safety. Keep away from overhanging branches and unstable banks across the water.
Communication and rescue readiness: establish a buddy system; designate a lead; agree on basic signals and hand gestures, and carry a fully charged phone in a waterproof case. If trouble hits, signal and begin pulling toward shore and wait for help.
Pre-launch review: talk through hfac check–harness, flotation, area, and communications–with the crew; confirm everyone is accounted for and that you have a plan for getting back to the riverfront safely.
On-Water Techniques and Self-Rescue Tips
Always wear jackets and keep your service whistle accessible; secure your outfit and check your gear before you launch. Stay with your crew, watch the clock, and rely on clear communication so you can react quickly if something felt off on the river near the hudson. These tips are awesome for rafting as well as tubing and add to your adventure.
Positioning and Gear Management
- Balance on your tube by keeping hips centered, shoulders relaxed, and feet slightly apart; this lets you respond to waves without flipping.
- Outfit your self with a PFD and a snug, secure setup; keep straps and clips in place so you can pull yourself easily when needed.
- Maintain distance from downstream obstacles; scan 10–20 meters ahead and plan two quick options in case you encounter a downed branch or debris.
Kendini Kurtarma Protokolleri
- Eğer dışarı düşerseniz, göğsünüz yukarı bakacak şekilde sırtınız üzerine yuvarlanın, bacaklarınız akıntı yönünde olsun ve tüpü iki elinizle kavrayın; kontrollü bir çekme hareketiyle kendinizi gemiye çekin, ardından pozisyonunuzu yeniden kazanmak için dizlerinizle sabitleyin.
- Eğer tüpünüz ters dönüyorsa veya bağlantı halatına dolanıyorsanız, dengeli nefes alın, herhangi bir kayışı serbest bırakın, hızlı bir yüzmeyle yönünüzü yeniden bulun, arkadaşınıza bir sesle sinyal verin ve güvenli bir şekilde tekrar binmek için tüpe doğru yüzün.
- Hize tekrar çizgiye katıldığınızda, her şeyi kontrol edin: ceketler, tasma, ip ve konumunuz; bir sonraki adımları üzerinde anlaşın ve tempoyu korumak için kıyıya ve saate göz kulak olun. Ne uygularsanız suda gerçek olur.
- Eğer mevcut durum zorlayıcı kalırsa kuzey yönüne doğru ilerlemek için bir yedek plan var; önce sakin suda pratik yapın, ardından güven kazandıkça akıntı ekleyin.
Her bir matkap, suda riski azaltmanıza yardımcı olur.
Tehlikeler, Acil Durum Adımları ve İz Bırakmama Uygulamaları
Her zaman ceket ve uygun şekilde takılmış bir can yeleği giyin, başlamadan önce grubunuzla iletişim kurun ve başlangıçtan itibaren daha güvenli geziler sağlamak için planınızı iletin.
Tehlikeler arasında güçlü akıntılar, sıkışma noktaları, suya batmış kütükler ve oyulmuş kıyılar yer alır. Su seviyesindeki değişikliklere karşı dikkatli olun ve parlamayı azaltmak için güneş gözlüğü kullanın. Daha güvenli, istikrarlı bir ritimde hareket edin ve mesafe sağlamak için teknelerin arasında kalın; küreğinizi ve grubunuzu elinizde bulundurun. Hız ve mesafe arasındaki mükemmel denge çarpışmaları önlemeye yardımcı olur. Güvenli olmayan koşullar ağustos güneşinde yükselir, bu nedenle yetişkinler rehberlere yakın kalmalı ve deneyimli kürekçiler kıyıya yakın ekstra alana ihtiyaç duyarlar. Kıyıdaki bir balıkçı sizi dikkatini dağıtabilir - misinalara dikkat edin ve sarkık dalların altındaki ekipmana yaklaşmaktan kaçının.
Eğer birisi devrilirse, sakin kal, yüzüstü çevrerek yüz, elinle başını koru ve düdükle yardım iste. Konumunu gruba ilet, ardından eğer yapabiliyorsan en yakın kıyıya doğru hareket et. Yaralanmalar meydana gelirse, yerel kurtarma hizmetlerini ara; eğer mevcutsa bir atma ipi veya torba kullan ve yardım gelene kadar o kişiyle kal. Scott gibi, harpers yakınlarındaki beyaz sularda tecrübeli bir rehber, ekibi daha hızlı güvenliğe yönlendirebilir; kıyıya vardıktan sonra, nefes ve sıcaklığı kontrol et ve yolculuğa devam etmeden önce kurula.
İz Bırakmama yönergeleri: tüm çöpleri yanınızda taşıyın, bitki örtüsünü bozmaktan kaçının ve belirlenmiş patikaları ve erişim noktalarını kullanın. Uygun olduğunda mevcut ateş çukurlarını kullanın ve derelerin yakınında sabun veya deterjan kullanımını en aza indirin. Covid'den beri el dezenfektanı taşıyın ve ekipmanı paylaşmaktan kaçının; mümkün olduğunca daha fazla mesafeyi koruyun ve başkalarının da alandan keyif alabilmesi için fazladan eşyaları saklayın. Harper'ın nehir gözetim yönergelerine saygı gösterin, vahşi yaşama saygı gösterin ve bir sonraki grup için siteleri bulduğunuz gibi bırakın.