

 Proper Reefing Procedures – A Step-by-Step Guide to Safe Sail Handling">

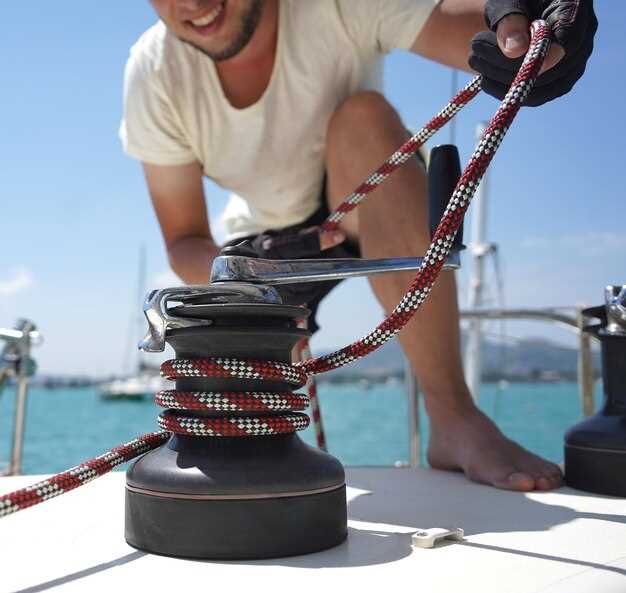
Begin with securing the craft and preparing the working cloth. Secure the boat to a stable stance, crew to leeward, and clear the deck of loose gear. Check the halyard path: lowering the cloth area should travel smoothly through the ring on the halyard, through a block, and over the sheaves. Use the winch to take the initial load; watch for blue tags indicating line strength. Ensure all hardware is intact, and that lines are secured to cleats before moving to the next step.
With the load established, proceed to a controlled sequence: apply gradual tension on the halyard via the winch, aiming to have the cloth area lowered evenly. This action reduces flutter and shaking of the fabric, while the increased tension on the line helps keep the luff smooth. Monitor the weight on the line; when the weight rises you should back off slightly to avoid overloading the halyard. If the line shows signs of strain or the hardware shows wear, stop and inspect. Prolong the life of the system by keeping a clean path and avoiding sharp bends. This sequence works on most boats.
Guide the line through the ring and into the block, then toward the cleat. Keep hardware rated for the loads, and distribute weight evenly to prevent back strain on crew. Use multiple wraps on the winch to keep the line under control; verify the system remains secured. Use much care, as misalignment can cause flutter and increase fatigue on lines. This helps maintain a steady cloth surface and reduces risk during gusts.
Consult the sailmakers for recommended reduction ratios based on rig, fabric, and conditions. In typical boats, start with a cloth area reduction of 25–30%, then test in light gusts; for heavier conditions use up to 40% if the hardware holds and line angles stay clean. Always measure the impact on balance, helm, and center of effort; this increased lift can shift the back of the boat, so adjust the backstay or weight accordingly. Review the line travel path to avoid friction points; a dirty path increases breaks risk and prolongs operations. Keep the halyard in blue color-coding to quickly confirm the correct line is being used. Notes from sailmakers and thoughtful weight distribution help you maintain a great attitude and reduce shake.
Pre-reefing readiness: safety checks, crew roles, and gear
Inspect all lines and hardware before any move: onto the deck, verify the area is clear, and ensure the vang, shackle, and ring are pinned correctly to prevent unexpected movement. Confirm full tension on the primary control lines and check for rough wear on sheaves that could bind under load.
- Safety checks
- Clearance around winches, cleats, and candidate haul points; secure loose gear and stow any items that could snag during the procedure.
- Inspect hardware: check shackles and pins for corrosion or looseness, verify the ring on the vang is intact, and confirm the shackle is snug before any load goes through the line.
- Line condition: look for frays, glazing, or stiff spots; replace or hand-pick line segments that show signs of wear to reduce the risk of failure under pressure.
- Winch readiness: ensure the winch brake works, handles are secure, and the area around the drum is free of obstructions; test a light rotation to avoid binding when the full load comes on.
- Communication and watch protocol: establish a clear call-and-response system, nominate a lead on deck, and define who calls the turn or stop if something goes wrong.
- Crew roles
- Helm: maintains course and tempo, calls turns and speed changes to keep the operation on track.
- Line handlers: two dedicated crew on the windward and leeward sides, assigned to cleats and blocks; they manage hauls smoothly to prevent jerks and reduce snag risk.
- Winch operator: coordinates line take-up and release, monitors tension, and communicates any surge to the helm.
- Auxiliary watcher: watches for signs of overload, entanglement, or gear misalignment; ready to stop or re-sequence if needed.
- Selection approach: hand-pick the most capable crew member for critical roles, ensuring the most experienced hands handle high-load tasks.
- Gear readiness
- Lines and leads: verify that the mainsheets, control lines, and halyards are rigged onto the proper sheaves and winches; confirm routing avoids sharp bends and reduces friction.
- Rigs and fittings: confirm vang alignment onto the correct winch, validate the ring and shackle pins are secure, and ensure the cleats are free of paint or debris that could inhibit secure mooring.
- Hold and haul points: check that the leeward area has ample space for a controlled haul; ensure all turns around blocks are correct and that the redirections are clean to prevent snagging.
- Tension control: plan how pressure will rise as load increases; prepare for a faster take-up on the initial haul and a controlled, slower movement as the sail becomes taut.
- Coordination tools: use video or quick reference signals to verify technique and timing; this helps crews on deck stay synchronized and increases overall efficiency.
- Securement and lines: tie or cleat lines neatly when not active; avoid loose tails that can create trip hazards or snag during a maneuver.
- Documentation and readiness checks: run a quick visual check and note any anomalies; a short video review later can reveal missed steps and help prolong reliability.
Deck and rig inspection for reefing readiness
Begin with a light, methodical pass over the deck and along the rig. Mark any edge wear, fraying, or white marks on sheets and halyards. Ensure the place where lines pass through channels is clear and dry; wipe away salt and foam that could hide damage. Identify dangerous spots such as loose strops or misplaced cleats that could snag during a reef maneuver.
Inspect the tack and standing rigging: check stays and shrouds for corrosion or kinked strands. Confirm the vang and cant fittings align with the mast; test the second layer of line through fairleads. Run fingers along the lines to feel for rough spots; various lines may show wear at winch drums or blocks. If you see wear, tag it for service or replacement before any reef operation.
Halyard and running rigging: pull each line through its sheaves with modest tension; ensure strops sit snugly and without twist. Check the end fittings for security and the splice condition. In slab-reefing setups, confirm the follow-through of the sheets and the option of taking in reef with even tension; verify the above deck blocks move freely. If lines show stiffness or binding, replace or lubricate as required.
Deck hardware and control points: test cleats by applying deliberate tension; ensure they bite and release cleanly. Inspect fairleads, blocks, shackles; remove dirt or corrosion. Check the secondary stops and stoppers; ensure the running rigging doesn’t shake under load. Document issues for clients’ boats or your own project.
On vessels used by bohemia crews, verify locker access and channel alignment; misplacement here can cause a dangerous snag during an operation.
Safety and test procedures: perform a controlled lowering test on the halyard to verify that reef points can be reached while the boat remains above waves. Do a foam test under the deck to confirm no soft spots. If bulkheads or slabs show movement, address before proceeding; do not proceed with any full or heavy reef until issues are resolved.
| Area | Visual check | Operational test | Acceptance criteria |
|---|---|---|---|
| Deck surface and lines | No soft spots; no frays; white marks visible; channels clear | Lines pass freely through tracks and through fairleads under light tension | No corrosion, no loose hardware; lines glide without snagging |
| Standing rigging | Stays and shrouds free from corrosion; no kinked strands | Tension holds under gentle load; vang and cant align with mast | All fittings secure; no movement under modest load |
| Running rigging and blocks | Strops intact; no twisted or frayed runs | Sheets and halyards run through blocks smoothly; no binding | Sheaves rotate easily; no sharp edges creating heat or wear |
| Cleats and hardware | Cleats bite and release cleanly; no looseness | Applied load holds; quick release works | Hardware in place; no corrosion; regularly serviced |
| Slab-reefing specifics | Reefing track and hardware aligned; sheets clear | Reef point takes in evenly; no skew under tension | System ready for reefing with even tension and no binding |
| Güvenlik donanımı | Harness points, lines, and devices present | Emergency release and backup lines tested | All safety systems functional and accessible |
Choosing reef points and determining sail reduction
Recommendation: Start with the first reef when apparent wind is 18–22 kt in moderate seas; deploy the second reef around 28–34 kt, or sooner if gusts regularly exceed 25 kt and the yacht shows increased leeway or a tendency to round up. Inspect the white marks on the cringles to verify alignment, and use the extender if available to keep halyard tension clean; tie off firmly with a stopper knot and keep lines tidy. This reduces the exposed cloth by roughly 15–25% with the first reef and about 25–40% with the second, depending on fabric cut. The gain in control is smoother handling and steadier helm during heavy conditions.
Konsept and decision criteria: figure whether to stay at the first reef or step to the second based on wind trend, sea state, and crew readiness. The navigator weighs whether gusts will push the yacht into the rounding or cause excess leeway. Whether the wind increases in bursts, a small reduction now keeps power steady rather than waiting for a dramatic drop later. Many captains prefer to keep the tempo smooth by applying the change gradually; those who reef early gain better helm balance and reduce leeway. If the wind pushes the yacht over 25 kt and the cloth shows excessive twist, advance to the second reef. Then recheck trim with the mainsheet to avoid unnecessary twist and to maintain a flat head of cloth.
Implementation notes: Step 1 – figure the reef point based on forecast and gust history; Step 2 – during the maneuver, ease the sheets, then pull the halyard to the chosen cringle; stop the twist by aligning the luff. Step 3 – tie the reef line to the cringle and secure with a stopper knot; Step 4 – if needed, lowered the reef line and anchor with extra loops; Step 5 – adjust the mainsheet to keep a smooth arc and verify there is no excessive twist. Those steps help the load stay manageable and reduce the risk of break or jam. In practice, you gain reliability and a calmer platform while using the extender to fine-tune tension.
Assigning tasks, signals, and go/no-go criteria
Recommendation: assign clear roles and confirm go/no-go criteria before any canvas reduction to maintain purpose and coordination after gusts.
- Roles and responsibilities
- The helmsman remains in command of steering; the second crew member handles lines and checks locks at the gooseneck and extender, ensuring their actions are synchronized.
- Other crew members perform lifting, lowering, and securing tasks as directed, ensuring full readiness and that hands stay away from pinch points.
- The process involves a brief rehearsal so tasks are performed correctly and involves checking radial tension across the lines; after practice, crew coordination improves and the risk of miscommunication drops.
- Signals and communication
- Pre-arranged verbal and visual signals reduce misinterpretation when the lines shake; shaking indicates the need to slow and reassess.
- Between signals, maintain a calm and rhythmic cadence; signals must be acknowledged, thus preventing a break in flow.
- Use both radio and hand signals to cover noise and distance; this increases reliability in heavy weather and yields much from redundancy.
- Go/no-go criteria
- Go criteria include: sufficient crew able to complete tasks, and all hardware secured, including the gooseneck and extender assembly; if not, wait.
- No-go criteria arise when any cause increases risk, such as excessive weather, gear slack, or miscommunication; between youre and the rest, youre expected to stop and regroup.
- Third, timing matters: actions must occur in-time; thus evaluate the gain versus risk and proceed only when conditions allow a full reduction and the crew is able to manage the workload.
Weather timing: when to reef and how to monitor gusts
Reef the main before gusts hit 25–28 knots; because reducing boat load early keeps balance and avoids damage to hardware. The move helps the boat track more predictably and prevents the mast from bending under loads that can become dramatically high.
Monitor gusts by tracking short-term wind shifts: use a handheld anemometer or observe the cloth’s shape and the water; the navigator on deck should have been watching for sudden shifts and recording gusts in the place they occur, so you know where the next change will appear; gusts can become fierce quickly.
Keep the reef point secure with cringles and lines; trim the main efficiently and quickly; keep weight low and away from the rail to prevent reduced maneuverability; if gusts rise, ease the topping and vang to maintain shape while you tack and adjust the load.
Balance is a portion of successful handling: shift weight to the lee side, limit draft, and move crew in the area where the boat remains stable on bohemia-like seas. In a gust, another tack may reduce load on the main and keep the boat from pinching forward.
Utilize a method that includes forecast tracking, real-time observation, and a quick check of hardware condition; friction in halyards should be minimized by keeping lines clean and away from block edges; this will help the main stay trimmed and the cloth hold its shape properly.
Always plan ahead: know where to place the reefed point and how much area to reduce; prepare to tack and move weight with care to avoid sudden heeling; keep topping and vang in the right range and remember cringles for secure attachment; your track record will improve as the wind shifts and the boat moves more efficiently.
Tools, lines, and knot knowledge for quick reefing
Keep a dedicated shortening kit within arm’s reach at the cockpit for swift reductions of the mainsail. Use two 8–12 ft lines, each with a robust thimble end, stored in a small, waterproof pouch. A third line can be added for gusts, enabling a reduction quickly if winds rise unexpectedly, keeping the mainsail shape intact.
Route the shortening lines through the mains reef points or luff grommets and into cockpit blocks; keep them tensioned and aligned with the boom and deck channels. If you have a furler installed, feed the line to the furler drum to avoid wrapping and to maintain smooth operation.
Knots to master: figure-eight on a bight as a stopper; bowline for secure cleat hitches; clove hitch for quick attachment to reef points; a slip knot or half-hitch for adjustable tension. Practice tying each knot with gloves on, so you can make it without looking, which supports precision during quick adjustments.
Check equipment before setting out: inspect line wear, keep lines above the side of the boom, and ensure channels and blocks are free of debris. When making adjustments, use both hands to control the cloth and avoid entanglement with the furler or furled sheet. Being mindful of needs, this setup works for both sails and rig and remains balanced as winds go up or down. If a gust breaks the edge, ease tension and re-trim.
For forecast winds up to 25 knots, deploy the third line as part of the method; the result is earlier sail reduction and reduced load on the rig. This helps prevent damage to hardware and protects ourselves from unnecessary strain. In florida channels and harbors, practice under calm conditions to build muscle memory and ensure the actions were smooth.
Designed for efficiency, this approach relies on precision: instead of yanking, ease tension and hold the line steady to keep the cloth in the desired shape. The line is held steady during adjustments on both sides of the rig, and the process goes quickly when shifts left or right. It is purpose-built for fast deployment.