

 Bir Botu Dock'a Nasıl Bağlanır – Güvenli Demirleme İçin Adım Adım Dockline Teknikleri">

heres a concrete recommendation: secure the bow line first to prevent drift into pilings. Begin by assessing wind and current direction, then choose main lines that match that direction and the berth’s spacing, keeping the process simple and repeatable.
Most vessels at a quay rely on a prepared boater; generally, a quick inspect of cleats, and a layered approach that spreads load across multiple lines. Refer to the main lines when the boater positions the craft, while maintaining control to avoid excessive movement and strain on hardware such as pilings and fenders.
During approach, keep a tight bow line and a relaxed stern line to balance pressure as moving currents shift. Inspect pilings for rough edges; look for protrusions, then avoid excessive strain by attaching lines at different heights and using chafing gear. Never overload hardware and never let lines rub against sharp edges.
In the main process, maintain slack management by feeding lines through cleats smoothly. While the craft settles, tighten lines incrementally, avoiding excessive tension that might pull away from fenders or shift onto pilings. Heres a concise checklist you can refer to during docking: prepared lines, inspect attachments, and adjust as needed.
Look at weather, moving water, and berth configuration; some berths have pilings arranged in clusters. The main aim remains to balance all lines so the hull stays aligned with the quay, the lines do not chafe, and the strain stays within designed limits. This approach helps you find balance even when tidal shifts complicate alignment.
To keep the process consistent, record slack changes in eights increments of a foot, then re-check alignment by eye. This approach supports the boater in maintaining predictable results during docking duties and reduces the chance of unexpected shifts, while also protecting attached hardware from undue wear.
In practice, refer to these practices whenever you prepare, inspect, and execute lines. By adhering to this approach, the boater gains confidence during berthing at a quay, while keeping the vessel secured and the berth undamaged.
Boat Mooring Mastery: Safe Docking Essentials

Decide on nylon lines in the 20–25 ft length to suit most berths; this choice yields reliable strength, resilience, and a forgiving ride when winds shift. A spare shorter line, 12–15 ft, provides quick adjustments without reworking everything, keeping the setup flexible since conditions can change that moment. If storage is tight, purchase a compact kit that includes two 25 ft lengths and one 12 ft length; if budgets push, used lines can serve as dependable backups as long as they show no excessive wear, stiffness, or glazing.
Knowing the basics helps a boater doing everything with confidence. Below are practical points commonly used by crews when choosing type, length, and hitch methods, including answers to asked questions about best practice.
- Line selection and inspection: Choose nylon as the best option for weight, float, and elastic rebound. A 3/8 in diameter with a 20–25 ft length works widely; keep a spare 12–15 ft length on board. Look for clean fiber, no glazing, and minimal stiffness; used lines must still look strong and retain some give.
- Approach angle and alignment: When you approach the pier, keep the angle well below a quarter of a circle relative to the piling. This angle reduces stress on hardware and makes tightening easier without excessive pull on the cleats.
- Securement hitch on hardware: Use a reliable hitch on the cleat with two wraps and a locking finish to prevent slipping. This arrangement is strong and simple, minimizing the risk of sudden release when waves or wakes push the vessel sideways.
- Tightening and load management: After contact, tighten until you feel a light, steady load. Avoid over-tightening, which reduces the line’s ability to absorb surge; the goal is a calm, controlled stance that still allows for tide movement.
- Final checks and adjustments: Test movement by gently shifting weight along the line path and look for rubbing or chafe points. Ensure stops are in place to prevent friction with sharp edges, and confirm the float position keeps lines clear of water and hardware.
- Best practices emphasize keeping the fewest friction points–protective sleeves or fenders at chafe points are recommended, and stops should be used below fairleads or hardware.
- Commonly used kit options include a mix of nylon lengths and a spare short line to handle changing berthing conditions without scrambling for gear.
- Know your options: purchase new gear when possible, but used lines with clear histories and no glazing can work well as backups.
- Knowing the weight characteristics helps: nylon’s stretch dampens gusts, float helps visibility and retrieval, and the overall setup remains manageable under varying wind and current.
Just remember to verify every connection before leaving the slip, since a single loosening hitch can lead to a sudden shift. Below is a quick recap: pick the type that matches the vessel size, length that provides enough reach, and hitch that stays secure under load. The best practice must leave you with smooth adjustments, predictable response, and confident berthing every time.
Assess Dock Type and Fender Placement
Start with a practical rule: determine berthing class–floating pontoon, fixed pier, or timber quay–and set bumper coverage plus line routing to match that form. This choice, combined with tidal range and current, drives where bumpers sit and how lines cross the hull to protect the center and the side contact zones during approach and departure.
Common mistakes include leaving gaps between bumpers, clumping bumpers on one area, or relying on a single line. Usually, a three-finger spacing across the beam provides balanced protection. During approach, ensure lines cross the hull to share load between contact points; sometimes a quick adjustment prevents hull contact. Look across the bow, center, and stern positions before finishing, and adjust as needed to keep side bumpers aligned with the hull profile. Doing this reduces risk of damage when tidal changes create extra movement.
| Berth Type | Fender Setup | Notlar |
|---|---|---|
| Floating pontoon | Two long bumpers along midship, plus an extra near bow; offset side bumpers to cover port and starboard; add a third bumper if hull curvature demands | Protection across the beam adapts to shifting height during tidal swings; lines should cross to distribute impact |
| Fixed concrete pier | Bumpers at bow, midship, and stern; a smaller bumper at any overhang to fill gaps | Edge-to-center coverage minimizes wear; slack in lines absorbs sudden motion during quick approaches |
| Timber quay | Multiple small bumpers along centerline; additional bumpers near bends; align heights with waterline | Irregular surfaces require adaptive placement; maintain cross-line support across the hull |
Select and Prep Docklines: Material, Length, and Safety
nylon braided berthing lines, 1/2 to 3/4 inch diameter and 10 to 12 feet long, are your specific choice to enable steady handling; typically they remain manageable while offering enough reach, becoming standard in boating operations.
properly inspect each line: look for remaining frays, a tangled section, or soft spots; if any issue shows, replace rather than risk failure.
protecting the core from sun and abrasion is essential; use UV sleeves or guards where the line crosses across hardware, and beware wakes from nearby craft; ends properly wrapped at wear zones reduce abrasion, keeping boating safer.
heres a concise guide to finishing: center the line on the cleat, wrap across the base toward each side, attach the end, and secure a half-hitch; gently snug, ensuring the end is attached and the setup remains security under load will.
Once you have attached, check remaining slack and adjust angle; guide yourself to make sure the line is not tangled and that each strand sits neatly, avoiding cross-wrapping.
Plan Your Approach: Speed, Position, and Timing
Set a single, steady approach at 3–4 knots from open water, then slow quickly to idle within 20–30 m of the edge. Keep wakes small by avoiding abrupt turns and by maintaining a fixed heading that aligns the main hull with the slip’s entrance. This minimizes strain on your ropes and yields less stress, giving you more time to react. Tips: stay calm, keep hands steady, and communicate clearly. Since conditions can change, adjust your plan without panic. If conditions worsen, you can handle this yourself.
Position yourself so your hull axis is across the approach axis, with a shallow angle (about 10–15 degrees) toward the face. This same angle reduces side loads and keeps fenders from contacting the edge. Use a four-line spread to control load across the bow and stern areas, leaving space to adjust if a gust moves you. Since winds shift, the setup should allow quick adjustments, creating margin for different conditions.
When within a length of the edge, create line purchase with the main line, then deploy a fixed sequence of stops to avoid slack. Do not rush: keep your mind moving to a steady, measured rhythm that minimizes tension on the crew and maintains control. Doing this with a fixed base helps you maintain spacing and prevent cross-loading.
If you lose control, deploy an extra purchase to steady the stern, reducing drift across the face. Once the first lines hold, secured lines stay under tension while you adjust remaining lines, preventing a sudden jerk or lost positioning. Mind the wakes and keep things calm as you prepare for the final hold.
After the approach, verify that all ropes clear below the waterline, that strain stays within the limit, and that you have secured purchase on each end. This gives you a better base for the next moves, keeping length and spread even across the pier. Since things can change quickly, monitor where to relieve tension and where to shorten length across the lines, adapting to different conditions.
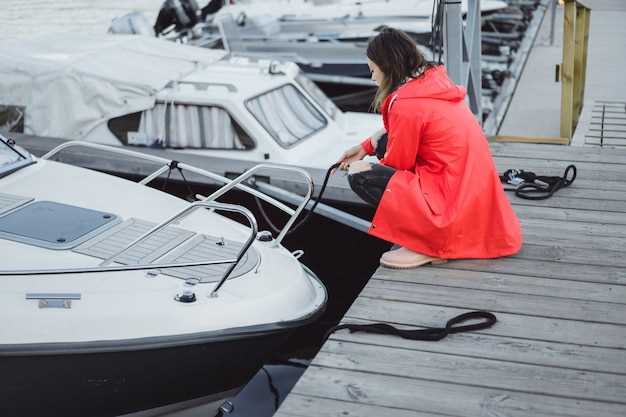
Execute Mooring: Bow, Stern, and Spring Lines
Attach the bow line with a simple half-hitch on the front cleat, nylon favored due to its minimal stretch, following a common method that keeps everything tight as the current shifts.
Run the stern line to a stern cleat on the opposite side, repeating the same knot with nylon, leaving a small margin of slack to absorb wake and swell and to avoid overloading the cleat; this approach allows some movement while keeping risks low.
İki adet spring halatı bağlayın: bir tanesi baş taraftan iskele üzerindeki yan yana bir noktaya çaprazlama, diğeri ise kıç taraftan paralel bir noktaya; bu, ileri ve enlemesine kaymayı sınırlayan ve bordada kontrol sağlayan toplam dört halat elde etmenizi sağlar.
Düğümleri kontrol edin: Her bir ısırığı son bir sıkı bitirişle tamamlayın, fazla ipi kesin ve yükü hissetmek için rıhtımlar boyunca nazikçe çekerek kendinizi test edebildiğinizden emin olun; bu yaygın, basit yöntem birçok kaptan tarafından kullanılan riskleri en aza indirir.
Koşullar değiştiğinde (rüzgar yön değiştirdiğinde, akıntı güçlendiğinde veya rıhtımlar kalabalıklaştığında) uzun halatları buna göre ayarlayın; operatörler tarafından yaygın olarak kullanılan dört nokta kurulumuyla birlikte bu, diğer halatların yardımcı olmasına izin verirken geminin hizalanmasını sağlar, en az hamleyle yapılır ve kullandığınız düğüm türünün güvenilir kalmasını sağlar.
Kendine güvendikten sonra, bağlanma yerini kendi kamarana göre ayarla ancak dört ana noktayı (baş, kıç ve iki spring halatı) güvendiğin bir düğümle sabitle ve diğer halatlardan daha fazla kontrol gerekip gerekmediğini kendine sormayı unutma; talep edilirse, iskeleleri ve diğer operatörleri aklında tutarak duruma uyum sağla.
Koşullara Uyum Sağlama: Rüzgar, Akıntı ve Gelgit Değişiklikleri
Koşullara duyarlı bir planla başlayın: Yaklaşmadan önce rüzgar yönünü, hızını, akıntıyı ve gelgit seviyesini değerlendirin. Genellikle pruva rüzgara ve kıç akıntıya doğru teknenin yan tarafları en fazla hareketi yaşayacaktır, böylece bunun farkında olursunuz ve yükü eşit olarak dağıtmak için dört adet bağlama halatı ayarlayabilirsiniz. Her bir halatın tekne eksenine paralel olduğundan emin olun ve sıkarken kopmayı önlemek için planınıza bakın.
Rüzgar yönetimi: Rüzgar hızı 15–20 knot'ı aştığında, savrulmayı en aza indirmek için tekneyi rüzgara dik konuma getirin. Gövdeyi hizalı tutmak için iki ön halat ve iki arka halat kullanın; halatları düzgünce sarın, böylece hiçbir halat donanımın etrafına sarılmaz ve hareketin şiddeti artmak yerine sönümlenir. Rüzgar hamlelerini emmek için gevşekliği biraz artırın, ardından aşamalar halinde yeniden sıkın. Ani rüzgar hamlelerinin yön değiştirebileceğini unutmayın; rüzgar yön değiştirirse, plana geri dönün ve ayarlayın.
Mevcut değişiklikler: Akıntı güçlendiğinde, yana doğru sürüklenmeyi azaltmak için akıntıya uyum sağlayın. Akıntı medcezirin ortasında artarsa, baş tarafın iskeleye doğru gitmemesi için baş halatlarını hafifçe gevşetin; kıç halatlarını duvarla paralel sabit bir açıyı koruyacak şekilde çekin. Her bir halatın gerginliğini dengede tutun ve herhangi bir halatı aşırı sıkmaktan kaçının, bu durum takılmalara veya gereksiz aşınmaya neden olabilir.
Gelgit değişiklikleri: Gelgitler birkaç metre yükselebilir veya birkaç metre alçalabilir; yüksek sudan önce ve alçak sudan sonra tekrar kontrol etmeyi planlayın. Dikey salınımı sınırlamak için pruvadan yapı üzerindeki güvenli bir noktaya bir spring halatı ekleyin; gelgit hareket ettikçe yanaşmanın güvenli bir aralıkta kaldığından emin olun. Gelgit düştüğünde, tekne gövdesi daha aşağı iner; halatın kazıklara sürtünmemesi için yeterli gevşeklik bırakın ve mülkü korumak için usturmaçalar kullanın. Gelgit yükseldiğinde, aşırı hareketi önlemek için halatı biraz kısaltın; halatın keskin bir şeyin etrafına sarılmadığını her zaman kontrol edin.
Kaçınılması Gereken Hatalar: Rüzgârı veya akıntıyı hafife almak, hava durumunu kontrol etmeyi ihmal etmek veya halatları yetersiz gevşeklikle bırakmak, savrulmaya ve olası hasara yol açar. Ayrıca, halatları yanlış donanım etrafına sarmak veya eşit gerginliği koruyamamak kazalara neden olur. Herhangi bir halatta aşınma fark etmeye başladıysanız, değiştirin ve yeniden yönlendirin; kopmalar genellikle aşınmanın gizli olduğu yerlerde başlar.
Hızlı hatırlatmalar: Hazır ve iyi durumda halatlarınız olsun; her bir halatın yolunu kontrol edin, mümkün olduğunca gövdeye paralel tutun ve her bir çeyrekteki harekete dikkat edin. Daha büyük teknelerin halat güzergahına daha fazla dikkat gerektirdiğinin farkında olun; ayrıca, hava tahminindeki değişiklikleri asla görmezden gelmeyin; anında ayarlama yapabilirsiniz. Dikkatli olan tekneci riski en aza indirir ve mal hasarı riskini azaltır ve sonuç, değişen koşullarda bile dengeli yüzmedir.