

 From Stern to Bow – A Complete Guide to Boat Parts">

Recommendation: Start with a focused checklist and inspect the mast first. For a beginner, this quick check helps you assess parts above and below the deck, and sets a baseline for the rest of the guide. On every vessel, the mast ve kıl anchor the system; inspect fittings, standing and running lines, and hardware for wear. Keep a small store of spare hardware on board to reduce downtime when something breaks.
Then map the parts by area: hull, deck, rigging, electrical, and propulsion. In various areas the parts behave differently, so documentation helps: for example, navigation gear sits above the dash, while the kıl and rudder connect to the hull below. For a small crew, keeping a compact inventory improves efficiency; depending on voyage length, you may carry extra fuses, spare bulbs, clamps, and a few fasteners.
Prioritize parts that provide everyday safety and basic function. For a vessel, the kıl ve mast are critical; check fasteners, bolts, cotter pins, and vital hose connections on a cadence that matches usage. Once you establish baseline wear, you can plan maintenance around the sailing season, and you’ll see improved navigation reliability. This wont take long to implement for most boats.
Keep a parts store organized and labeled. A simple approach: categorize parts by their location on the boat–above deck, midships, or below the waterline. This helps crew members find what they need fast, and reduces difficult decisions during a storm or quick repair. When you buy, consult trusted sources and record that information in your log; it makes future replacements straightforward, whether you order from a shop or a store.
Tailor the guide to your vessel’s needs. Depending on size and type, a small sailboat differs from a larger motor vessel; this guide provides a framework for evaluating equipment, from stern to bow and from lines için navigation electronics. Always begin with safety-critical systems and then expand to comfort parts; this structured approach keeps maintenance practical, and the crew confident on every voyage.
From Stern to Bow: A Practical Boat Parts Reference
Always verify the winches, halyards, and sheets before you take the helm to ensure smooth operation and safe tacking.
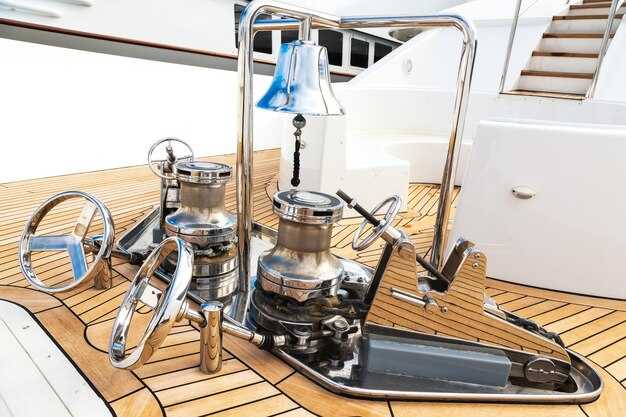
At the stern, the transom hosts the cleats, swim platform, and the self-bailing cockpit drain. Check the tiller or wheel alignment, inspect the rudder stock, and note the photo left showing the typical arrangement. A clean lazarette keeps spare parts handy for overnight stays, and an unforgettable difference when you need a quick fix.
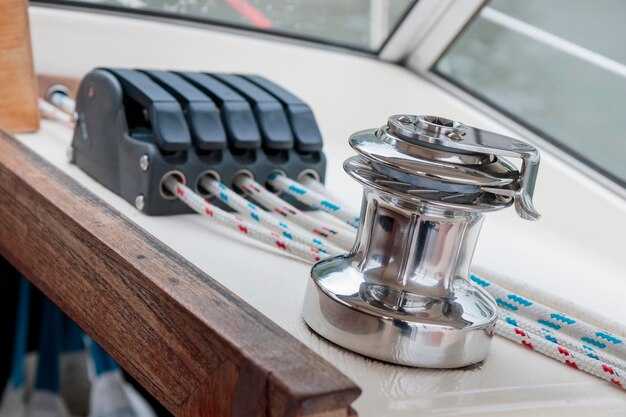
Midship deck hardware powers your tacking and sailing: winches, cleats, blocks, traveler car, and the mainsheet system. Learn to adjust the main halyard tension with the winches to shape the sail. When tacking, make smooth, deliberate turns and stop the line at the cleat to secure it. Keep spare lines and gear stowed left in the cabin lockers for quick access.
Inside the cabin, the kitchen (galley) keeps fuel for cooking during a voyage. The bathroom (head) should be ventilated and dry, with a small mirror and cleaning supplies. Small, organized storage under bunks helps the crew sleep better by keeping gear out of the way, and it supports a curious, relaxed environment on long passages.
Foredeck and bow area: inspect the anchor chain, windlass, bow roller, and the hatch. Check the forestay, stays, and the headstay turnbuckle to prevent a surprise during a rough breeze. A simple photo sketch or checklist helps the skipper stay exact about what to test before every sail. whats critical: exactly verify that the anchor rode is not fouled and the chain locker stays dry.
This article serves as a practical guide you can reference before every voyage. It highlights the fundamental parts and practical checks that keep a boat predictable on the water. Learn from each trip, take notes, and build a routine that makes sleep more comfortable, the breeze steadier, and every voyage unforgettable.
Hull and Keel: Practical Inspection and Replacement Triggers
Inspect the hull and keel at the next docking and plan replacement if you find cracks, movement, or corrosion.
Key signs to check during the process include:
- Cracks in gelcoat or structural cracks along the keel root, with measurement of width and length to document changes.
- Delamination or soft spots in core material around the keel or hull interfaces that affect stiffness.
- Keel bolts showing corrosion, rounded heads, or looseness when you gently move the keel; treat any looseness as a replacement trigger.
- Visible water intrusion near the keel seam or hull bottom, including dampness in bilge or adjacent cabins; check after a splash or rain.
- Osmosis blistering on the hull surface, especially within the waterline zone; map the blistered area and monitor growth over time.
- Unusual swing, wobble, or play in the keel during handling or lifting; stop work and consult a yard if you detect movement beyond a small amount.
- Evidence that prior repairs failed and new issues emerged during docking or after rough seas; break in several spots is a clear alert.
- Moisture or damp spots in the bathroom or nearby interior areas that correlate with hull fittings or ballast movement.
Replacement triggers you should act on now include:
- Structural cracks wider than 0.25 inch (0.6 cm) or cracks that run across multiple seams.
- Keel bolts with advanced corrosion, signs of thread loss, or any detectable movement during a lift or manual check.
- Delamination with persistent moisture in the core despite repair attempts.
- Extensive osmosis blistering affecting a large portion of the hull or water intrusion that returns after resealing.
- Repeated repairs that fail within two seasons, indicating the backbone of the hull-keel assembly is compromised.
How to proceed, practically, to handle replacement:
- Document measurement data: capture keel bolt pattern, bolt length, and hull thickness; photographic records help when building a replacement plan.
- Coordinate with the boatyard; during the haul-out, use winches and lifting gear to stabilize the hull and avoid bending or twisting.
- Choose a keel option based on load, center of gravity, and hull design; ensure compatibility with existing foundations and fasteners.
- Follow torque specifications and rebed the keel shoes with fresh sealant; verify gaskets and shims are correctly positioned to prevent water ingress.
- After installation, perform a slow test load and inspect for any movement, water leakage, or misalignment; confirm the hull tracks true with no swing.
- Maintain a clear communication log with crew and yard staff; this involves sharing findings, decisions, and next steps to keep everyone aligned.
Practical tips to ensure ongoing reliability:
- Build a routine inspection cadence during docking and at seasonal transitions; good documentation supports current and future maintenance decisions.
- Communicate findings promptly to all stakeholders, including current crew and future owners; their input can highlight areas you may miss in solo checks.
- Learn basic handling checks you can perform safely on deck; use small measurements to flag changes before they escalate.
- During long waits between surveys, monitor the hull visually from the waterline and inside the cabin for any new damp spots or odours.
- Understand that prevention saves money: addressing minor signs early is far more manageable than repairing large breaks later.
Bottom line: a proactive, measurement-driven approach keeps the hull and keel functional and lets you handle larger tasks safely, effectively, and with confidence.
Deck Hardware: Fastening, Longevity, and Wear Checks
Always tighten deck fasteners to the manufacturer’s torque specs and replace any corroded fittings. The term deck hardware involves fastening, longevity, and wear checks, and it spans winches, cleats, padeyes, chainplates, fairleads, and anchor rollers that the crew rely on every day.
Fastening practice keeps the deck solid whether youre in a dinghy or at a spot with a breeze. When moving from the saloon to deck, perform a quick check on the most accessible fasteners. Use through-bolts with backing plates for deck-mounted items on boats with solid cores, and avoid thin-fastener layouts that crush soft decks. Apply marine-grade sealant between fittings and the deck, add a washer and a lock nut, and tighten to the printed torque. Clean and dry threads before the final pull; if a spec isn’t printed, log the need for professional guidance. These steps involve planning and time, and youre ready to enjoy smooth handling in wind and spray.
Longevity depends on material and environment. Use AISI 316L stainless for deck fittings in saltwater, bronze for fittings near the bow roller, and avoid mixing dissimilar metals without protective barriers. Expect 10–15 years from high-quality stainless fittings with regular inspection in temperate seas; chainplates and stanchions can reach 15–20 years if protected from crevice corrosion. Outdoor cycles, UV exposure, and heavy loads shorten life, so inspect more often in hot climates or near salt spray, and replace any pitted or cracked items promptly. Keep coatings intact and reapply marine-grade sealant every 2–4 years or after heavy seas.
Wear checks should become a routine part of every trip. Look for loosened fasteners, corrosion pits, thread wear, and bent or cracked fittings. Check depth of thread engagement, ensuring at least 1.5x the bolt diameter is engaged; if threads are damaged, replace the part and re-tap if allowed by deck material. Inspect backing plates for deformation, verify that locknuts still lock without spin, and test for deck movement by applying a firm hand twist. Inspect deck penetrations for water ingress; reseal as needed. Maintain a spare parts kit with common sizes so you can swap a part quickly and keep youre crew enjoying the voyage, especially after a long watch when fatigue lowers vigilance.
Planning and roles matter. Designate a lead for wear checks, keep a quick checklist, and assign a crew member to carry spare bolts, washers, and locking nuts. Do a fast walk-through at each dock or anchor spot, tagging parts that show wear and logging the torque and date. Whether youre on a dinghy or at the helm of a tall vessel, these habits protect depth of deck integrity and reduce repair time, letting you stay relaxed and focused on the breeze and the view.
Rigging and Control Lines: Selection, Tuning, and Common Fixes
Start with a concrete recommendation: choose braided polyester lines for halyards and sheets, sized by your boat length (under 30 ft: 3/16–1/4 in, 30–40 ft: 5/16 in, 40–50 ft: 3/8 in). Pair with nylon for downwind loads and reserve low-stretch options like Dyneema for critical control lines when weight saving matters. Add chafe protection at masthead, fairleads, and around blocks, and label each rope by function to stay abreast of what runs where on deck.
- Selection
- Materials: Polyester means low stretch and long life; Nylon cushions loads but stretches more; Dyneema/Spectra delivers very low stretch for high-load control lines.
- Construction: Braided lines resist snagging; kernmantle designs offer long run strength with a durable sheath. Reserve kernmantle for long runs where you must protect the core.
- End fittings and terminations: Favor stainless fittings and reliable knottings. Whipping and proper splices reduce unraveling after miles of use.
- Size guidance by boat length: under 30 ft 3/16–1/4 in; 30–40 ft 5/16 in; 40–50 ft 3/8 in. For fleets or larger ships, plan for slightly larger diameters to handle gusts and waves.
- Color coding and labeling: Distinguish halyards, sheets, and control lines at a glance to speed handling during busy days on water or holiday crossings.
- Rope vs line: Use rope for flexible runs where you need grip and ease of tying; reserve dedicated lines for anchoring and docking to prevent cross-use at the helm.
- Tuning
- Line routing: Keep lines away from sharp edges, and ensure fairleads are aligned to minimize friction. When a line sits on a winch, check contact points every few weeks to avoid wear.
- Halyard tension: Apply enough tension to remove sail wrinkles without overloading the mast hardware; verify tension with a wind shift and recheck after gusts.
- Sheets and control lines: Set fair lead angles to keep line stays near 15–25 degrees at the winch, reducing slip and heat. For downwind winds, a bit more bend helps control.
- Cleat and winch health: Inspect cam cleats and drum grooves. Clean corrosion and grease moving parts; replace worn components before a long passage.
- Interior and exterior coordination: Keep interior lines free of cargo and place spare rope in a dedicated reel or bag so you can grab it without slowing down for repairs.
- Common fixes
- Frayed rope at wear points: cut back to clean rope and re-terminate with a splice or whipping; replace if fray continues; this prevents sudden failure on deck.
- Chafe and abrasion: install protective sleeves or hose around lines where they contact hard edges; re-seal sleeves after seasons of use to keep moisture out.
- Stiff or stuck hardware: clean blocks and sheaves, lubricate low-load areas, and replace worn bearings to restore smooth operation.
- Weak terminations: re-terminate with proper knots or splices; ensure thimbles stay intact and rope ends stay tucked and whipped.
- Shifts in load: add extra line length where needed and stash spare rope in the interior for quick repairs; keeping a small extra length can save moments when winds rise and waves build.
- Mooring and anchoring lines: check for glazing and replace when you notice significant wear; adding a protective sheath at rubbing points extends rope life during long stints in port or anchorage.
Applying these practices helps boaters maintain a safe, reliable rig across a fleet of vessels, from a compact yacht to a larger ship. With thoughtful selection and regular tuning, you’ll handle water, waves, and gusts with confidence, leaving more time to enjoy every holiday afloat and to keep interior crew changes smooth. Regular checks, prompt fixes, and clear terms for line roles should become part of your routine, ensuring your rig stays strong from the first mile to the last dock.
Propulsion and Steering Components: Alignment, Maintenance, and Troubleshooting
Align the prop shaft and steering linkage now: place a straight edge on the coupling flanges to verify true surface alignment. If misalignment is visible, loosen bolts slightly, shift the components in small increments, and retorque in a crisscross pattern. This room for adjustment keeps the drivetrain aligned for every sailing vessel and reduces vibration that boaters aboard feel.
Maintenance includes guarding the packing gland, greasing the rudder stock, and cleaning surfaces after each voyage. After you rinse salt from the stern area, apply light marine grease to the prop shaft and bearings. Keep a small bathroom kit aboard for quick cleanup of spills and to store rags and cleaner. Check halyards and lines nearby so they stay placed away from moving parts. Replace packing per the vessel’s plan, typically once per season or after the first 200 hours of operation.
Troubleshooting scenarios: if you experience heavy steering, check rudder position and surface alignment, and inspect the starboard linkage and hydraulic lines for kinks or leaks. Listen for grinding or clunking from the gearbox. In tough situations, issue a calm command, follow the plan, lead the crew to recheck fittings, and test on a short, safe ride. If the action remains stiff, stop and consult a professional.
Planning for common situations aboard, keep a compact guide on deck that covers checks, tool list, and step-by-step actions. Include a simple flow: assess, adjust, realign, test ride; if issues persist, escalate to a professional. Involve a friend or crew member, always follow safety rules, and lead by example to deliver a better ride for boats and sailors alike.
Electrical Systems and Battery Layout: Safe Wiring Practices
Install a dedicated battery distribution panel with clearly labeled circuits and a main shutoff to centralize control and prevent chaotic sprawl of lines.
Route control and power lines through protected conduits along bulkheads, keeping positive and negative runs together and away from mainsail tracks. Plan areas such as the saloon, cockpit, and berths so wires do not obstruct movement or doors, especially when waves push against the ship. Ensure the routing facilitates good visibility of labels and switches, allowing quick checks without taking excessive time during a sea trial or in rough weather.
Choose marine-grade conductors with tinned copper and insulation rated for heat and vibration. Use proper terminal blocks, grommets, and strain relief. Do not expose conductors on surface panels where waves can splash; fix them in protected routes and secure entry points to the bulkhead. A tidy setup makes maintenance easier and reduces the chance of a short that could take out critical systems during a critical moment.
Place the main battery bank in a ventilated locker toward the ship’s center, away from berths and living spaces. Use a distribution panel mounted near the companionway and keep trunk lines short to minimize voltage drop and running resistance. Size the main disconnect to withstand at least 125% of the maximum continuous load to allow safe isolation in an emergency.
Protect every branch circuit with an appropriately rated fuse or breaker, and keep the protection device close to the battery within 1.5 meters. Label each circuit with high-visibility tags to improve visibility in low-light conditions. Use a dedicated negative return path to reduce noise and avoid shared terminals that can become chaotic under heavy use, especially when sailing with a dinghy or auxiliary equipment running.
Selection focuses on daily consumption and reserve. For many vessels, a 12V system with a 100–150 Ah bank covers lighting, navigation, and comms; add a 200–300 Ah bank if you routinely run an inverter for short periods. For larger boats or longer passages, a 24V configuration can reduce current and heat, with LiFePO4 offering longevity and safe charging if combined with a proper BMS. Always design for at least two days of autonomy on essential loads and account for peak draws from the mainsail winch, autopilot, or chart plotter during heavy seas.
During operation, ensure wiring does not swing or rub against moving parts. Keep lines from interfering with the mainsail tracks, winches, or steering cables. Use grommets on openings and secure cables to bulkheads with ties and clamps, preventing accidental contact with vibration or moisture. Maintain clear surface access to the control panel so crew can act quickly, and conduct periodic tests to confirm continuity, insulation, and fuse integrity. A controlled, well-documented layout reduces risk when emergencies arise and makes routine checks straightforward for any crew aboard a vessel.
Maintenance cadence matters: inspect terminals for corrosion every season, tighten connections to the manufacturer’s torque spec, and verify that protective covers remain intact. Keep spare fuses, terminal blocks, and a small marine-grade cable kit in the saloon or a dedicated locker to speed repairs on the berth or when plans change–especially after a long voyage or when stowing a dinghy after docking.
| Circuit Area | Load (A) | Run Length (m) | Wire Gauge | Protection (A) | Notlar |
|---|---|---|---|---|---|
| Saloon lighting & outlets | 4 | 5 | 16 AWG | 10 | Switched; keep separate from engine circuits |
| Navigation lights | 2 | 4 | 18 AWG | 5 | Critical for visibility; route near hull |
| Bilge pump | 8 | 6 | 14 AWG | 15 | Automatic float switch; keep negative common |
| VHF radio | 3 | 2 | 14 AWG | 5 | Keep run as short as possible |
| GPS/Plotter & electronics | 4 | 3 | 18-16 AWG | 10 | Dedicated branch circuit |
| Mainsail deck equipment | 5 | 4 | 16 AWG | 15 | Water-spray protected; short runs |
| Dinghy charger | 4 | 2 | 16 AWG | 5 | Isolated from critical loads |
| Engine starter | 40 | 2 | 2/0 AWG | 100 | Near-battery protection; heavy-gauge run length |