

 Category Diving in Hawaii – The Ultimate Guide to Top Diving Spots, Gear, and Safety">

Recommendation: Start with a three-island itinerary that emphasizes the archipelago’s diversity, giving you a great balance of surface comfort and underwater exposure. If you’re getting into the gear mindset, this approach keeps momentum without overwhelming you. Focus on lava tubes, reef passages, and wrecks, then rotate through morning trips to maximize visibility and chances to observe feeding events and plankton blooms. This fırsat comes with a side of memorable adventures and helps you realize your dream of exploring Hawaii’s currents with confidence.
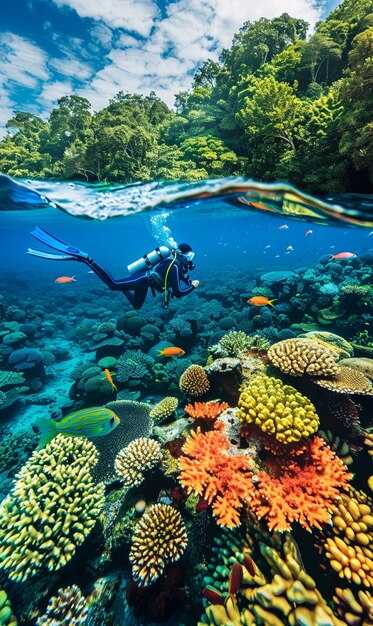
Molokini Crater, Maui: The crescent caldera delivers reliable visibility and calm conditions. Expect 30–100 ft views and depths around 20–40 ft in the inner reef, with sea life including schooling fish and occasional turtles. Operators run morning trips from Kihei and Maalaea, and the site is ideal for photographers who want a clean backdrop and easy entry. You’ll be near plankton hotspots during certain seasons, which can attract dramatic feeding events for larger pelagics nearby.
Kona Coast, Big Island: The night manta encounter is a signature adventure with a high probability of sightings; mantas reach 12–15 ft wingspan and glide through 70–100 ft visibility at night, in water around 72–78°F. Dress in a 3–5 mm wetsuit for comfort, bring a primary and backup light, and listen to your guide’s safety briefing on beslenme areas and entry procedures. Lava-tube passages along this coast enrich the experience, offering surreal channels between molten formations–an fırsat to learn about the volcanic past while staying within your limits.
Wrecks, currents, and safety on Oahu and Kauai: On Oahu, several shallow wrecks lie in sheltered areas, offering accessible connections to ship history and vibrant reef life. When planning a seyahat, consult a licensed operator and follow depth limits; regarding currents, always plan an exit and keep an eye on air. Use a surface marker buoy to signal your side of the team and to aid safety. For Kauai, drift dives along the north shore require local guidance for the best visibility and experience.
Gear, planning, and safety basics: Start with a 4/3 mm or 5/4 mm full suit for year‑round comfort, a good mask and fins, a regulator with an alternate, and a computer with safety stops. Pack a surface marker buoy, whistle, and reel for entry-and-exit scenarios near lava shelves or wreck lanes; consider a small camera rig for adventures and keep a second light for night sites. For your itinerary, schedule two to three main dives per island and leave space for rest days to recover and getting used to Hawaii’s currents. These choices give you a steady rhythm and ensure you have enough energy for your best shots and most memorable moments.
Regional Dive Planner and Gear Checklist for Hawaii
Start with a practical plan: base in Honolulu as your hub, then schedule inter-island hops to kauais and other islands, limiting to three sites per trip to keep the pace comfortable. This approach keeps the feet moving and helps you manage dozens of options across the state while staying on top of changing conditions.
Gear for Hawaii action splits into personal items and operator gear. Personal kit should include a low-volume mask with tempered glass, a compact snorkel, fins, booties in 3-5 mm, a 3/2 or 4/3 wetsuit, a weight belt, and a buoyancy compensator with a reliable regulator and octopus. Rent tanks, weights, and other essentials from local ops when possible to stay flexible for inter-island moves. Carry a surface marker buoy, whistle, waterproof notebook or slate, and a compass. For night experiences, add a headlamp and spare batteries. Bring a safety reel for currents and a spare mask or dry bag for transitions between hubs.
Site selection tips: choose shallow, sheltered reefs when you base in Honolulu or kauais. Iconic spots often sit near calm bays with thriving corals and intriguing sea life. Start with dawn sessions to enjoy magic light and calmer seas, then switch to afternoon tours when winds pick up. Always check the latest conditions and wind map before departures.
Inter-island planning details: check flight and boat schedules; dozens of operators offer transfers between islands; book a buffer day after a long crossing to stay rested. If you stay on one island, concentrate on a handful of reefs that are easily accessible by boat or shore. This approach reduces fatigue and keeps you safe in populated anchorages with helpful crews.
Weather, seas, and safety tips: monitor forecast updates from a trusted source (источник local operators) and carry a simple weather card; Hawaii seas range from glassy to moderate chop, rarely exceeding moderate on most coasts. Winds shift with seasons; count on 70-80°F (21-27°C) water temps in summer and 68-76°F (20-24°C) in winter. Pack layers and a warm layer for post-experience. Consider a lightweight dry suit for winter nights when cruising coastal sites. Stay with a buddy, stay in daylight hours, and keep a clear plan at each site to prevent fatigue and maximize enjoyment.
Checklist quick-reference: mask, snorkel, fins, booties; wetsuit; weights; buoyancy compensator; regulator with octopus; surface marker buoy; signaling gear; underwater slate or notebook; compass; light and spare batteries; safety reel; dry bag; hydration. Store a digital copy of local operator contact numbers and emergency numbers. Mark each site with arrival times and currents, so you can adjust quickly during inter-island itineraries.
Oahu Beginner Dives: Region Access, Rental Gear, and Buoyancy Basics
Start with a guided, beginner-friendly outing from Waikiki and rent a basic gear set (mask, snorkel, fins) from a reputable shop. This approach is perfect for building comfort and planning a solid base for your oahus experience.
Region access centers on three practical options. Waikiki waters offer gentle, nearby entries for first sessions, while outside Waikiki you’ll find Hanauma Bay Nature Preserve with protected reefs and clear water, and Ko Olina’s calm lagoons that suit first-timers. Each location provides different landscapes, but all fit a category of beginner experiences with low current risk and straightforward exits.
Buoyancy basics start with a neutral stance about two to three feet (roughly 60 to 90 centimeters) below the surface. Breathe slowly, keep your breaths even, and make tiny adjustments with your chest and hips rather than big leg kicks. This slightly controlled method helps you stay close to the reef without touching life or stirring silt, which benefits everyone being in the water with you and improves comfort as you gain experience.
Rental gear should cover essential items: a well-fitting mask, a snorkel that clears easily, and fins sized for your feet. Add a lightweight exposure suit if the water feels chilly (April mornings can be cooler), and consider a small weight belt to help achieve neutral buoyancy at the surface. Check the shop’s gear for wear, mask seal, and valve function before heading out, and confirm any regulator or buoyancy aid options if you plan a longer session with a guide.
For beginners planning a Hawaii itinerary, a local susan, a trusted guide, can tailor the day to your pace and skill level. Her advice helps you maximize the advantage of calm mornings, choose a route that avoids heavy surf, and stay safe while exploring nearshore habitats. Many operators offer short, original routes around waikiki waters that emphasize gradual progression and clear safety briefings, which keeps your planning focused and realistic.
Be mindful of wildlife and reef life. Frogfish sightings exist in some pockets of Oahu reefs but are not guaranteed, so manage expectations and stay relaxed about outcomes. If you’re curious about hammerhead activity, know that those encounters are famous in Kona, not common around oahus, but you’ll still enjoy watching a diverse array of small reef fish and friendly reef structures on your region day. The goal is steady improvement, not chasing a single moment, and the right preparation will help you gain confidence with every session and with every new location you visit within the island’s waters.
With a clear plan, the right gear, and a patient guide, your first weeks as a beginner on oahus will feel approachable and rewarding. The category of beginner experiences on this island offers a practical path to build skills, enjoy calm conditions, and grow into more confident underwater moments as the months progress, especially when you align your outings with favorable weather and sea states.
Molokini Crater Dives: Visibility, Boat Access, and Marine Life Encounters
Book a morning boat charter from Maui to Molokini Crater and snorkel the crater rim for the clearest visibility and calmer currents.
Molokini sits about 2.5 miles off Maui’s southwest coast and is accessible from Lahaina, Kaanapali, or Maalaea Harbor. Plan a 2.5–4 hour excursion, including time at the site, with 30–45 minutes of cruising each way depending on wind and seas.
Visibility on ideal mornings reaches 60–100 ft (18–30 m) commonly, with peaks above 100 ft when trade winds are light. Surface temps hover in the mid-70s F, and water temps typically linger in the mid-70s to low 80s F–comfortable for a long session in a lightweight wetsuit or rash guard. The night sky over hawaiis oceans fades as dawn approaches, and the first light enhances visibility for the morning trip.
Marine encounters deliver an abundance of reef life: expect schools of tangs and surgeonfish, bright wrasses, parrotfish, morays in crevices, and green sea turtles cruising the outer shallows. Sightings of reef sharks are possible near the outer wall, and pelagic species may drift by the edge on calmer days. If youre lucky, you might even spot spinner dolphins skimming the channel at dawn.
Boat access is straightforward: multiple operators offer morning departures, with pickups from Maui resorts and nearby towns. Resorts and transfer services arrange convenient options for visitors; check-in times are typically 6:30–7:15 am to maximize visibility and wildlife activity. Remember that the outer rim can experience stronger currents; stay with your guide, use provided flotation, and avoid stepping on coral for an intriguing, respectful experience.
Practical tips: bring a waterproof camera, reef-safe sunscreen, a light layer for the chillier wind, and a small snack. Read the operator briefing ahead of time to understand zones to avoid and how to minimize disturbance to wildlife. Molokini’s location, combined with the neighboring lanai and nearby Oahu itineraries, makes a visit to this area part of thrilling adventures in hawaiis oceans and a must for any visitor to visit.
Kauai Night and Macro Dives: Lights, Photography, and Tiny Critters
Get a compact macro-lighting kit: a 60–100 mm lens, two compact strobes, a focused LED light, and a red-light option to preserve natural colors. Getting the most from Kauai’s night macro opportunities starts with patient, steady movements and a plan that keeps you close to the subject (about 8–15 cm) while youre getting the composition right. This setup is a great foundation for intriguing close-ups as the marine world wakes after sunset.
Great locations include caves along the Na Pali coastline, lava tubes, and sheltered reef flats where you see diverse tiny life. Those high-contrast walls offer abundance and a choice of subjects, including gobies, pygmy shrimps, nudibranchs, and small octopuses found in crevices. Expect endemic species such as the hawaiian reef goby and the Hawaiian bobtail squid to appear, plus the iconic hawaiian monk seal occasionally at the water’s edge–keep your distance and let those majestic animals pass. At sunset, a turtle glides by, offering a larger silhouette against the tiny world you’re documenting. These sites provide tropical color and plenty of options for getting close to them, and you may also catch the occasional flying reef fish skittering through the current.
Aydınlatma ve tekniği düşünün: nesneyi çift flaş kurulumuyla aydınlatın ve geri saçılmayı azaltmak için hafifçe eksen dışından ışık verin. Gün batımından sonra resif kenarına yakın olduğunuzda yüzeye yakın manta şekilleri yakalayabilirsiniz; koyu maviye karşı zarif silüetler olarak görünürler ve resifin ötesindeki pelajik alemin harika bir hatırlatıcısıdırlar. Makro için flaşları yaklaşık 40–60 dereceye konumlandırın, odak kilitlemek için odaklanmış bir ışık kullanın ve manuel beyaz dengesiyle RAW çekin. Önerilen ayarlar: enstantane 1/125–1/200, diyafram f/11–f/16, ISO 400–800; görünürlüğe ve geri saçılmaya göre ayarlayın.
Çeşitli konular bekleyebilirsiniz: Hawaii kısa kuyruklu kalamarı, endemik deniz salyangozları ve mağaralara saklanmış o utangaç yengeçler. Yakınlaşmak sabır gerektirir, ancak getirisi büyüktür: kabuklardaki dokular, minik balıklardaki solungaç yaylarının karmaşık çizgileri ve tropikal resifteki renk patlaması. Çekim yaparken arka planda resif şarkıları duyabilirsiniz, bu bir şeylerin burada yaşadığına dair işitsel bir ipucudur. Gün batımında çekim yapmak dramatik renkler katarken, kaplumbağa siluetleri belgelediğiniz minik dünya içinde ölçek sağlar. Makro çekim yapıyorsanız, mesafenizi koruyun ve yaşamın bolluğunun kendini göstermesine izin verin. Deniz gecesinde, mikro dünyanın canlanmasını sağlayan büyülü bir şeyler vardır.
Güvenlik ve görgü kuralları seansa rehberlik eder: girmeden önce akıntıları ve rüzgarı okuyun; resif kenarı boyunca yavaşça hareket edin, vahşi yaşamla temastan kaçının. Asla dokunmayın veya kovalamayın; onlara alan tanıyın ve stres belirtileri gösterirlerse geri çekilin. Fok balıklarından ve diğer korunan hayvanlardan saygılı bir mesafe bırakın; orada gözlemlemek için varsınız, etkilemek için değil. Lav tüplerindeki mağaralar ve yüksek duvarlar gibi hassas yaşam alanlarını korumak için yüzdürme sağlayın. Döndükten sonra notlarınızı okuyun ve gelecekteki geziler için en iyi çekimlerinizi kataloglayın.
Büyük Ada Yanardağı Dalışları: Akıntılar, Tehlikeler ve Güvenlik Bilgilendirmeleri
Kesin bir güvenlik bilgilendirmesiyle başlayın ve güncel gelgit ve dalga tahminlerini doğrulayın; çiftler halinde seyahat edin ve planlanan giriş ve çıkış noktalarını takip edin. Volkanik kıyı sularında, akıntılar hızla değişebilir ve resif yüzeylerine veya dar kanallara doğru itebilir. Rehberle birlikte net bir maksimum derinlik belirleyin, yüzey sinyal cihazının hazır olduğundan emin olun ve acil durum yükseliş planını doğrulayın. Bu yaklaşım grubu korur ve riski azaltır.
Başlıca tehlikeler arasında ani akıntı değişiklikleri, çalkalanan tortudan dolayı sınırlı görüş mesafesi, keskin bazalt, gevşek moloz ve hatlara veya ekipmana takılma yer alır. Taze kaya yüzeyleriyle ve su altı özellikleriyle temastan kaçının; kılavuz yolu takip edin ve işaretli çıkış bölgelerine saygı gösterin. Tetiklenen dalgalanmalar daha derin kanyonlara doğru itebilir, bu nedenle planlanan profil içinde kalın.
Güvenlik bilgilendirmeleri, dalış eşleşmesini, sinyal yöntemlerini, yukarı çıkış ve çıkış planını, tempoyu, derinlik sınırlarını ve ekipman kontrollerini (BCD, regülatör, dalış elbisesi, eldivenler, paletler) kapsar. Ada kasabalarından operatörler bu gezileri sağlar ve planları koşullara göre uyarlar. Her zaman bir yüzey sinyal cihazı taşıyın ve yüzeye çıkarken bir yüzey işaret şamandırası kullanın. Görüş mesafesi düşerse veya akıntılar şiddetlenirse, durdurun ve çıkış hattına geri dönün. Seansın ardından, koşulları ve herhangi bir ekipman sorununu kaydedin ve geri dönmeden önce rehberle bilgi alışverişinde bulunun.
Mevsimlik Pencereler: Hawaii Sualtı Maceraları İçin En İyi Zamanlar, Hava Durumu ve Planlama
Balina gözlemciliği ve resif karşılaşmaları sunan saygın bir operatörle erken rezervasyon yaptırın; kambur balina aktivitesi ve mükemmel deniz koşulları için Ocak-Mart dönemini hedefleyin.
Sezonsal pencerelere genel bir bakış:
- Kıştan ilk bahara (Kas–Mar) – kambur balinalar sahneye hakim olarak unutulmaz bir gösteri sunuyor; en yoğun izleme dönemi genellikle Aralık'tan Mart'a kadar. Koşullar kıyıya göre değişir: rüzgaraltı kıyılarında daha sakin, açık kuzey cephelerinde potansiyel olarak daha büyük dalgalanmalar. Su sıcaklıkları yaklaşık 23–26°C (74–79°F) civarında seyrederken, resif bölgelerinde görüş mesafesi genellikle 18–30 metre (60–100 ft) olur. Yaban hayatı izlemeyi resif keşfiyle birleştiren teklifler için araştırma yapın; yapay resif yapıları ve zengin resif oluşumları ilgi çekiciliği artırır. Deneyiminize uygun bir plan oluşturmak için bir rehberle iletişime geçin ve en iyi ışık ve daha sakin denizler için sabah erkenden yola çıkın.
- Yazdan erken sonbahara (Mayıs–Eylül) – denizler genellikle sakinleşir ve birçok rotada daha yüksek görüş mesafesi ve daha rahat geçişler sağlar. Bu dönem, Maui, Oahu, Kauai ve Big Island yakınlarındaki çeşitli bölgelerde daha uzun tüplü dalış gezileri ve şnorkelli yüzme maceraları için mükemmeldir. Suda geçirilen zaman verimli olabilir ve yunuslar, kaplumbağalar ve manta vatozlarıyla karşılaşma olasılığı yüksektir. Rehberler genellikle vahşi yaşam karşılaşmalarını en üst düzeye çıkarırken koşulları uygun tutan çoklu bölge güzergahları sunar; ayrıca, sabahlar genellikle en iyi koşulları sunar.
- Omuz mevsimleri (Nis, Eki–Kas) – geçiş koşulları ve daha az kalabalık. Yeni teklifler için alışveriş yapmak ve farklı operatörleri test etmek için daha iyi bir zaman, çünkü bire bir karşılaştırmalar hangi mağazanın en çok değeri sunduğunu ortaya koyuyor. Neredeyse tüm bölgelere erişim sağlanabiliyor ve rehberler, gezileri tam olarak tercihlere ve beceri seviyelerine uyacak şekilde özelleştirebiliyor.
Dikkat: Koşullar hızla değişebilir; daima bir önceki gece operatörünüzle teyit edin ve en son tahmini kontrol edin.
Planlama ve güvenlik kontrol listesi:
- Timeframe – yoğun aylarda 6–8 hafta önceden rezervasyon yaptırın; ilkbahar başı ve sonbahar başı hala planlama gerektirebilir, ancak talep biraz düşer.
- Operatör ve ekipman – sağlam bir güvenlik geçmişine ve konfor seviyenize uygun ekipmanlara sahip bir operatör seçin; yapay resifler ve heveslerinize uygun diğer alanlar hakkında bilgi alın.
- Itinerary flexibility – Kıyı boyunca farklı noktalara seyahat imkanı sunan ve böylece vahşi yaşamı gözlemleme şansınızı en üst düzeye çıkarırken uygun koşullara dayanmanızı sağlayacak seçenekleri sorun.
- Preparation – güneş koruyucu, resif dostu güneş kremi, UV koruyucu giysi, havlu, su ve atıştırmalıklar hazırlayın; teknelere erişim için su geçirmez bir çanta ve güvenli ayakkabılar getirin.
- Yaban hayatı zamanlaması – kamburlar en çok sabah erken ve öğleden sonra geç saatlerde aktiftir; hayvanlarla geçirilen süreyi optimize etmek için rehber önerilerine göre plan yapın.