


Begin with a dawn run to the nantuckets beacons off massachusetts. It’s the most reliable opening leg for a year-round coastal cruise, delivering clear lines of sight and steady conditions as you head toward cape and rocks.
From there, chart a long arc toward beacons such as bodie and matagorda, whose offshore settings illustrate how rocks shape harbor entries; expect both year-round and seasonal windows, making a careful tour plan easier to keep.
Heading toward portsmouth and northward, the coastline tightens around cape approaches and rocky stretches; these beacons are known to mariners for guiding through fog and bright mornings, helping you select safe moorings along massachusetts.
Turn to online resources and authority updates to come prepared; beacons built along the coast include reliable signals that you can become proficient at reading, using tide charts and wind forecasts to sustain a steady year-round schedule, like sticking to a practical tour window.
Along the journey you may notice wildlife such as owls in dune groves and seabirds above the wake, reminding you to treat the coast with careful respect as you cross from cape to cape and island outposts like nantuckets and ports; this awareness enhances every stop and helps the overall voyage feel purposeful.
Boat-Friendly Access and Practical Routes for Coastal Lighthouses
Arrive before dawn and pick one of three practical entry routes to reach a coastal beacon cluster. During slack water, depart from a protected harbor, grab a tender, and land at a nearby slip or pebbled shoreline. Pack a picnic and capture three impressive shots of the majestic lighthouse as the sun climbs; this first-order approach minimizes wake and keeps the voyage smooth. Earned confidence comes from careful prep, and you’ll definitely notice the benefit when winds stay light.
Beacons come in three archetypes: offshore towers, lakefront lights, and river-mouth lamps. biscayne routes sit offshore and require an outside-channel approach; for lake sites, landings are usually in sheltered coves near cottages, but many shorelines were closed during nesting seasons–check signage before you land. rivers and niagara-fed inlets demand patience: arrive slowly and favor the inside bend where water is calmer; catch the next window if conditions tighten. very few crews enjoy surprises when lakes meet the shore, so plan ahead.
Three practical routes stand out for coastal beacons: the biscayne offshore track from a protected harbor, the leon inlet corridor with a quick shore visit, and a niagara lake junction along the northern coast. Each path has its own cadence: verify tide windows, keep speed low near shoals, and stay nearby private slips. If a shore is closed, pivot to a public slip and catch the next tide; were signage unclear, opt for the safest option and return later.
Tell crew to log depth readings, current strength, and wind direction in a simple notebook. This earned data gives you confidence on the next hop and helps you plan for an even more picturesque trip. If conditions turn harder, shorten the stay and move on. With careful planning, you’ll grab unforgettable views and the next beacon sequence, totally rewarding the journey during calm hours.
Nantucket Lightship LV-112: How to Approach, Moor, and Time the Tide
Approach LV-112 at slack water, roughly 60 minutes before or after low tide, and maintain a slow, controlled speed to minimize drift. Check NOAA tide tables for the day youre cruising, and adjust depending on current and wind. Have two spring lines ready and 4–6 fenders to cushion contact with the lightship’s deck and mooring points.
From the nantuckets coastline, stay on the seaward edge of the shoals and use a broad approach toward the lightship, keeping your hull roughly parallel to LV-112. If winds are light and variable, approach from the east to ease alignment; if wind comes from the west, approach from the north to stay clear of the vessel’s starboard side. Maintain about 40–50 meters of clearance until you signal readiness with VHF, then close under a steady hand on the helm. Capture bearings from nearby land features along the lush coastline to keep you on the intended track.
Mooring: once alongside, grab the forward spring and secure to a bow cleat; run a stern line to a stern cleat; fit a secondary line as a backstay to limit drift. Place fenders along the gunwales to prevent contact with the lightship’s weather deck. Keep people clear of the hawseholes and avoid stepping on any deck equipment. Have extra lines ready in case tide or current shifts.
Tide timing: the best window is early in the flood and late in the ebb, generally within 60–90 minutes of slack. Depending on the day, you may find a longer or shorter window, so monitor currents on the water and adjust. For year-round trips, plan for calmer mornings or evenings when weather is favorable.
Logistics and nearby spots: parking is limited; in season, use designated lots in Truro or along nantuckets coastline and arrange a short walk to the vessel. Bring weather-appropriate gear and extra layers, since conditions can switch quickly. If you want to study the LV-112 in context, there are exhibits and photos in regional museums in Boston and at Rondout, Verona, and Yorks maritime centers. If youre routing via hudson-athens or toward boston, align your trip with reliable weather updates.
Portland Head Light: Offshore Entry, Anchorage Options, and Shore Landing Tips
Begin offshore entry in daylight under favorable conditions; use Portland Head Light’s area as reference, with Ram Island Ledge Light marking the main channel edge. Stay in the channel toward Portland Harbor; ships transit the area, so keep a vigilant watch and maintain a buffer from shoals. Always check current depths and tides on the latest charts before committing.
Offshore entry specifics: Approach from the east or southeast, keeping the head of the vessel toward the harbor and the shore to starboard. Ram Island Ledge Light lies about a mile offshore; pass roughly a quarter mile south of it, avoiding the outer ledges. Use VHF channel 16 to monitor traffic and call the harbormaster if you need guidance. The coastline around the head is dotted with coves where conditions can shift quickly, and currents can surge near the main channel during fresh tides.
Anchorage options: In Casco Bay, seek lee behind small promontories along the Cape Elizabeth shore or in the outer bay near Chebeague Island. Official moorings are typically coordinated by the Portland Harbormaster; if you anchor, choose mud or sand with good scope and steer clear of the shipping lanes. For a longer stop, nearby rockland and other coastal pockets offer protection from prevailing winds; this would be practical for a short or extended stay, with local knowledge.
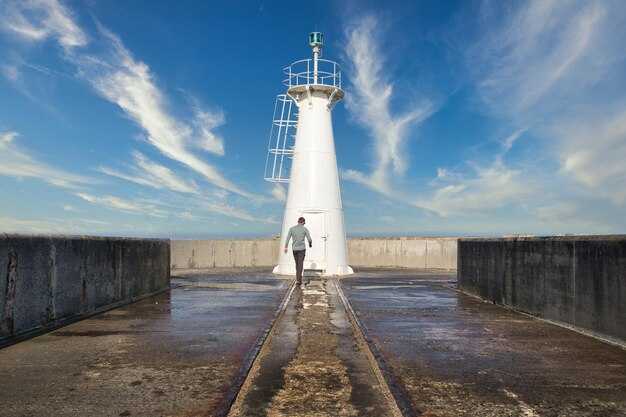
Shore landing tips: Access shore from a small dinghy; landing points include Fort Williams Park area where paths lead toward the lighthouse, and a rocky beach at low water. Do not block public access and use lines to secure if needed. Be mindful of rocks and submerged hazards; follow posted landing rules and seasonal closures. the beacon originally built in 1791 remains a real piece of home history, and the short walk offers a chance to observe the lantern up close.
Regional context: The coast around Portland Head Light is known for amazing seascapes and a homey feel along rivers and flats. The tall brick tower sits on the head and remains a real beacon visible far offshore; the site was originally built in 1791 and has drawn mariners for generations. nearby rockland and other coastal hubs connect this corner of Maine to broader routes; whether you extend to eastham, truro, nauset, nantucket, or even california as a far reference, kingston. youve got options, charts, and weather windows to weigh, the plan would require effort and patience, but a little planning makes the voyage rewarding.
Keep a steady watch on weather and traffic; for shore landings, use official access points and posted rules; plan for possible shifts in wind or current and adjust your plan accordingly.
Cape Lookout Lighthouse: Island Permits, Safe Landing Zones, and Seasonal Windows
Recommendation: secure the required permit online before launching and plan landing during calm conditions and slack tides to minimize risk.
Island permits and access: for any overnight stay on the islands, a backcountry camping permit is needed and must be obtained online in advance, with a thirty-day lead time recommended. If you’re only visiting for the day, carry your park-issued proof and follow posted access points; there there no general fee for short day trips, but you must stay on permitted routes and respect nesting zones during sensitive periods.
Access and landing zones: use official ramps and designated sandy approaches to minimize impact on fragile shorelines. Do not land in restricted areas and keep a safe distance from nesting birds and sensitive dunes. There are limited zones that are well suited for small craft, and landing there requires careful evaluation of sea state, wind direction, and current conditions. Stay well clear of shoals and breaking waves; approaching during slack water is ideal, and plan to arrive close to the low tide window when shallower flats are exposed and hazards are reduced. For the most accurate options, check the online status board before you come; there are ongoing updates that reflect the original access rules and any temporary closures.
- Permits and paperwork: online application, backcountry camping permits if you plan to stay, thirty-day lead time recommended, keep digital and printed copies, shared with your marshal or crew as needed.
- Landing points: use official ramps and maintain a slow, controlled approach; avoid nesting seasons and restricted beaches; ensure you land within legal zones and leave no trace.
- Seasonal windows: spring and fall offer the most stable conditions for day trips; avoid peak crowded periods and hurricane season (rough seas can close access); monitor online alerts for any park advisories and weather advisories.
Seasonal factors and planning: wind and swell patterns shift with the seasons, so the classic window for smoother boating tends to be April through June and September through October. During these periods, there are usually fewer crowds, and the routes along the islands remain open when conditions permit. Hurricanes or tropical storms can close access abruptly; always check the forecast and park conditions online before you come. If you spend time on the shore, budget for extra minutes at a lake-like inshore inlet and be prepared for sudden changes in tide.
Nearby logistics and notes: visitors frequently collaborate with local owners to arrange nearby parking and shuttle options, and you’ll see a number of posts on instagram from people who visited the area and captured striking landmarks at dawn. If you’re coming from elizabeth or toward savannah routes, plan for a longer crossing and factor in fuel and safety margins. Lands and access points near the park are owned by the NPS and local partners; there’s always a need to stay within established paths and to respect wildlife and protected habitats. Be mindful that crowded weekends can limit available landing zones, so aim to leave earlier in the day and spend time observing the original rules and posted conditions.
Ponce de Leon Inlet Light: Tide-Safe Passages, Mooring Spots, and Shore Access
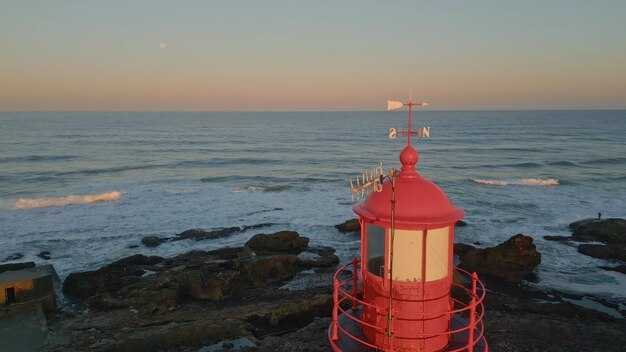
Transit the inlet on a rising tide with daylight, following the beacons, and keep the white, cylindrical Ponce de Leon Inlet Light on your starboard side as you enter the main channel. marshall notes emphasize a cautious, orderly trip, reducing risk of shoal interaction and allowing the current to stay manageable above the surface. This approach is truly reliable and sets a solid tone for a safe, efficient run.
For mooring, aim for marina slips just inside the inlet or designated shoreline moorings, and make a reservation well in advance during busy months. This setup offers secure ties, power and water, and quick shore access for a picnic before continuing the journey.
The shore presents a dramatic panorama: the white tower rising over a line of beacons, with a park where sculpture installations line the edge. It’s instagram-worthy to capture shots of the tower above the dune line; bring a tripod for a steady snap, and enjoy a vantage that draws visitors early and late. If you want extra space, arrive before the crowds–still mornings offer clean light.
Wildlife and shoreline features: adorable owls sometimes perch on the dunes at dusk, and the shoreline draws observers who keep quiet to respect the habitat. If you plan a morning trip, the marsh behind the shore reflects light dramatically, offering good photo opportunities.
tide-safety and navigation: check tide tables and local notices; expect currents up to 3-4 knots near peak ebb and flood. Whether you cruise solo or with a crew, stay in the marked channel, keep above shoals, and allow extra margin for turns near the jetty. A well-timed passage reduces risk and makes the rest of the day smoother.
Nearby attractions and context: the inlet’s shoreline and adjacent parks offer quiet spaces for a casual trip, a picnic, or a short stroll. Some interpretive boards reference hudson-athens connections in maritime art, and a small sculpture garden near the shore echoes that vibe. If you’re curious about broader maritime heritage, you’ll notice nods to erie and england coastlines in the placards. Whether you prefer a crowded scene or a remote stretch, this area accommodates both.
Planning tips and practicalities: reserve a mooring or slip ahead of time; check weather and tide, bring water, sunscreen and snacks; the shore area has restroom facilities and a shaded picnic area. For photographers, the best time is early morning or late afternoon when the light is gentle; this makes extra images easier to capture and reduces glare. If you want to avoid crowds, visit on weekdays when the vibe is calmer and the park trails are less busy; there are more spots to relax and enjoy.
Enjoy the run from tide-safe passages to shore access, and share your experience with a few well-timed instagram posts. Thanks to beacons guiding the approach, this leg offers dramatic views, a white tower, and plenty of space for a quick picnic or a longer trip. marshall’s tips help you plan a smooth, memorable outing.
Heceta Head Lighthouse: Weather Windows, Wave Patterns, and Photo-Op Angles
Begin at first light on calm mornings during late spring through early fall to lock in the best weather window and clean, cream-colored light along the bluff. Use a mid- to long-telephoto to compress the scene and isolate the tower against the sea; plan full 30–60 minutes for successive frames and then unwind with a short walk along the coastal path.
Weather patterns here hinge on the Pacific, with fronts dragging in from the west and occasionally dipping in from california, bringing fog, rain, or clear skies. The winds shift the surface from glassy waters to whitecaps; rivers feeding the region can amplify humidity. Conditions vary with both onshore breezes and offshore swells. The island offshore adds a real element to the frame, while nearby shorelines provide a heart-pounding backdrop for walking shots along the bluff.
Wave patterns form a classic shoal interaction: long breakers wrap around the headland, leaving spray racing along the guard rail and along the rocks. At full swells you’ll see towering lips and a foamy crest; during calmer days the water remains glassy, revealing every crevice in the rocks. The beacon served mariners for decades and the bluff still stands as a protective guard against gusts, yet it also hosts wind-driven mist that softens textures for portraits.
Photo-Op Angles: Three reliable vantage points deliver mood and scale. From the main overlook you frame the beacon with the dramatic coastal line and the island just offshore; walking down toward the beach shows the spray and the shoal’s texture against the dark basalt. A second angle along the bluff includes the historical keeper’s residence and nearby houses, giving a sense of history along the coast. For close-ups, a mid- to long lens isolates details among the cracks and the rolling water, while a wide shot captures the entire horizon with clouds moving across the heart of the scene.
Practical notes for visiting: making the most of a weather window requires patience; the main trail can close during hazardous conditions, so check notices for closed zones. Wear sturdy walking shoes and bring layers for wind. If you’re coming from hillsboro, ontario, california, maines, or ponce, plan a long drive and a full day to sample nearby coastal towns and viewpoints. The entire experience helps you enjoy the coast; after stepping back from the spray, visiting photographers can unwind and savor a real sense of place along the shore.