

 Starved Rock Kayaking Near Chicago – A Practical Paddling Guide">

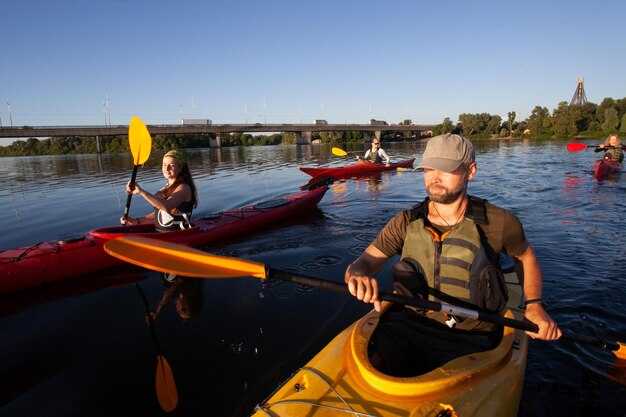
Start with a properly fitted PFD, a helmet, and a quick shore check of water level and forecast before your launch. It grounds the plan and reduces risk. For a family outing or solo run, pick a single-occupant craft or a stable tandem, and pack dry bags with water, snacks, sun protection, and a compact repair kit. immerse in the surroundings by scanning the banks for wildlife and listening to the water, and keep a plan to mmerse in the ground truth of the riverbank as you go.
Launch ramps line the indiana side, with ground-access parks convenient for a quick setup. For scenery watchers, expect towering cliffs and carved alcoves that reveal the area’s history. The route length varies, from a short, famous circuit to a longer, rugged circuit. A typical day covers 6–11 miles round trip with measured flow; consult local gauges before leaving. The coast features cabos and sheltered inlets ideal for a brief break and a snack.
Rapids range from easy riffles to a few punchier sections after rains; scout from shore before each move and pick a line that keeps you in the main current. A warm drysuit helps when spray gets up, and be ready for ground-gusts across bluff lines. For a rugged day, tie gear securely, carry a spare paddle, and keep a fully charged cell and a whistle within reach, especially if you’re paddling with family. Watch for pushy cross-currents that can steal your balance and force a quick correction.
The river valley offers amazing wildlife and scenery, from monarchs to viceroy butterflies and shorebirds. Expect habitats that range from bald bluffs to grassy banks, and plan shots for dramatic light on the cliffs. The route near indiana towns provides a mix of historic landmarks and modern access points; you’ll often encounter turn-offs and boat ramps that provides reliable entry. Stay aware of wind shifts, which can be dramatically different from morning calm to late-day gusts.
Pre single paddler, a compact setup frees you to explore in ground-level detail and to breathe with warm air on the water. For family trips, choose a stable tandem and plan rests at cabos coves or sheltered pockets. The experience is amazing when you respect the current, dress for the wind, and maintain a line that keeps you in a consistent tempo rather than chasing the next rapid. The overall plan should be fully prepared–maps printed, gauges checked, and a simple exit strategy ready in case weather or water conditions shift dramatically.
Practical Paddling for Starved Rock and Lower Wisconsin River Canoe Trips
Launch at dawn on a 6- to 8-mile loop from a Riverside access; calm waters minimize wind exposure and boost serenity while delivering solid scenery. Illinois paddlers can combine a compact adventure from midewin with a riverside escape, offering reliable wildlife viewing and a manageable rhythm for small trips. Make a plan to test water depth at the first bend and carry a map to stay flexible along Lodore reaches and side waters. Ensuring the basics–PFDs, dry bags, spare paddle, and whistle–keeps the work light and the experience safe, so you can immerse without rushing.
Gear decisions should favor stability and efficiency. Select a 14- to 16-foot canoe, pack two quarts of water per person, snacks for a mid-morning break, and a compact rain shell in case clouds roll in from the northwest. Provide a waterproof container for a phone or camera, and use waterfront access points to shorten portage needs if weather shifts. The plan is to become fluid: if wind increases, you can follow a sheltered bend or return early to riverside trails in Washington County and nearby towns.
Route options balance scenery and effort. A classic start drops you at a calm limb of the waters, passes by a trout-populated pool, and comes back along a broad bend where shore birds call overhead. This arrangement gives you a steady cadence and a chance to immerse in discovery, with plenty of opportunities to come ashore briefly, stretch, and test gear before resuming. For a focused outing, keep to a single reach near Lodore and explore a couple of side channels that open onto small backwaters, where the currents slow and the scenery stabilizes into serenity.
The experience can become a family-friendly opener or a focused solo test of paddling technique. The Riverside corridor offers kern features in a compact footprint: easy access, modest distances, and an offering of quiet moments along the waterline. A well-planned trip in Illinois may also connect with informal routes near Midewin, offering a chance to combine trail wanderings with water-based exploration, and leaving room to come back with new ideas for future journeys and even longer trips along the lower stretches.
| Aspect | Recommendation | Poznámky |
|---|---|---|
| Best time | Dawn to late morning | Calm water, wildlife activity; plan around shade and heat |
| Distance | 4–8 miles per outing | Loop or one-way with shuttle; adjust for conditions |
| Gear | 14–16 ft canoe, PFD, dry bags, spare paddle | Whistle, map, rain shell, sun protection |
| Prístupové body | Riverside trailheads, lodore-adjacent ramps | Prefer quieter entry during peak season |
| Wildlife | Birds, trout in pools | Move slowly; minimize noise to preserve serenity |
| Nearby options | Small trips exploring nearby waterfronts | Areas linked to chicagos region can inspire planning |
Access Points and Launch Sites for Illinois River Paddle Adventures
Recommendation: Begin at a public county park ramp with a broad concrete launch, ample parking, and a gentle grade; this setup yields still water in the early morning, serenity on the water, and a smooth entry for paddler families. Use it as the baseline for classic day trips or multi-day adventures along the river.
-
Access Point A – County Park Public Ramp
Type: concrete ramp; Parking: ample; Surface: smooth; Condition: well-maintained; Water: still at dawn; Depth: 3–6 ft in the main channel; Best for: paddler families and beginners; Wildlife: look for trout in cooler pockets downstream; Nearby: a short riverbank hike (0.5–1 mile) leads to canyon viewpoints; Notes: after rainfall water levels can rise; Early morning or dusk offers the best serenity; test water level before launch; Days: 2–4 hour sessions or longer for a full-day loop.
-
Access Point B – Riverside Marina Public Access
Type: floating dock with ramp; Parking: limited; Permit/fees: may apply; Water: deeper near the main channel; Currents: mild; Best for: gear-heavy days and multi-hour paddles; Safety: check depth markers; Local outfitters sometimes run trips from this site; Dusk launches provide gorgeous lighting.
-
Access Point C – Riverfront Trailhead Launch
Type: gravel ramp; Parking: moderate; Water: gentle flow; Depth: variable with season; Best for: canoeing and short paddler outings; Add: a short hike along the canyon rim for a scenic look; Wildlife: birds and small mammals; Days: 2–3 hours typical; What to bring: dry bag, layers, water.
-
Access Point D – Private Day-Use Marina
Type: owner-operated; Permit/fees: required or day-use; Parking: on-site; Water: deeper; Currents: moderate; Best for: longer trips and multi-day loops, with staged exits from the north reach into wilderness corridors; Caution: follow marina rules; Seven-day itineraries are feasible with planned takeouts; Local outfitters can support multi-day itineraries.
What to bring: dry bag, waterproof case for electronics, spare clothes, snacks for days on the water; Where to store extra gear: dry bags inside the boat; When planning: test water levels, wind forecasts, and potential hazards; While some days are easy, others require a bit more effort; Here, the most popular routes combine paddling with short hikes to canyon viewpoints for a classic outdoor experience.
Water Levels, Flow, and Best Windows for Chicago-Area Kayaking
Recommendation: Target late april to early may when runoff has settled and gauges commonly read 2.0–3.5 ft, delivering 0.8–2.0 ft depth in calmer stretches for efficient tracking and easy rescues. Check USGS readings the day before, and pick a section with light debris and modest winds.
Best windows by system: After ice-out, the Des Plaines and Fox river corridors offer reliable conditions when the flow sits in the 2.0–3.5 ft range and you can keep paddling effort manageable. In april, avoid after heavy rain; plan for mornings with light winds and low gusts–those windows often yield the smoothest water and best wildlife observations. For those seeking longer routes, target a stretch that stays at or below 4.5 ft stage during peak tributary pulses.
Geology and scenery: The floodplain features moraine ridges and kettle landscapes that shape the water’s path. The backdrop is a patchwork of prairie and forest along the landscape, with sugar maples along banks. Trout inhabit cooler pockets; wildlife is frequent at the edges of marshes. Midewin offers additional wilderness routes and hikes that pair well with day trips. Towering trees line many banks, especially in the early spring light.
Route notes: Scout the first section, look for floating logs and snag debris, and wear a Personal Flotation Device. Plan an overnight only if permitted; just verify sites and rules, since those routes often rely on established camps. Dawn and dusk deliver the best light for photos, and winds are commonly calmer then. Carry a map and whistle, stay mindful of state and local restrictions through parks and preserves, and respect wildlife along the water.
Experience and tips: The winds can shift quickly; those gusts–often 15–20 mph on exposed sections–are common, so pick a window with stable conditions if you want to immerse in wilderness and keep the pace steady for adventures. Think about what you want to learn from the section–state planning, wildlife watching, or trout spotting–and adjust your start time accordingly. The reflections on a calm evening can feel caribbean-like, the scenery is gorgeous, and you’ll finish with a sense of progress and work well done. A short trip may become an overnight if you secure permitted sites and plan logistics in advance; thanks for reading, and enjoy the immersion into this landscape of wilderness and water.
Gear Checklist for Short Trips and Multi-Day River Camping
Begin with a complete base: a compact stove with fuel, a 40–45 liter dry pack, a 2-person tent with groundsheet, and a 2-inch sleeping pad paired with a 0°C to 5°C bag. This setup will keep base weight around 7–12 kg for a 2–3 day trip, leaving room for 1–2 extra meals and essential tools.
Shelter and sleep: Choose a 2-person tent or tarp-bivy combo; add a groundsheet to stay dry at riverside camps. Use 4–6 guy lines and four stakes; in high wind, an extra tie or strap helps lead tension. Pack a compact liner or sleeping bag cover to extend warmth; include a small inflatable pillow for comfort without much weight.
Water and cooking: Hydration plan targets 2 L per person per day, plus 1–2 L per person for cooking in cooler weather or for hot days. Carry a compact water filter (pump or squeeze) and 2–3 clean bottles; treat creek water since creeks can carry silt. For cooking, bring a pot, a pan, a mug, a spoon carved from light wood, and a compact fuel canister. A carved spoon adds a personal touch for meals along the riverside. When trekking through indiana state parks or similar places, carry a backup filter and spare bottle caps in the dry bag.
Clothing and footwear: Layered system–moisture-wicking base, insulating layer, and a waterproof shell–plus spare socks. Include wool socks, river-appropriate sandals for camp, and light trail runners for day hikes on the hills. Pack a beanie and gloves for chilly evenings; bring a compact microfiber towel to soak up dampness after a quick swim or rain.
Food and fuel: Plan 2,000–2,600 kcal per person per day, depending on exertion; mix dehydrated meals with nuts, dried fruit, and energy bars. Use a dry bag for groceries and a separate small zip bag for spices or seasoning. For trips with long carries, a lighter stove and smaller fuel canisters are ideal; on more rugged routes, you may want a backup stove or alcohol burner. If you’ve traveled to algarve or caribbean settings, adapt portions to available cooking options. This setup will offer dependable performance across varied conditions.
Navigation and safety: Pack map and compass or a GPS with preloaded routes, a compact headlamp with spare batteries, and a whistle. Include a first-aid kit, blister care, and a simple fire starter. A personal locator beacon or satellite messenger is recommended for remote stretches; carry a spare dry bag for electronics. In environments with wildlife, watch for birds such as warblers along the riverside and creeks; keep your distance and enjoy watching them pass by.
Packing and layout: Use dry bags in 5–10 L, 15–20 L, and 30–40 L sizes to keep gear organized. Distribute weight with the heavy items at the bottom and close to your spine; use a small lead bag or strap to keep items balanced. Label each bag to save time when setting up camp at a new place; this will make you more efficient and reduce rummaging on the trail. For a whole trip, plan for backups and spare parts for critical gear–valves, patches, and duct tape.
Regional note and mindset: Nearly every route offers chances to immerse in varied scenery–from quiet creek crossings to cliff-carved overlooks. Think about where you’ll hike and where you’ll stay, as there are rare places with little human impact. If you are a runner or a casual hiker, you’ll appreciate the still calm after a hot day; plan for high sun exposure and a shaded riverside retreat where you can soak in the view, watching wildlife, and sharing the experience with people you trust.
Navigation Hazards, Reading the River, and Safety Procedures
Always wear a USCG‑approved life vest and carry a whistle; test depth and current at the riverside before launch, and establish a short lead with your paddler companion for rapid responses to movement changes.
Read the river by observing water color, surface texture, and boil lines; identify seams and hydraulics that signal faster flow, and note landmarks such as granite outcrops and moraine ridges to orient quickly; beware certain snags and strainers formed by debris, especially after storms; drift toward the center of the channel where possible to reduce turbulence and avoid overhanging limbs.
Carry a waterproof map with key locations and a place to turn around, exit points, a compact first‑aid kit, a signaling device, and a throw bag; designate a lead to keep pace and a follower to monitor hazards; after storms, check water levels and be ready to pivot to a slower line; maintain contact with everyone on shore and downstream, there being a clear plan for communication in low-visibility conditions; watch for runners along rivers to avoid conflicts at takeouts and choose routes with minimal crowding there; thanks to shared tips, virtually all risk can be reduced by sticking to known locations and currents and by keeping your group together there.
For a richer outing, visit places that offer scenic canyons and landscapes which feel dramatically different from one bend to the next; seek birding opportunities along the southern riverside to discover more wildlife and marvel at changes in shade and water; if possible, explore granite features that resemble algarve coastlines; talk with friendly paddler peers such as zena to learn safe routes and preferred entry points; virtually all risk can be reduced by sticking to known locations and currents and by keeping your group together there; marvel at the changing light as you move.
Camping on the Lower Wisconsin River: Permits, Sites, and Leave-No-Trace Rules
Get your permit online from the riverway authority before you start; overnight camping is allowed only at designated sites along the waterway, and the permit assigns your site and date window. Fees are posted at booking and vary by site and season; reservations fill quickly on weekends and holidays, so plan at least two weeks ahead for your preferred spot; for family trips, select sites with shade and gentle approaches to sandy banks; chicagos-area visitors would appreciate the renowned experiences that pair scenic views with easy hiking and relaxed adventures. Whether you’re new to river camping or returning, the system keeps campsites spaced and fully available for visitors who follow the rules, and mmerse yourself in the river experience through careful planning.
Site options range from small riverbank clearings to larger overlooks with trail access. Look for spots with sandy shorelines for easy water entry and exit, and avoid delicate vegetation and fragile dune areas. Many popular camps sit within a short hike from the waterway, with rocks forming natural steps and sheltered nooks ideal for cooking in a kettle or warming tea. Coordination with shuttle services is common, and some launches include a shuttle connection between put-in and take-out points to save backtracking. For families, pick sites near shallow pools or rapids that remain safe during lower water; the alpine vibe peaks where towering bluffs frame the water, delivering dramatic sunsets and a sense of adventure during the evening.
Leave-No-Trace rules: pack out all trash and leftover food; store smells securely in bear canisters or appropriate containers when available; use established fire rings only and keep fires small and fully extinguished; do not cut live trees or strip bark; keep noise low after dusk to respect other campers; minimize water use and avoid contaminating the shoreline; keep a neat footprint and depart with the site clean to ensure the next visitors can enjoy the same conditions; tread lightly on fragile dunes and rocks and stay on marked trails to protect delicate shoreline habitats and the broader waterway ecosystem; salt-scented breezes are common, so plan for odors and freshness without leaving residues behind.
Practical tips: whether visiting solo or with a family, arrive prepared for a thousand little details; bring a reliable water filter, a sturdy kettle, and durable footwear; if you’d rather not drive the round trip, Wright Outfitters and other local operators offer shuttle services that help you move through the river corridor with ease; some outfits, such as zena, provide gear rental and guided options to simplify planning; plan for midweek trips to avoid crowds, combine a short hike to a vantage point, and keep gear simple and fully contained to minimize load and maximize comfort; always verify current permit rules and site availability before you depart.