

 How to Use an Outboard Motor Flusher – Step-by-Step Instructions">

Firstly, prepare a non-toxic flush kit and a tight hose connection to the boat’s cooling-water intake. On a trailer or dock, position the vessel level and secure the lines. Attach the flush line to a clean water source, then run sladká voda through the cooling passages for five minutes to dilute salt, debris, and mineral buildup.
What to check during the rinse: inspect areas around hoses, clamps, and the gearcase for leaks; examine the propellers for debris or nicks. If you notice cracks or worn gaskets, pause and replace the affected equipment before continuing.
Five practical checks were designed to keep longevity high: 1) confirm the hose connection remains tight; 2) keep the intake clean and free of debris; 3) run the flush for about five minutes; 4) inspect the gearcase and seals; 5) perform a quick second pass to clear any remaining scum.
Chavarria notes that pairing a non-toxic cleaner with a focused flush cycle protects boats and engines. Were youre able to apply these steps on every trip, youre boats will hold their value and the engine longevity will improve.
After the rinse, let the engine drain on the trailer or at the dock, then wipe dry and recheck for leaks. Keep the equipment clean and secure on shore, ready for next trip. If youre planning to sell the boat, this routine helps keep longevity and performance visible.
Outboard Flusher Usage Guide
Connect a clean freshwater source to the flush port and run the engine at idle for 60–90 seconds; immediately observe the tell-tale spray, fill the line, and note how salt dissolves–this keeps deposits from building up and helps you love the result. Perform this every year to keep corrosion at bay and ensure a seamless start to boating.
Set a standard: a 1–2 minute flush window is ideal for most motors; whether the water is clean or slightly cloudy, never exceed 2 minutes to avoid overheating. A couple of boats show fewer issues when the flow is steady and the nozzle remains sealed; this attitude toward routine maintenance yields phenomenal reliability.
Inspect every hose, clamp, and the filler cap after finishing; manufacturers recommend a quick visual inspect for leaks and wear. For those looking for a clue, a common issue is a loose hose or cracked seal near the tell-tale; the tell-tale shows wear and should be addressed.
Couple of practical tips: keep the flushing tool kept clean and dry after use; store hoses away from direct sun to prevent material fatigue; this habit ensures you can act immediately when needed, and helps everyone maintain readiness.
Phenomenal product for marine care, ideal for anyone who loves a simple maintenance routine; this approach was enjoyed by guys at the dock, who reported it saves time and reduces anxiety about salt buildup.
| Phase | Action | Time |
|---|---|---|
| Preparation | Turn engine off, connect clean freshwater to the flush port, verify fittings | 1 min |
| Flush Run | Run at idle for 60–90 seconds; observe tell-tale, fill line as needed | 1–2 min |
| Inspection | Inspect seals, hoses, and clamps; look for leaks and wear; address issue promptly | 2 min |
| Údržba | Keep system kept clean; store away from sun; record the year for routine checks | As needed |
Verify flusher compatibility with your outboard model
Confirm the exact drive unit model number and year, then check what the official compatibility chart lists for that unit. Ensure the connector thread size and hose ID exactly match your vessel’s installation points; a mismatch might cause leaks, poor seal, and overheating within minutes. If the chart is clear, you can proceed with purchasing from a reputable source.
Verify the kit contents: clamps, barb fittings, o-rings, and adapters. Confirm the port sizes and thread type shown in the product page match what your drive unit requires. Choose metal fittings in hot areas; if only plastic is available, verify temperature rating and UV resistance. This simple inspection saves money and avoids service calls when the engine runs under load.
Contact the team of experienced technicians in Bluffton or your local marina to perform a quick fit check on the vessel. They should have completed a hands-on test, then run the engine at idle and at moderate RPM to confirm no leaks and no overheating. Ask whether the ports align with your intake passages and whether the overall flow is adequate for boats of that size.
Guard against deposits and mineral buildup in the cooling path: clean passages before testing, and recheck after the first run. If you detect any mismatch, stop, complete another compatibility review, and replace the fittings as needed.
From that point, if everything lines up, proceed with purchasing the final product and schedule the install. Your vessel runs reliably, your access to spare parts improves, and the experience with the team is outstanding. Owners who enjoyed trouble-free maintenance report fewer service calls.
Choose flushing bags or a bucket setup and assemble the kit
Recommendation: Choose flushing bags for a quick, clean flush and seamless operation; if space is tight or you want a backup, a bucket setup with a short hose lets you operate with confidence and comes with reliable results. This has been asked by many; this approach is fantastic for simplicity and delivers highly durable performance.
Two ways to configure the kit:
- Flushing bags: components include a bag with high durability, a flexible hose (3–6 ft), hose clamps, a quick-connect fitting, a small intake adaptor, a stopper for the intake, a clean water source, and a dedicated waste container. Using a bag keeps weight down and speeds the process; for better results, select models with reinforced seams and robust fittings to minimize leaks. Purchasing from reputable brands is advised; contact the supplier if anything feels loose. Anchoring the bag to a stable point prevents movement during turning or tilting and helps save water by capturing residual fluid.
- Bucket setup: components include a 5-gallon bucket, lid or cap, short hose, hose clamps, intake adaptor, stopper, stand or support, and a small drain container. A bucket setup offers exceptional flexibility in cold temperatures or when space is limited; its level is easy to monitor and maintain, reducing the chance of spills. Anchoring the bucket and keeping the hose at a safe angle supports seamless operation. Following manufacturer guidelines, ensure the bucket is not overfilled; the drain path should flow into a secondary container to avoid mess.
Assembling the kit: following these tips helps you save time and avoid surprises. Gather items, verify fit, contact suppliers if needed, and check for leaks before heavy use. When coming sessions, keep the intake clear of debris and ensuring the drain is unobstructed. On completion, disconnect hoses, rinse fittings, and store components in a dedicated case to improve durability and prolong life.
Checklist highlights:
- Parts list with quantities
- Safe water source and drain plan
- Anchoring points and weight options
- Color-coded hose and clamps to avoid cross-connection
- Test run plan to verify level and leaks
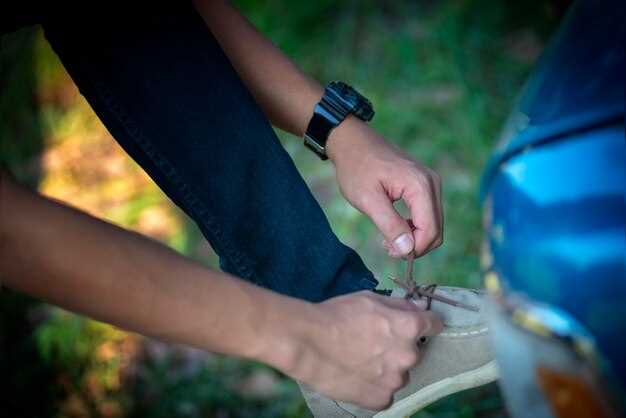
Securely connect hoses to the cooling water intake and secure connections
Pripojte hadice k prívodu chladiacej vody pomocou dvoch nerezových svoriek pre námorné použitie na každej hadici, umiestnených na každom konci, a utiahnite na 15-22 in-lbs (1,7-2,5 N·m) pre malé hadice 1/2 ″ až 3/4 ″ alebo 22-30 in-lbs (2,5-3,4 N·m) pre väčšie hadice 1″. Prípojka by mala priliehať priamo k objímke; vyhnite sa nadmernému uťahovaniu, ktoré môže hadicu zdeformovať. Aj mierne nadmerné utiahnutie môže spôsobiť netesnosti počas prevádzky. Po pripojení nechajte motor bežať na voľnobeh a skontrolujte, či je prietok plynulý; ak zistíte netesnosti, odpojte, znova nasaďte a dotiahnite. Na väčšine plavidiel to trvalo len niekoľko minút a vydrží to počas nasledujúcich plavieb a udalostí.
Skontrolujte vstupné kanály, či sa v nich nenachádzajú usadeniny minerálov alebo nečistoty, ktoré môžu spôsobiť upchatie. Posvieťte si do kanálov a prehmatajte drsné miesta v blízkosti spojov; uvoľnené usadeniny odstráňte mäkkou kefkou a prepláchnite čistou vodou. Konkrétne pokyny pre daný model nájdete v príručke a v produktoch odporúčaných výrobcom; či už vykonávate ľahké prepláchnutie alebo hlbšie čistenie, pred spustením sa uistite, že sú všetky kanály priechodné.
Starostlivosť po použití sa zameriava na trvanlivosť a spoľahlivosť: pred uskladnením odpojte hadice, vysušte svorky a po vystavení slanej vode skontrolujte miesta okolo armatúr na plavidle. Ak hadice vykazujú praskliny, stuhnutosť alebo opotrebovanie, vymeňte ich, aby ste zachovali trvanlivosť; používajte produkty určené pre námornú prevádzku a riaďte sa príručkou pre kompatibilitu. Majitelia by mali mať v skrinke na náradie náhradné svorky a hadice pre rýchle pripojenie počas nadchádzajúcich ciest a zaznamenávať možné potreby servisu pre každú oblasť použitia. Dodržiavajte príručku a pokyny pre servis, aby ste si udržali fantastický výkon vo všetkých oblastiach vystavených teplu, vibráciám a soli.
Otázky od vlastníkov o tom, kde získať spoľahlivé produkty? Postupujte podľa spôsobov uvedených v príručke, kontaktujte servis pre usmernenie a porovnajte možnosti, ktoré vyhovujú modelu vašej lode. Ak budete kričať otázky na linku podpory, pomôžu vám s kompatibilitou, krokmi pripojenia a miestami, kde sledovať upchatia. Ak máte podozrenie na upchatie alebo zmeny prietoku, vykonajte rýchlu kontrolu a v prípade potreby zabezpečte servis. Tento prístup udržuje váš chladiaci systém v hladkom chode a minimalizuje prestoje.
Nechajte motor bežať na voľnobeh a preplachujte ho odporúčanú dobu.
Nastavte voľnobeh na 800 – 1 000 ot./min a nechajte motor bežať 3 – 5 minút s pripojenou preplachovacou vodou; riaďte sa pokynmi výrobcu pre daný model a v prípade potreby ich upravte. Vďaka tomu je servis jednoduchý a efektívny.
Pripojte hadicový adaptér bezpečne k portu, pričom udržujte vodný lúč zarovnaný so závitom vodného portu, aby ste predišli únikom; uistite sa, že je prevodovka v neutrále a stav motora zostáva stabilný; táto práca pomáha udržiavať systém čistý a v dobrom stave; umiestnite sa do bezpečnej polohy a udržujte ich mimo dosahu pohyblivých častí; riadne utiahnite svorky.
Otvárajte prívod vody postupne a udržiavajte stály, mierny prúd; toto nastavenie zjednodušuje operáciu a umožňuje čisté vypláchnutie. Používajte len hadice určené na preplachovanie a skontrolujte kompatibilitu s portom. Neprekračujte odporúčaný tlak; ak sa prietok zoslabí, okamžite skontrolujte pripojenia a podľa potreby ich znova nasaďte. Ak spozorujete akékoľvek netesnosti, odpojte hadicu a znova ju nasaďte.
Keď časovač skončí, ihneď odpojte hadicu a nechajte motor bežať 30–60 sekúnd na voľnobeh, aby sa z chladiacich kanálov vypláchla všetka zvyšná voda; ak sa zastavíte, počkajte pár sekúnd pred opätovným spustením voľnobehu, potom vypnite motor a utrite armatúry.
Tipy od tímu: majte jednoduchú, pohotovo použiteľnú súpravu s vreckami náhradných svoriek, O-krúžkov a tesnení hadíc; námorníci prevádzkujúci viacero modelových usporiadaní by na tom boli lepšie s rýchlym kontrolným zoznamom; septembrové okná údržby sú ideálne na overenie tesnení a hadíc; opotrebenie dlhým pobrežím je možné spozorovať na armatúrach, takže problémy riešte skoro; ak boli problémy predtým prehliadnuté, výnimočná starostlivosť by ich udržala v hladkom chode; tento prístup by ich udržal pripravených na ďalšiu cestu.
Odpojte spoje, opláchnite zariadenie a po prepláchnutí skontrolujte, či nedochádza k únikom.
Odpojte pripojovaciu hadicu a všetky armatúry, ktoré ste počas procesu odstránili. Znížite tak riziko tlaku a zabezpečíte hladšie preplachovanie a kontrolu tesnosti.
Zariadenie opláchnite čistou vodou, pričom prúd smerujte mimo tesnení a závitových spojov. Po prepláchnutí dôkladne opláchnite priestor prevodovky, teleso obežného kolesa a výfukové kanály, aby ste odstránili zvyšky. To vám pomôže rýchlo potvrdiť čistotu.
Po opláchnutí skontrolujte, či nedochádza k únikom: hľadajte vlhkosť na hrdlových tvarovkách hadíc, svorkách, priechodkách a spojoch, kde sa tesnenia stretávajú s kovom. Otestujte každé pripojenie, či je pevné, a sledujte, či nekvapká, keď vyvíjate mierny, rovnomerný tlak, pričom dbajte na to, aby sa nič nepohlo.
Medzi bežné problémy patria uvoľnené svorky, prasknuté hadice alebo závitové tvarovky, ktoré sa uvoľňujú pod tlakom. Mnohé z nich vznikajú v miestach pripojenia bez ohľadu na typ hadice. Ak zistíte niektorý z týchto problémov, dotiahnite svorky, vymeňte poškodené hadice alebo znova zaskrutkujte tvarovky podľa potreby. Ak zistíte akýkoľvek problém, vyriešte ho skôr, ako budete pokračovať.
Či už dokončujete prácu pre zákazníka alebo sa pripravujete na odovzdanie, zdokumentujte zistenia a poznačte si diely, ktoré boli počas procesu odstránené. Jednoduchý, stručný záznam o stave šetrí nedorozumeniam a podporuje servisnú históriu. Fenomenálna sledovateľnosť pochádza z udržiavania tohto záznamu v aktuálnom stave. Poznačte si, ktoré diely boli počas procesu použité.
Ďalšie kontroly: overte, či sú všetky spoje čisté, resetujte tlak v potrubí, ak je to potrebné, a uistite sa, že počas krátkej skúšobnej prevádzky nevznikajú žiadne netesnosti. Na ostrovných dokoch udržiavajte kotvenie a upratané pracovisko, aby ste predišli strate dielov a náhodným kvapkaniam. Ak máte prenosný preplachovač, pred kontrolou sa uistite, že je odpojený.
Po spustení uvádzame praktické metódy na efektívne dokončenie úlohy: dodržiavajte konzistentný postup, udržiavajte nástroje usporiadané a pred vrátením zariadenia do prevádzky overte tesnosť. Šetrí to čas, znižuje objem hovorov a pomáha zákazníkovi dôverovať výsledku. Tento posledný krok posilňuje spoľahlivosť a pomáha vám ušetriť námahu pri budúcich prácach.