

 The Best Way to Dock a PWC on Floating PWC Docks – Practical Tips">

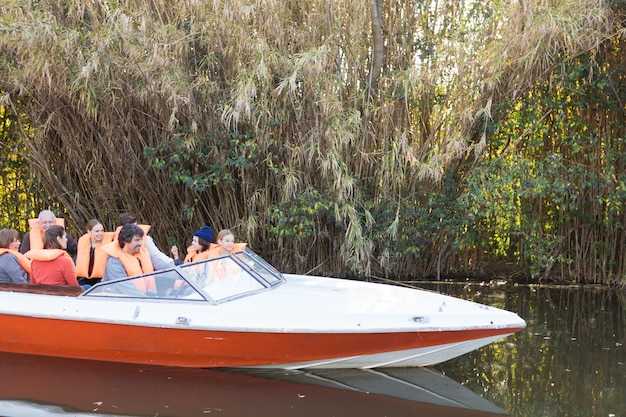
Dock with a drive-on approach and a steady throttle as your first move. For floating PWC docks, this gives you immediate control and minimizes sway as you contact space near the platform. These sports rides require precision, and these notes help you find confidence right away.
Next, verify the fixed docking system and set fenders at the bow and stern to cushion any drift. Keep a little clearance from posts to avoid contact, then secure lines with a simple, reliable knot. Maintain a clean routine: maintenance tasks become easier when you stay organized. We recommend following these checks at every docking.
Approach from about a 30–45 degree angle, then smoothly engage the drive-on sequence and use a gentle throttle to lift the craft onto the platform. After the bow touches, shift to neutral and pull the stern line. These steps help you find a stable stance on the dock and reduce bouncing during the first moments of berthing. Maintain a 0.5–1 m clearance from the edge during contact.
When passengers board or depart, keep space around the craft and coordinate with a single crew to avoid unattended handling. Never leave personal watercraft unattended; always secure with a fixed cleat and bystander precautions. This practice protects people, gear, and the ride.
After docking, perform a quick maintenance check: inspect the throttle linkage, lanyard, and drive components; rinse spray, dry thoroughly, and inspect for wear. Write down little notes about alignment; these tips help you find issues early and plan more reliable maintenance cycles.
With a simple routine, you craft a safe, repeatable method that works for most floats and weather, giving you more confidence and space for personal rides. Start with these practices, and tailor them to your fixed dock and local system constraints–these steps are practical for all levels of experience.
Docking Steps and Setup for Floating PWC Docks
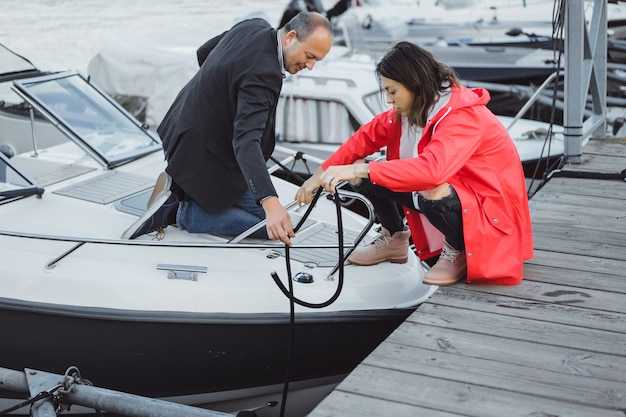
Secure the PWC with a bow line and a stern line before contact to prevent overshoot and keep the craft aligned with the platform.
heres a concise setup that improves location, stability, and ease of use for owners and their guests. Usually, docking options that reduce motion work best near the coast; confirm regulations for your area and prepare fenders, lines, and a quick-release setup. Ensure the engine is powered off and all loose items are stowed to take safety seriously.
Attach lines directly to dock cleats rather than rails, and use a reliable knot that you can release quickly. This helps manage load and protects the hull. Choose materials that tolerate sun, spray, and salt; nylon and dyneema blends are common uses for PWC mooring. Theres no need to guess–know your PWC weight and the dock’s capacity, based on the design, so you stay within the range of safe operation.
Position the PWC with the bow toward the edge of the float, keeping level and minimizing motion. Use fenders to shield the hull and plan to connect the lines at the appropriate height to prevent chafing. When you take the craft in, move slow and steady to maintain stability and avoid sudden shifts in center of gravity. Once the lines are set, verify the boat sits level and adjust as needed to maintain contact without pinching.
| Step | Action | Примечания |
|---|---|---|
| 1 | Power off, fuel secure, attach fenders | Prepares for safe approach |
| 2 | Attach bow and stern lines to dock cleats | Use a quick-release knot; ensure direct attachment |
| 3 | Align bow toward dock; position near edge | Keep hull level and minimize drift |
| 4 | Approach slowly and tie off | Gradually snug lines; check for overshoot |
| 5 | Final checks | Inspect stability, weight distribution, and safety gear |
Assess Dock Height, Water Depth, Wind, and Current Before Approach
Confirm dock height and water depth in the approach corridor and set your speed to keep the PWC level and ready to align with the dock. In saltwater conditions, wind and current can push you off course; plan a precise, controlled entry to avoid overshoot and contact with pilings.
- Dock height and approach gap: note the vertical clearance between water and dock deck at the current tide; floating docks often vary 5–25 cm, with larger swings in exposed waterfront zones. Adjust your trajectory so the bow lands smoothly and the hull stays level as you reach the contact point.
- Water depth in the approach zone: check depth along the path to the mooring area with a depth gauge or marked line; aim for at least 0.5 m under the hull at the closest point; if depth is shallower, re-route to the deeper side and reduce speed to avoid touching bottom.
- Wind and current assessment: identify wind direction relative to shore and dock; if wind is from the side, bias the angle by 5–15 degrees toward the dominant breeze; reduce speed to 3–6 km/h within 2 m of the dock; allow current to help line up instead of fighting it; pull gently with throttle or a light reverse to maintain control.
- Approach zone and alignment plan: establish a clear approach zone about 5–10 m from the dock; keep the hull level and the bow aligned with the intended mooring line; use a slight drift to guide toward the cleat without crossing over the space you plan to occupy.
- Equipment and hull protection: position fenders at the expected contact height and keep a spare polyethylene line ready; check hardware for saltwater corrosion and replace worn mooring fittings to extend lifespan; use durable, low-stretch lines for long-term reliability.
- Mooring and securing: when touch occurs, grab a line and secure to a cleat or mooring point; do not rely on the engine to hold you; if needed, have a team member assist from shore or dock; keep lines loose enough to absorb wave action but tight enough to prevent drift.
- Etiquette and local rules: announce intentions loudly and politely; yield to pedestrians and other crafts in the waterfront zone; follow posted conditions and local guidelines to reduce risk for yourself and others. Based on local conditions, adjust your plan and communicate with others.
Shore preparation: keep your speed low and your own zone clear of passersby; this approach improves confidence and the lifespan of fittings and fenders. In calm saltwater days, a perfect approach combines accurate depth reading, a careful angle, and a steady pull on the final reach, making docking smooth for yourself and crew.
Wear PFDs, Ready Kill Switch, and Keep Extras Handy for Safety
Always wear a PFD and clip the kill switch before you start or step onto the drive-on platform, and keep the lanyard secure during the entire approach. This immediate action reduces the risk of losing control if you hit a wake or slip near the dock.
Keep extras handy in a dedicated location on the dock or aboard the PWC. A waterproof pouch with an extra PFD, spare kill switch lanyard, whistle, and flashlight is accessible within steps of the mooring. Having them ready is an investment in safety that pays back in seconds during an emergency.
Local inspect of safety systems: Before every ride, inspect the kill switch, PFD integrity, whistle, and signaling devices. Look for frayed straps, worn buckles, tears, or saturation. Inspect corrosion on metal fittings and lanyard attachments; replace if corrosion or wear is present.
Lines and mooring fixtures must be checked for tightness and alignment. Choose a location on the dock that allows the PWC to align with the dock face when the driver eases into a drive-on approach. Use fixed lines to prevent drifting off the lift or floating platforms; ensure there are enough lines to hold the craft in choppy water. This setup elevates stability and reduces the chance of damage to hulls or fixtures.
Maintenance routines prolonging the life of your safety gear pay off. Regularly test the kill switch, clean buckles, and dry PFDs after use. Store gear dry and away from heat, which prevents material degradation and keeps lines flexible. Plan for periodic replacement of outdated gear as part of your investment in local safety standards.
Design elements of your PWC and dock setup should place safety first. For instance, perfect placement of mooring lines reduces the risk of the craft slipping off and helps when wind shifts the boat. If your dock uses a drive-on design, picking lines that allow gentle docking without abrupt tension works well. Elevate visibility by using high-contrast fixtures and reflective tape on mooring lines, so you can see them in dim light. This approach which ensures safer operation and easier docking.
Theres always room to improve; keep the backup gear in multiple spots: on board, dock pockets, and a waterproof bag in the vehicle to extend reach if you’re alone. Picking a routine helps: inspect, replace worn items, and practice the steps during calm days so you can act fast during busy times.
Prepare the PWC: Kill Switch Attached, Engine in Neutral, Power Off Before Contact
Attach the kill switch immediately, ensure the lanyard is attached to your life jacket, engine in neutral, and power off before contact. Clip the lanyard to the PWC’s switch, verify the key is off, and acknowledge this three-step setup to minimize engine response and give you time to plan as you approach.
Make the approach level and stable by checking fixtures and hydroport alignment. This is convenient for boat owners at a hydroport; position the PWC so the bow points toward the dock, the hull sits level, and mounting fixtures are clear of lines or fenders. Use securing lines to hold the boat in place and add a small fender to cushion contact; keeping contact to a few inches reduces choppy jolts and overshoot risk.
During fluctuating times of water and wind, maintain control with deliberate, slow motions. Always communicate with the dock crew and follow tips from experienced operators; this keeps attention on the task and reduces accidents. If you overshoot, back off, adjust, and re-approach rather than forcing contact.
This process aligns with regulations and supports a safe, repeatable approach for this purpose. Treat it as a small investment in safety and convenience: mount a reliable kill switch, verify fuel and main power off before contact, and extend your range of operation by practicing regularly. After contact, check fuel caps and secure the PWC with a quick-release strap when leaving the hydroport. Owners will notice improved control and a smoother touch-down each time.
Approach Slowly: Maintain Straight Path, Small Corrections, Minimal Wake
First, start the approach in a прямая линия на гидропорт, уменьшите газ до холостого хода в пределах 3–5 метров от причала и держите нос на уровне. В соленой воде при ветре и течении, устойчивое 0,5–1,5 mph диапазон минимизирует отклонение и снижает риск damaging платформы с плавающей точкой. См. док fixtures для справки и тонкой настройки соответствующего заголовка; они поблагодарят вас за контролируемый заход к доку.
Поддерживайте прямой путь только с небольшие исправления: используйте руль или штурвал по мере необходимости, но никогда резко не тяните газ и не поворачивайте резко. Если вы отклоняетесь от курса, слегка прикоснитесь, затем вернитесь в центральное положение. Держите нос в соответствии с креплениями и палубой; четкая линия минимизирует волну и защищает плот и близлежащие лодки. не следует: избегайте резких поворотов в пределах фута от дока и оборотов, которые вызывают резкие движения кормы, предоставляя пространство другим судам.
Управляйте дрейфом, поддерживая низкие обороты и выполняя микроскопические корректировки, особенно в ветреную погоду. Когда почувствуете, что гидроцикл начинает крениться или скользить, ослабьте управление и восстановите параллельный курс к пирсу; избегайте создания волны, которая может толкнуть вас к краю или на путь к кому-то другому, улучшая контроль в более тесных местах вокруг пирса.
Сначала подготовьте снаряжение перед приближением: промывайте после спуска на воду, чтобы удалить морскую брызгу; проверяйте глубину на подходе, поскольку неглубокие края увеличивают риск контакта корпуса. Используйте аксессуары, такие как fenders, при проектировании вашего поплавка, и have time to adjust depth or line lengths if the ассортимент изменения. Наличие времени для проверки глубины помогает снизить количество происшествий вокруг причала.
Разработка и choosing подбор подходящих осветительных приборов и глубины для условий морской воды имеет значение. tommy отмечает, что регуляр maintenance продлевает срок службы вашего гидропорта и плавучей платформы materials и снижает нагрузку на фитинги. Они подчеркивают необходимость проверки глубины и диапазона глубин вокруг пирса; убедитесь, что глубины достаточно, чтобы избежать посадки на мель во время низких приливов или волнения, и поддерживайте небольшой запас прочности, чтобы избежать контакта с корпусом. Это дизайн поддерживает более безопасную стыковку в более сложных условиях.
Уход после использования: промывайте и осматривайте после каждой сессии, храните accessories правильно, и перепроверьте выравнивание с доком, чтобы подготовиться к следующему запуску. Оставаясь внимательным к ветру, глубине и условиям, вы можете пристыковать плавно с minimal wake и минимальный износ вашего гидроцикла и плавающей платформы. Помните о запретах и избегайте рискованных действий, которые могут повредить край причала или находящиеся поблизости суда.
Надежно закрепите ПВК: Правильно установите fenders, привяжите носовые и кормовые линии.
Прикрепите якорный трос к прочному гидропортовому клину, затем установите два фендера так, чтобы они выравнивались с носом и передней частью корпуса для смягчения удара. Такая установка обеспечивает лучшую защиту и некоторый запас для движения.
Пропустите строповый трос к кормовому креплению или точке крепления на плавучей платформе, поддерживая трос в умеренном изгибе и избегая свободных петель для поддержания стабильного диапазона движения.
Сохраняйте линии плотно, но не чрезмерно натянутыми, чтобы снизить риск разрыва и предотвратить трение корпуса о платформу при изменяющихся условиях. В сложных условиях эта конструкция поддерживает выравнивание и снижает риск зацепа.
Установите заднюю точку крепления или упор для быстрого освобождения и добавьте аксессуары, такие как защитные бамперы и защита от истирания, чтобы повысить удобство и защитить компоненты в кормовой области.
С помощью этого подхода целью является более безопасная фиксация и более легкий доступ для вас; профессиональная настройка помогает вам справляться с различными условиями и поддерживать безопасное поведение при приближении к пирсу.