

 Powerboat Anatomy – A Complete Guide to the Parts of Your Boat">

Secure deck fasteners and hatch seals before start, then verify lines, straps, and clamps are intact. A quick visual check shows performance can vary with hull rigidity on sides and in forwards directions, especially under wind.
In engine bay, inspect fuel lines along inner side panels, coolant hoses, and electrical harnesses for wear. Keep away from heat sources; ensure venting is clear to prevent fumes from accumulating. For planing craft, propeller shaft alignment and steering linkage directly affect handling; verify u-joints and helm connection here while secure.
Hull integrity starts with bow, keel, and stern framing. Check rivets, welds, and bonding for corrosion or fatigue; heavy vibrations can loosen fasteners gradually on ship frames. If vibrations increase, find culprit by scanning engine mountings, drives, and stringers, then secure or replace as needed.
Deck structure should offer solid footing; non-slip surfaces, handrails, and anchor locker must serve as safe zones during movement, each serves as a grip reference. In windy conditions, stay aware of surroundings and avoid leaning over railings; this reduces risk of swaying away from vessel’s centerline or sideways slip. sunbathe on calm days only, with gear secured and away from edges.
Performance section: planing behavior occurs when bow rises and hull reduces contact with water; planing speed changes weight distribution across sides. For many vessels, trim tabs or ballast influence overall stability; adjust ahead of heavy seas, and mark which settings work for different loads. From load changes, stability shifts. Performance factors vary with load and trim. Here, operators should find balance between speed and control, regardless of other vessels nearby.
Core Powerboat Anatomy: Key Components and Practical Roles
Recommendation: verify propulsion setup, bilge, and gelcoat before each outing; confirm weight balance and secure mounting of accessories. This article highlights practical roles for each component in boating contexts.
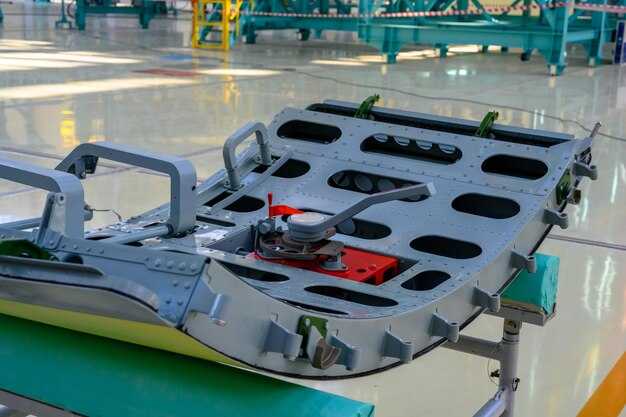
- Propulsion module: inboard engine, shaft, coupling, and propeller form a single drive train. When mounted with precise alignment, vibration drops, efficiency rises, and engine life improves. This core is crucial for providing forward thrust across types of powerboats.
- Hull and surface: gelcoat finish on white hull helps resist moisture and UV; weight distribution shifts with ballast, batteries, and fuel; well-designed hull shapes reduce drag, raise planing speed, and stabilize handling. In search of stability, yacht-grade stiffness and quiet operation are benefits of disciplined hull shaping. This arrangement keeps weight distributed well.
- Helm and steering: wheel sits at a console with direct sight to gauges. Clear view ahead and back during docking and maneuvers; maintain seating height to keep line of sight comfortable for boaters of various statures. In rough seas, fury of waves tests helm stability; proper ballast and trialed maneuvering routines maintain control.
- Electrical network and accessories: battery bank, alternator, charging circuit, and onboard electronics supply lighting, navigation, and comms; mountings keep components dry and wired connections protected when used in rough conditions. Critical sensors monitor temperature, voltage, and fuel level to reduce risks.
- Bilge and safety systems: bilge pump, float switch, and drain lines ensure water removal; regular tests confirm automatic operation in heavy seas; clean bilge reduces weight shift and avoids corrosion risk. Clear labeling helps boaters make quick safety checks while boating.
- Fuel arrangement and weight control: built-in tanks or portable units; placing tanks low and aft maintains low center of gravity; verify remaining range under planned load and gear.
- Maintenance and long-term care: check hoses, clamps, and electrical insulation; keep gelcoat repairs ready; schedule periodic wax, plus well-designed access panels to simplify service.
Hull and Keel: Structural basics, materials, and inspection cues
Begin with focused inspection plan: perform comprehensive, well-designed assessment that explores load paths forming from keel to stern, to monitor motion under various conditions. Inspect hull skin for cracks, blistering, or delamination; check keel mating surfaces, bolts, and fastenings located near rear sections where forces concentrate. Boarding areas, decks, and seating must stay clear during checks to protect boater safety. This article provides practical cues for analyzing structural basics, whether craft moves fast or serves as yacht offering longer life on inland or coastal waters. Situated near engines, check mounting pads and stringers for motion transfer.
Materials span fiberglass, aluminum, steel, wood, and advanced composites; each demands different inspection cues. Fiberglass reveals osmotic blisters, resin cracking, or exposed fibers; aluminum or steel shows corrosion at seams, welds, or fasteners; wood reveals rot, splits, or insect damage; composites require delamination checks and moisture in core. Hull shapes influence stress distribution; keels appear as fin, full, or bilge type; load path and ballast influence stiffness. Inspect keel bolts, shoes, attachments, plus bonding straps; bolts should be tight, free from corrosion, with even mating surfaces.
Boaters should learn to interpret cues quickly: a well-run inspection yields comprehensive status. Having a plan helps. When signs appear, whether craft operates near isle shores or inland waters, address quickly to avoid emergency risk. Ground contact signs and motion fluctuations require action; life-saving gear mounting points, bilge water quality, and deck integrity demand check. Learn to read vibrations and sounds to catch issues early, whether during boarding, docking, or after a fast turn in motion.
| Area | Знаки | Action |
|---|---|---|
| Hull skin | cracks, blistering, delamination | avoid operation; arrange repair with yards; keep area clear |
| Keel mounting | loose bolts, gaps, corrosion | tighten to torque spec; replace bolts; inspect backing plates |
| Bilge | oil sheen, water, odor | trace source; fix leak; pump bilge; record finding |
| Decks & seating | loose fasteners, creaks, flex | retighten; reinforce; check mounting hardware |
| Keel bolts | rust, stripped threads | replace; inspect undercarriage; ensure corrosion protection |
Deck, Cockpit, and Safety Gear: Layout, drainage, and non-slip surfaces
Recommendation: Position seating to keep personal space clear, placing secure handle anchors at entry points and locating storage away from engines, hull, and propeller zone; extended crew quarters should stay accessible without creating pinch points during taking waves or running.
Drainage: Integrate vertical scuppers and extended channels to push water toward rear or sides, avoiding pooling near seating, consoles, and storage compartments; check section between cockpit and hull for clean water flow when underway; keep points of discharge audible and visible for quick inspection.
Non-slip surfaces: Use molded anti-slip tread on main deck, cockpit floor, and step edges; apply extended non-slip strips at wet zones near storage, gunwale handles, and seat bottoms; choose color-coded traction for quick recognition of danger zones, such as near blades or propeller area; keep sideways movements stable when positioning dinghy or boarding from side.
Safety gear placement: Life jackets stored in secure quarters with quick-access storage near rear; throwables stowed in durable cases; maintain dedicated section for safety items, including PFDs, fire extinguisher, distress signaling tools; verify items stay in good condition and accessible during rough ride.
Terminology note: Different layouts use terms for zones such as cockpit, deck, quarters, and storage. Plan according to vessel size, whether dinghy stored onboard or afloat, or yacht with extended cockpit. This article focuses on practical layout choices, helping keep seating secure and gear accessible. Consider placement of controls, seating, and safety gear to keep equipment secure and ready when taking off or running propeller-driven craft with blades rotating.
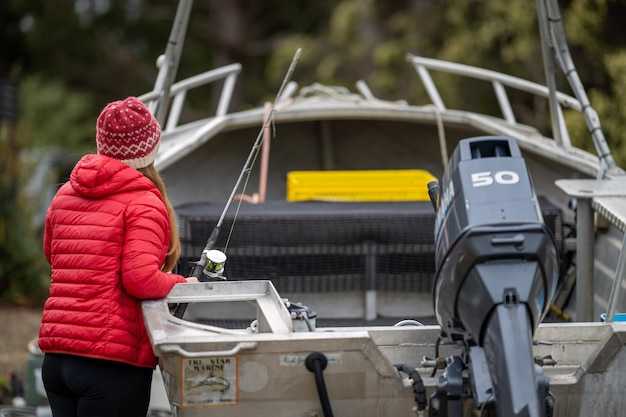
Propulsion System: Outboard vs Inboard choices and routine maintenance
Recommendation: mounted outboard engines deliver easier service, lower costs, and faster routine checks, making outboard setups a better choice for most vessels. specific engines designed for saltwater or freshwater use require different maintenance intervals; plan ahead based on mounting type.
Outboard units benefit from front mounted access, which makes spark plugs, fuel lines, and impellers easier to inspect and service. Front access also reduces service time during rolling operations when moving passengers or gear, improving maneuverability on planing craft. This approach works well for owners chasing low maintenance. This arrangement is convenient when under time pressure.
Inboard installations provide centralized weight distribution, reduced exhaust exposure for passengers, and often quieter operation once underway. Yet drive components sit behind hull structure, complicating routine tasks and demanding dedicated spaces for bilge pumps, coolers, and drive service. Another factor is engine access; inboard units require more scattered attention to reach mounted components, while outboard setups simplify checks at front faces. These differences help crews handle routine tasks more easily.
Routine checks apply to each arrangement: drain and refill gearcase oil, grease steering links, examine propeller hubs, and secure mounting bolts. Replace fuel filters and water separators, verify electrical connections, and secure corrosion protection on exposed metal. Regularly inspect anodes and install as needed; test cooling circuits where applicable. During operation, maintain safe distances from docks, other craft, and submerged hazards. For powerboats, plan to move using starboard turns to improve maneuverability. When handling dinghy or tying lines, secure ropes, keep passengers away from rear areas, and move everyone to front if planned shifts occur.
Узнайте практические советы и знания из журналов технического обслуживания, отслеживайте моточасы двигателей и выстраивайте распорядок, соответствующий местным климатическим условиям. Увлеченность растет, когда работа остается предсказуемой. Надежность их работы повышается, когда проверки проводятся регулярно, и этот подход способствует безопасному перемещению пассажиров и грузов на расстояния с уверенностью.
Рулевое управление и контроль: руль, тросы, гидравлика и советы по калибровке
Начните с точного соответствия между движением штурвала и углом поворота руля. Измерьте градусы хода руля от центра до каждого упора, затем переведите в обороты штурвала. Стремитесь к сбалансированной реакции: примерно 1,5–2,5 градуса поворота руля на градус движения штурвала, и отрегулируйте стопорные винты соответственно. Такой подход повышает стабильность и надежность, когда ветер или течение сдвигают корпус с курса. Эта регулировка важна для надежности.
Осмотрите компоненты на предмет износа: рулевую колонку, вал, шлицы и быстроразъемные соединения. Обратите внимание на люфт между рулем и рулем направления, превышающий несколько градусов, так как ослабление снижает точность. Замените изношенные тросы или гидравлические шланги; убедитесь, что траектория имеет плавные изгибы и избегает загромождения пола, которое может привести к защемлению линий. Следите за тем, чтобы на панелях пола не было мусора, чтобы движущиеся части оставались доступными.
Тросы требуют регулярного ухода: смазывайте соединения легкой смазкой для морского применения; избегайте густых смазок, задерживающих абразивные частицы. Проверяйте на предмет изношенных прядей, коррозии в местах крепления и перегибов по всей длине. Прокладывайте линии вдали от путей выхода пловцов; закрепляйте каждые несколько футов зажимами или ремнями, чтобы предотвратить микродвижения во время шторма.
Гидравлика: осмотрите насос, резервуар, шланги на предмет утечек. Удалите воздух до тех пор, пока жидкость не станет чистой, без пенообразования. Подтвердите предварительное давление в гидроаккумуляторе в соответствии со спецификацией; удалите воздух из линий, затем повторно проверьте плавность хода гидроцилиндра без заеданий. Измерьте гидравлическое давление манометром и сравните со спецификацией производителя; отрегулируйте с помощью калиброванных упоров или пределов рычажного механизма. В случае отказа переключитесь на механическое резервное копирование для поддержания мобильности при минимизации рисков.
Этапы калибровки на палубе: при выключенном питании отцентрируйте руль и совместите метки на ступице для достижения нуля. Поверните штурвал до упора влево и вправо; отметьте соответствующие углы поворота руля и отрегулируйте тягу с помощью регулировочных винтов до равномерного хода с обеих сторон. Снова отцентрируйте штурвал; убедитесь, что штурвал плавно возвращается в центр после каждого поворота. Для гидравлической системы повторите прокачку, затем проверьте на воде на малой скорости перед полным дросселем, убедившись, что реакция соответствует вводимым данным, а изменения ветра отражаются в ощущениях управления.
Регулярное техобслуживание для надежности: поддерживайте чистоту напольных поверхностей; проверяйте крепежные болты; обеспечьте хранение запасных тросов в сухом месте; убедитесь, что хомуты надежно удерживают шланги; защищайте от коррозии вблизи соленого воздуха. Установите регулярный контакт с сервисными центрами или дилером для получения данных калибровки и запчастей. Во время плавания следите за ощущениями от рулевого управления; любой скрежет, дрожание или люфт сигнализируют о немедленном осмотре и возможной замене компонентов. Плюс тестирование на воде после обслуживания.
Безопасность и надежность: пути эвакуации должны быть свободны; храните аварийное снаряжение под рукой; регулярные проверки технического обслуживания сокращают время простоя и повышают производительность в любых условиях. Точная маршрутизация и своевременная калибровка поддерживают быстрое реагирование во время стыковки и маневров в марине, повышая уверенность оператора при каждом плавании. Такой подход помогает оператору сохранять уверенность.
Коллекция запчастей должна быть компактной, но исчерпывающей: храните кабели, фитинги, уплотнительные кольца и гидравлические уплотнения в промаркированных контейнерах рядом с сиденьем оператора; это сокращает время простоя во время обслуживания и поддерживает график плавания в целости.
Черновик: следите за осадкой корпуса при поворотах на скорости на мелководье; корректируйте маршрут, чтобы избежать посадки на мель; следите за тем, чтобы выход был свободен, и контролируйте изменения ветра, чтобы защитить устойчивость и производительность.
Электрические, топливные и системы безопасности: аккумулятор, зарядка, трюмные насосы, предохранители и аварийные процедуры
Установите систему с двумя аккумуляторами: один для запуска двигателя, другой для бытовых нужд. Разместите их в вентилируемом, прилегающем отсеке у транца. Предпочтительны герметичные AGM или гелевые аккумуляторы для устойчивости к вибрации. Типовые размеры: пусковой аккумулятор 700–1000 CCA и 120–160 Ач; бытовой 100–200 Ач. Установите мощный главный выключатель, а также автоматический изолятор, чтобы можно было отключить питание во время обслуживания или поездок. Проложите кабели на большие расстояния с надлежащим снятием натяжения и цветовой кодировкой.
Стратегия зарядки: питание тяговой аккумуляторной батареи от генератора двигателя через интеллектуальный регулятор; добавьте DC-DC зарядное устройство для поддержания работоспособности сервисной аккумуляторной батареи при выключенном двигателе. Для длительных поездок включите солнечную панель или ветрогенератор для пополнения емкости во время спокойных переходов. Для судов, совершающих длительные поездки, эти варианты помогают. Используйте многоступенчатую зарядку для предотвращения сульфатации; вот почему добавление солнечной или ветровой энергии помогает.
Предохранители и защита: установите блок предохранителей возле аккумуляторов; используйте отдельные предохранители для таких нагрузок, как навигационные огни, датчики, насосы и электроника. Каждое устройство должно иметь собственный предохранитель, рассчитанный на потребляемый ток. Выбирайте номиналы предохранителей с запасом в 125–130% от тока устройства; храните запасные предохранители и съемник предохранителей.
Система откачки воды: автоматический трюмный насос с поплавковым выключателем на выделенной цепи и звуковым оповещением на консоли. Для судов с большей осадкой и для плавания в неспокойной воде рассмотрите установку второго насоса. Следите, чтобы водозаборник трюмного насоса не был засорен мусором; проверяйте шланги на предмет износа; убедитесь, что сливной путь отводит воду от транца.
Аварийные процедуры: включите аварийный выключатель для отключения движителя; закройте ручной запорный топливный клапан в случае утечки топлива или пожара; отсоедините аккумулятор, если угроза сохраняется. Имейте при себе огнетушитель, проверяйте срок годности; уведомите береговую охрану по УКВ-каналу; активируйте EPIRB; отметьте местоположение; проработайте план с экипажем или другими яхтсменами. Если есть румпельное управление, держите шнур аварийного выключателя в легкодоступном месте.
Заметки раздела: перед каждым плаванием выполняйте быструю проверку: проверяйте сигнализацию, предохранители, работу трюмного насоса и убедитесь, что напряжение на холостом ходу превышает 12,4 В. Ведите журнал измерений; убедитесь, что пространство за транцем свободно; соблюдайте безопасную дистанцию от пловцов при работающем двигателе. Необходимо оценить расстояние до острова или зон с малой осадкой; всегда будьте лучше оснащены и помните о комфорте, обеспечивая безопасность этой системы. Судовладельцы полагаются на эти показатели для обеспечения безопасности. Во время стоянки на якоре держите двигатель выключенным, чтобы уменьшить осадку и успокоить ветер.