

 How to Do Catch-and-Release Fishing – The Complete Guide for 2025">

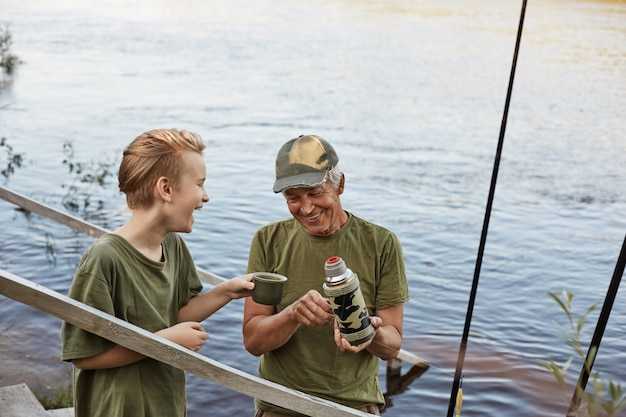
Do this first: wet your hands and cradle the fish gently, keeping it in the water line as much as you can. Большинство anglers see better results when they minimize air exposure and avoid squeezing the body. This simple step shortens handling time and increases the chance to survive after release, especially for the year ahead.
Choose gear that opens the mouth gently: circle hooks or barbless hooks sized to the target species. Хотя hooking instincts surge during a strike, keep your pull light and steady to reduce stress. If the hook is buried, avoid wrenching; cut the line and remove the hook with pliers only if you can do so safely, keeping the fish in water when possible. This approach lowers hooking damage and protects the environment.
Handle in water whenever possible: keep the fish horizontal, supported with two hands–one under the belly and the other below the dorsal fin. Lift only briefly for measurements or photos, when necessary, then return it to the water. The longer you keep it out, the more tiring the process becomes; aim for under 15 seconds of air exposure.
Unhook and release strategy: move to shaded, clearer water, minimize handling, and let the fish recover in the current before letting go. When water temperatures rise, keep the release time under 60 seconds to preserve energy and improve the chances of survival. Protect the environment youre fishing in and respect other anglers who share the spot.
Alex notes that the steps mentioned above work for most species and help you keep the chances high for a healthy release. For your next trip, use a simple checklist and keep doing the same safe sequence: wet your hands, gentle unhooking, quick release, and mindful line management. Share tips with other anglers to raise the standard of catch-and-release practices in 2025, year by year.
Catch-and-Release Fishing: The Complete Guide for 2025
Do not remove fish from the water longer than 15 seconds. Keep it in the current or a wet hand, move gently, and unhook quickly before returning it to deep-water where it can recover and thrive.
Prepare full tackle readiness: a pliers, needle-nose, barbless hooks, and a soft-release net. Making a quick, smooth unhooking process is right for the fish and your next cast.
Handle technique matters: wet hands, cradle the fish horizontally along its body, support the tail, and never squeeze the skin or gills. For delicate species, stay calm and minimize handling; several seconds with the mouth out of water can cause stress or tissue damage.
Unhooking and release: avoid cutting the line far from the hook; cut close to the hook or use a releasing tool to minimize handling. Keep the fish in the water as much as possible, or return it to the surface quickly to minimize air exposure.
Temps and season: in summer, even small temperature increases heighten stress. In warm temps keep air exposure under 60 seconds and release into moving water or shade. Temps above 75°F (24°C) require extra care and a faster release to help the fish back, better responding to the current and avoiding unnecessary struggle.
Species considerations: some fish are hardier and recover well with quick handling; others have delicate mouths or slower metabolism. Experienced anglers adjust technique by target species, using appropriate gear and keeping handling brief to support a healthy return to the water.
If a fish appears dead or remains unusually lethargic after a brief revive attempt, do not release it. Otherwise, release gently into a calm bend of the stream or a fast-rlooding edge so it can regain strength and back away with vigor.
Comment: track what works across several trips, especially in warmer seasons, to refine your approach for next season and continue to improve survival rates for the target populations.
Best practices summarized below help make every release more successful:
| Aspect | Recommendation | Примечания |
|---|---|---|
| Handling time out of water | 10-15 seconds maximum | minimizes stress and tissue damage |
| Unhooking method | barbless hooks or circle hooks; unhook in water when possible | reduces skin damage; easier to remove |
| Netting | soft, properly sized net; wet netting | supports the fish and lowers abrasion |
| Air exposure in warm temps | keep exposure under 60 seconds | temps influence survival rates |
| Release location | deep-water or moving current | helps recovery and final kick-off |
| Species considerations | adapt handling to target species | some are hardier; others require extra care |
How to Do Catch-and-Release Fishing: Best Practices for 2025
Keep the caught fish in the water and unhook quickly to reduce stress; return it to the water within seconds to help it thrive. If the fish is hooked, work calmly and minimize handling to protect scales and keep the fish calm.
Be prepared with a knotless net, long-nose pliers, and a wet handsone grip. Approach from the side, avoid squeezing, and use a handsone technique to minimize time out of water while you work the hook. Often a light touch reduces damage and speeds recovery. These steps cover the parts of a clean release.
First step: assess whether the hook is easily removable; second step: back the hook out along the line’s path. Third step: cradle the fish with both hands and return it to the current or water edge as soon as the hook is out.
For flatfish and other bottom-dwellers, keeping the fish resting on the surface of the water or in a shallow, calm area while you work the hook free is best; avoid lifting the fish by the body or fins. Watch for signs of stress and limit handling to protect the organism’s integrity.
When handling larger or delicate species, keep the back supported and the body kept horizontal; either side is fine if you control the motion and avoid bending the spine. In whitetail-rich waters, maintain a quiet presence to reduce alarm and speed recovery.
Cutting the line should be a last resort for safety; if you must, cut as close to the hook as possible and back out slowly. This reduces trauma for both flatfish and other species and keeps you ready for future adventures.
Keeping the practice humane benefits everyone: cherish the activity, take part with others, and commit to consistently responsible release methods. If you come across a stressed fish, step back, respond calmly, and give it time to recover before moving on.
Know Local Regulations, Species Rules, and Size Limits
Always check your local regulations before fishing. The current rules posted by your state or provincial fisheries department specify license requirements, season dates, gear restrictions, and bag or landing limits for each water. Use the following official sources, and save a copy for landing in the field. Once you have the page, a quick comparison proves easy in the moment, and a call to wardens can clear up any doubt. Birddog the spots where rules differ by water to avoid above or below limits, avoiding fines.
Species rules are not universal. For each water body, check the specific limits for species you target. Common scenarios include minimum-size limits, slot limits that protect brood fish, and seasonal closures. For many waters, largemouth bass require a 12-inch minimum, trout often demand a 7-inch minimum, and walleye commonly use a 15-inch minimum. Some waters impose a slot, letting you keep only fish within a middle range, with fishs outside that range to be released. Above the slot, or below it, rules change by date or spot. Always verify the exact numbers below the header on the agency page, and note any catch-and-release rules for designated species.
Measure carefully with a compliant tool: a flat measuring board or a ruler, then reset and photograph only when necessary. Respect the fishs’ strength; use a firm but gentle grip to avoid a drop. When a fish reaches a size threshold, release quickly; otherwise, keep it gently in the water with a supporting hand. To avoid damage, never hold fishs by the gills; use wet hands; lift only short moments to check measuring line. Pictures should be taken swiftly; avoid over-handling to keep the fish’s protective mucus layer intact.
Release technique matters: keep the fishs in the water as long as possible, support the body, and revive if needed. If there is any sign of stress, hold gently oriented upstream and flick or swirl the tail to restore the swim current. Avoid cutting, squeezing the abdomen, or handling with dry hands, which damages the protective layer of slime. After releasing, observe for a moment to ensure the fish swims away on its own. Less handling means less stress for fishs.
Common mistakes include assuming all waters share the same rules, and fishing on a line you haven’t checked. Unnecessary handling or over-pressing the fishs can cause harm; reading a rulebook should be as routine as checking current conditions. Usually, you will have more success when you plan ahead and avoid the temptation to bend the rules. By following the official limits, you reduce unwanted bycatch and help conserve populations for the next visit. Use these details rather than guessing.
Choose Gear That Minimizes Injury: Rod, Reel, Line, and Net Setup
Start with a balanced combo: a medium-light rod with fast action around 6’6″–7’0″ paired with a smooth, reliable reel and line rated for your target species. This setup helps prevent injury to yourself and the fish and keeps the fight manageable during even the busiest evenings on the water.
- Rod – Choose a graphite rod with fast action and a length in the 6’6″–7’0″ range. A forgiving tip absorbs sudden surges, reducing torque on your wrist and forearm. Opt for a comfortable cork grip and corrosion-resistant guides to prevent damage from salt or freshwater exposure. A well-made rod keeps parts aligned and makes a long session easier to manage.
- Reel – Pick a reel with a smooth, dependable drag system and a clean, steady retrieve. For most freshwater applications, a reel with 4–6 lb of effective drag is ample and minimizes the fight strain. Look for sealed or well-lubricated bearings and a durable bail/line roller to prevent snags when you’re fighting a fish that darts, then pause to keep line tension steady.
- Line – Use braided line of 6–12 lb test for sensitivity and control, paired with a fluorocarbon leader in the 8–15 lb range to resist abrasion. This setup improves bite detection and reduces the likelihood of sudden line breakage. Learn and practice knots that hold reliably under pressure, such as the improved clinch or palomar, to prevent slipping when a fish runs or dives.
- Net – Select a knotless, rubber-mesh landing net with a long handle (24–30 inches) to minimize slime removal and tissue damage on the fish. A live-well compatible net helps keep the fish oxygenated and reduces stress during the de-hooking process. Keep the net ready and pre-positioned so netting is quick and safe instead of hurried and damaging when a fish is caught.
- Handling and hooks – Always carry long-nose pliers and a hook-disengagement tool to remove hooks with minimal trauma. Wet your hands before handling, support the fish horizontally, and keep it in an aerated, oxygenated environment as long as possible. If the fish looks stressed or lacks control, you can set it down gently and reassess, which prevents irreparable harm. When removing a hook, work quickly and calmly to avoid stressing the fish further, and place it back into the water as soon as possible to keep it live and swimming.
Tip: Practice these steps in your online resources and article references to stay aligned with best practices in fisheries ethics. The goal is easy, repeatable techniques that protect yourself, the fish, and the ecosystem, reducing the risk of being caught by surprise and ensuring care is taken at every step of the process.
Topic-specific reminders: always check local regulations and ensure your setup matches the environment you’re fishing in. A well-chosen gear layer, careful knot work, and a mindful net setup keep harm to a minimum and make catch-and-release a safer, more efficient routine that anglers can repeat–evening after evening.
Handle Fish Properly: Wet Hands, Support the Body, and Minimize Air Exposure
Wet your hands before touching a fish to protect its slime and help it thrive after release. Support the body with one hand under the belly and the other along the tail to keep the spine aligned and reduce stress on delicate spots. Keep the fish horizontal and minimize air exposure; lower your grip and return it to the water as soon as it can swim away. Even under pressure, avoid squeezing.
In streams and morning sessions, handle the fish in the water whenever possible to minimize stress and keep protection intact. If you must lift, keep it vertical and supported from belly to tail; this reduces the chance of damage and makes the release smoother. Rewet your hands using fresh water between fish; this helps the slime remain and makes releasing more likely. Above all, drop it gently back into the current so that the fish opens up its route to recovery.
Here are several tips for case-by-case handling that could save fish lives. Heres a quick checklist to use on the water. here a quick reminder: using a light grip can help reduce stress. In many cases, sometimes a fast lift causes damage, so rather slow and deliberate movements. This generally applies to each species and spots; although some delicate fish need a little extra care, the core rule remains: minimize air, keep the body supported, and know the signs of distress such as rapid gill movement. In forums and current field reports, anglers note that practice with small fish in full light can be tricky, so using patient handling and keeping pressure low helps anyway. Each stream has its own needs, and in likely conditions this method could help thrive and remain ready for the next cast. Even in tougher conditions, focus on control rather than speed, rather than trying to rush the release.
Safe Hook Removal Techniques and Minimal Handling Time
Always remove the hook in water whenever possible using long-nose pliers to back the barb out along the entry line, while keeping the fish supported and your hands damp to protect protective tissue and minimize temperature shock. This approach reduces damaging handling time among all catch-and-release adventures and increases the chance of a successful released return.
-
Prepare the tools and stance: keep a dehooking tool or long-nose pliers within reach, a damp towel, and optional protective gloves. Stand with a stable stance, ready to cradle the fish without squeezing. Among the steps, quick readiness shortens the fight and minimizes stress for smaller fish.
-
Secure the fish correctly: wet your hands, then cradle the fish with one hand supporting the belly and the other near the tail. Keep the head slightly above the waterline and the body angled to reduce the chance of gill contact. If the fish battles, pause only briefly, then resume–the goal is to finish the operation without prolonging the fight.
-
Assess hook location and route: look for a visible barb in the mouth corner or upper lip. If the barb is easily accessible, back it out along the entry line with steady pressure. If the barb is buried or the hook is head-first deep, consider pushing the hook through the tissue to exit on the same side and remove, or cut the line close to the hook and leave it in place if removing would cause excessive damage.
-
Remove or cut: for a visible hook, back out slowly in the direction of entry. If removal would damage tissue or deepen the wound, cut the line as close to the hook as possible and leave the hook in place to minimize tissue tearing; the fish then has a better chance to recover after release.
-
Check and release: inspect the mouth for bleeding; apply gentle pressure with a damp finger if needed, then release the fish head-first into clean, unbroken water. If the fish remains active, support it and let it swim away on its own strength. Finally, ensure the fish remains upright and capable of sustaining itself after release.
Minimal handling time tips for a clean release: limit out-of-water time to under 30–60 seconds, shorten contact whenever possible, and keep the fish in water that matches the surrounding temperature to avoid thermal shock. When you’re in warm conditions, submerge more of the body and keep the environment calm. Basically, quick, correct handling reduces stress and improves survival after catching a fish, whether you’re on a calm river trek or a whitetail-inspired outdoor adventure. Sometimes, the right technique makes the difference between a damaged, fighting fish and a smooth, successful release.
Revive and Release: Timing, Water Flow, and Species-Specific Needs
To give the best chances of survival, revive for 15–30 seconds in a gentle, flowing current. Use the lightest touch, support the fish with wet hands, and move it just enough to keep water moving over the gills. When you see steady breathing and the tail starts to move, slide the fish back into deeper water and let it swim away on its own. Let the fish come to life in water and observe its reaction before final release.
Water flow matters: in fast riffles, keep reviving in the calmer edge or hold the fish with the current to flush lactic acid without pressing the body into rocks. In warm pockets, shorten handling and bring the fish to a slow, cool area before release. If a fish has been stressed, reduce handling and move it to the right spot. Handling should be minimal and with wet hands to reduce slime loss and injury. If you need to check the fish, come to the water’s edge and observe without lifting. The right approach minimizes stress and supports various species when it comes to recovery.
Species-specific needs determine the timing. For trout and other cold-water species, brief revives in cold, oxygen-rich flow work best. For sunfish and panfish, a quick revival in a shallow, calm pool often suffices. Larger bass or pike may benefit from a longer, calmer wait in a sheltered spot. Rather than lifting the fish out of water, cradle it close to the body to reduce stress. Use the correct grip to keep the body straight and avoid land contact to protect the mucous layer and skin; this helps most recover. This applies to various species with similar needs; adjust depth and velocity accordingly.
Photos and notes: if you take photos, keep the fish in the water and in the current, and shoot a quick image with the fish supported. Return the fish to a quiet area and watch for signs of strong movement before release. This practice helps reduce handling time and improves survival for many species. Tell yourself what signs indicate recovery and stay consistent to increase your best chances.