

 Cooking Aboard Totem’s Galley Essentials – A Practical Guide">

Всегда выделяйте специальное место для сухих продуктов и держите надежный термос под рукой. В современной камбузе, герметичный контейнеры и компактный glasses стойка помогает уменьшить беспорядок и ускорить подготовку, позволяя перейти от подготовки к подаче блюда без лишних шагов.
В зависимости от доступности электроэнергии, планируйте блюда, сочетающие скорость приготовления и вкус. Готовые для запекания запеканки in a семейный размер блюдо экономит время, и вы можете layer ингредиенты, чтобы адаптировать порции для экипажа или гостей.
Хранение и посуда должны быть прочными и balanced. Выбирайте посуду с features которые сопротивляются движению во время волнения; прочный набор сковородок обеспечивает равномерный нагрев, а простая крышка помогает готовить запеканки и предотвращает разбрызгивание. Держите небольшой набор баночек со специями внутри герметичный ведро рядом с плитой для ускорения приправы.
Для напитков и быстрых перекусов держите грипстик ухват за крышки и прочный glasses стойка, чтобы хрупкие предметы оставались в безопасности во время движения. thats Почему выделенное место для посуды для напитков имеет значение, и как компактная кофеварка может приготовить горячий чай или кофе за считанные минуты, не нарушая ход трапезы.
Эта договорённость позволяет вам сохранять гибкость при готовке сложных блюд, позволяя переносить задачи на вторичную станцию подальше от основной плиты по мере необходимости. Это помогает при приготовлении многослойных запеканок или блюд, которые готовятся один раз, в то время как основная конфорка поддерживает медленное кипение, и это предотвращает заторы во время смены вахты.
Totem Vessel Galley Guide
Recommendation: Храните муку и сухие продукты в герметичных, светонепроницаемых банках, чтобы сохранить свежесть и предотвратить появление плесени; обновляйте запасы примерно каждые две недели и держите контейнеры на чистой, ровной поверхности вдали от источников тепла.
Печенье остается хрустящим, если хранить его в герметичных банках; держите его в прохладном, сухом месте, защищенном от солнечного света; используйте прозрачные контейнеры, чтобы сразу видеть содержимое; своевременно заменяйте уплотнители при появлении влаги.
Содержите компактный, легкий набор ножей и разделочную доску; регулярно затачивайте ножи; используйте подходящую поверхность для каждой задачи, чтобы продлить срок службы лезвий и избежать несчастных случаев.
Работа с духовкой начинается с равномерного предварительного разогрева; установите примерно 175°C (350°F) для большинства печений и быстрых хлебов; выпекайте на плоском противне, затем переложите на решетку для остывания; результат дольше сохраняется при равномерном распределении и бережном обращении с тестом.
Вскипятите воду на отдельной конфорке и держите под рукой небольшой чайник; используйте термостойкую посуду и прочную подставку; не ставьте горячие кастрюли на окрашенные или необработанные поверхности, чтобы не повредить их.
Обязательно подписывайте каждый контейнер датой и приблизительным сроком годности; ведите простой план хранения, чтобы брать необходимое, не перекладывая всё остальное; хорошая маркировка имеет большое значение для контроля запасов и сокращения отходов.
Очищайте непищевые поверхности специальным спреем, например, Gunkel, а затем вытирайте насухо; храните чистящие средства отдельно от зон приготовления пищи; обязательно промывайте и сушите на воздухе, чтобы предотвратить перенос влаги.
Если есть возможность использовать солнечную энергию, планируйте готовку на дневное время; по возможности используйте теплоизолирующие чехлы для кастрюль и отражатель; планируйте время кипения в соответствии с доступным солнечным светом и экономьте энергию.
Быстро фотографируйте уровни запасов и пломбы контейнеров раз в неделю; это поможет вам отслеживать использование и заметить снижение качества хранения, прежде чем оно повлияет на блюда; всегда держите ножи острыми и готовыми к следующей задаче.
Готовим на камбузе Totem: Практичное руководство по быстрой пасте
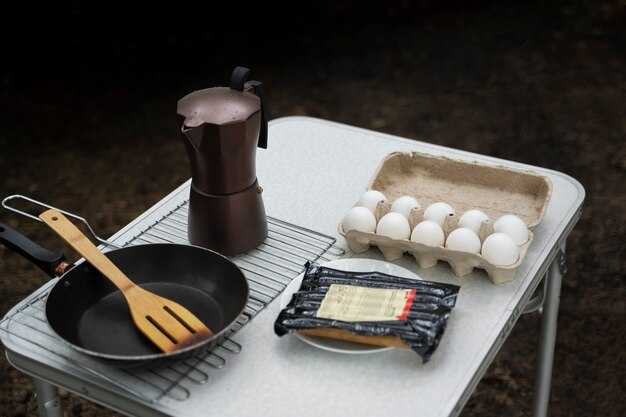
Начните с набора из одиннадцати предметов, легкого, прочного и предназначенного для компактных помещений: противоскользящий коврик, чугунная сковорода, плоская сковорода, кастрюля семейного размера, дуршлаг, два ножа, мини-доска для подготовки, ложка для смешивания, мерный стакан и плотно прилегающая крышка. Этот готовый к работе комплект оставляет достаточно места для приготовления пасты и соуса и сводит к минимуму походы на камбуз судна.
- Планирование и подготовка: спланируйте быстрый рабочий процесс. Наполните кастрюлю объемом около литра большим количеством воды, щедро посолите и поставьте на переднюю конфорку. Держите под рукой небольшие миски для приправ и маленькую разделочную доску для чеснока, трав или сыра; это уменьшает количество ошибок и ускоряет процесс.
- Приготовление пасты: опустите пасту в кипящую воду, помешивая ложкой, чтобы она не слиплась. Сначала поддерживайте устойчивый нагрев, чтобы добиться энергичного кипения, затем убавьте до интенсивного кипения на медленном огне; варите до состояния аль денте, попробовав один-два кусочка для подтверждения.
- Соус отдельно: пока варятся макароны, используйте сковороду-гриль или чугунную сковороду, чтобы обжарить чеснок в оливковом масле, затем добавьте домашний соус. Поддерживайте нужный уровень нагрева, чтобы избежать пригорания; разбавьте небольшим количеством воды из-под макарон, чтобы начать эмульгировать соус в смеси.
- Слейте воду и смешайте: слейте воду с пасты через дуршлаг, оставив немного воды. Верните пасту в кастрюлю, вылейте соус на макароны и тщательно перемешайте, чтобы они покрылись соусом; при необходимости добавьте соль и перец.
- Подача, хранение и транспортировка: подавайте сразу же другу или члену семьи или разделите на отдельные порции. Если вы планируете заранее, заморозьте излишки соуса в пакетах объемом 1 литр или храните домашний песто в контейнере, пригодном для заморозки; заморозка гарантирует готовность блюд в тяжелые дни. Такой подход сэкономит время в напряженные периоды.
Правильный размер кастрюли и крышка для быстрого кипячения
Используйте котелок объемом 1,5–2,0 л с плотно прилегающей, быстро закрывающейся крышкой для максимально быстрого закипания на компактной плите. Этот рекомендуемый размер позволяет эффективно приготовить 1–2 порции, сводит к минимуму использование энергии и обеспечивает предсказуемое время закипания.
Сначала откалибруйте объем с помощью мерного стакана, чтобы убедиться в соответствии цели 1,5–2,0 л. Правильный размер имеет значение: кастрюля объемом 1,0 л быстро нагревает воду, но ограничивает выбор блюд, а кастрюля объемом 2,0 л подходит для приготовления пасты на двоих или нескольких чашек зерна. На практике для большинства задач следует ориентироваться на 1,5–2,0 л; большие кастрюли вдвое увеличивают время кипения и приводят к потере энергии.
Крышки имеют значение: металлические крышки со встроенным вентиляционным отверстием обеспечивают равномерное кипение; силиконовые крышки (силиконы) хорошо герметизируют, но могут задерживать пар, если вентиляционное отверстие заблокировано. Плотно прилегающая крышка или набор крышек с безопасной вентиляцией — лучший выбор для быстрого кипячения.
Дополнительные мелочи, которые помогут: небольшая подставка под горячее удержит кастрюлю над конфоркой и предотвратит пригорание; держите под рукой кухонные полотенца, чтобы вытирать конденсат, и продумайте план мытья посуды, чтобы уменьшить беспорядок. Фотография для быстрой справки в бортовом журнале покажет идеальную схему; когда вы добавляете пасту или овощи, возвращайте крышку, как только вода снова закипит, чтобы энергия концентрировалась на кастрюле.
Время закипания и энергия: на плите мощностью 750–1000 Вт 1,5 л воды закипают примерно за 6–9 минут; 2,0 л – примерно за 8–12 минут. Предварительный нагрев воды теплой водопроводной водой снижает потребление энергии на 15–25 %. Используйте вторую кастрюлю или чайник для предварительного нагрева воды, если планируете готовить несколько блюд подряд.
Практические советы: если нужно быстро разогреть что-то для перекуса, йогурт можно аккуратно подогреть в небольшой емкости после закипания, а не прямо в кипящей воде. Перед первым кипячением перепроверьте, плотно ли прилегает крышка, чтобы ничего не выплеснулось; при варке макарон добавьте соль и перемешайте, затем накройте крышкой, чтобы сохранить тепло внутри кастрюли.
Самое важное вкратце
| Размер горшка (л) | Тип крышки | Ideal use | Расчетное время закипания (мин) |
|---|---|---|---|
| 1.0 | Vent-cap metal lid | Single serving, grains, light veg | 5–7 |
| 1.5 | Metal lid with vent | 1–2 servings, pasta, potatoes | 6–9 |
| 2.0 | Silicone lid or vented metal lid | 2–3 servings, soups, larger portions | 8–12 |
Salt, water volume, and when to add pasta
Recommendation: use 4–5 L of water for 400 g pasta, bring to a rolling boil in lightweight cookers, add 60–80 g salt (about 4–5 tablespoons) and stir evenly. On liveaboards with a yacht-based setup, this method minimizes energy use and splatter while keeping the pot clean for the next cook.
When to add pasta: drop pasta after the water returns to a vigorous boil and salt has dissolved, then maintain a steady boil and stir to prevent clumps. Times for common shapes: spaghetti 8–10 min, penne 10–12, fusilli 12–14. Reserve 120–180 ml of starchy cooking water per 400 g pasta to loosen sauce if needed. If cooking with veggies, add slices 2–3 minutes before pasta finishes to keep texture balanced. This method takes the guesswork out of making pasta for a person or crew, and it seems reliable across situations.
Tips for keeping the space tidy: preheat with a kettle to cut energy use, finish on the cooker, drain quickly to avoid gunkel forming on the bottom, and tilt the lid slightly to reduce splatter. Store leftovers in a clean, mould-free container; use replacement lids or kettles when worn. This approach adds value and experience for every person cooking and works during pizza nights or simple veggie bowls, with something easy to replicate every time.
One-pot pasta workflow: boil, simmer, toss
Start with a large space-saving pot on the stove. Have salted water at a rolling boil, drop in pasta and cook to al dente, stirring only as needed to prevent sticking. weve trimmed prep by using a single pot.
Simmer a simple sauce in the same pot: olive oils, garlic, and crushed tomatoes. If you want creaminess, simply add a splash of milk toward the end and simmer until lightly glossy.
Keep the energy level steady by maintaining a gentle simmer rather than a furious boil. Stir evenly and adjust heat to keep the liquid just covering the pasta. Use the least amount of liquid that still allows the pasta to move freely.
Toss in greens, cheese, or mushrooms toward the end; the whole dish should be balanced and glossy. Share with friends. Plate onto a serving dish. Avoid heavy sauces; aim for a light coating that clings evenly.
Choose sturdy, lightweight accessories, such as a kuhn pot or a yachtfridtjof lid set. Moulds can hold silicone mats or spare lids; these space-saving options keep space free for a cloth and a few utensils.
Storing and transporting: after cooling, store leftovers in a container or glass jar; keep in the lowest possible temperature and reuse the same pot to reduce washing. For transport, stack the pot and lid, wrap in a cloth, and keep oils and spices sealed to avoid leaks. Store leftovers in any suitable container–anything that seals well.
Prep sauce and toppings while water heats
Recommended approach: heat a small iron pan on the back burner and prep a quick sauce base. While water heats, wash and chop a piece of garlic, measure 1–2 tbsp stock or cream, and lay out herbs. This keeps the kitchen ready for a fast finish as the boil comes up.
Choose a compact set of tools: spoon, whisk, hand blender, fine sieve. Included items include two pans (iron and nonstick), a trivet, cutting board, knife, and washable towels. Planning takes five minutes and pays off in texture and speed, providing several solid ways to adapt on the fly.
Technique: when water reaches a gentle simmer, reduce heat and swirl in the base; it takes 3–5 minutes to meld flavors. For pureeing, use the hand blender directly in the pan or transfer to a small jar and pulse once or twice. If you want ultra smooth, try three ways: immersion blending in the pan, pureeing in a jar, or passing through a sieve. The magic is how the texture becomes velvet with minimal effort.
Top with toppings: offer three smaller bowls–grated cheese, chopped olives, and toasted nuts or seeds. youll want to choose items that complement the main dish, keeping portions small. This view keeps the flow smooth and allows you to clean the pans and hands quickly; thanks for planning ahead and using washable tools.
Timing and methods: water heating very often takes 4–7 minutes on a marine stove; a double sauce can be held warm on a trivet while you finish other steps. If solar power aids the setup, adjust timing by a few minutes. Smaller steps, careful planning, and steady hand make this an easy, great workflow for the chef.