

 The Bay Guide – Sfaturi Esențiale de Navigație pentru Ape din Golful San Francisco">

Check dockdepth and tide charts before you depart across the Bay. This quick check gives you a reliable baseline and helps you set a safe speed for the crossing. If you’re new to the area, add a margin of 15–20 minutes to your plan and avoid rushing through busy channels, giving yourself room to react to wind shifts. dont overlook wind shifts; Bay conditions change quickly.
Where the main channels run, follow published markers and keep a steady watch on the weather and traffic. white buoys mark the preferred path; drifting off can place you in the wakes of ferries or container ships. Maintaining a careful pace in daylight and adding margin at night makes plans more resilient. As phil from the harbor log notes, early light reduces chop and improves marker visibility.
Action items to implement: designate a lookout for traffic, monitor dock depth via charts, and set a limit for deviations. omalley area near the inner marsh requires extra care during shifting tides. If fog or current shifts, reset the plan and retreat to a nearby sheltered slip. Even a short yoga breathing drill can help keep your crew alert and focused.
every trip adds data: log wind, dockdepth readings, and times of successful passes; this country coast rewards careful planning. celebrating a safe return starts with good prep. If you hear a horn or radar ping, adjust your course without delay and share the details with the team. This practice keeps you connected and ready for acțiune on the next leg of your Bay crossing.
The Bay Guide
Depart during slack water in the Main Channel for better control and a smoother catch when turning past the ferry lanes; check wind and tide with NOAA and adjust your plan 15 minutes before entering the approach to Angel Island or the Bay Bridge span.
The Bay Guide offers a practical pre-departure checklist: verify your device (GPS/chartplotter) is powered and loaded with current charts, confirm cell service as a backup, and program VHF channels 16 and 13 for safety and boating cues.
For safety and operations, apply risk management: maintain 0.3–0.5 mile clearance from ferries and large ships in busy channels, give way when required, and keep a designated lookout aboard; if heavy gusts push you off course, revise your plan and communicate early. These habits were passed along by seasoned skippers and remain beloved on every trip.
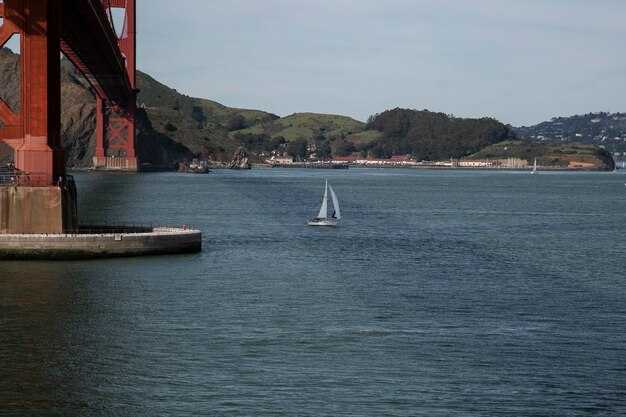
From Alcatraz and Angel Island to the Marin Headlands and the East Bay hills, the landscapes along the water offer awe-inspiring scenes at dawn and dusk; keep a camera ready but keep hands on the wheel.
The Bay Guide was born from a community of captains who sought something more reliable than rumor when the fog thickens. It is beloved by beginners and seasoned crews alike, and it offers practical ways to boost your passion for boating while preserving serenity on every voyage. When you bring hammocks to the stern deck, you create downtime after a long watch and keep morale high for everyone aboard; the guide helps you catch more color from the water and gives you a sense of calm even in chop.
The Bay Guide: Navigation Tips for San Francisco Bay Waters; Fall in Love With Colors
Plot a color-coded route before you depart: mark red buoys as port-hand, green as starboard, and keep your line 0.5–1 mile off the Gate to avoid strong eddies. Check the day’s tide/current charts and seize a window when river and bay beats align with your heading. This approach brings clarity fast and helps you feel confident on the water, whether you’re setting a course for beaches, ridges, or a quiet lunch at an eatery along the way.
- Use fastfind and resqlink to pull real-time tide, current, and wind data; keep a backup paper chart in your gear bag.
- Choose a path that stays within safe ranges from busy channels, and plan stops at beaches or parks for rest and photo breaks.
- Plan during daylight hours and aim for a calm start in the morning; those days often offer the best visibility and fewer gusts along the river mouth.
- Bring a compact yoga mat for five-minute on-deck breathing sessions; this keeps the heart steady when gusts pick up near the ridges and coastlines.
- Carry water, snacks, and sun protection; bringing extra layers helps you stay comfortable as the season shifts and the wind shifts from north to southwest.
- Map a door-to-door route home and note nearby eateries; phils at the marina often share whats next on their routes, offering tips and local color.
Seasonal shifts shape your plan: in fall, lighter morning fog can reveal far-off city silhouettes, while afternoon offshore breezes push currents toward the Golden Gate. Those cues help you decide when to push a bit farther along the river or linger near a protected cove. If you feel the rhythm of the water, you’ll sense when it’s time to leap to a new position or to hug the coastline for a safer harbor, bringing you closer to the community that loves the Bay as much as you do.
Tips at a glance:
- held in mind: color cues, tide windows, and safe offsets from lanes
- says: trust what the water tells you–eddies hug the shore, currents accelerate near the Gate
- will: adjust your plan if wind shifts or visibility drops; flexibility saves time and fuel
- days and ranges: plan 2–4 hour legs with a mid-route break near a beach or spaces for rest
- bringing: extra layer, water, and a small first-aid kit; a light lunch keeps energy steady
- home and community: connect with local crews; bringing friends along strengthens safety and fun
- season, door, resqlink: check season forecasts, use the door as a metaphor for stepping into calmer zones, and query resqlink for current data
Those who wander the bay with color as a guide often report a stronger sense of place: the river’s pulse, the heart of the city beyond the ridges, and the vibrant spread of eateries and markets along the shore. Weve seen crews seize chances to pause at a beach, share a snack, and then press on with renewed focus. For a fall color palette, mix teal water with coral sunsets, and let the colors guide your pace as you navigate the bay’s many spaces and seasons.
Plan Bay Crossings: Tides, Currents, and Bridge Clearances
Cross during slack water within the low-tide window and confirm clearance across both bridges before you depart; keep the helm active, a crew member on watch, and a charged cell phone in a dry bag; coordinate with a contact on shore at a nearby hotel for a quick talk if needed; this planning gift reduces risk for any person at the helm and makes the crossing worth the effort.
Tides swing 6–7 feet, spring tides up to 9–10 feet, neaps around 4–5 feet. Current speeds reach 6–8 knots near the Golden Gate during peak flow and remain around 2–4 knots in Central Bay. To minimize exposure, time your crossing for slack water within a 2–3 hour window around turning times, and keep a margin of 0.25–0.5 nautical miles from moving traffic in the channels. If you’re on a smaller craft, plan for crossings that stretch into the eight- to ten-minute range depending on wind and boat speed, to the extent conditions permit.
Bridge clearances vary with tide; Golden Gate provides about 220 feet of navigable clearance at mean high water, while the Bay Bridge main spans offer a similar order of magnitude but with a lower margin during higher water. Always verify with USCG Bridge Clearance Tables for your draft and rig; if your mast height exceeds roughly 180 feet, consider avoiding peak spring tides or dropping the mast if possible. This is important when crossing among the famous vistas such as Alcatraz, Angel Island, and the city skyline. Where you observe the buildings and a navy pier remains in the distance, know the channel markers and keep watch for ferries and naval traffic flows.
A practical loop starts near downtown hotels, then sweeps toward Crissy Field, the Presidio’s navy yards, and Alcatraz, before returning along the Embarcadero. The perdido neighborhood lookout offers a quiet place to observe the water and confirm traffic patterns before you cross, and a quick talk with the harbor master helps to coordinate with ferries. A quick recon at a hotel lobby can be a reliable anchor before you depart. A local guide, clemens, runs short talks at the dock to outline channel rules and safe pass points. This route yields vistas you’ll remember, with famous landmarks along the way and several building clusters and small parks along the shore that remain accessible to recreational boaters throughout the day. It also passes near a few trails along the waterfront for shore-side observers.
For a person with prediabetes, bring snacks to maintain energy and monitor hydration; keep a low-sugar plan and avoid dehydration in warmer crossings; plan rest windows and check the weather offshore. Safe operations require a crew that stays fit and aware of limits. The eight-point safety checklist in your course guide covers weather, tides, current, traffic, clearance, comms, contingency, and bailout options. Keep a cell charged, carry a spare VHF, and stay in a position where you can respond quickly to a changing situation.
Plan days ahead and practice the crossing in calmer days to build confidence, then apply your family or group as activities across the loop; the experience remains a gift for anyone who enjoys Bay exploration and the connection between the water and the city.
Use Electronic Tools: Chartplotters, AIS, Radar, and Tide Tables
Connect a chartplotter, AIS, radar, and tide tables to one display and follow that setup as your primary guide for SF Bay routes.
When choosing a chartplotter, look for SF Bay coverage that includes eastern and western channels, shallow pockets near beaches, and the front of marina facilities. Confirm it can stream tide data, supports a multi-hued radar overlay, and accepts AIS inputs for ongoing identification throughout the voyage. This approach simplifies planning and makes it easier to read the chart in bright sun and dim twilight.
AIS and radar synergy improves identification and detection in fog or low visibility. AIS shows vessels broadcasting data, radar reveals non-transmitting targets, and the combination provides clearer awareness throughout the corridor toward the hotel front and other busy segments of the bay.
Tide tables reveal the rhythm of depth changes and currents. Load regional data for your operating area and set alerts for shallow zones near beaches or sandbars. In november, shifts in wind and tide can alter channels along the eastern shoreline, so keep the tide layer visible in your plan.
phil notes a practical tip: keep the display held in a protected front cockpit and use a dedicated power source for longer trips. A compact tablet can feed data to the chartplotter via NMEA 2000 or Wi‑Fi, helping you stay coordinated when lounging on the deck between legs of the voyage.
Early tests build confidence. Start with a familiar route, verify chart accuracy, and compare tide predictions with known depths. Dress for the elements with proper clothing, and maintain a steady reading rhythm so identification and plan reviews stay current.
| Tool | Benefit | Quick Setup Tip |
|---|---|---|
| Chartplotter | Displays charts, routes, radar overlays, and tide data on one screen | Load SF Bay charts; enable radar overlay and AIS layer |
| AIS | Identifies vessels and shares course/speed for collision avoidance | Set safety alarms and display only nearby targets to avoid clutter |
| Radar | Detects targets in poor visibility and measures relative motion | Adjust range, tune sea clutter, and use color trails for approaching boats |
| Tide Tables | Predicts depths and currents to time passages and safe crossings | Load regional data and set alerts for shallow windows |
Read Bay Markers by Color: Buoys, Day Shapes, and Channel Markers
Begin with a simple rule: read color cues first. Red buoys guard the starboard side when returning to port; green buoys guard the port side; white markers with numbers confirm the channel sequence on your chart edition. Keep this baseline action for safe passage.
On the bridge, dont rely on sight alone. Whos on watch should read the markers, log color, number, and position. The blues of the water can help confirm distance at dawn or dusk. For well-being and self-care, run a compact safety checklist before a busy transit. This edition of the SF Bay chart notes sectors like Macomb Channel and Umatilla Reach. The company crews in the area greeted mariners with clear signage; expect popular docking zones near waterfront restaurants. dont forget to check their notices and always keep your cell charged to access real-time advisories if conditions shift.
Day shapes provide daylight signals about vessel status. Look for white symbols on ships and markers to infer actions; a ball suggests underway, a pair of balls conveys a specific maneuver, and a ball over a diamond signals restricted ability to maneuver. Always cross-check with your chart and rules, especially in crowded lanes where currents can push you toward the wrong side of the channel. Distinct color cues and day shapes keep your action predictable.
Channel markers: Stay centered by following color pairings and numbers on the buoys. dont drift toward the red-right edge or the green-left edge; let the sequence guide you. In SF Bay, markers near Macomb and Umatilla sectors help delineate safe passages through busy bends and shallows. If you spot markers outside their lane, ease off, verify against the edition, and adjust course. The deep-sea currents nearby can be strong after tide changes, so slow and maintain contact with the helm. Some lanes are ruled by tides and traffic, so keep to your plan. The marks are designed to be distinct and quick to read, a relief in crowded waters.
Action plan now: Identify color markers as you approach; note their number; cross-check with the current chart edition; log everything in your navigation notebook; if a marker seems unreliable, dont hesitate to pause and verify with the harbor authority. This practice supports your well-being and your crew’s safety and helps you avoid the absurdity of misread marks.
Final note: read Bay markers by color consistently, and you will reduce risk across the Bay. Keep your kit ready, your team synchronized, and treat markers as your guide rather than an obstacle. together, you and your crew can navigate the blues with confidence.
Fog and Low Light Navigation: Color Cues, Lighting, and Visibility Strategies
Run a fog-and-light checklist before departure: verify all required lights work, keep a bright handheld light, and set a conservative speed. This action reduces risk in fog and low-light settings along the Bay.
Facts from harbor conventions show that SF Bay can shift from glassy water to dense haze in days, with visibility dropping to a few hundred meters. Color cues and lighting help you stay on a safe path, even when shapes arent clear. Arent rely on sight alone–cross-check with sound signals and shore references to stay grounded.
Color cues in fog and low-light settings give you reliable guidance when you cant rely on full clarity. Red buoys mark the left side of the channel when returning from sea and green buoys mark the right; white channel lights provide a luminous guide along the centerline. Though contrast is muted, you can triangulate position by watching the glow along the shore and the silhouette of piers at sunset, then aligning with familiar landmarks ashore. Exploring along the waterline, you’ll notice the setting glow reflecting off waves and boats, which helps confirm bearing rather than guessing.
Along the coast, the body of cues extends beyond buoys. Masthead lights on sailboats, the bright deck lights on ferries, and even the occasional kayak mounted light create a constellation you can read in low light. In some countys around SF Bay, visibility patterns differ with wind and marine layer, so you should anticipate a variable setting across Marin, San Francisco, Alameda, and countys in the broader region. Youll notice that, even though conditions change, the core cues remain consistent: lights, color, and shoreline hints cohere into a workable picture.
Lighting and visibility strategies to apply now:
- Lighting setup: carry a handheld LED with a tight beam, keep a bright forward white nav light, and ensure a rear deck light is accessible for signaling. For nearshore activity, add a red or green bow light on small craft; youll stand out to riders and other water users without blinding them.
- Speed and spacing: reduce speed to maintain 360-degree awareness; for kayaks and small boats, use a slow, deliberate action and maintain visual contact with a lead vessel or shore marker. If you’re navigating with seniors on board, extend margins and avoid abrupt maneuvers.
- Communication: use standard sound signals if visibility drops; then switch to VHF radio when possible to confirm positions with other traffic. Although sound helps, you should stay visually oriented and rely on multiple cues to stay on course.
- Crew and gear discipline: designate a watch partner (for example, a wife or another crew member) to call out landmarks and hazards, and keep a spare battery for your light sources. This keeps the body of your team calm and cohesive during exploring in fog.
- Orientation drills: practice checking three cues at each pass–shoreline silhouette, buoy color, and masthead light–so you can stay on an intended track even if one cue fades. Though conditions vary, these recurring checks create a resilient routine.
To maximize safety in difficult settings, tailor actions to the vessel type. For a kayak, keep all paddlers within sight of the lead rider, stay close to the shoreline along a known channel, and use a personal buoyant light you can flip on quickly. For a sailboat, maintain visual contact with the channel markers and use the mainsail’s angle as a rough bearing indicator when wind allows. In environments where you often encounter watercraft of different speeds, such as a boat wake pattern near marina entrances, plan your lane well before you reach a bend in the shore.
Practical scenarios help consolidate these habits. If a fog bank rolls in at sunset, you can still rely on a bright white light along the bow and a secondary deck light to illuminate the water ahead. Your community on the water benefits when you stay within the planned line and share checkpoints with other boats; this approach is especially helpful for seniors who value steady, predictable cues. In the Wallowa setting, fog cues behave similarly, proving the consistency of these methods across different environments.
Key takeaways: stay proactive with lighting, interpret color cues accurately, and combine visual information with sound and radio when possible. Youll find that a deliberate, repeatable routine reduces stress for any crew and keeps exploring around the Bay safer, whether youre guiding a wife, a kayak partner, or a sailboat crew. Stay focused on color, stay aware of the wave and shore cues, and stay ready to adjust your pace and direction as conditions change.
Choose Safe Routes and Anchoring Spots: Avoid Hazards and Busy Traffic
Plot your SF Bay leg to stay 0.8 to 1.5 nautical miles clear of high-speed ferry lanes during peak traffic, and anchor only in spots with proven holding and ample swing room. Use updated charts, harbor advisories, and real-time AIS to confirm you’re avoiding wake-heavy channels and busy moorings. You should also check the latest Notice to Mariners before departure.
Hazards are predictable if you read the water: ferries generate wakes, shallow sandbars form near channels, and strong ebb tides push boats toward the swing circle. In addition, monitor current and visibility; if conditions worsen, execute a safe back-tack or take refuge in a sheltered harbor. tracy, a veteran mariner, notes that a calm, concise plan is transformative and protects the well-being of everyone on deck. That kind of preparation reduces cognitive load and makes long runs more manageable.
Anchor in mud or soft-silt bottoms with good holding, and set a scope of 7:1 or more in typical SF Bay winds. Avoid rocky shores, weed beds, and crowded swing circles. Keep at least two boat-lengths of clearance from others and ensure an unobstructed exit path. In april, tides shift, so check depth before dropping and add extra scope if swell is present. Branyon, known for practical piloting tips, highlights famous anchorages with calm water and safe approaches; when possible, use those locations as a baseline.
When navigating, carry a quick-check sheet: current wind, traffic, tide, and anchor readiness. Use both digital charts and a reliable paper backup, and maintain a clear plan for a safe fallback route. If you see an overwhelming amount of traffic or you’re cruising with a single-handed crew, pause, reassess, and maybe switch to a known safe anchorage. If women on board are part of the crew, assign clear roles to reduce debilitating fatigue and protect well-being. Christmas-season marinas often publish extra shelter options; use these to regain calm blues at dawn. A deep-sea mindset and a few million small details–like confirming buoy IDs, checking line chafe, and rehearsing anchor drills–keep the crew confident and ready for anything, and addition of local piloting resources helps navigating the channels more smoothly. christmas, plan ahead for tide shifts that may come with april rain and busy race days to avoid a breakdown of routes and crew.