

 Diving in Lake Michigan – Best Spots, Wreck Dives, and Essential Safety Tips">

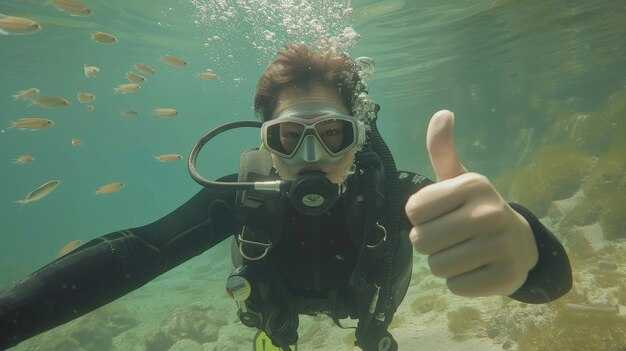
here is a simply practical start: hire an experienced guia e seu buddy para todos viagens, and plan around the season dates. Por favor pack light and bring a reliable light, a surface marker buoy, and a backup air source if possible. When you talk with a local operator, ask which boats run to wreck sites and how they manage hull integrity around historic finds. For Intermédio experiences, your guia will map routes that fit your level and offer support on a careful ascent. here, this approach keeps you focused on learning and enjoying the scene of submerged history with respect.
Popular spots span the Wisconsin and Michigan shores. In the Manitowoc area you find shallow wrecks with hull sections that are suitable for Intermédio teams at roughly 40–80 feet; visibility is often best from July through September and can reach 15–25 feet in calm conditions. Milwaukee area and nearby Two Rivers offer offshore targets down to about 100–120 feet, accessed via calm seas and guided viagens with experienced crew.
Wrecks range from wooden schooner hulls to iron hulled steamers. Expect exposed decks, hatchways, and cargo pockets that tell local history, with artifacts lying in sand pockets. Do not remove items; observe from a distance. Your guia will point out which hull features to inspect, and how to approach each artifact with care.
Safety tips in practice: always explore with your buddy and follow a clear plan. Carry a surface marker buoy, a reliable light, and a signaling device; check water temperature, currents, and forecasted winds from a trusted operator before departure. Stay within your training level and maintain a calm finning technique to minimize sediment; do not disturb artifacts or hull integrity; if conditions tighten, abort with your guia‘s support and ascend safely together.
Seasonal timing matters: the warmest water and best visibility typically occur mid-summer to early fall, with peak conditions usually in July through September. Outside that window you’ll face cooler water, higher turbidity, and shorter days. For internacional travelers, coordinate with a local guia or shop that offers multilingual briefings and gear checks to align your goals with local rules and safety standards.
To choose a shop, look for a long-standing record of responsible wreck work, current safety procedures, and gear checks. Ask about dates, depths, and crew experience, and request to see a sample plan for a typical trip. A good operator will offer clear support, share trip weather alerts, and adapt to conditions. Prefer outfits that emphasize hull protection and respectful observation of artifacts, including schooner-based routes if that interests you.
Lake Michigan Diving: A Practical Guide for Explorers
First, check currents and weather for your home harbor before any open-water outing. Always confirm the scheduled window with a trusted local guide and keep a simple plan for entry and exit.
Go with a buddy; youre safer when you know your route, signals, and the exit points. Keep to easy routes near shore when youre new to the area, and build experience gradually. If you have a chance, discover locally discovered conditions from recent reports.
Most wrecks lie at depths of 20-60 ft (6-18 m); larger hulls sit partially under sand at deeper pockets, where steel shows age and rivets.
Currents along the Lake Michigan shore can shift quickly, especially near piers and harbor entrances. The water still holds surprises, so always plan a return path, choose a site with sand bottom for easier navigation, and stay within your planned area.
Exposure protection: use a 7 mm to 5 mm wetsuit in late spring to early fall; add a hood, gloves, and booties as water temp drops. Open-water sessions should be kept under 60 minutes to avoid hypothermia and because exposure changes how you move and think. Each site has their own micro-currents.
Safety practices: never explore alone; check surface conditions and currents again at the surface; carry a surface marker buoy, a reel, a compass, and two lights for wrecks; know when to abort and surface calmly. Each site has its own hazards.
Wrecks offer great beauty and a glimpse into nature’s resilience. Theres always something new to know what structure tells about past operations, and youll find that many sites sit within similar depth ranges and share hazards like loose decks and entanglements.
Listed spots near Milwaukee, Ludington, and the northern harbors provide accessible introductions to underwater exploration; these regions feature sand bottoms, clearer months, and a concentration of steel wrecks that still show their original lines. Most trips are open to certified participants; consult local clubs for escorted programs and open-water sessions.
Diving in Lake Michigan: Best Spots, Wreck Dives, and Key Safety Tips; The Lake’s Allure More Than Just a Big Puddle
Plan your first Lake Michigan dive with a local Milwaukee charter and verify currents before arrival. The cold freshwater demands proper gear and a mindset ready for real depth; equip a drysuit, insulated gloves, and a reliable computer, and lean on mydiveguide for site-specific notes.
Start with a beginner-friendly Milwaukee Harbor wreck in the 40–70 ft range to build confidence before moving deeper. The beauty of the site lies in hull fragments and deck structures, with aquatic life starting to anchor the scene. Visibility is variable–often 6–25 ft in summer–while water temperatures hover around 60–68°F (15–20°C). In calmer, warmer months you’ll enjoy easier buoyancy and better写真 opportunities; for colder days, plan accordingly and layer protection. Specialty wrecks offer different challenges, but they reward careful planning and steady practice.
Beyond Milwaukee, Whitehall’s deeper sites push toward 50–100 ft, and Chicago-area wrecks can reach 40–120 ft with currents that demand good trim and line management. Always verify entry and exit points with the local crew, adjust your depth plan, and keep a mindful approach to air and time on the bottom. This mix of hull remnants, chains, and deck fittings creates a tangible history under water, while the surrounding aquatic life adds color to every swim over the wreck. Over successive trips, you’ll notice what changes with seasons and what stays constant in the lake’s mechanics.
Safety comes first: dive with a buddy, follow a clear plan, and respect every charter’s briefings. Before arriving, review weather, visibility, and water temperature, and carry a surface marker buoy plus redundant air. Charters can walk you through entry and exit points, current patterns, and areas to avoid. Knowledge builds confidence, and being prepared reduces risk each time you descend. Schedule at least two short dives per trip to build comfort and validate gear; keep notes on what works and what needs adjustment, and verify measurements with the deck crew to prevent ambiguity.
Gear and planning notes: in spring and fall, a 7–to 7.5-mm wetsuit with gloves works, but many divers choose a drysuit for colder sessions. Check valve seals, suit integrity, and buoyancy; adjust weights for heavier drysuits and varying exposure protection. When approaching a wreck, mind the chains and hull plates, avoid entanglement, and use a reel or line to control your ascent. Arrive early to align with the crew, and log each page of observation to track what you learned for future dives, whether you’re sticking to Milwaukee, Whitehall, or exploring further afield.
| Spot | Location | Typical Depth (ft) | Visibility (ft) | Best Time | Notable Features |
|---|---|---|---|---|---|
| Milwaukee Harbor Wrecks | Milwaukee, WI | 40–70 | 6–25 | July–Sept | Hull debris, deck sections, chains |
| Whitehall Deep Sites | Whitehall, MI | 50–100 | 8–30 | June–Sept | Freshwater life, intact hull plates |
| Chicago-area Wrecks | Chicago/Nearshore | 40–120 | 5–25 | July–Sept | Eastland link, varied hull, cranes |
| Two Rivers/Manitowoc Region | Near Two Rivers | 60–120 | 10–25 | Julho–Agosto | LST wrecks, multiple hulls |
Top Beginner-Friendly Underwater Spots on Lake Michigan’s Shoreline
First-stop recommendation: Milwaukee Inner Harbor’s Veterans Park Cove, inside a sheltered basin with depths around 12–25 ft, offers calm water, sandy bottoms, and easy exits–a most reliable place for a first underwater session.
Listed below are spots along the shore that are actually friendly for first-timers and some looking to build steady buoyancy and navigation skills. Each spot is accessible from park facilities or a nearby boat ramp, with anchor points, freshwater visibility that varies by season, and simple features to observe.
-
Milwaukee Inner Harbor – Veterans Park Cove
Depth: ~12–25 ft; bottom: sand with sparse weed; visibility: commonly 6–15 ft in summer.
- Access: shore from the park or short boat hops from nearby marinas; inside harbor walls reduce surge.
- What you’ll see: anchor chains, small sunken objects, and schools of perch and bass along the edges.
- Why it’s beginner-friendly: gentle current, obvious entry/exit paths, and frequent surface intervals with nearby facilities.
- Tips: keep close to the bottom to minimize sediment; use a surface marker buoy when drifting near boat traffic; practice buoyancy around 0–2 ft to feel the water’s feel.
-
Grand Haven Channel – Coast Guard Pier Area
Depth range: ~15–35 ft; bottom: mix of sand and weed; visibility: 6–12 ft in typical conditions.
- Access: shore-based entry from the town’s park areas or short boat ride from the marina.
- What you’ll see: shallow wreck fragments, crane anchors, and several small fish schools near pilings.
- Why it’s beginner-friendly: short boat ride, sheltered channel influence, clear entry points.
- Tips: stay within marked channels, watch for boat traffic, and use the harbor’s calm mornings for best visibility.
-
Holland State Park Breakwater – North Shore Approach
Depth range: ~10–30 ft; bottom: sandy with patches of seagrass; visibility: 6–14 ft.
- Access: park shoreline access or gentle boat ramp from nearby marina; great for shore outings.
- What you’ll see: weed flats hosting small fish; occasional sunken items near the breakwater stairs.
- Why it’s beginner-friendly: predictable currents, easy surface access, and nearby restrooms/ facilities.
- Tips: maintain buoyancy near the edge of weed beds to avoid stirring sediment; plan a short loop to minimize time in deeper zones.
-
Ludington Breakwater – Outer Edge
Depth range: ~18–28 ft; bottom: sand and rocky outcrops; visibility: commonly 8–16 ft.
- Access: primarily boat-based from Ludington; parking and access from state park facilities.
- What you’ll see: linear patterns of riprap, small freshwater species, and occasional man-made objects near the breakwater.
- Why it’s beginner-friendly: short boat ride, clear entry points, and predictable water motion when winds are light.
- Tips: anchor your boat well away from the breakwater; monitor wind shifts; carry extra tanks for longer shallow exploration sessions.
-
St. Joseph Outer Harbor – Pier Approach
Depth range: ~15–30 ft; bottom: sand with weed pockets; visibility: 6–12 ft.
- Access: shore-based near the pier or boat from the marina; nearby parks support a quick entry and exit.
- What you’ll see: pier pilings, small fish along the sand, and occasionally wreck relics near the harbor mouth.
- Why it’s beginner-friendly: sheltered conditions, clear entry zones, and simple navigation between landmarks.
- Tips: use natural light near the top 10 ft to gauge depth changes; be mindful of boat traffic in the channel and avoid long drift zones.
Each spot provides a foundation for core skills: buoyancy control, trim, navigation, and careful air-use planning. For beginners, start with a short, shallow excursion inside a sheltered area, then gradually extend depth and duration as comfort grows. If you’re unsure about conditions, check with a local shop or yourmydiveguide contact before heading out; they often provide current advisories and gear checks that list recommended approach paths for freshwater zones.
Gear notes: bring a primary and backup regulator, a reliable SMB, a surface signal, and spare tanks for longer inland sessions. Focus on keeping your buoyancy steady in sandy or weed-heavy patches, and avoid stirring the bottom to protect aquatic life and reduce particulate in the water. Always dive with a buddy, and never push beyond your training–these spots are listed because they tolerate a gradual introduction to underwater exploration.
источник: local park services, shop guides, and community-run training programs. Anyone curious about more sites should consult your local shop, as conditions vary with season and wind. If you’re building a routine, consider a few sessions per week in different spots along the shoreline to understand how temperature, visibility, and currents change through the year.
To connect with more beginner-friendly routes, join a guided session through mydiveguide, where instructors highlight safe anchors, entry points, and the most common indicators of favorable underwater visibility. Everyone starts somewhere, and these shores offer some of the most approachable freshwater environments for learning and progression in the world.
Iconic Wreck Dives: Depths, Entrances, and Features to Look For
Plan the sanilac location wreck visit at 60–90 ft depth, use a single tank, and suit up in a drysuit if the water is cool. This setup keeps gas margins solid while you inspect hull openings, chains, and access points from deck to interior spaces. Schedule trips during stable weather, and log dates for quick planning checks. This wreck has long been a local haven for enthusiasts, and it often serves as a reliable source (источник) for judging equipment and technique before broader exploration.
- Depths to expect: Most iconic hulls rest between 50 and 110 ft. The sweet spot for many sessions sits around 60–90 ft, with deeper pockets near 100–120 ft reserved for intermediate teams who have adjusted buoyancy and gas planning. Always respect limits and ascent rates tied to your certification and recent training.
- Entrances to prioritize: Open cargo holds, wheelhouse doors, and deck hatchways provide natural lines of sight into the wreck’s layout. Some portals are partially blocked by collapsed plating or silt; use a light, a buddy line, and deliberate movements to stay oriented as you approach right-angle turns or narrow passages.
- Features that define the wreck: look for intact chains and anchor gear still attached to the bow or deck, engine-room remnants, and the hull’s overall silhouette. Notice sediment patterns and how the structure protects life above the bottom. Other indicators include portholes, railings, and preserved deck fittings that tell you how the vessel operated in its time.
- Access and planning: Choose a location with reliable boat support, and confirm the dates when charters operate. Gather local notes, check surface conditions, and plan a conservative profile that fits within your air supply and bottom-time goals. If you’re near sanilac, coordinate with a local captain who can point you toward the best ramps and launch sites while keeping you within the lake’s limits and regulations.
- Equipment and technique for intermediate trips: Carry redundant gas and a drysuit for temperature control. Practice neutral buoyancy and trim before entering any wreck interior, and use a guideline or reel when exploring enclosed spaces. Adjust weight belts and suit inflation in advance so you can maneuver through openings without stirring silt or disturbing the wreck’s delicate features.
- Surface and safety considerations: Maintain clear communication with your buddy team and surface support. Keep to a steady ascent rate and perform a safety stop on every exit. If visibility shifts to crystal-clear or becomes uncertain, slow your tempo and reassess your route to the entrances you planned to visit.
Local notes highlight how these sites respond to seasonal conditions; recently, conditions around sanilac and nearby lakes have favored clearer water during late spring and early fall. Use this timing to maximize visibility through the chains, along the hull, and inside accessible rooms. Right planning, careful trim, and respect for the wreck’s fabric will keep each trip productive and safe, whether you’re just starting to explore these classic Lake Michigan icons or revisiting them for a refresher on entrances and hull features. haven in the local community and consistent access to well-mapped routes makes these wrecks a reliable training ground as you build experience on more challenging wrecks in the region, including those that you might encounter on trips with regional crews from Buffalo and other nearby ports.
Seasonal Conditions: Visibility, Temperature, and Best Diving Windows
Target late May or early September for the clearest water and most comfortable temperatures. This window works well for Milwaukee-area wreck trips and other lakeside locations, helping you match planning with seasonal patterns.
Visibility varies by wind, currents, and turnover. Generally, spring offers 5–15 ft near the shore and up to 20 ft at deeper wrecks; summer commonly stays in the 5–20 ft range unless a calm, long-lasting spell lifts clarity; autumn often settles around 10–20 ft as the water cools.
Water temperatures follow a similar arc. Expect surface readings of 40–50°F (4–10°C) in spring, with bottoms near 40–45°F (4–7°C). Summer brings 65–72°F (18–22°C) at the surface and bottom temps around 55–65°F (13–18°C). Autumn cools quickly to 50–60°F (10–15°C) near the surface, with chilly bottoms.
Best diving windows are two stable periods: late May–early June and late August–early October. These windows balance higher visibility with milder water and air temps. Before starting a trip, verify the latest forecast and lake conditions; coordinate with a local guide to align your location with current patterns, and keep an eye on the hourly wind from the open water to predict drift and silt.
Gear and planning: For shoulder-season dives, a drysuit is highly recommended; in summer, a 3–5 mm wetsuit suffices for most Milwaukee wrecks. Many divers use single tanks for shallower sites, but deeper or cooler-water venues benefit from extra tanks or a pony. Include gloves and a hood if you plan multiple legs of a scheduled trip, and verify tanks and air quality with your dive shop the day before you arrive.
Location specifics: Milwaukee-area wrecks include many wooden-hull craft that can kick up silt if you rush the descent. Look to a local guide and museum-like artifacts to set expectations, and consider scuba courses or a dedicated day trip if you are looking to build confidence before the next scheduled outing.
Safety Gear and Procedures: Buoyancy, Drills, and Boat Traffic Awareness
Begin every session with a buoyancy check at the surface and a five‑minute drill set, then enter with neutral buoyancy. Verify your weight, BCD, and air supply, and confirm your buddy is ready; those checks prevent surprises over the next minutes. Keep your breathing calm and tune air slowly to hold steady at the planned depth, because even small changes can push you over your limits.
Buoyancy control relies on a well‑fitted BCD, correct weighting, and relaxed breathing. Start neutral around 5–9 m in michigans waters and hover for 10–15 seconds to verify stability. If you feel head‑heavy or foot‑heavy, adjust weight in 0.5–1.0 kg steps and test again; partial adjustments are easy to manage and avoid rapid ascent. For drysuits or colder seasons, add 1–2 kg as needed to offset exposure and keep surface returns smooth.
Drills establish reliability: regulator recovery with one hand, mask‑clear at surface and underwater, alternate air source switch, buddy‑tether awareness, controlled ascent with a safety stop, and surface signaling. Practice each drill at the surface first, then twice in easy, partially sheltered conditions, aiming to complete each in under 60 seconds. Next, run the sequence with your guide, practicing once more before moving to a new site.
Boat traffic awareness keeps you safe in busy zones. Stay clear of shipping lanes and keep to the edge of the channel near marinas and charter operations, where activity is high. When a boat approaches, stop movement, signal with a surface marker and whistle, then resume only after the vessel has passed. Those protocols reduce exposure to wakes and improve visibility for you and those on the surface.
Plan with local knowledge and reliable resources: michigans beauty is best enjoyed with a trusted guide next to you, especially when near a marina or river junction. Use mydiveguide to compare sites, check current conditions, and map routes with partners youre comfortable swimming with. Figure your maximum depth and air requirements before you begin, keeping your limits in mind and staying within easy, safe ranges. Home ports, charters, and local operators can provide up‑to‑date briefings, helping you stay safe and confident while exploring the lake’s surface and its hidden features.
Regulatory and Planning Tips: Permits, Etiquette, and Local Resources
Get permits at least 30 days ahead through the Wisconsin DNR and your local marina office to access offshore wreck sites. Provide permit numbers to your guide and dock crew, and keep a crystal-clear copy on hand, either digitally or in your home kit, for quick verification.
Know which zones are open to exploration and which are protected, with permissions allowing access only to designated sites. Follow etiquette by yielding to commercial traffic, keeping quiet near live work areas, and preserving an aquatic environment that supports fish and other wildlife. Maintain a safe distance from anchors and any barge moorings, and minimize wake to protect submerged artifacts and the shoreline. This approach keeps the lakes welcoming for years to come and reduces risk for everyone on the water.
Reach out to a local marina for up-to-date rules and site-specific guidance. In Milwaukee, contact the harbor office or your preferred marina to confirm offshore access windows and entry points, then work with an experienced guide who tailors plans to current conditions. For historical context and site information, visit a nearby museum or connect with local wreck researchers; which resources they share often helps you pick wrecks that align with your skill level and gear, adding depth to your plan.
Prepare with purpose: a drysuit is essential in shoulder seasons, and freshwater lake conditions can shift quickly. Mind the forecast, wind shifts, and currents, and verify contact numbers for the issuing agency in case you need updates after you depart. If you notice a typo in any permit or vessel detail, contact the issuing authority immediately to fix it and avoid delays that could cut into your trip.
Document your plan and stay reachable by listing a home marina contact, emergency numbers, and a backup site list for offshore options. After trip, log depth, visibility, and notable fish activity to build a simple database that helps future excursions. With proper planning, permits in place, and respectful etiquette, your exploration of Lake Michigan’s wrecks becomes a rewarding journey, reinforcing a haven for long-standing appreciation of crystal-clear freshwater beauty which preserves history for years, guided by an experienced team that simply provides practical, real-world tips you can trust from Milwaukee to the farthest shore. Contact, plan, and enjoy the process with your guide, noticing how the lake offers a safe, well-supported experience that honors both the pastime and the heritage of the region.