

 Understanding Roller Furling Systems – A Comprehensive Guide for Sailors">

Zacznij od dopasowanego systemu rolfokowania od zaufanego producenta sprzętu i zaplanuj instalację, biorąc pod uwagę sztag i plan ożaglowania twojej łodzi. Czyste dopasowanie zmniejsza tarcie i ułatwia refowanie podczas porywów wiatru. Zastanów się, czy potrzebujesz wspomagania silnikowego, zwłaszcza na większych łodziach, czy też wystarczy prosta konfiguracja bez silnika. To zwiększa zrozumienie wpływu konfiguracji na potrzeby związane z obsługą i konserwacją.
Zrozumienie tego, co kupujesz, zależy od types zalet: system mocowania na miękko, który współpracuje z rękawami, a system z rolką i sztagiem. Każda z tych wersji ma inne installation kroków, zakresów naprężeń i kompatybilności z twoimi fałami. article należy sprawdzić wartości znamionowe obciążenia, prędkość obrotową i warunki gwarancji; skonsultuj się z источник dane producenta, aby porównać parametry przed zakupem.
Zaplanuj instalację tak, aby zminimalizować prace na pokładzie; użyj lower punkty mocowania do zmniejszenia dryfu w nawietrzną podczas refowania i upewnij się, że elementy mocujące są zamontowane na czystej, suchej powierzchni. Niektóre kroki mogą być trudne, jeśli wymieniasz elementy sztagu lub ustawiasz bęben. W przypadku podstawowego urządzenia, ustaw sztag, zabezpiecz bęben i przewlecz linkę przez odpowiednie bloki. Na łodzi o długości poniżej 35 stóp spodziewaj się około 4–6 godzin pracy ręcznej; większe jednostki mogą wymagać 6–10 godzin, plus czas na wymianę sztagu.
Koszty mogą być expensive z góry, ale zyskujesz znaczny zysk na szybkości refowania i żywotności żagli. Jeśli przewidujesz intensywne użytkowanie, rozważ motorized opcja zwijania dla płynniejszej obsługi na pokładzie z board sprzętu. Po instalacji należy serwisować urządzenie co roku: smarować ruchome części, sprawdzać bęben i obrożę oraz wymieniać zużyte uszczelnienia przez żaglomistrz lub sprzedawcy, w razie potrzeby.
Wybierając, odnieś się do tego, co article o zgodności powierzchni żagla i potwierdź wymiary montażowe z planowanym osprzętem na Twojej łodzi. Sprawdź источник kartę danych producenta i zasięgnij porady u żaglomistrz aby upewnić się, że lik przedni żagla pasuje do rękawa rolerfoka. Jeśli nie masz pewności co do poszczególnych kroków, zatrudnij technika; proces jest prosty, ale niewłaściwe ustawienie może uszkodzić sztag, bęben lub mechanizm obrotowy, szczególnie w przypadku jednostki z napędem.
Niezbędnik żeglarza: system rolowania foka
Zalecenie: Wybierz system zwijania foka typu Profurl z wytrzymałym profilem i niezawodnym bębnem, dobrany do rozmiaru twojego największego żagla przedniego. Taki zestaw umożliwia zwijanie i rozwijanie z kokpitu, redukuje opór powietrza po zwinięciu i ułatwia obsługę jednoosobową. Jeśli często pływasz samotnie, rozważ wspomaganie silnikiem; w przeciwnym razie sterowanie ręczne jest zwykle wystarczające. Sprawdź kompatybilność tkaniny i wzmocnienie na liku przednim oraz upewnij się, że okucia są odporne na korozję. Użyj instrukcji i źródła informacji, aby uzyskać szczegółowe informacje dotyczące instalacji i momentów obrotowych. Twój wybór powinien obejmować jasne instrukcje serwisowe i łatwy dostęp do części zamiennych od dostawcy.
Niezależnie od tego, czy żeglujesz przy lekkiej bryzie morskiej, czy pokonujesz trasy w trudnych warunkach pogodowych, odpowiedni system rolowania zmienia sposób operowania żaglami przednimi na jachtach żaglowych. Zacznij od upewnienia się, że twój największy żagiel przedni może być rolowany bez modyfikacji oraz że mocowanie sztagu pasuje do twojego takielunku. Wczesne planowanie pozwala uniknąć przeróbek w przyszłości i zapewnia płynność pracy w kokpicie.
- Typy: rolfok z profilem wytłaczanym zapewniają czysty przepływ powietrza i łatwe refowanie; systemy z profilem stanowią sztywne prowadzenie krawędzi żagla. Zrozum, jak każdy typ wpływa na efektywność rolowania i kształt żagla po rozwinięciu.
- Materiał: Większość przednich żagli jest przystosowana do rolowania, ale laminowane materiały zużywają się inaczej niż dakron. Sprawdź wzmocnienie liku przedniego i rozważ dodanie paska ochronnego, aby zmniejszyć zużycie krawędzi żagla.
- Rozmiar i obciążenie: Dopasuj system do powierzchni żagla i długości łodzi. Za mała jednostka będzie mieć problemy w porywach; za duża zwiększy wagę i tarcie. Celem jest znalezienie równowagi, która zapewni lekkie sterowanie przy słabym wietrze i niezawodność przy silniejszym.
- Prowadzenie i rozmieszczenie: Poprowadź liny zwijania żagli, fały i liny kontrolne przez efektywne prowadnice do kokpitu. Czyste prowadzenie zmniejsza wysiłek sternika i minimalizuje ryzyko zaczepienia podczas manewrów.
- Opcja z napędem: Dla żeglarzy samotników lub łodzi z ciężkimi żaglami przednimi, elektryczne wspomaganie pomaga przy trymowaniu lub refowaniu, szczególnie w trudnych warunkach. Jeśli Twój budżet lub liczebność załogi tego nie wymagają, sterowanie ręczne pozostaje niezawodne.
- Uwagi dotyczące instalacji: Postępuj zgodnie z instrukcjami producenta zawartymi w instrukcji obsługi; sprawdź kompatybilność sztagu i upewnij się o właściwym smarowaniu i stanie uszczelek. Zapoznaj się z instrukcją obsługi, aby uzyskać informacje dotyczące momentu obrotowego i okresów między przeglądami.
- Częstotliwość konserwacji: Przynajmniej dwa razy w sezonie sprawdzaj wytłoczkę, bęben, obrotnicę i zaślepki. Szukaj oznak korozji, zużycia linek oraz śladów otarć na liku przednim żagla.
- Kontrola działania: Przed wypłynięciem na pełne morze, poćwicz zwijanie i rozwijanie przy słabym wietrze, sprawdź płynność obrotu i upewnij się, że żagiel zwija się równomiernie bez zacinania.
- Oceń swój profil żeglarski: wielkość łodzi, typowy zakres wiatru i dostępność załogi.
- Potwierdź kompatybilność: największy żagiel, tekstura żagla i mocowanie sztagu.
- Plan instalacji: zebrać kompletny zestaw sprzętu, smarowanie, części zamienne i oficjalną instrukcję.
- Test w spokojnych warunkach: zweryfikuj łatwość użytkowania, prowadzenie linek i zasięg z kokpitu.
- Udokumentuj konfigurację: zanotuj ustawienia naprężenia i wyniki kształtu żagla dla przyszłych odniesień.
Dzięki dobrze dobranemu systemowi zwijanie i zmiana żagli w locie stają się proste. Skoncentruj się na konfiguracji, która obejmuje solidny profil, niezawodny bęben i tkaniny żaglowe dostosowane do rolowania. Twój wybór wpływa na obsługę, bezpieczeństwo i szybkość dostosowywania się do zmieniających się warunków.
Co robi rolfok masztowy i kiedy go używać
Rozwiń roller grotżagla przed nadejściem szkwałów lub gdy chcesz zmniejszyć powierzchnię żagla. Sam furler zwija żagiel wokół stałego profilu lub bębna, umożliwiając szybkie zwijanie lub rozwijanie żagla bez wychodzenia z kokpitu. Utrzymuje to równowagę łodzi, zmniejsza opór powietrza i zużycie lin i szekli. W przypadku żaglówek, łodzi wiosłowych i większych ożaglowań, odpowiednio wyposażony furler sprawia, że refowanie jest proste i pomaga utrzymać kontrolę w zmieniających się warunkach. System wykorzystuje metalowe okucia zaprojektowane z myślą o wytrzymałości; regularnie je sprawdzaj, aby zapobiec awarii.
tak to działa: żagiel posiada rękaw liku przedniego, który wsuwa się na stały profil; podczas ciągnięcia linki sterującej, żagiel owija się wokół profilu i pozostaje w prowadnicy. Dodatkową korzyścią jest możliwość regulacji powierzchni żagla w małych krokach, zachowując właściwy kształt i zmniejszając zużycie linek. Te cechy, wraz z łatwym przechowywaniem pod pokładem, sprawiają, że to rozwiązanie jest popularne zarówno na jachtach żaglowych, jak i na łodziach typu dinghy. Upewnij się, że okucia są prawidłowo zabezpieczone szeklami, a profil i bęben są wyrównane; luźne części mogą powodować trzepotanie lub zużycie. Ten styl systemu dobrze sprawdza się na łodziach o różnych rozmiarach i konfiguracjach.
Kiedy wdrażać: przy słabym wietrze (mniej więcej 6–12 węzłów) możesz pozostawić większość żagla; przy umiarkowanym wietrze (12–18 węzłów) zarefuj do około 60% pełnej powierzchni; przy porywistym lub silnym wietrze (>18–20 węzłów) zarefuj dalej do 40% lub całkowicie zroluj żagiel. Najpierw powinieneś poćwiczyć rozkładanie w spokojnych warunkach i przetestować system przy umiarkowanym wietrze, aby upewnić się, że możesz szybko regulować i utrzymać równowagę steru. Dla tych, którzy wybierają sprzęt do małych łodzi, zacznij od kompaktowego bębna i krótszego liku przedniego; dodatkowy ciężar jest zwykle minimalny, a obsługa pozostaje łatwa i bezpieczna.
Konserwacja i instalacja: dostęp do rolera pod pokładem jest minimalny, ale szyna i tor liny muszą pozostać czyste i wolne od przeszkód. Sprawdź szynę pod kątem zadziorów lub korozji; zweryfikuj ustawienie szyny masztu i uszczelnienia bębna. Jeśli zauważysz zużycie lub oznaki uszkodzeń na żaglu, wycofaj żagiel z użytku i wymień uszkodzony panel. источник zauważa, że prawidłowa instalacja i regularne przeglądy wydłużają żywotność i zmniejszają ryzyko awarii; dla tych, którzy mają pontony, upewnij się, że okucia są odpowiednio dobrane do łodzi, a liny są zabezpieczone, aby zapobiec zaczepianiu. W tym artykule omówimy kroki rozkładania i czynności konserwacyjne.
Wybór odpowiedniej jednostki: wybierz furler pasujący do stylu i olinowania twojego żagla głównego; upewnij się, że system jest wyposażony w odporne na korozję metalowe okucia, solidny bęben i profil dopasowany do tkaniny żagla. Podczas instalacji wyrównaj profil z masztem i torem bomu; niewspółosiowość zwiększa zużycie żagla i może wymagać przeróbek. Wybierając odpowiednią jednostkę i przeprowadzając regularne kontrole, zyskujesz niezawodną kontrolę w szerokim zakresie warunków, a tym samym możesz żeglować bezpieczniej i z mniejszym zmęczeniem podczas długich rejsów lub jednodniowych wycieczek.
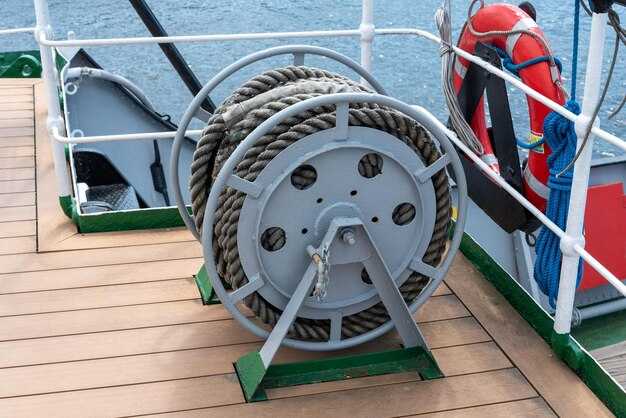
Kluczowe komponenty: bęben, folia, obrotnica i złączki
Sprawdź bęben, folię, krętlik i okucia przed rejsem morskim, aby upewnić się, że są bezpiecznie przymocowane i działają płynnie.
Drum: Drums have developed over decades to handle reefed and unfurled lines; choose a drum equipped with a smooth bore and ample groove width to prevent wear and binding when you reef or trim sails. Wind lines evenly; mis-wraps create friction that slows furling and can jam in rough seas. If you notice burrs, cracks, or uneven wear, remove the drum from service and replace it to avoid issues offshore. This helps reduce potential problems during a long sail.
Foil: to optimize flow, place the foil so the sail line path stays straight and the luff runs close to the drum. Use a light, corrosion-resistant foil with an asymmetric profile to minimize drag and balance load. Check for nicks, bends, or delamination after long passages, and replace a damaged foil promptly to keep performance easy.
Swivel: The swivel attaches the foil to the drum and must rotate freely; choose a unit rated for the expected load and secured with a robust pin. If play develops, replace the swivel; a stiff or sticky swivel makes it difficult to manage sails offshore.
Fittings: Use corrosion-resistant hardware sized for the lines; fittings equipped with locknuts and cotter pins support reliable performance. Install with proper clearance to avoid chafe; protect line edges with solents to reduce wear. Keep fittings accessible for quick adjustments when lines bind during changes in wind or seas.
In this article, implement a practical routine to manage wear and keep the system reliable: inspect corrosion, wear, and alignment; test under light load and under full sail. A routine developed for your boat, combined with clear inspection notes, helps remove surprises and make the most of the drum, foil, swivel, and fittings setup.
How furling influences sail shape, reefing, and handling
Install a properly matched roller furling and verify the installation with care. This holds the sail shape, reduces flutter, and allows quick reefing and safer operation while cruising.
How it changes sail shape: when the sail is fully unfurled, the fabric works with the foil to hold a balanced draft. As you furl, the sail wraps around the foil, flattening the curve and lowering the overall draft. This lower draft shifts the center of effort slightly forward and aft, which can affect steering feel and weather helm. On a cruiser or sailboats with long mains and small jibs, the same adjustment tends to move power out of the windward zone and toward stability, though you may notice modest loss of top-end drive in strong winds. A comprehensive approach considers not only the furling angle but also luff tension and halyard load to avoid a crowded, wrinkled luff that reduces efficiency.
Reefing with a furling system: expect a smooth reduction in sail area without leaving the cockpit. Typical systems reduce 20–40% of the exposed area when reefed, and larger sails can approach a 50% reduction with deep reefing. Added tension on the luff helps keep a clean shape behind the reef, while maintaining enough leech tension to prevent excessive flapping. In heavy conditions, reefing early over a moving breeze profile keeps control over the boat and reduces heeling, making the operation safer and more predictable.
Handling and control: a well-designed installation improves control during gusts and waves. You can trim the sail from the helm, reducing crew movement behind the wheel and avoiding awkward maneuvers that slow speed. For cruising sailboats, this means you can maintain speed without aggressive steering corrections, while keeping the same feel in your steering system. When you need to shake out a reef, the quick reefing line and the same mechanism make it faster to restore full power, even when the wind shifts behind you. The equipment should run smoothly in all conditions, with regular checks on turnbuckle gains, foil wear, and the luff tape to prevent added friction that slows operation.
Practical recommendations for effective use:
- Match the furling design to your sail designs and fabric weight; heavier fabric benefits from a robust foil and stiffer forefoil to keep shape under load.
- Keep the installation aligned with the forestay and ensure the tracks run true to avoid binding that makes reefing difficult.
- Inspect the entire system quarterly, including the halyard, headfoil, and stitched seams; replace worn fabric or luff tape behind the foil to maintain the same performance over decades.
- Choose a sail with added reinforcement at the luff and tack to handle the compression from furling and minimize rope-on-fabric wear.
- Use a moderate amount of tension on the halyard during operation to prevent the luff from bagging, which can spoil control and reduce efficiency.
- Plan reefing before the wind spikes, especially on a cruising schedule where you move between sheltered bays and open water; delaying reefing often makes the move harder and reduces safety behind the wheel.
Bottom line: a well-chosen system, installed correctly, backed by proper maintenance, provides a reliable tool for shaping sail power, reefing quickly, and maintaining control in changing conditions. This comprehensive approach helps cruiser crews keep sailing smoothly for years, with less effort and more confidence behind the helm.
Manual versus powered furlers: selecting the right type
For boats under 30 feet, start with a manual furler. It delivers reliable furling at low cost and with minimal electrical dependency. If you sail larger sailboats or regularly fly a big genoa, then a powered furler offers smoother operation and easier handling, though it is more expensive upfront.
Manual furlers rely on a spool that winds the luff line as you turn the handle. The luff rope runs through grooves in the extrusion, aligning the sail with the forestay and preventing twisting. The system centers on a few components: the spool, grooves, locks, bearings, and mounting hardware. After you furl, verify the sail sits neatly in the roll and remove any slack by hand, then lock the unit to prevent drift. This simple layout suits sailboats with moderate rigging and keeps maintenance lightweight.
Advantages of manual furlers include reducing fatigue, lower cost, and straightforward maintenance. They avoid electrical dependencies and spare parts are widely available. On the downside, manual operation can require more effort, particularly when the sail is flying and gusts hit, which can slow down furling and test your timing.
Powered furlers add a motor–electrical or hydraulic–built into the furler. They automate spool rotation, delivering consistent furling pressure and reducing crew workload, especially when handling flying genoas or sailing single-handed. The trade-off is a higher initial cost and a need for a reliable power source and wiring aboard. They introduce more components to maintain and you must ensure the extrusion and boom fit the motor housing without interference; installation varies by brand and may involve extra controls and weatherproofing, so plan the setup accordingly.
Guide to choosing focuses on certain factors: sail size and type, number of sails you furl regularly, mast height, and whether you want to operate from the cockpit. Check compatibility with your extrusion profile; confirm grooves align with the sail’s luff and locks engage securely. Consider the number of moving parts, as fewer components reduce failure risk. If you sail with little crew and want smooth handling of flying sails, a powered unit can be worth the investment–including its ability to furl without climbing into the rig, which is especially useful on a sailboat cruising in variable conditions.
During installation, verify the spool size matches your luff extrusion and ensure the system fits your mast or boom without conflicts. For genoas and flying sails, confirm the setup accommodates a broad range of sheet and halyard layouts. After setup, test in light winds, then monitor tension and lock engagement. Remove and recheck the sail alignment after a few sessions to prevent wear in grooves or the extrusion. Regularly clean the locks and lubricate pivot points to keep components in good shape, which sustains a clear choice between manual and powered furling for your boat.
Maintenance, inspection, and common troubleshooting steps
Inspect the in-boom roller furling drum, control line, and swivel monthly, and follow the instructions to ensure even furling and avoid sail damage at sea.
Inspect the sail, luff rope, drum, swivel, and control lines for wear, corrosion, and deformation. Watch for asymmetric wear on the luff and reel; if you see it, recheck alignment and fittings and replace any worn components to prevent uneven furling.
Clean and lubricate moving parts with a marine-grade product. Wipe off excess lubricant and avoid applying it to the sail fabric. Maintenance should be done with the system powered off and the boat secured. When done, run a short hand test to verify motion.
Test the system by hand: by hand rotate the drum and manually furl/unfurl the sail a few turns to confirm smooth action and even tension. If you encounter resistance, grinding, or a sticking point, stop, inspect the sheaves, and re-lubricate the bearings. Then re-test. Offshore conditions demand extra attention; plan maintenance accordingly.
Understanding your experience with the setup helps you tailor the checks to your needs and sailing style, including offshore trips where added caution is prudent.
| Area | What to check | Tools/Notes | Frequency | Pass/Fail |
|---|---|---|---|---|
| Drum, seals, fittings | Corrosion, leaks, loose end caps, seals | Marine grease, clean rag, torque wrench | Monthly | OK / replace |
| Control line and hardware | Frayed lines; top swivel and attachment integrity | Spare line, ferrules or knots as needed | Monthly | OK / replace |
| Sail and luff track | Wear, tears, asymmetric fabric; luff rope seating | Flashlight, cloth, spare luff rope | Kwartalny | OK / replace |
| Manual testing | By hand furl/unfurl 2–3 revolutions to verify smoothness | Gloves, clean hands | With checks | OK / recheck |
When issues arise, then follow the steps above to identify the root cause and restore performance, ensuring your setup remains reliable for your sailing needs.