

 From Stern to Bow – A Complete Guide to Boat Parts">

Rekomendacja: Zacznij od skoncentrowanej listy kontrolnej i oceń maszt jako pierwszy. Dla początkującego, ta szybka weryfikacja pomaga ocenić elementy nad i pod pokładem oraz stanowi punkt odniesienia dla reszty przewodnika. Na każdym statku, the mast oraz keel zabezpiecz system; sprawdź złączki, stałe i ruchome lines, i sprzęt odporny na ścieranie. Zachowaj mały store posiada zapasowe podzespoły, aby zminimalizować przestoje, gdy coś ulegnie awarii.
Następnie zmapuj części według obszaru: kadłub, pokład, wyposażenie żeglarskie, elektryka i napęd. In various areas elementy zachowują się inaczej, więc pomocna jest dokumentacja: na przykład, wyposażenie nawigacyjne znajduje się above the dash, while the keel i ster są połączone z kadłubem poniżej. Dla a small za[mcrew, utrzymywanie kompaktowego zapasu poprawia efektywność; depending w przypadku długości rejsu, możesz przewozić dodatkowe bezpieczniki, zapasowe żarówki, zaciski i kilka elementów mocujących.
Priorytetyzuj części, które provide codzienne bezpieczeństwo i podstawowa funkcjonalność. Dla statku, the keel oraz mast są krytyczne; sprawdzaj złączki, śruby, kołki ustalające i kluczowe połączenia węży w rytmie dopasowanym do użytkowania. Once ustalasz podstawowe zużycie, możesz planować konserwację zgodnie z sezonem żeglarskim, a zobaczysz poprawę navigation niezawodność. Nie zajmie to dużo czasu na wdrożenie w większości łodzi.
Utrzymuj zapas części zorganizowany i oznakowany. Proste podejście: kategoryzuj części według ich lokalizacji na łodzi – nad pokładem, w śródokręciu lub pod linią wodną. Pomaga to członkom załogi szybko znaleźć to, czego potrzebują, i redukuje difficult decyzje podczas burzy lub szybkiej naprawy. Kupując, skonsultuj się z zaufanymi źródłami i zapisz that informacje w Twoim dzienniku; to sprawia, że przyszłe wymiany są proste, niezależnie od tego, czy zamawiasz z sklepu, czy z store.
Dopasuj poradnik do potrzeb Twojego statku. Depending w zależności od rozmiaru i typu, a small żaglowiec różni się od większego statku motorowego; ten przewodnik provides ramy oceny sprzętu, od rufy do bow i od lines do navigation elektronika. Zawsze zaczynaj od systemów krytycznych dla bezpieczeństwa, a następnie przechodź do elementów zapewniających komfort; takie uporządkowane podejście sprawia, że konserwacja jest praktyczna, a załoga ma pewność na każdej wyprawie.
Od steru do bow: Praktyczny przewodnik po częściach łodzi.
Zawsze sprawdzaj liny, halardy i sztagliny przed zajęciem steru, aby zapewnić płynną pracę i bezpieczne halsowanie.
Na grodzie, burta łączy sztagrzyny, platformę kąpielową i odpływ kokpitu samoodpompowujący. Sprawdź ustawienie steru lub koła sterowego, obejrzyj trzon rzędu i zwróć uwagę na zdjęcie po lewej stronie, które przedstawia typowe ułożenie. Czysta lazareta z ręcznymi częściami zamiennymi jest wygodna na nocne pobyty i stanowi niezapomniane udogodnienie, gdy potrzebna jest szybka naprawa.
Okucia pokładu midship napędzają twoje tackowanie i żeglugę: wkrętki, klamry, bloczki, wózek suwaka i system grotu. Naucz się regulować napięcie linialnika grotu za pomocą wkrętek, aby nadać kształt żaglowi. Podczas tackowania wykonuj płynne, przemyślane obroty i zatrzymaj linę na klamrze, aby ją zabezpieczyć. Przechowuj zapasowe liny i sprzęt w lewej części kabinowych szafek, aby mieć do nich szybki dostęp.
Wewnątrz kabiny kuchnia (galeria) przechowuje paliwo do gotowania podczas rejsu. Łazienka (toaleta) powinna być wentylowana i sucha, z małym lusterkiem i środkami czystości. Małe, uporządkowane miejsce do przechowywania pod ławkami pomaga załodze lepiej spać, trzymając sprzęt z dala, i wspiera ciekawiącą, zrelaksowaną atmosferę podczas długich rejsów.
Pokład przedni i obszar dziobu: sprawdź łańcuch kotwiczy, wciągarkę kotwiczną, rolkę dziobową i właz. Sprawdź linę fokmasztową, sztagownice i śrubę naprężającą stagmasztu, aby uniknąć niespodzianki podczas silnego wiatru. Prosty szkic fotograficzny lub lista kontrolna pomaga sternikowi zachować dokładność co do tego, co należy sprawdzić przed każdym żeglowaniem. Co jest krytyczne: dokładnie zweryfikuj, czy linia kotwiczna nie jest splątana, a sejf łańcuchowy pozostaje suchy.
Ten artykuł służy jako praktyczny przewodnik, do którego można się odnosić przed każdą podróżą. Podkreśla podstawowe elementy i praktyczne kontrole, które utrzymują łódź przewidywalną na wodzie. Ucz się na każdej podróży, rób notatki i wypracuj rutynę, która sprawia, że sen jest wygodniejszy, bryza bardziej stabilna, a każda podróż niezapomniana.
Kadłub i Kiel: Praktyczne Badanie i Wyzwalanie Wymiany
Sprawdź kadłub i kil następnego dokowania i zaplanuj wymianę, jeśli znajdziesz pęknięcia, ruchy lub korozję.
Kluczowe objawy do sprawdzenia podczas procesu obejmują:
- Pęknięcia w żywicy lub pęknięcia konstrukcyjne w okolicy połączenia kilu z kadłubem, z pomiarem szerokości i długości w celu udokumentowania zmian.
- Delaminacja lub miękkie miejsca w materiale rdzenia wokół połączeń kilu lub kadłuba, które wpływają na sztywność.
- Widoczne korozja śrub kilowych, zaokrąglone główki lub luźność przy delikatnym poruszaniu kilą; traktuj jakąkolwiek luźność jako sygnał do wymiany.
- Widoczne wnikanie wody w okolicy szwu kilowego lub dna kadłuba, w tym wilgoć w trymie lub przylegających kabinach; sprawdzać po zachlapianiu lub deszczu.
- Bluszcznienie osmotyczne na powierzchni kadłuba, szczególnie w strefie linii wodnej; zmapuj obszar objęty bluszcznieniem i monitoruj wzrost w czasie.
- Nietypowe chybotanie się, wahania lub luz w kielu podczas obchodzenia się z nim lub podnoszenia; przerwij pracę i skonsultuj się ze stocznią, jeśli wykryjesz ruch przekraczający niewielką ilość.
- Świadczy o tym, że wcześniejsze naprawy zawiodły, a nowe problemy pojawiły się podczas dokowania lub po sztormach; przerwa w kilku miejscach to wyraźny sygnał ostrzegawczy.
- Wilgoć lub wilgotne plamy w łazience lub pobliskich pomieszczeniach, które korelują z elementami kadłuba lub ruchem balastu.
Wymienione poniżej wyzwalacze wymiany, na które powinieneś teraz reagować, obejmują:
- Pęknięcia konstrukcyjne szersze niż 0,25 cala (0,6 cm) lub pęknięcia przebiegające przez wiele łączeń.
- Śruby kilowe z zaawansowaną korozją, śladami utraty gwintu lub jakimkolwiek wykrywalnym ruchem podczas podnoszenia lub kontroli ręcznej.
- Rozwarstwienie z utrzymującą się wilgocią w rdzeniu pomimo prób naprawczych.
- Rozległe pęcherzowienie spowodowane osmozą wpływające na dużą część kadłuba lub wniknięcie wody, które powraca po uszczelnieniu.
- Repeated repairs that fail within two seasons, indicating the backbone of the hull-keel assembly is compromised.
How to proceed, practically, to handle replacement:
- Document measurement data: capture keel bolt pattern, bolt length, and hull thickness; photographic records help when building a replacement plan.
- Coordinate with the boatyard; during the haul-out, use winches and lifting gear to stabilize the hull and avoid bending or twisting.
- Choose a keel option based on load, center of gravity, and hull design; ensure compatibility with existing foundations and fasteners.
- Follow torque specifications and rebed the keel shoes with fresh sealant; verify gaskets and shims are correctly positioned to prevent water ingress.
- After installation, perform a slow test load and inspect for any movement, water leakage, or misalignment; confirm the hull tracks true with no swing.
- Maintain a clear communication log with crew and yard staff; this involves sharing findings, decisions, and next steps to keep everyone aligned.
Practical tips to ensure ongoing reliability:
- Build a routine inspection cadence during docking and at seasonal transitions; good documentation supports current and future maintenance decisions.
- Communicate findings promptly to all stakeholders, including current crew and future owners; their input can highlight areas you may miss in solo checks.
- Learn basic handling checks you can perform safely on deck; use small measurements to flag changes before they escalate.
- During long waits between surveys, monitor the hull visually from the waterline and inside the cabin for any new damp spots or odours.
- Understand that prevention saves money: addressing minor signs early is far more manageable than repairing large breaks later.
Bottom line: a proactive, measurement-driven approach keeps the hull and keel functional and lets you handle larger tasks safely, effectively, and with confidence.
Deck Hardware: Fastening, Longevity, and Wear Checks
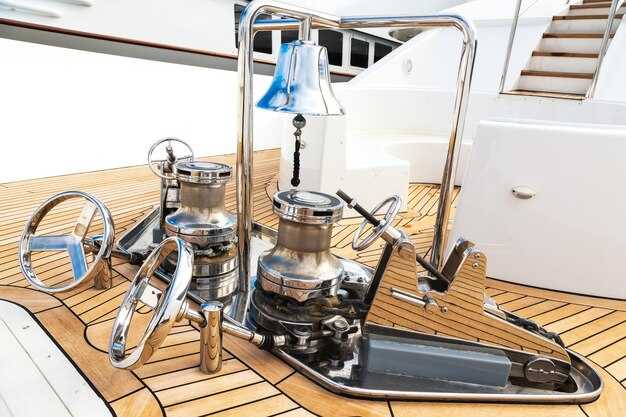
Always tighten deck fasteners to the manufacturer’s torque specs and replace any corroded fittings. The term deck hardware involves fastening, longevity, and wear checks, and it spans winches, cleats, padeyes, chainplates, fairleads, and anchor rollers that the crew rely on every day.
Fastening practice keeps the deck solid whether youre in a dinghy or at a spot with a breeze. When moving from the saloon to deck, perform a quick check on the most accessible fasteners. Use through-bolts with backing plates for deck-mounted items on boats with solid cores, and avoid thin-fastener layouts that crush soft decks. Apply marine-grade sealant between fittings and the deck, add a washer and a lock nut, and tighten to the printed torque. Clean and dry threads before the final pull; if a spec isn’t printed, log the need for professional guidance. These steps involve planning and time, and youre ready to enjoy smooth handling in wind and spray.
Longevity depends on material and environment. Use AISI 316L stainless for deck fittings in saltwater, bronze for fittings near the bow roller, and avoid mixing dissimilar metals without protective barriers. Expect 10–15 years from high-quality stainless fittings with regular inspection in temperate seas; chainplates and stanchions can reach 15–20 years if protected from crevice corrosion. Outdoor cycles, UV exposure, and heavy loads shorten life, so inspect more often in hot climates or near salt spray, and replace any pitted or cracked items promptly. Keep coatings intact and reapply marine-grade sealant every 2–4 years or after heavy seas.
Wear checks should become a routine part of every trip. Look for loosened fasteners, corrosion pits, thread wear, and bent or cracked fittings. Check depth of thread engagement, ensuring at least 1.5x the bolt diameter is engaged; if threads are damaged, replace the part and re-tap if allowed by deck material. Inspect backing plates for deformation, verify that locknuts still lock without spin, and test for deck movement by applying a firm hand twist. Inspect deck penetrations for water ingress; reseal as needed. Maintain a spare parts kit with common sizes so you can swap a part quickly and keep youre crew enjoying the voyage, especially after a long watch when fatigue lowers vigilance.
Planning and roles matter. Designate a lead for wear checks, keep a quick checklist, and assign a crew member to carry spare bolts, washers, and locking nuts. Do a fast walk-through at each dock or anchor spot, tagging parts that show wear and logging the torque and date. Whether youre on a dinghy or at the helm of a tall vessel, these habits protect depth of deck integrity and reduce repair time, letting you stay relaxed and focused on the breeze and the view.
Rigging and Control Lines: Selection, Tuning, and Common Fixes
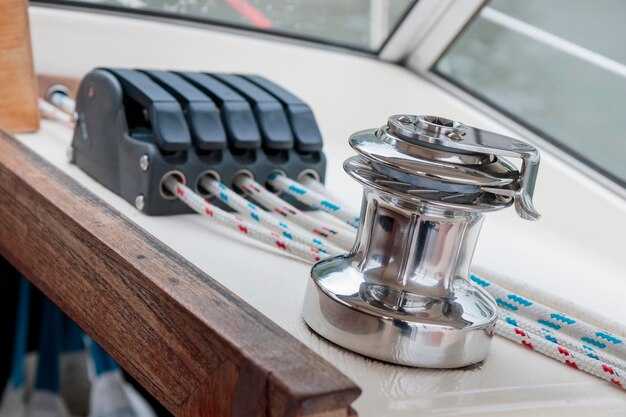
Start with a concrete recommendation: choose braided polyester lines for halyards and sheets, sized by your boat length (under 30 ft: 3/16–1/4 in, 30–40 ft: 5/16 in, 40–50 ft: 3/8 in). Pair with nylon for downwind loads and reserve low-stretch options like Dyneema for critical control lines when weight saving matters. Add chafe protection at masthead, fairleads, and around blocks, and label each rope by function to stay abreast of what runs where on deck.
- Selection
- Materials: Polyester means low stretch and long life; Nylon cushions loads but stretches more; Dyneema/Spectra delivers very low stretch for high-load control lines.
- Construction: Braided lines resist snagging; kernmantle designs offer long run strength with a durable sheath. Reserve kernmantle for long runs where you must protect the core.
- End fittings and terminations: Favor stainless fittings and reliable knottings. Whipping and proper splices reduce unraveling after miles of use.
- Size guidance by boat length: under 30 ft 3/16–1/4 in; 30–40 ft 5/16 in; 40–50 ft 3/8 in. For fleets or larger ships, plan for slightly larger diameters to handle gusts and waves.
- Color coding and labeling: Distinguish halyards, sheets, and control lines at a glance to speed handling during busy days on water or holiday crossings.
- Rope vs line: Use rope for flexible runs where you need grip and ease of tying; reserve dedicated lines for anchoring and docking to prevent cross-use at the helm.
- Tuning
- Line routing: Keep lines away from sharp edges, and ensure fairleads are aligned to minimize friction. When a line sits on a winch, check contact points every few weeks to avoid wear.
- Halyard tension: Apply enough tension to remove sail wrinkles without overloading the mast hardware; verify tension with a wind shift and recheck after gusts.
- Sheets and control lines: Set fair lead angles to keep line stays near 15–25 degrees at the winch, reducing slip and heat. For downwind winds, a bit more bend helps control.
- Cleat and winch health: Inspect cam cleats and drum grooves. Clean corrosion and grease moving parts; replace worn components before a long passage.
- Interior and exterior coordination: Keep interior lines free of cargo and place spare rope in a dedicated reel or bag so you can grab it without slowing down for repairs.
- Common fixes
- Frayed rope at wear points: cut back to clean rope and re-terminate with a splice or whipping; replace if fray continues; this prevents sudden failure on deck.
- Chafe and abrasion: install protective sleeves or hose around lines where they contact hard edges; re-seal sleeves after seasons of use to keep moisture out.
- Stiff or stuck hardware: clean blocks and sheaves, lubricate low-load areas, and replace worn bearings to restore smooth operation.
- Weak terminations: re-terminate with proper knots or splices; ensure thimbles stay intact and rope ends stay tucked and whipped.
- Shifts in load: add extra line length where needed and stash spare rope in the interior for quick repairs; keeping a small extra length can save moments when winds rise and waves build.
- Mooring and anchoring lines: check for glazing and replace when you notice significant wear; adding a protective sheath at rubbing points extends rope life during long stints in port or anchorage.
Applying these practices helps boaters maintain a safe, reliable rig across a fleet of vessels, from a compact yacht to a larger ship. With thoughtful selection and regular tuning, you’ll handle water, waves, and gusts with confidence, leaving more time to enjoy every holiday afloat and to keep interior crew changes smooth. Regular checks, prompt fixes, and clear terms for line roles should become part of your routine, ensuring your rig stays strong from the first mile to the last dock.
Propulsion and Steering Components: Alignment, Maintenance, and Troubleshooting
Align the prop shaft and steering linkage now: place a straight edge on the coupling flanges to verify true surface alignment. If misalignment is visible, loosen bolts slightly, shift the components in small increments, and retorque in a crisscross pattern. This room for adjustment keeps the drivetrain aligned for every sailing vessel and reduces vibration that boaters aboard feel.
Maintenance includes guarding the packing gland, greasing the rudder stock, and cleaning surfaces after each voyage. After you rinse salt from the stern area, apply light marine grease to the prop shaft and bearings. Keep a small bathroom kit aboard for quick cleanup of spills and to store rags and cleaner. Check halyards and lines nearby so they stay placed away from moving parts. Replace packing per the vessel’s plan, typically once per season or after the first 200 hours of operation.
Troubleshooting scenarios: if you experience heavy steering, check rudder position and surface alignment, and inspect the starboard linkage and hydraulic lines for kinks or leaks. Listen for grinding or clunking from the gearbox. In tough situations, issue a calm command, follow the plan, lead the crew to recheck fittings, and test on a short, safe ride. If the action remains stiff, stop and consult a professional.
Planning for common situations aboard, keep a compact guide on deck that covers checks, tool list, and step-by-step actions. Include a simple flow: assess, adjust, realign, test ride; if issues persist, escalate to a professional. Involve a friend or crew member, always follow safety rules, and lead by example to deliver a better ride for boats and sailors alike.
Electrical Systems and Battery Layout: Safe Wiring Practices
Install a dedicated battery distribution panel with clearly labeled circuits and a main shutoff to centralize control and prevent chaotic sprawl of lines.
Route control and power lines through protected conduits along bulkheads, keeping positive and negative runs together and away from mainsail tracks. Plan areas such as the saloon, cockpit, and berths so wires do not obstruct movement or doors, especially when waves push against the ship. Ensure the routing facilitates good visibility of labels and switches, allowing quick checks without taking excessive time during a sea trial or in rough weather.
Choose marine-grade conductors with tinned copper and insulation rated for heat and vibration. Use proper terminal blocks, grommets, and strain relief. Do not expose conductors on surface panels where waves can splash; fix them in protected routes and secure entry points to the bulkhead. A tidy setup makes maintenance easier and reduces the chance of a short that could take out critical systems during a critical moment.
Place the main battery bank in a ventilated locker toward the ship’s center, away from berths and living spaces. Use a distribution panel mounted near the companionway and keep trunk lines short to minimize voltage drop and running resistance. Size the main disconnect to withstand at least 125% of the maximum continuous load to allow safe isolation in an emergency.
Protect every branch circuit with an appropriately rated fuse or breaker, and keep the protection device close to the battery within 1.5 meters. Label each circuit with high-visibility tags to improve visibility in low-light conditions. Use a dedicated negative return path to reduce noise and avoid shared terminals that can become chaotic under heavy use, especially when sailing with a dinghy or auxiliary equipment running.
Selection focuses on daily consumption and reserve. For many vessels, a 12V system with a 100–150 Ah bank covers lighting, navigation, and comms; add a 200–300 Ah bank if you routinely run an inverter for short periods. For larger boats or longer passages, a 24V configuration can reduce current and heat, with LiFePO4 offering longevity and safe charging if combined with a proper BMS. Always design for at least two days of autonomy on essential loads and account for peak draws from the mainsail winch, autopilot, or chart plotter during heavy seas.
During operation, ensure wiring does not swing or rub against moving parts. Keep lines from interfering with the mainsail tracks, winches, or steering cables. Use grommets on openings and secure cables to bulkheads with ties and clamps, preventing accidental contact with vibration or moisture. Maintain clear surface access to the control panel so crew can act quickly, and conduct periodic tests to confirm continuity, insulation, and fuse integrity. A controlled, well-documented layout reduces risk when emergencies arise and makes routine checks straightforward for any crew aboard a vessel.
Maintenance cadence matters: inspect terminals for corrosion every season, tighten connections to the manufacturer’s torque spec, and verify that protective covers remain intact. Keep spare fuses, terminal blocks, and a small marine-grade cable kit in the saloon or a dedicated locker to speed repairs on the berth or when plans change–especially after a long voyage or when stowing a dinghy after docking.
| Circuit Area | Load (A) | Run Length (m) | Wire Gauge | Protection (A) | Uwagi |
|---|---|---|---|---|---|
| Saloon lighting & outlets | 4 | 5 | 16 AWG | 10 | Switched; keep separate from engine circuits |
| Navigation lights | 2 | 4 | 18 AWG | 5 | Critical for visibility; route near hull |
| Bilge pump | 8 | 6 | 14 AWG | 15 | Automatic float switch; keep negative common |
| VHF radio | 3 | 2 | 14 AWG | 5 | Keep run as short as possible |
| GPS/Plotter & electronics | 4 | 3 | 18-16 AWG | 10 | Dedicated branch circuit |
| Mainsail deck equipment | 5 | 4 | 16 AWG | 15 | Water-spray protected; short runs |
| Dinghy charger | 4 | 2 | 16 AWG | 5 | Isolated from critical loads |
| Engine starter | 40 | 2 | 2/0 AWG | 100 | Near-battery protection; heavy-gauge run length |