

 PNW Crabbing Tips – Essential Guide to Dungeness Crabs">

Secure the pot with a rugged wire rig and check lines every 15 minutes. In the Pacific Northwest, wind can push gear off target fast, so keep tension on the line and turn the pot gently toward the wind to maximize where crabs come up. This routine boosts your success and reduces the chance of lost gear.
Set up two pots on separate lines to compare pull and catch quality. Usually, larger pots hold more crabs and keep them securely inside when lifted. Place bait onto the bottom of the pot or into a bait bag filled with hamachi scraps or lobster pieces, tied firmly with strings so the scent travels through the grate and onto the surrounding water, attracting crabs from the field.
When the pots surface, keep the line taut and pulled gently so crabs stay on the line. Inspect the catch for legal keepers and separate them from released or undersized crabs. If you encounter a wild crab with damaged claws, release it carefully back into the water. A quick, careful release preserves the stock, making future trips more successful.
After the haul, rinse the crabs and keep them on ice or freeze promptly. For best flavor, process within 24 hours; if you freeze, lay them in a single layer until solid, then bag to prevent freezer burn. Whether you’re cooking by steam, boil, or sauté, control the heat: high-quality crab meat stays white and tender when not overcooked. If you crab with friends, join early and plan to share; keeping the workload evenly distributed makes the day enjoyable and ensures everyone gets a taste. When packing for the freezer, label frozen portions so you know what you have for later meals.
PNW Crabbing Tips Series
Begin every crabbing day by inspecting gear before you drop traps: check lines for wear, confirm the traps are attached, and tighten hardware so the ends stay secure; keep your kit clean and ready.
View the tide and current before you set out, then place traps where crabs are known to forage–middle-depth shelves with steady flow. This setup will give you better catching opportunities and shorter soak times.
Use a bait mix that draws Dungeness: two pieces of oily fish and a single oyster, securely attached to the bait board so the scent stays strong as the trap sinks. White fish meat helps visibility in murky water and can boost interest from crabs passing by. If the bait shifts, poke it back gently to keep it evenly distributed.
- Trapping strategy: position traps with the entrance facing the current and ensure they land tightly on the bottom to reduce escape risk.
- Handling and safety: when retrieving, keep claws away from hands; lift firmly, and watch for missing limbs or damaged parts that could allow a crab to bolt from the trap.
- Times and cadence: check during ebb tide or early morning when Dungeness are most active; shorter soak times maintain bait quality and reduce bycatch.
- Business and sustainability: keep a tight log of catch and release modestly, so the local stock remains healthy for the long run.
- Left vs right orientation: mark each trap with a left/right tag so you can rotate placement and cover more area without overlap.
PNW Crabbing Tips: Dungeness Crabs; Step 2 Caution; PNW Crabbing Tips; Crabbing 10 Trot-Lining Tips; Step 4 Areas for Crabbing; Step 7 Types of Traps and How to Use Them; Step 3 Equipment; Step 8 Cleaning the Crab; Step 5 How to Hold a Crab; Step 1 Warning; Step 6 Types of Bait; Crabbing for Beginners; Crabbing Off a Boat 4 Tips for Beginners
Inspect gear before leaving the road to the water: secure lines, check weighted pots, and attach a bright basket for storage. Keep the amount of gear tight and manageable, then test knots and buoy tags to prevent loss in saltwater. With dungeness in mind, set a clear plan and move efficiently to the first pull.
Step 2 Caution: Stay aware of currents and nearby boats. Secure yourself to rails, keep your party spaced well, and leave room for others to work. Avoid overloading traps-this and watch where you place gear to prevent snagging lines on propulsion or motors.
Step 3 Equipment: You need bottom pots or baskets, a trot-lining setup if you choose that method, a weighted line, and cotton or synthetic weight, plus sturdy strings and a bright buoy. Keep bait close at hand and attach it firmly to the hook or clip. Have a chef-ready knife and a clean bucket for later handling, plus a small knife for quick cleaning on site.
Step 4 Areas for Crabbing: Target sheltered structures like rock piles, weed beds, and eelgrass edges where crustaceans gather. Look for channels with steady current and deeper pockets where dungeness tend to hold. Check local market reports for current hot spots, then adjust based on recent catches and boat traffic in those areas.
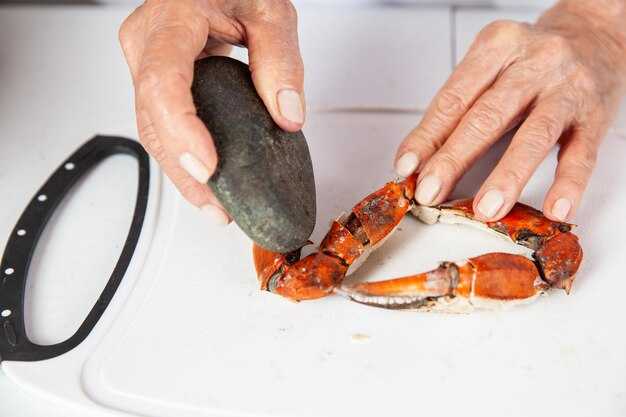
Step 5 How to Hold a Crab: Approach from behind the crab’s carapace, grab just behind the claws, and gently tilt to free the legs from the suction. Keep the claws pinched and away from the chef’s fingers, then transfer the crab slowly into a basket or bushel for safe handling. When releasing or stacking kept crabs, place them level and evenly to avoid crushing the legs or claws.
Step 6 Types of Bait: Use fresh whitefish chunks or scraps, attached securely to the bait clip. For trot-lining, lay several baited hooks along the line, spacing them to reduce tangles. Change bait every few hours if it softens, and keep bait pieces neat to encourage consistent feeding by dungeness and other crustaceans.
Step 7 Types of Traps and How to Use Them: Two common options are square pots and trot-line setups. For pots, position on the bottom with steady weight and a clear tether to the buoy. For trot-lining, run a straight line with evenly spaced hooks; keep the line taut and moving slowly to avoid snagging. When deploying, attach a bright marker and ensure the line is secure and visible to other water users. If you run into a snag, cut losses quickly to prevent larger losses later.
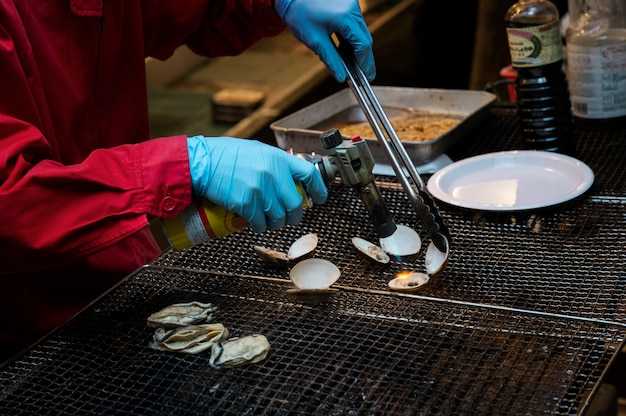
Step 8 Cleaning the Crab: Rinse the crab in saltwater, then remove the apron and gills. Separate the claws and legs, crack the shell, and extract the meat in clean, even pieces. Keep the meat on ice or in a cooler, and store in a well-ventilated space away from direct sun. For eating, extract the white meat and collagen-rich parts later, and remove any remaining grit before serving to guests.
Step 1 Warning: Always monitor weather, tides, and local regulations. Wear life jackets when crabbing off a boat or in rough water, and avoid crowded lanes. Keep kids and pets safe, and leave no trash behind on the road or boat ends. Check license rules and bag limits to prevent penalties and protect your business and the market supply.
Step 6 Types of Bait (revisited): For best results, rotate bait between whitefish and other crustacean scraps, and adapt with the season and area. Secure bait so it cannot fall off during moving tides, and avoid bait that quickly dissolves, which can cause wasted effort and reduced catches.
| Aspect | Practical Tip | Veelgemaakte fouten |
|---|---|---|
| Gear check | Inspect traps, lines, weights, and baskets; replace worn cotton or rope | Leaving gear attached and forgetting to secure |
| Safe handling | Hold crabs by the back of the carapace; keep claws pinched | Pinching the claws or dropping the crab |
| Deployment | Mark pots with a bright buoy; place on good bottom and check often | Dropping gear in heavy current |
| Bait choice | Use whitefish chunks; attach firmly and rotate if needed | Using soft bait that falls off quickly |
| Area selection | Focus on areas with structure and current; adapt to recent catches | Crabbing in open flats with little habitat |
| Cleaning | Rinse, trim apron, remove gills; chill meat promptly | Leaving guts or grit in meat |
Step 1 Warning: Coastal hazards, weather checks, and personal safety
Take a moment to check the NOAA marine forecast and tide charts 24 hours before you go, and verify again two hours prior to departure. If gusts reach 25–30 mph or seas rise above six feet, better to postpone. Put on a Coast Guard–approved PFD, keep a whistle, and have a VHF radio within easy reach. They should agree on a buddy system and a clearly scheduled check‑in time so a missed signal doesn’t become a rescue scenario.
Weather checks are ongoing. Monitor wind direction, swell height, and current. Use a reliable app plus official bulletins. Taking a moment to confirm changes saves risk, and simply re‑check on site when you arrive. If visibility drops below two miles or fog thickens, delay departure and reassess your plan.
Coastal hazards present in types you should know: sneaker waves, rip currents, slick rock, and rockfalls. Stay off wet, algae‑covered ledges and avoid standing in line with breaking surf near jetties. Be mindful of mushroom‑shaped rocks that can redirect water flow and tether or knock gear. Keep hands on rails when near the edge and watch for sudden surges that can pull you off balance.
Dress for traction: heavy duty, slip‑resistant boots, gloves, and a life jacket. Carry a dry bag for valuables, plus a waterproof flashlight and first‑aid kit. If you’re using a trotline or other long‑line setup, maintain slack and keep the line away from your body; test tension before deploying. When handling heavy gear, treat it like a chef handles sharp tools–careful, precise, and deliberate. Before you move, check that the line is secure and that you can release quickly if a line snags. Also be ready to release the line if something goes wrong and retreat to a safe spot.
Nearby commercial activity adds risk. They may be targeting sablefish, hamachi, or mahi, so give their gear ample space and avoid crossing lines or nets. If you see wire‑mesh pots or other gear, do not pull or cut lines; signal for help and wait for a safe moment to act. If a pot is released and drifts, mark its position and recover later with a partner. Keep a clear path to your own gear to prevent entanglement and stay aware of where you are in relation to others.
Pre‑crab season safety checklist: maintain a high level of situational awareness on every outing. You want a defined route, ETA, and emergency contacts, plus a plan to abort if conditions worsen. Taking these steps reduces risk and keeps the focus on a productive crabbing session. Re‑check conditions before each set and again after reloading gear, so you’re ready to adapt instead of reacting to a sudden change.
Step 3 Equipment: Gear checklist and setup for crabbing
Use a compact, fast setup: a heavy crab pot with 3-4 inch mesh; the buoy is attached to the main line, and a weight keeps gear from drifting by the blue float. Although compact, this setup handles steady currents and keeps your hands away from loose rigging.
Gear checklist: traps with reinforced lining, 2-3 spare lines, a heavy weight, a bushel-size catch basket, white buoy and a blue backup buoy, a knife or poke tool for bait, and spare fasteners to secure bait blocks. They stay ready for quick changes at the dock or on the water.
Setup: deploy traps along a straight line or gentle curve, leaving left and right margins clear of boat traffic; use the main line to lower pots and a shorter lead line to minimize snagging; once you set the line, mark a fixed path and note which pot sits on left or right. Each trap has a weight and a small ring which helps secure the line; they perform best when kept taut.
Bait: Use bait such as oily fish, heads, or cut squid; oysters can be used where allowed by market rules; place bait toward the lining to prevent scent loss.
Warning: check local regulations, avoid mixing traps with lobster pots in tight channels; never leave gear unattended; always secure lines and store in dry place.
Time management: test soak times; in calm water check after 20-30 minutes; in current or waves check every 15 minutes; later you can adjust based on catch and conditions.
Handling and safety tips: crouch with legs spaced; avoid stuffing hands into the trap; poke to check if crabs are alive; join a buddy to lift heavy pots. This game plan keeps you efficient and reduces fatigue.
Transport: use a basket or bushel to move crabs; line the basket with white lining to reduce friction; place a loose lid to vent.
Final tips: keep gear attached and labeled; always replace worn mesh; after each run, inspect knots and connections; tips: faster setups reduce time in water.
Step 5 How to Hold a Crab: Safe grip, hand position, and escape avoidance
Grip the crab from the back of the shell, with your thumb on one edge and your fingers spanning the opposite side. Hold the shell flat against your palm and tuck the walking legs under the body to limit movement. Always point the claws away from you and keep the body stable as you lift. What matters is a clean, controlled grip that reduces sudden escapes.
Place the base of the last walking legs under your palm for a four-point cradle. Spread your fingers to cover the center of the carapace, then slide the crab slightly toward the back so the primary claws stay clear of your fingers. If you have a long-handled tool, use it to shift the crab without exposing your hand. The holding position should feel secure but not constricting. For shellfish handling, this grip keeps fingers safe and makes it easier to move the crab later in the process.
Escape avoidance comes from a calm, deliberate pace: if the crab twists, hold firm and move your grip a notch rather than twisting your wrist. Lower the crab into a container with the shell facing down to regain control, then regrip and continue. Avoid sudden fast moves that trigger a pinch or drop.
Gear and setup make this easier: keep a small shop kit at home or in your market bag with cut-resistant gloves, a long-wire tongs, a sturdy bucket, and a netarts-style net or other accessories. If you started crabbing online or at the market, locate these items quickly and keep them nearby for future uses. A four-item setup speeds transfers during a party and around the table.
Once held safely, you can move to cleaning or cooking. Recipes and serving ideas follow, and this grip helps most crabs stay controlled, leading to success in fast transfers and better results on the plate. Since you’ve been practicing, you’ll feel more confident when you shop for gear at the market or online, and you can keep the same approach for future shellfish, what to cook next, and how to share tips with your party. Later, this method becomes your go-to for any crab handling you’ve started since you first joined the activity.
Step 6 Types of Bait: Best options by season and species (bait prep tips)
Use live sablefish heads as your go-to bait, then layer in shellfish like oysters or netarts for added scent. Use a trotline for broad coverage, and keep bait ready on boats in a cooler for quick re-baiting.
Spring: Keep live sablefish heads on hand and cut any whole fish into four-inch flat pieces. Pair these with fresh oysters or netarts to boost bite in cooler water. Attach pieces so they sit flat on the bait mount; this makes it easier to handle and reduces snagging when the line runs. Work the tide by repositioning anchors and bait along the line for even level exposure.
Summer: Switch to good-quality fish heads or scraps, cut into shorter 3–4 inch portions. Keep bait in a shaded cooler aboard boats and refresh every few hours if you’re actively crabbing. The scent travels well with current, and a steady supply helps you keep bait for both male and female crabs on the line.
Fall: Shellfish shine, especially oysters and netarts. Use whole shells or shucked meat; remove any sand and rinse before placing on hooks. Keep pieces around four inches long so they stay on line, and tie them securely so they don’t slip as you fish with traps or a trotline. This approach appears to attract a great bite rate when green water runs inshore.
Winter: Frozen or preserved fish remains work well when trips are short and days are slow. Use four-inch pieces of clean fish to fill gaps in bait bags, and switch to solid bait stations to keep scent strong. Store bait in a closed cooler and rotate materials to maintain freshness; this keeps boats fishing through cold fronts and rough seas.
Step 7 Types of Traps and How to Use Them: Pots, trotlines, and handlines; placement basics
Start with pots for reliable returns; set 2–4 pots per site with weighted drop lines and blue floats, then add trotlines or handlines as needed based on water access and weather. If you want a simple start, pots are the easiest to manage.
These things work together to boost reliability and keep gear organized.
- Pot setup and placement
- Choose flat-bottom pots 8–12 inches across; ensure durable lining; make sure the pot is attached to the weighted line so it sits on the bottom; seal the lid after baiting to keep scent in and smaller shellfish out.
- Placement basics: place on sandy or gravel bottom in 6–15 ft of water, with entrances facing upstream; leave 4–6 m between pots; leave room for retrieval; mark each rig with blue floats so you can locate them easily while returning from the market or dock; avoid areas with heavy boat traffic or kelp that can snag lines.
- Baiting and recipes: prep bait in your home kitchen; keep recipes simple; use shellfish byproducts and fish scraps with a mean scent and collagen to help scent stick; attach bait securely so it cannot fall out; check until you find crabs during each check; remove catch promptly and put pot back in place.
- Trotlines
- Structure: run a long main line with evenly spaced droppers; attach 6–12 inch leaders with weights to keep each drop near the bottom; a sturdy lining on the main line protects it and helps keep tangles down; ensure the line is attached to floats to mark ends; in a commercial setup, inspect line daily.
- Placement: anchor near structure features like pilings, rock rubble, or eelgrass beds where shellfish are found; keep line tension to prevent snagging; use floats to mark ends; don’t overhang moorings or buoys; check and reset after storms.
- Handlines
- Gear: handline with bait on a small baited line or lure; attach a weight; you can pull crab by hand from a calm area; keep line low to avoid surface winds.
- Placement: bays and weed lines, close to docks or structure edges; move to fresh spots after several checks; use a scoop to remove crab; avoid leaving lines attached when not in use for long periods.