

 Category Diving in Hawaii – The Ultimate Guide to Top Diving Spots, Gear, and Safety">

Recommendation: Start with a three-island itinerary that emphasizes the archipelago’s diversity, giving you a great balance of surface comfort and underwater exposure. If you’re getting into the gear mindset, this approach keeps momentum without overwhelming you. Focus on lava tubes, reef passages, and wrecks, then rotate through morning trips to maximize visibility and chances to observe feeding events and plankton blooms. This opportunity comes with a side of memorable avonturen and helps you realize your dream of exploring Hawaii’s currents with confidence.
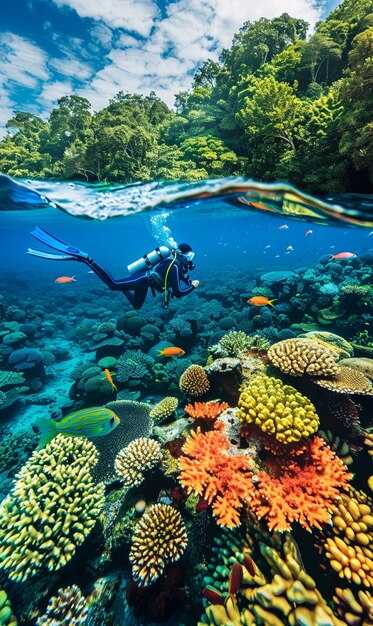
Molokini Crater, Maui: The crescent caldera delivers reliable visibility and calm conditions. Expect 30–100 ft views and depths around 20–40 ft in the inner reef, with sea life including schooling fish and occasional turtles. Operators run morning trips from Kihei and Maalaea, and the site is ideal for photographers who want a clean backdrop and easy entry. You’ll be near plankton hotspots during certain seasons, which can attract dramatic feeding events for larger pelagics nearby.
Kona Coast, Big Island: The night manta encounter is a signature adventure with a high probability of sightings; mantas reach 12–15 ft wingspan and glide through 70–100 ft visibility at night, in water around 72–78°F. Dress in a 3–5 mm wetsuit for comfort, bring a primary and backup light, and listen to your guide’s safety briefing on feeding areas and entry procedures. Lava-tube passages along this coast enrich the experience, offering surreal channels between molten formations–an opportunity to learn about the volcanic past while staying within your limits.
Wrecks, currents, and safety on Oahu and Kauai: On Oahu, several shallow wrecks lie in sheltered areas, offering accessible connections to ship history and vibrant reef life. When planning a trip, consult a licensed operator and follow depth limits; regarding currents, always plan an exit and keep an eye on air. Use a surface marker buoy to signal your side of the team and to aid safety. For Kauai, drift dives along the north shore require local guidance for the best visibility and experience.
Gear, planning, and safety basics: Start with a 4/3 mm or 5/4 mm full suit for year‑round comfort, a good mask and fins, a regulator with an alternate, and a computer with safety stops. Pack a surface marker buoy, whistle, and reel for entry-and-exit scenarios near lava shelves or wreck lanes; consider a small camera rig for avonturen and keep a second light for night sites. For your itinerary, schedule two to three main dives per island and leave space for rest days to recover and getting used to Hawaii’s currents. These choices give you a steady rhythm and ensure you have enough energy for your best shots and most memorable moments.
Regional Dive Planner and Gear Checklist for Hawaii
Start with a practical plan: base in Honolulu as your hub, then schedule inter-island hops to kauais and other islands, limiting to three sites per trip to keep the pace comfortable. This approach keeps the feet moving and helps you manage dozens of options across the state while staying on top of changing conditions.
Gear for Hawaii action splits into personal items and operator gear. Personal kit should include a low-volume mask with tempered glass, a compact snorkel, fins, booties in 3-5 mm, a 3/2 or 4/3 wetsuit, a weight belt, and a buoyancy compensator with a reliable regulator and octopus. Rent tanks, weights, and other essentials from local ops when possible to stay flexible for inter-island moves. Carry a surface marker buoy, whistle, waterproof notebook or slate, and a compass. For night experiences, add a headlamp and spare batteries. Bring a safety reel for currents and a spare mask or dry bag for transitions between hubs.
Site selection tips: choose shallow, sheltered reefs when you base in Honolulu or kauais. Iconic spots often sit near calm bays with thriving corals and intriguing sea life. Start with dawn sessions to enjoy magic light and calmer seas, then switch to afternoon tours when winds pick up. Always check the latest conditions and wind map before departures.
Inter-island planning details: check flight and boat schedules; dozens of operators offer transfers between islands; book a buffer day after a long crossing to stay rested. If you stay on one island, concentrate on a handful of reefs that are easily accessible by boat or shore. This approach reduces fatigue and keeps you safe in populated anchorages with helpful crews.
Weather, seas, and safety tips: monitor forecast updates from a trusted source (источник local operators) and carry a simple weather card; Hawaii seas range from glassy to moderate chop, rarely exceeding moderate on most coasts. Winds shift with seasons; count on 70-80°F (21-27°C) water temps in summer and 68-76°F (20-24°C) in winter. Pack layers and a warm layer for post-experience. Consider a lightweight dry suit for winter nights when cruising coastal sites. Stay with a buddy, stay in daylight hours, and keep a clear plan at each site to prevent fatigue and maximize enjoyment.
Checklist quick-reference: mask, snorkel, fins, booties; wetsuit; weights; buoyancy compensator; regulator with octopus; surface marker buoy; signaling gear; underwater slate or notebook; compass; light and spare batteries; safety reel; dry bag; hydration. Store a digital copy of local operator contact numbers and emergency numbers. Mark each site with arrival times and currents, so you can adjust quickly during inter-island itineraries.
Oahu Beginner Dives: Region Access, Rental Gear, and Buoyancy Basics
Start with a guided, beginner-friendly outing from Waikiki and rent a basic gear set (mask, snorkel, fins) from a reputable shop. This approach is perfect for building comfort and planning a solid base for your oahus experience.
Region access centers on three practical options. Waikiki waters offer gentle, nearby entries for first sessions, while outside Waikiki you’ll find Hanauma Bay Nature Preserve with protected reefs and clear water, and Ko Olina’s calm lagoons that suit first-timers. Each location provides different landscapes, but all fit a category of beginner experiences with low current risk and straightforward exits.
Buoyancy basics start with a neutral stance about two to three feet (roughly 60 to 90 centimeters) below the surface. Breathe slowly, keep your breaths even, and make tiny adjustments with your chest and hips rather than big leg kicks. This slightly controlled method helps you stay close to the reef without touching life or stirring silt, which benefits everyone being in the water with you and improves comfort as you gain experience.
Rental gear should cover essential items: a well-fitting mask, a snorkel that clears easily, and fins sized for your feet. Add a lightweight exposure suit if the water feels chilly (April mornings can be cooler), and consider a small weight belt to help achieve neutral buoyancy at the surface. Check the shop’s gear for wear, mask seal, and valve function before heading out, and confirm any regulator or buoyancy aid options if you plan a longer session with a guide.
For beginners planning a Hawaii itinerary, a local susan, a trusted guide, can tailor the day to your pace and skill level. Her advice helps you maximize the advantage of calm mornings, choose a route that avoids heavy surf, and stay safe while exploring nearshore habitats. Many operators offer short, original routes around waikiki waters that emphasize gradual progression and clear safety briefings, which keeps your planning focused and realistic.
Be mindful of wildlife and reef life. Frogfish sightings exist in some pockets of Oahu reefs but are not guaranteed, so manage expectations and stay relaxed about outcomes. If you’re curious about hammerhead activity, know that those encounters are famous in Kona, not common around oahus, but you’ll still enjoy watching a diverse array of small reef fish and friendly reef structures on your region day. The goal is steady improvement, not chasing a single moment, and the right preparation will help you gain confidence with every session and with every new location you visit within the island’s waters.
With a clear plan, the right gear, and a patient guide, your first weeks as a beginner on oahus will feel approachable and rewarding. The category of beginner experiences on this island offers a practical path to build skills, enjoy calm conditions, and grow into more confident underwater moments as the months progress, especially when you align your outings with favorable weather and sea states.
Molokini Crater Dives: Visibility, Boat Access, and Marine Life Encounters
Book a morning boat charter from Maui to Molokini Crater and snorkel the crater rim for the clearest visibility and calmer currents.
Molokini sits about 2.5 miles off Maui’s southwest coast and is accessible from Lahaina, Kaanapali, or Maalaea Harbor. Plan a 2.5–4 hour excursion, including time at the site, with 30–45 minutes of cruising each way depending on wind and seas.
Visibility on ideal mornings reaches 60–100 ft (18–30 m) commonly, with peaks above 100 ft when trade winds are light. Surface temps hover in the mid-70s F, and water temps typically linger in the mid-70s to low 80s F–comfortable for a long session in a lightweight wetsuit or rash guard. The night sky over hawaiis oceans fades as dawn approaches, and the first light enhances visibility for the morning trip.
Marine encounters deliver an abundance of reef life: expect schools of tangs and surgeonfish, bright wrasses, parrotfish, morays in crevices, and green sea turtles cruising the outer shallows. Sightings of reef sharks are possible near the outer wall, and pelagic species may drift by the edge on calmer days. If youre lucky, you might even spot spinner dolphins skimming the channel at dawn.
Boat access is straightforward: multiple operators offer morning departures, with pickups from Maui resorts and nearby towns. Resorts and transfer services arrange convenient options for visitors; check-in times are typically 6:30–7:15 am to maximize visibility and wildlife activity. Remember that the outer rim can experience stronger currents; stay with your guide, use provided flotation, and avoid stepping on coral for an intriguing, respectful experience.
Practical tips: bring a waterproof camera, reef-safe sunscreen, a light layer for the chillier wind, and a small snack. Read the operator briefing ahead of time to understand zones to avoid and how to minimize disturbance to wildlife. Molokini’s location, combined with the neighboring lanai and nearby Oahu itineraries, makes a visit to this area part of thrilling adventures in hawaiis oceans and a must for any visitor to visit.
Kauai Night and Macro Dives: Lights, Photography, and Tiny Critters
Get a compact macro-lighting kit: a 60–100 mm lens, two compact strobes, a focused LED light, and a red-light option to preserve natural colors. Getting the most from Kauai’s night macro opportunities starts with patient, steady movements and a plan that keeps you close to the subject (about 8–15 cm) while youre getting the composition right. This setup is a great foundation for intriguing close-ups as the marine world wakes after sunset.
Great locations include caves along the Na Pali coastline, lava tubes, and sheltered reef flats where you see diverse tiny life. Those high-contrast walls offer abundance and a choice of subjects, including gobies, pygmy shrimps, nudibranchs, and small octopuses found in crevices. Expect endemic species such as the hawaiian reef goby and the Hawaiian bobtail squid to appear, plus the iconic hawaiian monk seal occasionally at the water’s edge–keep your distance and let those majestic animals pass. At sunset, a turtle glides by, offering a larger silhouette against the tiny world you’re documenting. These sites provide tropical color and plenty of options for getting close to them, and you may also catch the occasional flying reef fish skittering through the current.
Think about lighting and technique: light the subject with a dual-strobe setup and light from slightly off-axis to reduce backscatter. You may catch manta shapes near the surface when youre close to the reef edge after sunset; they appear as graceful silhouettes against the dark blue, a great reminder of the pelagic realm beyond the reef. For macro, position strobes at about 40–60 degrees, use a focused light to lock focus, and shoot RAW with manual white balance. Suggested settings: shutter 1/125–1/200, aperture f/11–f/16, ISO 400–800; adjust based on visibility and backscatter.
Expect a diverse roster of subjects: the hawaiian bobtail squid, endemic nudibranchs, and those shy crabs tucked into caves. Getting close takes patience, but the payoff is great: textures on shells, the intricate lines of gill arches in tiny fishes, and the pop of color in the tropical reef. You may hear reef songs in the background as you shoot, an audible cue that something lives here. Getting shots at sunset adds dramatic color, and turtle silhouettes provide scale among the tiny world you’re documenting. If youre shooting macro, keep your distance and let the abundance of life reveal itself. There’s something magical about the marine night that makes the micro-world come alive.
Safety and etiquette guide the session: read currents and wind before entering; move slowly along the reef edge, avoiding contact with wildlife. Never touch or chase subjects; give them space and back off if they show signs of stress. Keep a respectful distance from monk seals and other protected animals; youre there to observe, not to influence. Maintain buoyancy to protect delicate habitats, such as caves and high walls in lava tubes. After you return, read your notes and catalog your best shots for future trips.
Big Island Volcano Dives: Currents, Hazards, and Safety Briefings
Begin with a precise safety briefing and verify current, tide, and swell forecasts; travel in pairs and follow the planned entry and exit points. In volcanic coastal waters, flows can shift quickly and push toward reef faces or narrow channels. Set a clear maximum depth with the guide, ensure a surface signaling device is ready, and confirm the emergency ascent plan. This approach protects the group and reduces risk.
Key hazards include abrupt current changes, limited visibility from stirred sediment, sharp basalt, loose rubble, and entanglement with lines or gear. Avoid contact with fresh rock surfaces and submerged features; keep to the guide path and respect marked exit zones. Induced surges can push toward deeper canyons, so stay within the planned profile.
Safety briefings cover buddy pair, signaling methods, ascent and exit plan, pace, depth limits, and equipment checks (BCD, regulator, exposure suit, gloves, fins). Operators from island towns provide these trips and tailor plans to conditions. Always carry a surface signaling device and use a surface marker buoy when surfacing. If visibility drops or currents intensify, discontinue and return to the ascent line. Following the session, record conditions and any gear issues and debrief with the guide before heading back.
Seasonal Windows: Best Times, Weather, and Planning for Hawaii Underwater Adventures
Book early with a reputable operator offering whale-watching and reef encounters; target January–March for humpback activity and excellent sea conditions.
Seasonal windows at a glance:
- Winter to early spring (Nov–Mar) – humpback whales dominate the scene, delivering an unforgettable show; peak viewing typically December through March. Conditions vary by coast: calmer on leeward shores, potentially larger swells on exposed north faces. Water temps run around 74–79°F (23–26°C) with visibility commonly 60–100 ft at reef sites. Shop around for offerings that pair wildlife viewing with reef exploration; artificial reef structures and richgiff formations add interest. Connect with a guide to tailor a plan that fits your experience, and head out in the morning for the best light and calmer seas.
- Summer to early fall (May–Sep) – seas often relax, delivering higher visibility and smoother passages along many routes. This window is excellent for longer scuba trips and snorkeling adventures along diverse sites near Maui, Oahu, Kauai, and the Big Island. Time on the water can be robust, and the opportunity to encounter dolphins, turtles, and manta rays is common. Guides frequently offer multi-site itineraries that maximize wildlife encounters while keeping conditions favorable; also, mornings tend to present the best conditions.
- Shoulder seasons (Apr, Oct–Nov) – transitional conditions and fewer crowds. It’s a better time to shop for new offerings and to test different operators, as head-to-head comparisons reveal which shop delivers the most value. Nearly all sites remain accessible, and guides can customize trips to suit exact preferences and skill levels.
Heads up: conditions can change quickly; always confirm with your operator the night before and check the latest forecast.
Planning and safety checklist:
- Timeframe – book 6–8 weeks ahead during peak months; early spring and fall can still require planning, but demand drops slightly.
- Operator and gear – choose an operator with a solid safety record and gear that fits your comfort level; inquire about artificial reefs and other sites that align with your ambitions.
- Itinerary flexibility – ask for options that move between sites along the coast so you can maximize chances to observe wildlife and endure favorable conditions.
- Voorbereiding – pack sun protection, reef-safe sunscreen, rash guard, towel, water, and snacks; bring a waterproof bag and secure footwear for access to boats.
- Wildlife timing – humpbacks are most active early morning and late afternoon; plan around guide recommendations to optimize time with animals.