

 Wakesurfing 101 – Expert Tips and Tricks to Master the Wake">

Begin with one concrete rule: keeping your center of gravity lower and flotation balanced with steady core control will help you stay in the wake and ride the first section confidently.
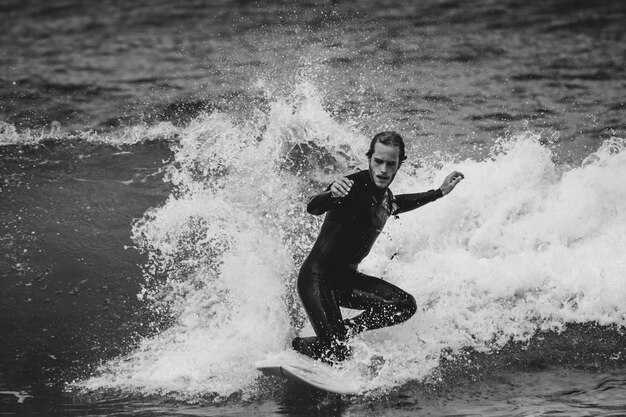
Set a compact stance–knees flexed, hips level, and shoulders square to the board–and ride toward the best spot on the wake with smooth, centered motion. they know that the simplest gains come from steady weight shifts and a constant feel for the water.
When you try transitions, keep your edge and aim for a clean forward carve, then test a backward move or tail-first trick. Start slow to feel the board respond, then apply more 힘 to push into faster rotations. Practicing these passes in short, focused sets helps you find your rhythm.
This moment of control is exhilarating 그리고 흥미진진한, because you maintain flotation and keep the board on an efficient path through the wake’s motion. Let your board slide slightly to stay in contact with the water, then accelerate in small bursts to stay faster during surfing edge changes.
Develop a personal routine that fits your day: practicing in 10–15 minute blocks, keeping your eyes on the horizon, and finding a reliable spot on the wake. They know consistent repetition beats one-off flair, so practicing with intention builds trust in the water.
Continue layering these steps until you can link a clean carve to a confident surface ride, then push into new moves with a patient, curious mindset. With time, your Wakesurfing 101 toolkit becomes a personal map of progress that stays fun 그리고 rewarding.
Getting Started and Gear Setup for New Riders
Put on properly sized vests and set the tow rope to a conservative length before you enter the water. This makes getting up easier and gives you a stable baseline for your first attempts. Have a buddy verify the rope length and keep the line pointed toward the boat for a clean start.
Choose a wide, stable board with a soft rocker; this setup is used for learning and reduces nose dives. If you can, pick a used board or a rental designed for beginners, and favor a front stance that stays buoyant and predictable as you move across the water.
Position your body with a centered stance: weight between your heels and toes, knees soft, and eyes forward. Lead with your chest and hips, then rotate to square your shoulders as you stand. A small rotate of the hips helps you stay balanced as you rise, making the pull from the wake more controllable.
Grab the rope handle with a light, steady grip and keep your arms relaxed. Accelerate smoothly with the boat, letting the wake push you up rather than forcing the rise. Stay between the rope and the board, with the front shoulder leading the direction you want to travel towards the wake.
Boat setup and safety: maintain a steady speed around 9–11 mph (14–18 km/h) for a clean wake and easier learning. If you’re aiming to deepen the wake, add extra ballast in a safe way and verify you have a clear path behind you. If you’re using an outboard, the operator should keep a smooth pace and avoid quick changes in direction. A friend named raley can help you watch the line, give signals, and coordinate moves with the rest of the people on board.
Progression and practice: attempting a clean pop-up on land helps; start with a few reps, then transfer to the water as you gain confidence. Use short runs to build feeling and control, and give yourself time to recover between attempts. In a group session, having teammates to spot you and cheer keeps motivation high, but stay mindful of safety at all times in this watersport. As you improve, work toward grabbing, standing, and landing cleanly, and you’ll notice how much easier balance and timing become.
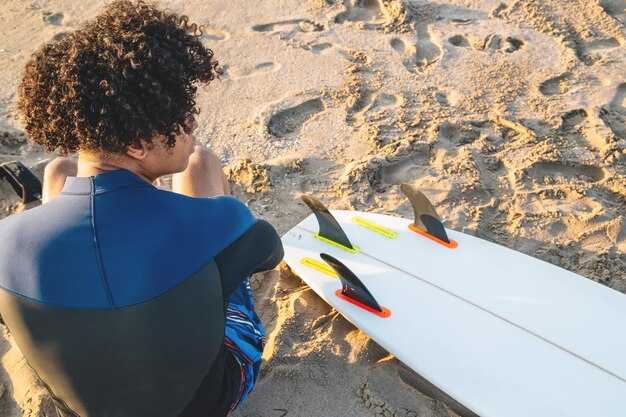
Choose the Right Board and Fins for Your Weight and Skill Level
Start with a 60–62 inch, high‑volume board if you weigh up to 180 lb; for 180–210 lb choose 62–64 inch and for 210 lb plus go 64–66 inch with a wide, thick profile. This setup provides reliable lift at the spot, easy early planing, and a forgiving feel so you can stand quickly and focus on balance rather than chasing the wake.
Fins matter as you progress. Use a two‑fin (2+1) system or a single center fin for beginner comfort, with side fins near 3 inches and a center fin around 4–5 inches. Position the center fin slightly forward to boost forward drive, helping you stay in the pocket as your personal feel improves. When you move toward advanced days, switch to a thruster (three fins) or a quad for extra speed and tighter turns, then move the side fins outward for a looser riding feel.
Weight and skill guide your choice. Heavier riders benefit from extra buoyancy, so a larger board remains stable while you learn the basics. Beginners gain confidence from the long, wide profile that lifts the front early and reduces fatigue–spend more time feeling the stance and less time chasing balance. When you stand, crouched in the knees and hips, let the front foot lead and shift weight gently to the forward foot to lift the tail and smooth the ride, which helps your body remember the moving rhythm of the wake.
Spot considerations and legal notes. Check the local spot rules for board size limits, and keep a spare fin or two so you can adapt quickly if the water is moving or rough. A large front fin increases stability on calm days, while extra side fins give you control on choppier water. Welcome adjustments as you improve, and tailor your setup to the wake, the rider, and personal preference for a smoother, more comfortable ride.
Safety Gear and Pre-Ride Warm-Up Routines
Wear a Coast Guard–approved PFD that fits your weight and a water-sport helmet before you enter the water. This gear provides buoyancy, head protection, and secure footing the moment you started. Attach a snug ankle leash if you’re new to wakesurfing, and double-check all straps so nothing shifts during the ride. These measures help you stay secure and reduce the chance of a slipped strap mid-session.
Consider an impact vest or padded shorts for added protection, and choose a wetsuit or booties appropriate to water temperature. These are the kind of gear choices that help rider move with confidence, staying comfortable across a range of weight shifts. The floatier feel of a good vest improves balance and reduces fatigue in demanding days.
Pre-ride warm-up on land focuses on basics and consistency. Step 1: 60 seconds of light cardio, Step 2: dynamic shoulder circles, hip hinges, leg swings, ankle circles, and a 5-minute mobility sequence. These moves prepare the shoulders, core, and ankles for the rotation and weight transfer you’ll use into the wake. This routine helps you have a path to success from the start.
Dry-land drills: practice the rotation of hips from toeside to heelside and switch to the opposite stance to build familiarity and master balance. Step 3: simulate edge loading, step into the board with controlled weight transfer, and land softly. If you started goofy, try the opposite to build a well-rounded motor pattern and keep it familiar and kind of even.
On-water warm-up: approach the wake with relaxed shoulders, keep your head up, and bend into a smooth rotation as you ride the edge. Do 4–6 gentle carves into the wake, then rotate back out and repeat, maintaining a consistent pace to build control. There might be a floatier feel as your stance settles, which indicates you’re in the best position for the next pass. You might feel tired in the legs, but quiet technique helps you stay calm and save energy for longer runs.
Post-session checks and care: rinse gear, dry thoroughly, and inspect for wear. A quick head-to-toe check of the board, fins, wax, and leash ensures okay conditions for the next ride. Hydration matters, so sip water and consider a light snack within 30 minutes. A simple plan like this provides a steady rhythm and helps you stay on track with the basics as you master the sport.
There is no substitute for consistency in your pre-ride routine. Track basics, keep the weight evenly distributed over your board, and continue to master rotation through varied sessions. With familiar, well-tuned gear and a focused warm-up, you reduce much of the guesswork and raise your rider’s odds of success in demanding conditions.
보트 웨이크 관리: 적합한 보트, 추진 장치 및 밸러스트 선택
웨이크서핑용으로 제작되었고 밸러스트가 통합되어 있으며 추진 방식이 안정적인 보트를 선택하세요. V-드라이브 또는 다이렉트 드라이브 설정의 인보드 보트는 안정적인 웨이크를 제공하며 조향에 영향을 주지 않고 밸러스트를 조정할 수 있습니다. 깨끗한 웨이크, 감소된 스프레이, 라이더 속도에서 일관된 성능을 지원하도록 설계된 선체를 선호하세요.
밸러스트 전략: 22–24피트 보트의 경우 총 밸러스트 목표는 2,400–3,000lb입니다. 후방 탱크에 대략 60%를, 선수 밸러스트에 40%를 분배합니다. 보트 트림이 너무 기울거나 선수 부분이 물에 잠기는 것을 방지하기 위해 밸러스트를 점차적으로 추가하십시오. 냉수에서는 펌프 성능으로 인해 밸러스트를 채우는 데 시간이 약간 더 걸릴 수 있으므로 이를 고려하십시오. 세트에서 길이가 늘어날 때 웨이크 높이를 일정하게 유지하기 위해 추가 밸러스트가 필요할 수 있습니다.
추진력 및 작동 시간: 긴 세트와 라이더 요청에 대한 빠른 응답을 위해 충분한 출력을 갖춘 엔진을 선택하십시오. 밸러스트 물은 빠르게 채워지므로 펌프가 꾸준한 흐름을 제공하고 백업 스위치가 있는지 확인하십시오. 견고한 밸러스트 시스템을 사용하면 턴 사이에 웨이크-투-웨이크를 유지하고 조건이 변할 때 라인을 빠르게 조정할 수 있습니다.
포지셔닝 및 웨이크 형성: 보트 뒤에서 안정적인 웨이크를 유지하기 위해 후방 밸러스트 쪽으로 무게 중심을 두고 자세를 잡으세요. 허리는 중심선 위에 두고 몸통은 편안하게 유지하세요. 초보자의 경우 자세와 라인 조절만으로도 회전 시 큰 개선을 얻을 수 있다는 것을 알게 될 것입니다. 조정은 발 위치와 라인 각도에서 이루어지며, 제어력을 잃지 않고 주행 중에도 정확한 변경이 가능합니다.
다양한 체중과 목표에 따른 라이더 맞춤 튜닝: 체중이 더 많이 나가는 라이더는 웨이크가 무너지지 않도록 높게 유지하기 위해 더 많은 후방 밸러스트와 적당한 선수 밸러스트가 필요합니다. 체중이 덜 나가는 라이더는 밸러스트를 줄여도 안정적인 립을 얻을 수 있습니다. 여러 명의 라이더가 있는 경우, 천천히 속도를 내어 잠시 테스트한 다음, 특히 변화가 빠른 바람이 많이 부는 날에는 반복할 수 있는 설정으로 고정하십시오.
현지 점검 및 안전: 해당 구역의 밸러스트 및 속도 제한을 확인하고, 항상 스파터가 보이는 곳에 있도록 하며, 미끄럽거나 장비가 빠진 상태로 타지 마십시오. 세트 사이 밸러스트를 조절하는 빠른 루틴을 활용하여 짜릿한 라이딩을 유지하십시오.
월드 커넥션 노트: 이 스포츠는 전 세계 라이더들을 연결합니다. 초보자와 프로 모두에게 도움이 될 수 있도록 밸러스트, 속도, 보트 설정에 대한 데이터를 공유하세요.
깨끗한 웨이크를 위한 로프 길이, 속도, 그리고 자세
깨끗한 웨이크와 예측 가능한 출발을 위해 로프 길이를 20~22피트로 설정하십시오. 체격이 큰 라이더는 길이를 몇 피트 정도 조정하면 좋습니다. 체격이 작은 라이더는 짧은 라인을, 체격이 큰 라이더는 더 긴 라인을 사용하여 보드가 계속 트래킹되도록 하고 웨이크를 일정하게 유지하십시오.
움직임과 서두름을 최소화하려면 9.5–11mph의 꾸준한 속도를 유지하십시오. 침착한 속도는 문제를 피하는 데 도움이 되고 자세를 똑바르게 유지해줍니다.
균형 잡힌 자세를 취하세요: 발은 어깨너비로 벌리고, 무릎은 살짝 굽히고, 등은 곧게 펴고, 가슴은 펴고, 엉덩이는 정면을 향하게 하세요. 레일에 압력을 유지하고 보드가 아래로 떨어지는 것을 방지하기 위해 뒷발 쪽으로 약간 기울이세요.
회전은 제어된 상태로 유지해야 합니다. 어깨 회전을 제한하고 움직임을 엉덩이와 일직선으로 유지하십시오. 이렇게 하면 많은 스핀을 줄이고 뒤의 물결이 깨끗하게 유지됩니다.
안전 및 장비: 차가운 물에서 잠수복을 입으면 체온 유지에 도움이 되고 관절을 보호합니다. 몸에 맞는 조끼를 입으면 라이딩 시 부력을 더할 수 있습니다. 문제나 통증이 발생하면 멈춰서 자세를 다시 확인하여 부상을 방지하십시오. 이는 필수적인 확인 사항입니다.
라이더와 스태프는 지속적으로 기술을 연마합니다. 스태프는 즉각적인 피드백을 제공하고, 라이더는 필요에 따라 로프 길이, 속도, 자세를 조정합니다. 이를 통해 실시간 개선이 이루어지고, 더 부드러운 출발을 보장합니다.
초보자가 흔히 겪는 실수와 빠른 해결 방법
보드 위에 굳건하고 낮은 자세를 취하고 라이딩이 시작되면 무게 중심을 유지하세요. 안정적인 자세는 웨이크 구간에서 균형을 유지하는 데 도움이 되며 액체 표면에서 더 부드러운 느낌으로 라이딩할 수 있게 해줍니다. 특히 초보자에게 좋습니다.
- 뒷발 바이어스와 노즈 리프트
- 수정: 엣지를 너무 오래 잡아당기거나 뒤로 기대면 꼬리가 튀어 오릅니다. 무게 중심을 중앙으로 옮기고, 무릎을 부드럽게 유지하며, 가슴을 들고 진행 방향을 주시하세요. 이러한 종류의 조정은 수평을 유지하는 데 도움이 되며, 시간이 지날수록 더 부드러워지고, 좌우 모두에 적합합니다.
- 앞을 보지 않고 아래를 볼 때
- 시선 고정: 가고 싶은 곳을 향해 시선을 고정하세요. 웨이크 각 구간에 대한 콜을 알고 계시죠? 시선을 위로 향하면 다음 지점을 미리 읽고 더 빠르게 반응할 수 있어서 리듬과 제어력을 유지하는 데 좋습니다.
- 굳어진 어깨와 뻣뻣한 팔
- 수정: 상체를 이완하고, 보드를 가볍게 잡고 엉덩이로 조종하세요. 이렇게 하면 엣지가 느슨해지고 각 면을 더 부드럽고 자연스럽게 회전할 수 있습니다. 이는 착지 지점과 나중에 멋을 더하고 싶을 때 모두 좋습니다.
- 불규칙한 속도 또는 타이밍
- 수정: 꾸준한 리듬을 확립하고 웨이크에 접근할 때 작은 가속도계 신호를 활용하세요. 시작 후 일정한 시간을 유지하면 포켓에 머물고 양쪽에서 정지하는 것을 방지하는 데 도움이 됩니다.
- 한쪽으로 지나치게 기울어짐
- 수정: 가슴은 수평을 유지하고 엉덩이는 중립으로 하세요. 보드의 한쪽 모서리가 물에 잠기지 않도록 주의하세요. 균형을 유지하기 위해 웨이크를 가로질러 평평한 보드로 구간을 타는 연습을 한 다음, 기본 트릭을 추가하기 시작할 때 제어된 엣지로 진행하세요.
- 스탠스 폭이 너무 넓거나 좁음
- 수정: 힙 너비 정도로 시작하고 손가락 한두 개 너비만큼 조절하세요. 적당한 중간 너비는 초보자에게 안정감을 주면서도 더 부드러운 착지와 때로는 간단한 플레어를 향해 나아갈 때 빠른 엣지 전환을 가능하게 합니다.
- 상태 변경 및 찹
- 수정: 바람이 많이 불거나 물결이 거친 날에는 접근 시 무게 중심을 앞으로 두고 무릎을 부드럽게 유지하세요. 마이애미를 포함한 인기 명소와 같이 많은 장소에서는 물의 느낌이 매 세션마다 다를 수 있으므로 그에 따라 엣지 압력을 조정하고 제어력을 유지하기 위해 긴장을 푸세요.
- 주행 방향 또는 측면에 대한 혼란
- 수정: 가슴과 엉덩이를 원하는 방향으로 향하게 고정한 다음, 짧고 집중된 움직임으로 양쪽을 번갈아 타세요. 이렇게 하면 각 측면이 편안해지고 타이밍을 알 수 있으며, 준비가 되었다고 느껴질 때 기본적인 플레어와 같은 미묘한 움직임을 추가할 수 있습니다.
- 설치 서두르기
- 수정: 숨을 고르고, 자세를 안정시킨 다음, 보드가 1~2초 정도 천천히 안정될 때까지 기다렸다가 움직이세요. 이렇게 하면 과도하게 수정하는 것을 방지할 수 있으며, 특히 여러 세션을 통해 자신감을 쌓고 싶어 하는 초보 라이더에게 도움이 됩니다.