

 Boat Towing and Trailering Tips – Safe Hauling & Best Practices">

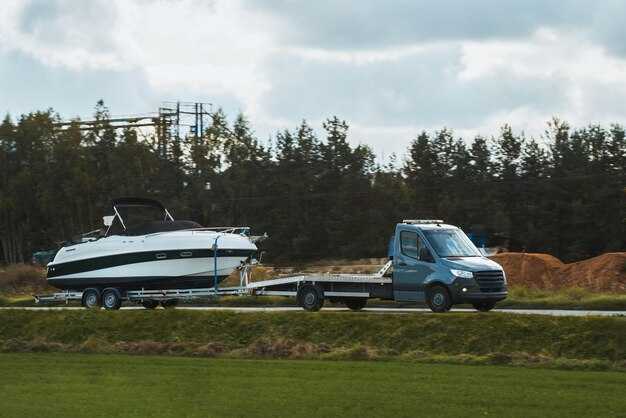
Verify your tow setup before every trip: check that the hitch rating matches your boat-trailer combination, inspect safety chains, and confirm the tire pressures on both tow vehicle and trailer. Read the manual for your vehicle and trailer; ensure the tongue weight is within the manufacturer’s spec and ready for the load. Use a brake controller rated for your trailer’s axles and verify wiring for lights and signals. This small audit can prevent overheating and keep sway from moving you out of your lane.
Avoid overloading and match the trailer model to your vehicle: distribute weight so that the front axle carries about 60% of the load for highway stability. Use a weight-distributing hitch if your tongue weight exceeds 350 pounds, and verify that the trailer’s axle bearings and tires are in good condition. For example, a 4,000-pound boat-trailer package may require about 400–600 pounds of tongue weight; calculate this using the manual or a trailer calculator. Check wheels for cracks, torque lug nuts to the manufacturer’s specification in pounds per square inch, and inspect the tires for even wear. This involves some planning upfront to avoid last-minute adjustments during a trip.
On the road, maintain a steady pace and smooth steering inputs to minimize trailer sway. Use a safe following distance and plan lane changes early; watch for other traffic, and keep the load centered. Maintain a comfortable speed–roughly 45–60 mph on highways with larger loads–and use lower gears when climbing grades. Almost imperceptible sway is achievable with proper weight distribution and mirror checks, and using a towing camera can help you stay clearly aware of sides and rear clearances. It’s still important to pull over if you notice unusual noises or a change in braking response.
Before leaving the dock, perform a quick post-assembly checklist: verify that trailer lights blink in all modes, safety chains are crossed, hitch is secured, and the coupler latch is locked. Secure the boat with tie-downs that have some give to prevent binding, and ensure the load remains centered on the axle. Do a final walk-around to confirm nothing rattles and the load is ready, then leave with confidence.
A common mistake is skipping the safety check: never tow with a coupling that isn’t properly locked or with the wrong ball size. A wonderful result comes from routine checks and deliberate planning rather than last-minute improvisation. Remember to verify all connections through the safety chain pattern, stay within your vehicle’s tow rating, and avoid overloading the trailer–some setups push the limits and increase sway and stopping distances. Avoid the downs of braking caused by improper weight distribution. By following a consistent manual process and taking a few extra minutes, you can prevent overheating, protect the axle, and keep pounds of weight evenly distributed throughout the trip. This approach involves thoughtful preparation through every leg of the trailering task.
Best Practices for Safe Boat Towing and Trailering
Install a rated hitch and verify the trailer brakes are working; the trailer should be equipped with safety chains and properly inflated tires. Grease the hitch ball and ensure the coupler latch is secure and installed.
Balance the load so most of the weight sits between the axles for a balanced tongue load; secure cargo evenly and keep the outboard and gear centered to prevent sway.
Drivers should think ahead: they should slow for curves, avoid sudden steering, and maintain a steady speed to prevent trailer spin. Some drivers overcorrect; stay calm and steer gently back to center.
Before towing, perform checks: inspect tires, test lights, and verify that safety chains stay connected. Grease wheel bearings as required and use a camera or backup monitor to confirm hitch alignment.
On the road, maintain a safe following distance and speed; if sway appears, dont panic–ease off the accelerator and steer smoothly toward center until the trailer aligns. Use emergency procedures if needed and pull over safely.
At campsite or open space, choose level ground, chock wheels, and unhook only after the engine is off and the tongue is secured.
Keep a short emergency kit and a plan for roadside issues; most setups are meant to be repeatable, and documenting the content of your checklist helps you stay ready for the next trip.
Verify hitch, ball size, and towing capacity compatibility
Verify the ball size and towing capacity compatibility before hitching. The correct ball size matches the coupler (1-7/8″, 2″, or 2-5/16″) and the hitch receiver class must align with the trailer’s weight and the vehicle’s capabilities. This prevents mismatches, reduces sway, and keeps driving with boater gear safer.
- Ball size check: Confirm the ball diameter matches the coupler opening exactly. Use a ball gauge or calipers; the ball should fit snugly, sit flat, and be fastened securely to the mount with no wobble. fastened hardware and a properly seated coupler are non‑negotiable.
- Hitch class, GTW, and gvwr: Read the receiver rating (Class I–V) and ensure the trailer GTW stays within that range. Check the trailer gvwr as stated on the plate and confirm it does not exceed the tow vehicle’s capacity per your state-approved documentation. Guides from reputable sources show 10–15% tongue weight for stable towing.
- Vehicle and trailer integration: Verify the tow vehicle’s GCWR and payload can handle the combined weight. If the tandem exceeds limits, choose a lighter trailer or upgrade the hitch and vehicle. when you’re unsure, reassess before driving.
- Coupler and fasteners: Ensure the coupler latches completely, the pin is in place, and the safety latch is locked. Check that the ball is fastened correctly and that the mount stays tight; replace worn components to avoid a mistake.
- Safety chains and lighting: Cross the safety chains under the tongue, connect the trailer’s lighting to the vehicle, and test brake, turn, and tail lights. Use lighting that’s clean and functionally visible from the cab; mirrors should give a clear view of the line behind the trailer.
- Load and straps: Place the boat and gear with even weight distribution. Use straps to secure cargo and keep the load from shifting down the trailer. Aim for a tongue weight around 10–15% of GTW to maintain stability; even weight distribution reduces sway and improves control.
- Roller and bearings: If your trailer uses a roller or roller jack, ensure it’s engaged and not dragging. Inspect wheel bearings and grease seals; repack or replace as needed to prevent heat buildup during long drives.
- Final checks: Before departure, verify tire pressures, lug nut torque, and wheel condition. Confirm mirrors provide visibility of the trailer line, and perform a short test stop in a safe area to confirm control and braking feel. Finally, plan for longer stopping distances and smooth steering to protect gears, straps, and fuel efficiency on the road.
Inspect trailer wiring, lights, and brake connections
Test every function with the tow vehicle connected: turn signals, brake lights, tail lights, and reverse lights; if any lamp is out or the brake signal doesnt sync, fix it now and repeat until all respond correctly. If you spot a faulty light, dont hesitate to fix it, and retest again to confirm reliability.
Inspect the wiring harness along the tongue for chafing or exposed conductors; securing any loose sections to the frame to prevent rubbing, using clips or ties. Look for corrosion on connectors; clean and reseat, and apply dielectric grease on metal contacts to improve contact and resist moisture. Over time, corrosion grew enough to impair contact; if you see green or white buildup, replace the connector or pigtail. If you see heat marks or melted insulation, replace the section and test again.
Check the plug and receptacle for corrosion; clean with spray contact cleaner and dry before reconnecting. Confirm the ground connection is solid by testing the light circuit to the frame; a weak ground causes dim or flickering lamps. Test again when you re-seat the plug and re-tighten the mounting screws to ensure a solid ground.
With the vehicle running, step back to judge visibility of signals from mirrors and ahead; ensure every amber turn signal and brake light is visible at typical following distances. If you tow boats with outboard, splash can obscure lights; verify clearance lights are bright enough in daytime; light tests should include reverse lights when backing. Use easy, repeatable checks to keep confidence high.
Braking connections: For electric brakes, test the brake controller’s response at low speed; the trailer brakes should engage smoothly and not feel jerky. Inspect the brake controller cable and the electrical chamber if applicable, check for leaks or loose fittings. When the system uses an air chamber, ensure the lines are tight and the brake chamber moves freely. If trouble comes, address soon to avoid late braking on the highway.
Physical connections and towing geometry: verify chains are crossed beneath the tongue and allow enough slack for turning; during heavy loads or rough roads, chains should catch if the coupler separates. Ensure the tongue is centered in the coupler and that the roller bearings, if present, are greased and free of play; inspect for grease seepage and worn seals. Always drive with the chain and gear in alignment to prevent binding.
Final checks and notes for owners 그리고 reviews: read the owner reviews for your model to catch common wiring quirks; inspect the plug and harness with a buddy while you watch the trailer lights go through a full cycle. whether you tow heavier loads or lighter boats, keep a simple log of tests and repairs, and carry spare fuses and a spare receptacle. With these steps, your wiring stays reliable and safe on trips ahead.
Close the hitch latch and insert the safety pin
Close the hitch latch firmly and insert the cotter pin to lock it in place. This wonderful step provides down-the-road confidence for towing, whether youre heading to a campsite, a forest trail, or a marina for boating.
Ensure the latch is down and seated with a solid click before proceeding. If youre unsure, re-check and repeat until the latch feels secure.
- First, verify the latch is fully closed by applying light downward pressure on the coupler and attempting a gentle tug.
- Using a small tool if needed, insert the cotter pin from the left side and through the latch hole so the pin projects on the outside.
- Determine the exact alignment by looking through the hole; the pin should slide in without forcing, and the cotter should lie flat against the bracket.
- Secure the pin with the retaining clip or bend its ends slightly if your setup uses a ring.
- Test the connection by slowly turning the steering wheel and applying a light downward push on the hitch to confirm no play occurs.
- Reverse a short distance to check that the latch remains engaged during movement; nobody should stand between you and the hitch during this test.
- Check clearance on uneven terrain–forest undergrowth or a high curb can snag the pin, so park at a level campsite or drive to a safe spot to inspect.
- For Fleetwood or other motor-trailer setups, this advice applies every time: close latch, insert pin, verify alignment for reliable towing support.
Note: If the hitch is equipped with a roller, ensure the roller sits in the groove and the pin passes through both the latch and the roller bracket for secure seating.
Loves securing reliable connections, many drivers appreciate a methodical, repeatable process that protects a motor, a trailer, and crew.
Distribute weight evenly and secure the load with tiedowns
Always load with the heaviest items centered over the trailer axles. This takes weight off the tongue and reduces sway during turns and braking, which benefits boating and transport safety. This approach is backed by boating transport guidelines and keeps the load stable on the road.
Balance weight side to side by placing gear evenly across the frame. Place the midline gear over the axle area and avoid stacking near the tongue or bumper, which can shift during launch or braking.
Aim for tongue weight around 10-15% of total load. For a typical mid-size rig, that means roughly 200–450 lb on the tongue. Heavier items should sit near the center and be secured to the frame to prevent displacement.
A common mistake is relying on a single strap or leaving slack. Always practise securing with multiple tiedowns to create a secure hold, and tighten securely before transport starts.
Use at least four tiedowns. Attach to solid frame points, not the bumper, and cross the straps over the load to form a cradle. For ultra stability, add an optional fifth strap on heavier loads. Ensure each strap is tightened securely and maintains angle generally within 60 degrees to the load direction.
Before leaving, inspect every anchor point, strap, and chock. If any strap shows wear, replace it. After tying, gently pull each strap to confirm it pulls tight and does not loosen during motion. If you notice movement, re-tighten all straps and adjust as needed.
| Step | Action |
|---|---|
| Anchor points | Attach tiedowns to the frame or dedicated anchors; avoid the bumper or tongue as primary anchors |
| Tiedown pattern | Use a minimum of four straps; two forward, two aft; cross them to cradle the load |
| Tension test | Snug straps; test movement by a light pull; straps should not shift |
| Pre-trip check | Re-check all anchors, straps, and wheel chocks; replace any worn strap |
| Periodic re-check | Stop for a quick inspection every 100 miles (or 2 hours) of driving and re-tighten if needed |
Check tires, bearings, and wheel nuts; perform a short test drive
Start with a precise pre-check: inspect tires, bearings, and wheel nuts on your trailer and the tow vehicle. Look for tread wear, cuts, or bulges, and check for grease leakage around the hubs. Verify cold tire pressure matches the rating on the placard or sidewall; inflate to spec with a reliable gauge. Torque the wheel nuts to the manufacturer’s spec using a torque wrench, and recheck after a short drive. If you use a winch, inspect the winch line and hook for fraying or corrosion and ensure the latch is secure. Open the trunk to access spare parts and confirm the spare is secured. These steps build safety from the start and align with your model and season of towing.
With these checks completed, load evenly to prevent sway. Position heavier items toward the center of the trailer bed to maintain proper tongue weight and balance; keep weight evenly distributed side-to-side. Secure all gear with straps and hooks, using solid anchor points andor strap loops; keep tension even. Unsecured gear increases sway, worsens handling in wind, and can raise fuel use. In the worst case, a shifted load can cause loss of control and dangerous trailer sway. If youre unsure about any step, consult the guide.
Next, perform a short test drive on a quiet road. Start at low speed and test acceleration, braking, and steering to feel for pulls or wandering. If you notice any pull, heaviness, or abnormal sway, stop and recheck hitch connection, wheel nuts, and alignment. Note wind gusts, as crosswinds can exaggerate any imbalance.
After the test, re-torque wheel nuts if needed and recheck tire pressures. Re-tension straps and inspect the winch if used. For owners camping or towing next season, stash a basic safety guide in the trunk and review these steps at the start of each season.