

 10 Must-Have Boating Accessories You Need Before Setting Sail">

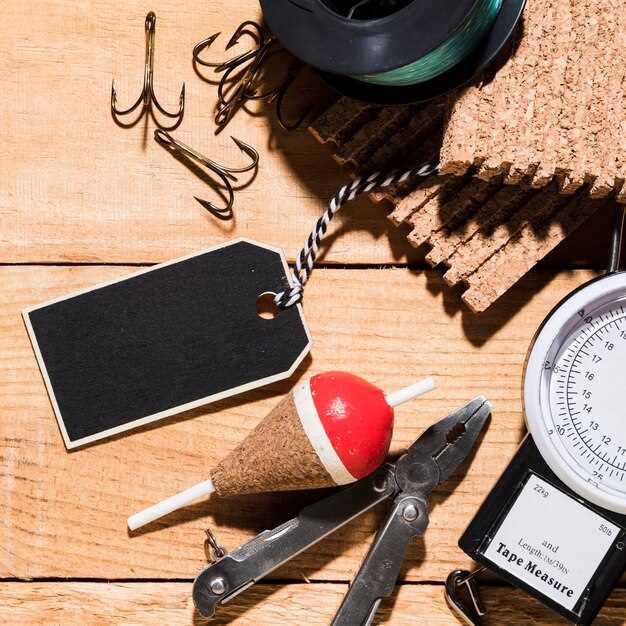
안전 요원 승인 구명줄 확보 출항 전에 하중을 가하여 테스트하십시오. 그래야 파도가 높아지거나 바람이 불 때 믿을 수 있는 고정점이 확보됩니다. 콤팩트한 세트를 추가하십시오. tools 한 손으로 닿을 수 있는 것들을 방수 파우치에 정리하십시오. 몽상가와 실용적인 관리자 모두에게 간단한 체크리스트는 difference 침착한 자신감과 마지막 순간의 허둥지둥 사이에서 말이죠. 또한, 승인된 이 접근 방식은 장비를 염수 요구 사항에 맞게 유지합니다.
간결한, 테스트 완료됨 toolkit 몇 가지 다용도 도구만 있으면 됩니다. 칼, 테이프, 멀티툴, 여분의 배터리, 그리고 손전등입니다. 과도한 짐을 피하기 위해 여러 용도로 사용할 수 있는 장비를 선택하십시오. 많은 선박의 경우, 건조 박스에 한 가방으로 보관하면 정리가 잘 되고 물건을 쉽게 꺼낼 수 있습니다. 이 version 키트의 구성품은 가볍지만 중요한 작업을 신속하게 처리할 수 있습니다.
탐색 및 신호 업데이트 컴팩트한 compass, 방수 호루라기, 휴대용 VHF 또는 신호 장치. 야간 작전과 주간 점검 모두에 유용합니다. 계획을 공유하십시오. friends 탑승하여 인지도를 높이세요. 명확한 메모는 모든 사람이 함께 협력하고 위험을 줄이는 데 도움이 됩니다. 간단한 signal 정기적인 루틴을 통해 조건이 변경될 경우 경고를 보낼 수 있습니다.
부식 방지 및 낚시 작업 계획 수립 내염성 재료를 선택하고 부식 방지 패스너를 사용하십시오. 만약 fishing 해안가에서는 녹에 강한 플라이어나 날카로움을 유지하는 라인 커터를 챙기세요. 몇몇 물린 자국 주의 사항–바늘, 미끼, 칼에 녹이 슬었는지 확인하십시오. 이렇게 하면 관리가 간단해지고 키트의 수명이 연장됩니다. 매번 여행 후 잠금 장치와 고정 장치를 테스트하여 손가락을 안전하게 유지하십시오.
그리고 difference 물 위에서 편안하고 자신감 넘치는 나날들을 보여줍니다.. 편안함은 크루들이 걸리적거림 없이 움직일 수 있도록 좌석, 라인, 장비를 정리하는 것에서 비롯됩니다. 친구들에게 간단한 역할을 분담하여 작업을 공유하고, 모두가 흐름에 익숙하도록 루틴을 연습하십시오. 컴팩트하게, easy version 선박에 맞춰 조정되어 날씨가 변하고 항해가 빠른 결정을 요구할 때 꾸준한 성능이 발휘됩니다.
보트 액세서리: 실용적인 계획 개요
정확히 조타 장치 가까운 곳에 믿을 수 있는 나침반과 안전한 라인 관리 장치를 배치하여 항해와 안전을 최우선으로 하십시오. 튼튼한 클리트 시스템을 사용하여 라인을 팽팽하게 유지한 다음, 여분의 라인을 방수 가방에 넣어 빠르게 접근할 수 있도록 보관하고, 여러 상황에 대비하여 신속하게 대응할 수 있도록 하십시오.
취급을 간소화하는 장치, 즉 VHF 라디오, GPS, 휴대용 날씨 모니터를 설치하십시오. 바람이 잔잔하고 판독값을 읽기 쉬운 곳에 놓고, 분무와 파도에도 견딜 수 있도록 단단히 장착하십시오.
상비 의약품 및 위생 용품: 붕대, 살균 티슈, 장갑, 경미한 부상 치료용 휴대용 위생 키트. 물이 튈 수 있는 곳에 기본 구급 상자를 비치하고 내용물 보호를 위해 방수 가방을 포함하십시오.
구명줄, 신호 거울, 손전등, 호루라기를 갖춘 선장 키트를 준비하십시오. 소형 소화기와 차트를 위한 방수 케이스를 포함하는 것을 잊지 마십시오. 장비 공급업체는 염분과 햇볕에 견딜 수 있는 부식 방지 하드웨어와 플라스틱 클립 부속품을 제공할 수 있습니다.
연료 전략 계획: 연료 탱크 내 연료량 추적, 예비 연료 계획, 허용되는 경우 추가 연료통 포함. 출발 시 탱크 벤트 및 라인을 확인할 수 있는 연료 게이지 및 간단한 점검 목록을 포함합니다.
편안함 및 장비: 드라이 슈트 또는 경량 재킷을 선택하고, 좌석과 손잡이는 인체공학적인지 확인하십시오. 특히 장거리 여행 시 승무원의 편안함을 위해 미끄럼 방지 매트를 사용하십시오.
장비 출처: 장비 공급 업체는 보트 모양과 공간에 맞는 해양 등급 장치 선택을 안내해 드릴 수 있습니다. 장비 보관 위치 지도를 포함하여 장비가 안전하고 건조한 상태로 유지되도록 하십시오.
정비 계획: 선체 부속품, 호스(플라스틱 클립 커넥터 포함), 빌지 펌프, 위생 설비, 인명 구조 장비에 대한 정기 점검; 삐걱거리는 소리가 날 때까지 기다리지 말고 점검하십시오.
PFD: 사이즈, 종류 및 빠른 점검
먼저 정확한 가슴둘레를 측정하고, 사이즈 차트에 맞는 USCG 승인 PFD를 선택하십시오. 몸에 꼭 맞고, 손을 자유롭게 사용할 수 있어야 하며, 선상에서 믿을 수 있는 생명줄 역할을 할 수 있도록 부력 지지력을 제공해야 합니다. 선원들을 위해, 여러 사람이 항상 안전하게 선택할 수 있도록 사이즈를 적절히 할당하십시오.
사이즈 및 착용감: 가슴 둘레가 가장 큰 부분을 측정하고 레이어링을 고려하여 여유 공간을 추가하십시오. 사이즈는 XS~XL 또는 S~XL로 다양하며, 안전한 착용감을 위해 스트랩 조절이 가능합니다. 착용 시 스트랩과 몸통 사이에 손가락 하나를 넣을 수 있어야 합니다. 허리 스트랩을 조절하여 엉덩이 위에 위치시키고 조끼를 중앙에 유지하십시오. 갑판 위에서 움직이거나 레일을 따라 장비를 잡는 테스트를 통해 움직임의 변화에도 이동성이 그대로 유지되는지 확인하십시오.
종류 및 선택: 유형 I은 장거리 이동에 최대 부력을 제공합니다. 유형 II는 사용자를 똑바로 유지하지만 거친 바다에서는 말려 올라갈 수 있습니다. 유형 III은 로우 프로파일의 이동성을 제공하며 일상적인 갑판 작업 및 가벼운 낚시에 이상적입니다. 유형 IV는 구조 상황을 위해 손이 닿는 곳에 보관하는 던질 수 있는 옵션입니다. 유형 V는 활동별 용도를 포괄하며 라벨에 사용법이 명시되어 있습니다. 낚시 및 갑판 작업의 경우 유형 III이 부력과 이동성의 균형을 가장 잘 제공합니다. 어두운 환경에서 가시성을 높이기 위해 호루라기와 반사 액센트와 같은 신호 장치가 있는 모델을 찾으십시오. 일부 주머니에는 여행 중 편안함을 유지할 수 있도록 휴대용 음료 용기 및 햇빛 차단 용품을 보관할 수 있습니다.
빠른 점검 및 유지 관리: 인증 라벨을 확인하고 폼 무결성 및 솔기를 검사하십시오. 버클과 조절 장치가 부드럽게 작동하는지 확인하고 손상된 장치는 교체하십시오. PFD를 턴버클이나 폴대처럼 천이 걸릴 수 있는 하드웨어를 피하여 선박 내 생명줄 근처의 접근하기 쉬운 위치에 보관하십시오. 매번 외출하기 전에 빠른 착용 테스트를 수행하여 모든 참가자가 자유롭게 움직일 수 있는지, 필요할 때 신호 장치를 작동할 수 있는지 확인하십시오. 눈에 잘 띄는 색상과 건조한 원단을 선택하여 변화하는 날씨 조건에 대비하십시오. 필요에 따라 여러 개의 PFD를 번갈아 사용하여 손님들이 공유하도록 하십시오.
| PFD Type | Best Use | 참고 |
|---|---|---|
| Type I | 험한 물길, 긴 항해 | 최대 부력; 더 벌키함 |
| Type II | 근해 크루즈 | 직립 부유; 큰 파도에서 솟아오를 수 있음 |
| Type III | 갑판에서 작업 중, 조업 | 눈에 잘 띄지 않음; 기동성 우수; 장시간 침수용 아님 |
| Type IV | 투척 구조 | 착용 금지, 손이 닿는 곳에 보관 |
| Type V | 활동별 (카약, 패들링) | 표시된 조건 하에서 착용 가능 |
비상 장비: 조명탄, 호루라미, 투척 장비
Store a guard-approved signaling kit within arm’s reach on the sailboat, pairing a beacon, a whistle, and a Throwable device for instant alerts anytime during trips.
Flares: keep 3-4 handheld red flares and 2 parachute or buoyant aerial flares in a waterproof container. Check expiry dates every six months and replace units when they reach 36 months. In saltwater conditions, deploy a flare high to maximize visibility, and note the time and location so crew members looking for help can find the source quickly.
Whistle: attach a loud, pea-less whistle to a bridle-style lanyard on each life vest. One long blast draws attention, three short blasts indicate distress. Keep a spare whistle in a plasticlip case to ensure a backup is available if the first is lost or damaged.
Throwable devices: include a horsehoe buoy and a throw bag with a 15–25 m line. The horsehoe buoy provides buoyancy and a ready grab handle; practice throws with several crew members until you can reach a swimmer quickly. If someone falls overboard during fishing trips, this gear helps you pull the swim back to the deck. Store near life jackets and deck chairs, ensuring they float in saltwater and stay accessible during fires or rough seas on a sailboat.
Maintenance and drills: test the radio and beacon regularly; replace batteries, inspect seals for saltwater exposure, and run a quick signaling drill with crew members. Keep a small reference card and a log for found replacements; this routine helps members stay calm and genial under pressure.
Storage and accessibility: choose a stable, waterproof cabinet and clearly label each item; keep a spare beacon battery and additional flares in a guard-approved container. Ensure the kit is visible to all members looking after the craft, and store a separate stash for fishing trips so the gear remains ready in saltwater safety. Across the world, several voyages benefit from this setup, with invaluable readiness when a swim is found in calm or rough seas; a whisker of line can be used to test tossing accuracy, and chairs stay stowed while fires risk remains low on the deck of a sailboat. Also keep a small supply of food and water for responders during longer delays.
Navigation Tools: Charts, GPS, and Plotter Apps
Opt for a rugged, waterproof handheld plotter with built-in GPS and offline charts. This device provides reliable access to charts and routes when signal is patchy, and should be tested in real marine conditions. Never rely on a single source; pair it with a backup paper chart stored in a dry pouch and maintain a rinsekit-ready setup to wash salt spray from ports. Protect the gear to keep it safe; the chain of command among members ensures clear communication during watch duties.
- Hardware selection: choose a model with IPX7+ protection, a sun-readable display, long battery life, and firmware version updates. Mount it with corrosion-resistant screws and attach a lanyard; ensure it can withstand boarding and rough seas. Include a wear-resistant case and a tether to prevent loss.
- Charts and data strategy: load official charts from regional sources; support multiple models and ensure offline access. Keep the data on the device and on a phone for redundancy; update the version when you move into new waters. Mark anchorages, fishing zones, hazards found near shoals, and shallow areas to reduce risk; verify it complies with regulations.
- Plotter apps and workflow: select apps that work offline, allow waypoint sharing with a couple of crew members, and overlay wind and weather layers. Create routes with clear turn points and export data to GPX for use on tablets or phones. Align the next voyage’s plan with vessel capabilities and the captain’s instructions.
- Maintenance, safety, and crew readiness: rinse connectors and ports after exposure to salt with a rinsekit for washing. Inspect screws and mounts for tightness; secure the device to prevent loss during rough seas or docking. If dogs are aboard, keep navigation gear out of paw reach; keep a throwable PFD within reach for emergencies.
- Practical tips: keep the phone charged and synced with the plotter; transfer critical waypoints to the anchor area and to other devices; practice a quick route recalculation routine in response to sudden wind shifts or a storm; the data needed for the next leg should be loaded and ready.
Communication: VHF Radio and Weather Updates
Install a compact, 테스트 완료됨 VHF radio with DSC and a built-in weather receiver; place within easy reach of the helm, securing the unit with a stable bracket and a splash-proof housing, and ensure reliable lighting for night checks. Keeping a drink within arm’s reach during long watches helps stay alert.
Keep weather updates at hand by enabling a marine forecast feed and a weather finder on a second device. For a cruise along this coast, monitor fronts shaped by high‑pressure systems and anticipate squall lines; use that data to adjust heading and speed and to select safe anchoring options.
Protect the console from salt and corrosion; use a sealed box, wipe ports clean, and store spare batteries. despite humidity, sanitation of switch areas helps prevent corrosion-related failures, and a little maintenance keeps gear reliable under heavy spray.
Use channel 16 to call, switch to a working channel for routine chatter; keep messages concise and include call sign, position, and intention. Carry a handheld unit in the dinghy as a back-up, with a spare battery and a small tool kit ready; those on deck should monitor the radio continuously when storms approach, since storm conditions demand rapid, calm planning.
Summer Comfort and Safety: Hydration, Sunscreen, and Shade
Hydration starts with a personal 1-liter bottle within reach and a 5-liter tank ready on deck; aim for 0.5-1 liter per hour in heat, increasing during fishing or active movement, and refill at each break.
Protect skin with broad-spectrum sunscreen SPF 30-50 and water resistance; apply 15-30 minutes before exposure and reapply after splash or sweating; keep supplies in waterproof cases so you can swap bottles quickly, and include lip balm with SPF plus sunglasses for full coverage, with clothing that offers more protection.
Shade strategy includes a portable canopy or foldable sun shade, placed where it blocks the strongest rays, which typically peak between 11 a.m. and 3 p.m.; breathable clothing and a brimmed hat provide solid coverage, while lighting adjustments help you stay comfortable at dawn or dusk. Teak decks heat up quickly in sun, so position shade to minimize heat transfer and use manual adjustments for quick setup. A bulky umbrella can serve as a backup when other options are not available.
Organization matters: group supplies in cases by purpose (hydration, sun care, safety) and keep a compact kit within reach of someone on deck; rank hydration and skin protection as top priorities, and maintain a simple checklist to speed up routine tasks. After splash or day-long activity, rinse towels and lightweight fabrics with fresh water; regular washing with mild soap prevents residue buildup on gear and fits easily into quick cleanups.
Next steps for smoother days include mapping where shade is best during peak heat, ensuring you have one more bottle anywhere there is a splash, and choosing adventure-ready gear that stays compact and light. Available options range from small canopy setups to more rigid frames; always check that supplies fit your plan and that you can control setup with a single person if needed, keeping the deck clear and safe for movement.