

 8 Best Hikes to Lakes Near Bozeman, Montana">

信頼性の高い、運動に適した導入として、ハイライトループから始める。 周囲のアルパイン地形へ:予期せよ seasonal そして 落ちる colors, a steady grade, and a full 水辺の眺めが、より長い日帰り旅行に備えてあなたを元気づけます。.
Eight routes span from short 2–3 mile loops to longer circuits that circle multiple 水域, 標高は数百フィートから約1,200フィートまで様々です。距離と状況は異なり、家族やベテランのハイカーの両方に十分な選択肢を提供します。計画を立ててください。 凍結 晩秋と早春の警告に備えて。 寒々しい わずかな重ねがすべてを変える朝。.
装備が重要です。重ね着、シェル、コンパクト down ジャケット、ヘッドランプ、水、そして雪や氷がより高いトレイルに残っている場合はトラクションが必要です。スリムなキットはあなたのパックを保ちます full しかし、軽く、そしてあなたに許可します。 enjoy 引きずられる重さのない、爽やかな空気。地図やGPSの軌跡を忘れずに、そうすれば。 避ける メインルートから外れてさまよう。.
redditのスレッドや地域ガイドでは、これらのルートに沿った隠れたストレッチオプションが紹介されており、海岸線や静かなプールでの静かなひとときを実現します。ビーチのような一息つくため、または簡単な水遊びに最適です。ペースを上げたい場合は、いくつかの日帰り旅行を選択してください。 seasonal オプションを選んで帽子と手袋を羽織れば 寒々しい その場所の暖かさを楽しむでしょう。太陽が沈むのが待ち遠しくなるでしょう。.
周囲の地形を背景に、各目的地は独特の雰囲気を醸し出しています。いくつかのトレイルはスプルースやアスペンの中に沈み込み、穏やかな夜をもたらしますが、他のトレイルは、広大な景色を望む露出した尾根を登ります。牧草地の輝きから山の影まで、さまざまなトーンを試すために、2つの目的地または3つの目的地の日帰り旅行を計画し、日の暮れに次の外出にも対応できる準備を整えましょう。 season.
申し訳ありませんが、リクエストされた正確なヘッダーはコンテンツ制限により使用できません。それに続くHTMLセクションと互換性のあるバージョンを以下に示します。.
山岳の町周辺の8つの水域ルートに関する、Instagram映えするガイドの実用的な概要
推奨事項:8つのストップでインスタ映えするルートを計画する際、日の出時に三日月形の海岸線から開始し、広角レンズで撮影すること。最初のスポットから、グリッドを初期の色で埋める準備が整います。.
ボゼマンの地域に点在する8つのスポットは、多様な背景と標高を提供します。ルートは、ダウンタウンの道から遠くのターンへと登り、松と花崗岩に囲まれ、ブリッジピークの景色を眺めることができます。これらのスポットは、整備されたループ状のトレイルヘッドに沿ってアクセスしやすい場所に位置しています。森林の道が最初の2つのスポットを結び、穏やかなスタートとなります。.
クレセント・ターン・ループと、町の中の短い森林の小道から始め、ブリッジャー・フットヒルズに向かって進み、山々の景色が見える高い見晴らし台へ。その後、回転エリアの池に下り、高い草原のターン、隠れた水壺のターン、広大な谷の池、遠隔の入り江を横断し、長い海岸線のサーキットで締めくくります。朝は柔らかな光と少ない群衆で報われ、これらのルートは地元の人々に人気です。.
トリップの所要時間:短い区間は45〜90分、長い区間は2〜4時間。午前中は遅い午前中まで寒さを感じます。いくつかの水辺では、穏やかな帰還のためのカヤックオプションが利用でき、またはアドベンチャー旅行スタイルのマルチスポーツのアイデアと組み合わせることもできます。この8つのスポットはボゼマンの地域に位置しており、市内の回廊やロータリープラザ近くのトレイルヘッドに駐車できます。.
キャプションのプロンプトと背景:各停車地ごとに、色や質感に関連する簡潔な一行を作成します。以下は、再利用できるスタータープロンプトです:霧を抜ける日の出、ガラスのような水面、松の香りのそよ風、花崗岩の板の反射。ボゼマンのオーディエンスとより広いアドベンチャーツーリズム層にアピールできるように、豊かで多様なものに保ち、リーチを最大化するために人気のある時間に公開できます。.
ギアチェックリスト: 軽量シェル、滑らかなビデオのためのコンパクト三脚またはジンバル、予備バッテリー、パワーバンク、マイクロファイバークロス、軽食、水; 丈夫なブーツ; 寒い朝には、重ね着と手袋を持参; 踏み道に沿って歩き、必要に応じて犬をリードで繋ぎとめてください。旅行前に、ボゼマン地域での気象条件と火災規制を確認してください。.
Outcome: これらの8つのルートは、到達可能な脱出経路と、ピーク、水、松のシーンであなたのフィードを満たす強力なInstagram体験を提供します。実践的なヒントは、コンテンツを盛り上げるのに役立ちますが、本物であることを維持します。ご希望でしたら、短いカヤッククリップやドローンショットを追加して、コンテンツを多様化することができます。.
トレイルヘッドへのアクセス、駐車場、および道路状況
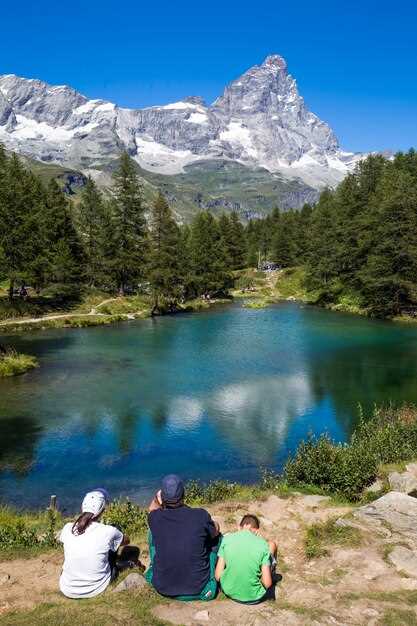
日の出前に到着し、公式の駐車場に駐車してスペースを確保してください。ピークタイムはすぐに満杯になるため、早めの出発が、エメラルドグリーンの池と森林地帯の風光明媚な早朝の景色をもたらします。.
森林局のルートは、舗装路からダブルトラックの土道まで様々です。肩の季節には、雪片、泥、および時折の洗い流れが発生する可能性があります。最大の駐車場はシーズン開始の早い段階で開きますが、他の場所はすぐに満杯になります。高クリアランス車が有利になり、いくつかのアクセスポイントでは冬の条件でチェーンが必要になります。.
多くのトレイルヘッドでは、広々としたアクセス可能な駐車場と、家族向けの簡単なスタートが提供されています。季節や体力レベルに合わせてルートを選び、穏やかな山の斜面を登りながら、小川や静かな川のそばで時間を過ごすオプションがあり、シンプルで逃避できる空間を提供します。.
若い旅行者向けに小型のおもちゃと、エネルギー補給用のグラノラバーを準備しましょう。これにより、スムーズな旅をサポートし、旅行者が勢いを得るのに役立ちます。ゴミを投げ捨てないでください。ゴミ袋を少量用意し、野生生物を尊重しましょう。短い道のりでも、地図と水を必ず持参してください。.
| Trailhead | Access | Parking | 道路状況 | 備考 |
|---|---|---|---|---|
| Trailhead Alpha | 舗装されてから砂利道 | 大きなロット、早期に満杯になる | 乾燥した季節には埃っぽく、雨の後には轍ができる。 | 近くにはエメラルドグリーンの池があり、家族連れでの旅行に最適です。 |
| Trailhead Beta | 町の方向の砂利道 | 適度なスペース | 2マイル舗装路に戻る | 急な傾斜; 晩秋に最適 |
| トレイルヘッド ガンマ | Forest service access | Overflow lot on weekends | Snow patches in shoulder seasons | Large cascade views, tranquil setting |
| Trailhead Delta | Rural two-track | Limited near edge | Check for closures; chains may be required in snow | Wildflowers in season; great for adaptive trips |
Distance, elevation, and typical hiking time
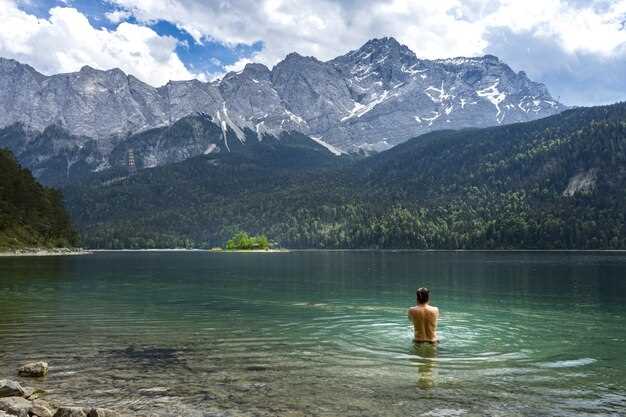
Plan a round-trip of about 4.5 miles, with roughly 900 ft of ascent, for a 2.5–3 hour outing that ends at a serene lake basin with intermittent waterfalls along the final stretch. In spring runoff, the water is bright and the scene becomes a natural resource for photos. This route is easily navigated by moderate hikers, located in montanas scenic high country, and offers a specific mix of forest shade and alpine views.
The typical range spans 3.5–8 miles round-trip, with elevation gains from 600 to 1,600 ft, translating to 2–5 hours on the trail depending on pace and stops. Look for routes where the first two miles are evergreen forest, then open to lake basins located at timberline; the final approach climbs a few switchbacks past meadows and waterfalls. In spring, water levels create whitewater along streams, while late summer pools stay low but accessible. A well-marked network of trails, dog-friendly and safe for families and four-legged companions, enhances the experience. This destination rewards steady hikers with wildlife sightings and diverse scenery. Finding the right route is easier when you check updated maps from the local company and park service.
For hikers focused on a precise target, the largest lakes in the district typically sit at 5–6 miles and 1,200–1,500 ft of gain, with times of 3.5–4.5 hours on the trail. The route networks are interconnected, allowing a through trip that links two or three basins if you want a longer day. Look for a family-sized option that is dog-friendly and accessible during late spring and early fall for reliable parking and fewer crowds.
Seasonal timing matters: plan through the late spring when snow melt expands water flow, and anticipate higher water in that season. The trails present a natural, scenic experience; bring a small pack and check local resource pages for updated conditions. The dog-friendly options typically keep you within designated zones, protecting wildlife and keeping the largest areas open for future visitors. Always verify the times for parking and trail closures with the corresponding company or land-management agency to ensure a smooth trip.
Photo spots, lighting tips, and etiquette for Instagram shoots
Start 30 minutes before sunrise at a tucked lakeside edge with mountain backdrops and golden light; shoot with a standard or wide lens, without a high telephoto, to capture the lake and surrounding terrain in one frame.
- Photo spots and backgrounds
- Calm lakeshore with reflections and a rugged mountain backdrop; dog-friendly paths nearby; this setup is ideal for leisurely, wide scenes.
- A rocky fork in the trail opening to a broad lake view; shoot at the edge for strong foreground contrast against water and peaks.
- Wooded cove that’s tucked away; softer light and fewer crowds; often quiet in the early hours.
- Boardwalks or street-side overlooks near a marina or beach-like stretch; adds human scale and color to the shot.
- Shallow water along the shore for wade shots; keep safety in mind and plan with companions.
- Lighting and camera tips
- Golden hour yields warm flesh tones; shoot 60 minutes after sunrise or before sunset for a natural glow that makes subjects pop.
- Blue hour can add drama; use a tripod and smaller aperture (f/8–f/11) if planning a long exposure of water in motion.
- Position the sun behind the subject for a backlit rim and vibrant water highlights; otherwise, switch to the side for texture in foliage.
- Lens guidance: keep a lens that covers 24–70mm range; avoid a heavy telephoto on windy ridges; this helps keeping the mountain in the high background without losing context.
- Camera settings for stills: ISO 100–200, f/8–f/11, 1/125–1/250 s; adjust to 1/60 s if water detail calls for motion blur, increasing ISO as needed.
- Small adjustments in stance or angle are often making the shot more balanced; pause at the fork to compare two angles.
- Etiquette and safety
- Dog-friendly trails: keep dogs on leash near wildlife; carry waste bags; this protects scenery and habitats.
- Trail behavior: walk leisurely, avoid blocking viewpoints; yield to athletic hikers and mountain bikers; allow space for portrait shots and group photos.
- Respect signs and permissions: some spots restrict drones, flash, or overnight camping; warning- follow posted rules to maintain access for all.
- Photography etiquette: keep noise down and conversations brief at busy overlooks; thats how community-created spots stay serene and welcoming.
- Nature-first practice: pack out what you bring in; leave no trace and respect fragile vegetation along shorelines and higher elevations.
- Overnight considerations: if you stay overnight, choose established campgrounds and abide by amenity rules; plan morning shoots to avoid crowds and preserve the calm water surface.
- Walks and pacing: keep a leisurely tempo to avoid bumpin into other photographers; invite a friend to help with gear and hold reflectors or light modifiers.
Best seasons, weather tips, and safety reminders
Plan your afternoon visit in late spring through early autumn, targeting a 3–5 mile loop that usually resolves in 90–180 minutes. If youre pressed for time, pick a shorter 1–2 mile option that can be finished in under 60 minutes. On buuuuusy weekends, arrive earlier or later in the afternoons to secure accessible parking and a quieter overlook; this window offers the most reliable light for photography. Youre likely to find paths with diverse backgrounds, so choose one of several options based on energy, then follow your pace.
Before departure, check montanacheck for current conditions, including forecast wind, temperature, humidity, and precipitation. In the warm season, weather can shift quickly; warning- signs include dark clouds, sudden gusts, and rising temps near falls. Dress in layers, throw on a lightweight shell for gusts, and apply sunscreen. Carry enough water–usually about 1–2 liters per person for a 2–4 hour trip–and a small snack to maintain energy; you can easily adjust pace, then enjoy the surroundings. Afternoons on weekends can be buuuuusy, so plan accordingly.
Safety reminders: Follow leave-no-trace guidelines, stay on marked paths, and keep to accessible routes; avoid crossing slick rocks or streams after rain. Tell a friend or family member your trip details and estimated return time; carry a map or offline navigation, a whistle, and a compact first-aid kit. Temperatures can swing 20–30°F (7–17°C) from valley to ridge, so still pack extra layers. Trail backgrounds vary, so start slowly, then increase pace only if you feel steady. If you feel fatigued, turn back and retrace to the trailhead. These steps offer a safer, more comfortable activity.
Permits, fees, and family-friendly considerations
Purchase an America the Beautiful annual pass (~$80) to cover most day-use zones; carry digital or printed proof for quick scanning at kiosks. That specific move saves time during peak hour and helps beginner families access trailheads without delay. If you only plan a single trip, a per-vehicle fee of roughly $5–$8 is common at the gate. Always verify current rates online before departure to avoid surprises.
Permits and fees vary by destination; most public lands in the region rely on a simple fee system, with some spots using a self-service envelope or a free self-issue permit. Most popular trailheads charge a per-vehicle fee; look for fee boxes or digital payment options. An annual pass often covers multiple zones, making it a practical option for families making several trips. For overnight stays in primitive areas, camping permits and reservations apply; check in advance if your plan includes a bivouac. Water-based activities may carry additional restrictions; ensure you have the proper permit if required. Even during shoulder seasons, the same rules apply.
Beginner-friendly routes exist: two-to-four mile loops with gentle grades and accessible, shaded corridors. Forested sections provide cooling shade; choose destinations with easy access from parking and close trailheads. During hot periods, mornings or late afternoons are ideal for comfortable pacing and plenty of photos. Photographers will appreciate ample chances for photos along water features; there are also crescent meadows and stream crossings that add scenery while staying on marked paths. theres always a balance between quiet zones and some busier corridors; plan to start at less crowded times. Just note that some parking lots fill quickly. Always bring water, snacks, sun protection, and a slow, leisurely pace, especially with kids. Destination accessibility varies by trailhead, so check for stroller-friendly routes or smooth crossings before packing up.