

 初心者向け 11 の必須セーリングのヒント – 専門家のアドバイス">

Always wear a properly fitted life jacket before heading out, then start with sheltered adventures to test yourself. In the beginning, rely on an accurate forecast from two local sources, and stay within virginia coastal waters where conditions are predictable. More practice, more confidence: keep distances short, ideally within a couple of miles, so you can assess how the keel responds as winds rise and fall.
Learn a handful of reliable knots, but prioritize those that work across types of craft you may encounter. Practice the bowline, square knot, and round turn two half hitches until you can tie them in the dark, leaving each loop with a neat standing part. This discipline helps you stay closer to the boat’s centerline and understand how the keel interacts with currents in calm water and in choppy water between gusts. If a line goes wrong, leave the line slack and re-tie calmly.
Establish a preflight routine that you can repeat between voyages: wind, tide, currents, and a simple plan that matches the crew’s abilities. Maintain a clear order of checks–gear, lines, sails, rudder–then confirm the forecast remains accurate. Start by rehearsing gentle maneuvers in sheltered water, progressing to short passages of cruising between safe channels, which builds timing and discipline without exposing the boat to unnecessary risk.
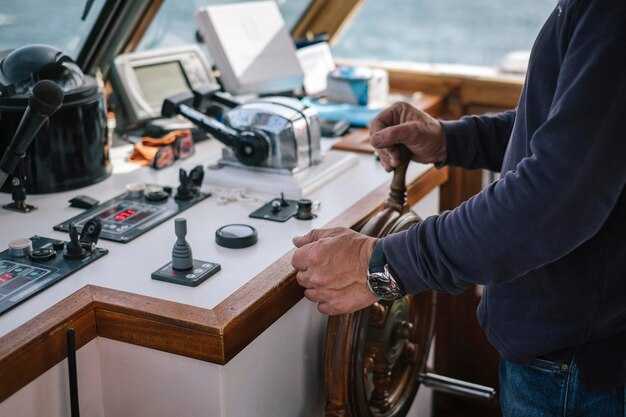
Know your keel and rigging: a compact dinghy behaves differently from a deep-keeled cruiser in gusts. When winds rise, reduce sail area instead of heeling over. The boat should respond promptly to steering inputs; they reflect how you will handle adventures at sea. Leave the harbor only after a quick systems check, ensuring steering, trim, and halyards are ready. Pack a basic safety kit–flashlight, whistle, a small medical kit, and signaling flares; tropical conditions require extra sun protection and water, with a local shelter as a plan when bands of rain sweep virginia waters.
Keep a log that records the time, conditions, and lessons from each voyage; this helps translate early wins into reliable skill. As you accumulate more hours, you understand how to pace your learning, move yourself closer to real cruising, and push beyond sheltered waters. The process is iterative: with each trip you leave the slip, you refine your plan, and the adventures become routine judgment when weather shifts.
Beginner’s Guide to Safe and Confident Boating
Start with a local skipper on a small bareboat to gain confidence quickly and build a real feeling of control.
Keep a simple pre-sail checklist, draw lessons from a trusted sailor in your group, dont forget safety gear and PFDs.
Develop understanding of tides, currents, and wind shifts; leeward protection helps you stay balanced when gusts rise.
Better results come from practicing in calm local waters, taking measured steps, then gradually extending to conditions where you can reach comfortable speeds and maneuvers.
When the crew is a small group, assign duties: skipper, lookouts, lines, and keep communication clear; also, rotate tasks to build familiarity.
Choose routes near your favorite harbor like hampton, and study harbor charts, review likely weather changes, and plan a reach to safer anchorages.
Back up plans reduce stress: carry a signaling device, know where to reach shore facilities, and keep a salty attitude while respecting limits.
After each outing, write lessons, note what worked, and look for situations that felt similar to past experiences to accelerate learning.
In yachting, the skipper leads, yet every sailor should know basic knots, safety procedures, and emergency communication.
Gather resources from local clubs, harbor masters, and online guides; given weather checks, their guidance will help you stay safer, more confident, and ready to take the next step.
11 Sailing Tips for Beginners: Expert Advice; Reserve Transient Slips Early
Step 1: Reserve transient slips at least three to five weeks ahead, 理想的には near marinas with power and water hookups. Availability drops quickly in peak seasons, so lock in a date with the desk and get a written confirmation. This prevents last‑minute scrambles and keeps your plan on track.
Step 2: Know your hull type from the start – monohull or multihull. If you sail a monohull, set ballast and trim to keep the boat balanced in light air and rough seas. In asia waters, choose a vessel with predictable handling and a forgiving helm.
Step 3: Skipper role clear from the start; assign them to steer, whom you trust, while three crew members handle lines, winches, and sail management. They should rehearse tethered maneuvers and man overboard drills in calm water. This order keeps tasks focused even when winds rise.
Step 4: Weather checks rely on a reliable источник. Use two sources; compare data to plan timing of passages. If forecasts show rough seas, delay departure or shorten times on the water, and revisit the basics to confirm your plan.
Step 5: Plan a simple route with five landmarks or waypoints, and note a date for return. Check depths against hull draft; monohull draft tends to 1.5–2.0 m, depending on model. Keep a conservative margin to avoid shoals.
Step 6: Basic rigging and sail handling: learn to reef sails, secure lines, and use the wind to your advantage. Practice intuitive tacking in calm waters; you may feel in control even when conditions rise, and play with small shifts in trim to learn responsiveness.
Step 7: Bareboat readiness: confirm charter place, review licensing needs, and ensure the crew understands local regulations. Have a simple safety briefing before leaving the dock; check life jackets, throw lines, and extinguisher dates.
Step 8: Footwear and deck safety: many sailors go barefoot or wear non-slip deck shoes; either way keep deck clear of loose items. Maintain power at essential systems, like bilge pumps, radios, and navigation lights.
Step 9: Right of way and collision avoidance: leeward vessels have priority; ありがたいことに, understand the rule to reduce doubt. Always maintain a safe distance when they approach. Use a proper lookout and clear communication with them via VHF.
Step 10: Practice sessions in benign conditions: plan three 30–60 minute runs in light winds before venturing into rough times. Likely, these sessions build confidence quickly, and you’ll rely on intuitive decisions when real gusts hit.
Step 11: After each leg, record date, wind speed, sea state, and hull performance; review the data with skipper and loved ones for continuous improvement. Track what worked, what felt rough, and which idea yielded best results.
Check Weather, Wind, and Tides Before Every Sail
heres five concrete checks you should run daily to keep plan tight and safe:
- Forecasts: Pull daily forecasts from two trusted sources (NOAA, Met Office, regional marine services). Compare wind direction, wind speed in knots, gust potential, and sea state. Watch tropical activity; if forecasts show development or squalls, adjust plan, reduce sail, or head to sheltered water. Note forecast windows; in many regions, variability increases as the day progresses, so log updates and adjust your plan accordingly. Occasional gusts are typical; a quick glance helps move mind then act.
- Wind: Note heading relative to your course, wind speed in knots, and gusts. Check forecasted direction shifts; if gusts approach your comfort limit, reef or shorten sail; avoid heavy upwind work when wind veers. If you prefer a simpler setup, reef earlier. If wind drops down, monitor deck movement and adjust.
- Tides and currents: Check tide tables and local currents; know slack window around high or low tide; plan entry or exit with the current; log movement onto your chart, and expect drift of a few tenths of a knot during slack.
- Route and contingencies: Build a simple route with heading, distance, and ETA; mark fallback options such as a nearby harbor or anchorage. If conditions worsen, headed to shelter; in a flotilla, confirm spacing with other boats and keep lines of communication open so everyone stays familiar with the plan.
- Crew readiness and safety gear: In bareboat charters, verify life jackets, VHF, signaling gear, and that all crew hold up-to-date certification or training. Sunscreen, hats, and protection; ensure their fit is correct. Assign roles, run quick safety drills, and keep learning as the idea behind this habit; move mind then act; catch any change, until headed in.
Learn Bowline and Cleat Hitch: Two Core Knots
Tie Bowline first, then Cleat Hitch, to secure lines quickly and reliably.
This would help you become more capable on deck. Practice the basics under real-time steering conditions to build marine awareness and move toward steady control during a cruise. Log progress on a blog or shorts; specify line diameter, stiffness, and cleat size as the specification that changes how each knot is set. In calm times you can rehearse with large lines to simulate field rigging, and keep your own movement smooth while you adapt to changes in wind. Catamarans offer a large working space on deck, aiding line management. A mosquito moment of rain may test how well you maintain tension. This practice will help sailors stay ready when steering and docking, and it will prepare you toward handling larger vessels.
| 結び目 | Purpose | Quick tying steps | 備考 |
|---|---|---|---|
| Bowline | Creates a fixed loop that won’t slip under load; easy to untie after stress. | 1. Make a loop in the standing part. 2. Pass the working end up through the loop. 3. Around the standing part and back down through the loop. 4. Tighten and test by pulling both ends. | Memorize the sequence to speed setup during steering changes; can be used on catamarans. |
| Cleat Hitch | Belays a line to a cleat, holds under load, releases when needed. | 1. Run line to cleat; make one base wrap. 2. Add two turns around the horns in a figure-eight pattern. 3. Finish with a tuck under the last turn. 4. Test with light pull before cruise. | Common on decks; practice when wind is calm; ensure tension is sufficient so the line won’t creep. |
Run a 5-Minute Pre-Departure Safety Checklist
1. Wear PFDs, secure harnesses, and clear the deck Set a 5‑minute clock and start now. Thankfully, this works on boats of all sizes. Each person on board wears a properly fitted life jacket; kids get extra supervision and a snug fit. Remove anything that could slip or slide on the slip or on the sides of the cockpit; secure belongings in lockers or below deck and coil lines neatly. Check halyards, sheets, and telltales to prevent tangles; if you use a harness, clip in before moving to the bow or while the boat heels. Keep aisles clear and maintain three points of contact when moving between areas, so you feel secure and ready for anything were the conditions to change.
2. Confirm comms, crew roles, and safety policy Power up the VHF and test distress calls; confirm channel 16 and switch to a local channel as needed. Designate a lookout and a responder, and assign tasks for each side of the boat to keep movement orderly. Review the boat’s policy for departures and know what to do if someone cannot respond. Ensure the kids are supervised and that the duties for the experienced crew are clear, reducing the chance of confusion during trips between maneuvers.
3. Inspect propulsion, bilge, and hardware Start the engine kill switch and verify throttle response, then confirm there is enough fuel for a safe return with a reserve. Run the bilge pump to ensure it clears water, and check batteries and lighting to avoid trouble after dark. Secure the stove or galley gear and verify hoses and connections. Confirm fenders and lines are ready for quick stops if you need to maneuver between berths or into a slip, and verify that all used gear on deck remains sturdy under load in rough conditions.
4. Review navigation aids and MOB readiness Ensure charts or offline maps are accessible on the console and aboard the companion area; set a primary waypoint and a backup route. Keep a whistle, flashlight, and spare batteries within reach, and have a throw bag ready. Practice a quick man‑overboard drill with the crew and kids where appropriate, so you know how to turn the boat and recover a person without delay. Make sure you understand the positions of lines, anchors, and safety gear on both sides of the cockpit for rapid response.
5. Check forecast, conditions, and timing Read the latest forecast for your sailboat route, noting wind shifts, waves, and visibility. Plan a turnaround and stops if conditions worsen, and ensure you have enough fuel and a practical margin to return before dusk. Align your plan with the port policy and local regulations, and assign a final check to observe conditions until you’re clearly clear to depart. In november coastal patterns can shift quickly; if anything in the data raises concern, delay departure until you have a solid understanding of the risks and a clear route back.
Master Points of Sail and When to Tack or Jibe
Tack early today when the wind shifts 10–15 degrees toward the side you want to sail, keeping sails filled and hull steady.
Five cues to guide the move today: wind angle, sails fullness, sides of the boat lifting, hull balance, and available space to maneuver.
Jibe becomes necessary once a steady plan exists; ensure the crew stance remains flat, move the main sheet smoothly, and avoid a boom swinging across.
On catamarans, gust response is quicker; keep balance on the lee side, adjust sails on both hulls, and keep a wider arc during the turn.
Understanding how sails interact with rig tension helps a beginner actually tune shape; at a broad reach, ease the mainsheet slightly to keep a clean curve.
Today, five deeper moves to practice: observe wind shifts, trim each sail to maintain balanced heave, keep a firm grip on the helm, communicate with one another, and check available space before each tack.
If lines were broken during a maneuver, swap to a spare halyard quickly before resuming the move.
Book Transient Slips Early: Tips for Securing a Docking Spot

Reserve a transient slip at least six months ahead during peak cruising season; thats the fastest way to ensure a dock when marinas fill up. Your priority is a confirmed reservation, so call the harbor office, then verify via the policy portal and lock in a hold with your credit card.
Know marina policy on cancellations; some marinas offer refundable holds up to 48 hours before arrival; others charge a nonrefundable fee. If you need flexibility, ask about a limiter window and a policy that allows moving from one slip to another within the same marina, which speeds up the process when plans shift.
コンパクトな乗船者リストとルート計画を用意してください。LOA、ビーム、喫水深を提供してください。予約リクエストには、必要な係留ポイント、船体構成、船にとって最適なドックの側面を明記してください。この準備により、チェックイン時の時間を短縮し、ドック係留員が迅速に係留できるようになります。.
固定ドック、一時ドック、係留浮子など、マリーナの様々な設定があります。潮の流れ、週末の混雑度、そしてチャンネルからのマリーナへの最適な進入方法について尋ねてみましょう。準備を整えておくことで、最初のアヴァイレビリティの窓に合流し、割り当てられた係留 बर्थまでより速く移動できます。.
必要な書類をすべて用意して到着:船舶登録、保険証、印刷された確認書。処理を迅速化するために、連絡先電話番号をすぐに用意し、到着時に港湾スタッフに会ってから、係留とフェンダーの配置に関する指示に従ってください。.
状況が変化する可能性があるので、移動の準備をしてください。理想的には、半径15~30マイル以内の代替案と、それを到達するための別のルートを用意しておきましょう。これにより、ダウンタイムを減らし、交通渋滞や悪天候でレーンが狭縮されても、クルージングスケジュールを順調に進めることができます。.
係留を行う組織と関わりましょう。地元の学校やクルーザー クラブに参加することで、スリップの事前手配から安全点検までの、実用的で実績のある手順を共有してくれる経験豊富なセーラーと繋がることができます。そのネットワークは、マリーナと新しい港に向かう際に使用する最適なルートの違いを学ぶのに役立ちます。.
桟橋に停泊したら、船体のクリアランスと隣接する船の側を点検し、フェンダーを設置してから、適切な係留索とスプリングにロープを固定します。必要であれば、桟橋に沿って移動して同じ風向に調整し、次なる港に移動する際にスムーズな出発を確保し、クルージングを自信を持って再開します。.
最後に、予約番号、キャンセル期間、連絡先名を単純に記録しておきましょう。ポート間の違いは微妙ですが一貫性があり、ログにこのデータを見つけることで、その後の目的地でもスムーズな到着を繰り返せるようになります。.