

 PNW Crabbing Tips – Essential Guide to Dungeness Crabs">

Secure the pot with a rugged wire rig and check lines every 15 minutes. In the Pacific Northwest, wind can push gear off target fast, so keep tension on the line and turn the pot gently toward the wind to maximize where crabs come up. This routine boosts your success and reduces the chance of lost gear.
Set up two pots on separate lines to compare pull and catch quality. Usually, larger pots hold more crabs and keep them securely inside when lifted. Place bait onto the bottom of the pot or into a bait bag filled with hamachi scraps or lobster pieces, tied firmly with strings so the scent travels through the grate and onto the surrounding water, attracting crabs from the field.
When the pots surface, keep the line taut and pulled gently so crabs stay on the line. Inspect the catch for legal keepers and separate them from released or undersized crabs. If you encounter a wild crab with damaged claws, release it carefully back into the water. A quick, careful release preserves the stock, making future trips more successful.
After the haul, rinse the crabs and keep them on ice or freeze promptly. For best flavor, process within 24 hours; if you freeze, lay them in a single layer until solid, then bag to prevent freezer burn. Whether you’re cooking by steam, boil, or sauté, control the heat: high-quality crab meat stays white and tender when not overcooked. If you crab with friends, join early and plan to share; keeping the workload evenly distributed makes the day enjoyable and ensures everyone gets a taste. When packing for the freezer, label frozen portions so you know what you have for later meals.
PNW Crabbing Tips Series
Begin every crabbing day by inspecting gear before you drop traps: check lines for wear, confirm the traps are attached, and tighten hardware so the ends stay secure; keep your kit clean and ready.
View the tide and current before you set out, then place traps where crabs are known to forage–middle-depth shelves with steady flow. This setup will give you better catching opportunities and shorter soak times.
Use a bait mix that draws Dungeness: two pieces of oily fish and a single oyster, securely attached to the bait board so the scent stays strong as the trap sinks. White fish meat helps visibility in murky water and can boost interest from crabs passing by. If the bait shifts, poke it back gently to keep it evenly distributed.
- Trapping strategy: position traps with the entrance facing the current and ensure they land tightly on the bottom to reduce escape risk.
- Handling and safety: when retrieving, keep claws away from hands; lift firmly, and watch for missing limbs or damaged parts that could allow a crab to bolt from the trap.
- Times and cadence: check during ebb tide or early morning when Dungeness are most active; shorter soak times maintain bait quality and reduce bycatch.
- Business and sustainability: keep a tight log of catch and release modestly, so the local stock remains healthy for the long run.
- Left vs right orientation: mark each trap with a left/right tag so you can rotate placement and cover more area without overlap.
PNW Crabbing Tips: Dungeness Crabs; Step 2 Caution; PNW Crabbing Tips; Crabbing 10 Trot-Lining Tips; Step 4 Areas for Crabbing; Step 7 Types of Traps and How to Use Them; Step 3 Equipment; Step 8 Cleaning the Crab; Step 5 How to Hold a Crab; Step 1 Warning; Step 6 Types of Bait; Crabbing for Beginners; Crabbing Off a Boat 4 Tips for Beginners
Inspect gear before leaving the road to the water: secure lines, check weighted pots, and attach a bright basket for storage. Keep the amount of gear tight and manageable, then test knots and buoy tags to prevent loss in saltwater. With dungeness in mind, set a clear plan and move efficiently to the first pull.
Step 2 Caution: Stay aware of currents and nearby boats. Secure yourself to rails, keep your party spaced well, and leave room for others to work. Avoid overloading traps-this and watch where you place gear to prevent snagging lines on propulsion or motors.
Step 3 Equipment: You need bottom pots or baskets, a trot-lining setup if you choose that method, a weighted line, and cotton or synthetic weight, plus sturdy strings and a bright buoy. Keep bait close at hand and attach it firmly to the hook or clip. Have a chef-ready knife and a clean bucket for later handling, plus a small knife for quick cleaning on site.
Step 4 Areas for Crabbing: Target sheltered structures like rock piles, weed beds, and eelgrass edges where crustaceans gather. Look for channels with steady current and deeper pockets where dungeness tend to hold. Check local market reports for current hot spots, then adjust based on recent catches and boat traffic in those areas.
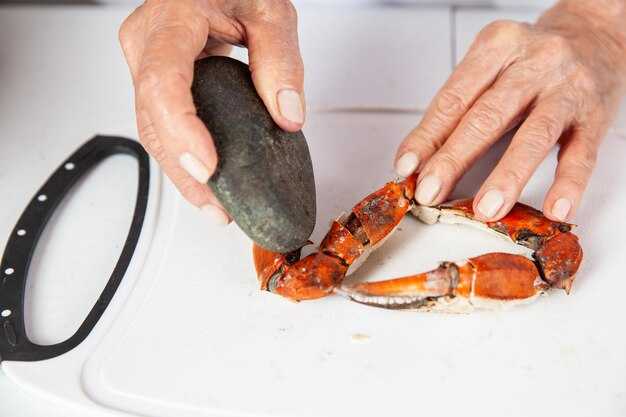
Step 5 How to Hold a Crab: Approach from behind the crab’s carapace, grab just behind the claws, and gently tilt to free the legs from the suction. Keep the claws pinched and away from the chef’s fingers, then transfer the crab slowly into a basket or bushel for safe handling. When releasing or stacking kept crabs, place them level and evenly to avoid crushing the legs or claws.
Step 6 Types of Bait: Use fresh whitefish chunks or scraps, attached securely to the bait clip. For trot-lining, lay several baited hooks along the line, spacing them to reduce tangles. Change bait every few hours if it softens, and keep bait pieces neat to encourage consistent feeding by dungeness and other crustaceans.
Step 7 Types of Traps and How to Use Them: Two common options are square pots and trot-line setups. For pots, position on the bottom with steady weight and a clear tether to the buoy. For trot-lining, run a straight line with evenly spaced hooks; keep the line taut and moving slowly to avoid snagging. When deploying, attach a bright marker and ensure the line is secure and visible to other water users. If you run into a snag, cut losses quickly to prevent larger losses later.
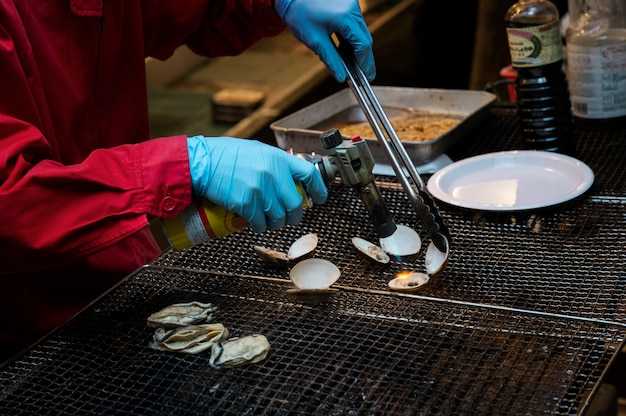
Step 8 Cleaning the Crab: Rinse the crab in saltwater, then remove the apron and gills. Separate the claws and legs, crack the shell, and extract the meat in clean, even pieces. Keep the meat on ice or in a cooler, and store in a well-ventilated space away from direct sun. For eating, extract the white meat and collagen-rich parts later, and remove any remaining grit before serving to guests.
Step 1 Warning: Always monitor weather, tides, and local regulations. Wear life jackets when crabbing off a boat or in rough water, and avoid crowded lanes. Keep kids and pets safe, and leave no trash behind on the road or boat ends. Check license rules and bag limits to prevent penalties and protect your business and the market supply.
Step 6 Types of Bait (revisited): For best results, rotate bait between whitefish and other crustacean scraps, and adapt with the season and area. Secure bait so it cannot fall off during moving tides, and avoid bait that quickly dissolves, which can cause wasted effort and reduced catches.
| Aspect | Practical Tip | Errori Comuni |
|---|---|---|
| Gear check | Inspect traps, lines, weights, and baskets; replace worn cotton or rope | Leaving gear attached and forgetting to secure |
| Safe handling | Hold crabs by the back of the carapace; keep claws pinched | Pinching the claws or dropping the crab |
| Deployment | Mark pots with a bright buoy; place on good bottom and check often | Dropping gear in heavy current |
| Bait choice | Use whitefish chunks; attach firmly and rotate if needed | Using soft bait that falls off quickly |
| Area selection | Focus on areas with structure and current; adapt to recent catches | Crabbing in open flats with little habitat |
| Pulizia | Rinse, trim apron, remove gills; chill meat promptly | Leaving guts or grit in meat |
Step 1 Warning: Coastal hazards, weather checks, and personal safety
Take a moment to check the NOAA marine forecast and tide charts 24 hours before you go, and verify again two hours prior to departure. If gusts reach 25–30 mph or seas rise above six feet, better to postpone. Put on a Coast Guard–approved PFD, keep a whistle, and have a VHF radio within easy reach. They should agree on a buddy system and a clearly scheduled check‑in time so a missed signal doesn’t become a rescue scenario.
Weather checks are ongoing. Monitor wind direction, swell height, and current. Use a reliable app plus official bulletins. Taking a moment to confirm changes saves risk, and simply re‑check on site when you arrive. If visibility drops below two miles or fog thickens, delay departure and reassess your plan.
Coastal hazards present in types you should know: sneaker waves, rip currents, slick rock, and rockfalls. Stay off wet, algae‑covered ledges and avoid standing in line with breaking surf near jetties. Be mindful of mushroom‑shaped rocks that can redirect water flow and tether or knock gear. Keep hands on rails when near the edge and watch for sudden surges that can pull you off balance.
Dress for traction: heavy duty, slip‑resistant boots, gloves, and a life jacket. Carry a dry bag for valuables, plus a waterproof flashlight and first‑aid kit. If you’re using a trotline or other long‑line setup, maintain slack and keep the line away from your body; test tension before deploying. When handling heavy gear, treat it like a chef handles sharp tools–careful, precise, and deliberate. Before you move, check that the line is secure and that you can release quickly if a line snags. Also be ready to release the line if something goes wrong and retreat to a safe spot.
Nearby commercial activity adds risk. They may be targeting sablefish, hamachi, or mahi, so give their gear ample space and avoid crossing lines or nets. If you see wire‑mesh pots or other gear, do not pull or cut lines; signal for help and wait for a safe moment to act. If a pot is released and drifts, mark its position and recover later with a partner. Keep a clear path to your own gear to prevent entanglement and stay aware of where you are in relation to others.
Pre‑crab season safety checklist: maintain a high level of situational awareness on every outing. You want a defined route, ETA, and emergency contacts, plus a plan to abort if conditions worsen. Taking these steps reduces risk and keeps the focus on a productive crabbing session. Re‑check conditions before each set and again after reloading gear, so you’re ready to adapt instead of reacting to a sudden change.
Passaggio 3 Attrezzatura: Lista di controllo dell'attrezzatura e impostazione per la pesca di granchi
Usa una configurazione compatta e veloce: una nassa per granchi pesante con maglie da 7,5-10 cm; la boa è attaccata alla linea principale e un peso impedisce all'attrezzatura di essere trascinata via dal galleggiante blu. Nonostante le dimensioni compatte, questa configurazione gestisce correnti costanti e tiene le mani lontane da manovre sciolte.
Lista di controllo dell'attrezzatura: trappole con rivestimento rinforzato, 2-3 cime di ricambio, un peso elevato, un cesto di raccolta delle dimensioni di un moggio, boa bianca e boa blu di riserva, un coltello o uno strumento per innescare l'esca e elementi di fissaggio di ricambio per fissare i blocchi di esca. Rimangono pronti per cambi rapidi al molo o in acqua.
Setup: disporre le trappole lungo una linea retta o una curva leggera, lasciando i margini sinistro e destro liberi dal traffico di imbarcazioni; utilizzare la linea principale per calare le nasse e una linea di piombo più corta per ridurre al minimo gli intoppi; una volta posizionata la linea, segnare un percorso fisso e annotare quale nassa si trova a sinistra o a destra. Ogni trappola ha un peso e un piccolo anello che aiuta a fissare la lenza; danno il meglio di sé quando sono tenute tese.
Esca: Utilizzare esche come pesce azzurro, teste o totani tagliati; le ostriche possono essere utilizzate ove consentito dalle norme di mercato; posizionare l'esca verso il rivestimento per evitare la perdita di odore.
Attenzione: verificare le normative locali, evitare di mescolare le nasse con le trappole per aragoste in canali stretti; non lasciare mai l'attrezzatura incustodita; fissare sempre le cime e conservarle in un luogo asciutto.
Gestione del tempo: tempi di immersione di prova; in acque calme controllare dopo 20-30 minuti; in corrente o onde controllare ogni 15 minuti; in seguito è possibile adattare in base alle catture e alle condizioni.
Consigli per la manipolazione e la sicurezza: accovacciarsi con le gambe divaricate; evitare di infilare le mani nella trappola; dare un colpetto per verificare se i granchi sono vivi; farsi aiutare da un amico per sollevare pentole pesanti. Questo piano di gioco ti mantiene efficiente e riduce l'affaticamento.
Trasporto: utilizzare un cesto o un moggio per spostare i granchi; rivestire il cesto con un telo bianco per ridurre l'attrito; posizionare un coperchio non fissato per favorire la ventilazione.
Consigli finali: mantenere l'attrezzatura collegata ed etichettata; sostituire sempre la rete usurata; dopo ogni corsa, ispezionare nodi e connessioni; suggerimenti: una preparazione più rapida riduce il tempo in acqua.
Passo 5 Come tenere un granchio: presa sicura, posizione della mano ed evitare la fuga
Afferra il granchio dal dorso del carapace, con il pollice su un bordo e le dita che coprono il lato opposto. Tieni il carapace piatto contro il palmo della mano e infila le zampe sotto il corpo per limitare i movimenti. Punta sempre le chele lontano da te e mantieni il corpo stabile mentre lo sollevi. Ciò che conta è una presa pulita e controllata che riduca le fughe improvvise.
Posiziona la base delle ultime zampe deambulanti sotto il palmo della mano per una presa a quattro punti. Allarga le dita per coprire il centro del carapace, quindi fai scivolare leggermente il granchio verso la parte posteriore in modo che le chele principali rimangano lontane dalle dita. Se hai un utensile con manico lungo, usalo per spostare il granchio senza esporre la mano. La posizione di presa deve risultare sicura ma non costrittiva. Per la manipolazione dei crostacei, questa presa protegge le dita e facilita lo spostamento del granchio in una fase successiva del processo.
La gestione della fuga si ottiene con un ritmo calmo e deliberato: se il granchio si contorce, mantieni la presa salda e spostala di una tacca invece di ruotare il polso. Abbassa il granchio in un contenitore con il carapace rivolto verso il basso per riprendere il controllo, quindi riprendi la presa e continua. Evita movimenti improvvisi e veloci che innescano pizzichi o cadute.
L'attrezzatura e la preparazione semplificano le cose: tieni a casa o nella borsa della spesa un piccolo kit da negozio con guanti antitaglio, pinze a filo lungo, un secchio robusto e una rete tipo Netarts o altri accessori. Se hai iniziato a pescare granchi online o al mercato, individua rapidamente questi articoli e tienili a portata di mano per usi futuri. Una configurazione con quattro elementi velocizza i trasferimenti durante una festa e intorno al tavolo.
Una volta tenuto saldamente, puoi passare alla pulizia o alla cottura. Seguono ricette e idee per servire, e questa presa aiuta la maggior parte dei granchi a rimanere sotto controllo, portando al successo nei trasferimenti rapidi e a risultati migliori nel piatto. Dato che ti sei esercitato, ti sentirai più sicuro quando acquisterai attrezzature al mercato o online, e potrai mantenere lo stesso approccio per i futuri crostacei, cosa cucinare dopo e come condividere consigli con i tuoi amici. Più avanti, questo metodo diventerà il tuo punto di riferimento per qualsiasi manipolazione di granchi tu abbia iniziato da quando hai partecipato per la prima volta all'attività.
Fase 6 Tipi di esca: le migliori opzioni per stagione e specie (consigli sulla preparazione dell'esca)
Usa teste di merluzzo carbonaro vivo come esca principale, poi aggiungi molluschi come ostriche o netarts per un profumo extra. Usa una lenza lunga per una copertura ampia e tieni l'esca pronta sulle barche in una borsa frigo per un cambio rapido.
Primavera: Tieni a portata di mano teste di merluzzo carbonaro vivo e taglia qualsiasi pesce intero in pezzi piatti di dieci centimetri. Abbinali a ostriche fresche o netarts per aumentare l'interesse in acque più fredde. Attacca i pezzi in modo che aderiscano al supporto dell'esca; questo rende più facile la manipolazione e riduce gli intoppi quando la lenza scorre. Gestisci la marea riposizionando ancore ed esca lungo la lenza per un'esposizione uniforme e orizzontale.
Estate: Passa a teste o scarti di pesce di buona qualità, tagliati in porzioni più corte da 8-10 cm. Conserva l'esca in una borsa termica all'ombra a bordo delle imbarcazioni e rinfrescala ogni poche ore se stai pescando attivamente. L'odore si diffonde bene con la corrente e una fornitura costante ti aiuta a mantenere l'esca sia per i granchi maschi che per le femmine sulla lenza.
Autunno: I molluschi risplendono, soprattutto ostriche e netarts. Utilizza i gusci interi o la polpa sgusciata; rimuovi eventuale sabbia e risciacqua prima di posizionarli sugli ami. Mantieni i pezzi intorno ai dieci centimetri in modo che rimangano sulla lenza e legali saldamente in modo che non scivolino mentre peschi con le nasse o una bilancia. Questo approccio sembra attirare un alto tasso di abboccata quando l'acqua verde entra sottocosta.
Inverno: Resti di pesce congelato o conservato funzionano bene quando le uscite sono brevi e le giornate lente. Utilizzare pezzi di pesce pulito da dieci centimetri per riempire gli spazi vuoti nelle sacche per esche e passare a stazioni di esca solida per mantenere forte l'odore. Conservare l'esca in un contenitore refrigerato chiuso e ruotare i materiali per mantenerne la freschezza; questo permette alle imbarcazioni di pescare durante i fronti freddi e in mari agitati.
Passo 7 Tipi di trappole e come usarle: nasse, palangari e lenze a mano; nozioni di base sul posizionamento
Inizia con le nasse per un ritorno affidabile; posiziona 2–4 nasse per sito con cime di discesa appesantite e galleggianti blu, poi aggiungi palangari o lenze a mano secondo necessità in base all'accesso all'acqua e alle condizioni meteo. Se vuoi iniziare in modo semplice, le nasse sono le più facili da gestire.
Queste cose lavorano insieme per aumentare l'affidabilità e mantenere l'attrezzatura organizzata.
- Configurazione e posizionamento dei vasi
- Scegliere nasse a fondo piatto di 20-30 cm di diametro; assicurarsi che abbiano un rivestimento resistente; assicurarsi che la nassa sia fissata alla lenza zavorrata in modo che si posi sul fondo; sigillare il coperchio dopo aver messo l'esca per trattenere l'odore ed evitare che entrino i crostacei più piccoli.
- Nozioni di base sul posizionamento: posizionare su fondali sabbiosi o ghiaiosi a una profondità di 2–5 metri, con le entrate rivolte a monte; lasciare 4–6 metri tra le nasse; lasciare spazio per il recupero; contrassegnare ogni attrezzatura con galleggianti blu in modo da poterli individuare facilmente tornando dal mercato o dal molo; evitare aree con traffico nautico intenso o alghe che possono impigliare le cime.
- Esche e ricette: prepara le esche nella cucina di casa; usa ricette semplici; utilizza sottoprodotti di crostacei e scarti di pesce con un odore intenso e collagene per aiutare l'aroma ad aderire; fissa saldamente l'esca in modo che non possa cadere; controlla finché non trovi granchi durante ogni controllo; rimuovi subito il pescato e rimetti la nassa a posto.
- Bolentino
- Struttura: stendi una lenza principale lunga con braccioli equamente distanziati; attacca braccioli da 15–30 cm con pesi per mantenere ogni bracciolo vicino al fondo; un rivestimento robusto sulla lenza principale la protegge e aiuta a ridurre i grovigli; assicurati che la lenza sia fissata a galleggianti per segnare le estremità; in un'installazione commerciale, ispeziona la lenza quotidianamente.
- Posizionamento: ancorare vicino a elementi strutturali come palafitte, macerie di roccia o letti di zostera dove si trovano i molluschi; mantenere la tensione della linea per evitare intoppi; utilizzare galleggianti per contrassegnare le estremità; non sporgere su ormeggi o boe; controllare e riposizionare dopo le tempeste.
- Parabordi a mano
- Attrezzatura: lenza a mano con esca su una piccola lenza o esca; attaccare un peso; è possibile tirare il granchio a mano da una zona tranquilla; tenere la lenza bassa per evitare i venti superficiali.
- Posizionamento: baie e bordi di erbai, vicino a banchine o spigoli di strutture; spostarsi in punti nuovi dopo diversi controlli; utilizzare un mestolo per rimuovere i granchi; evitare di lasciare le lenze attaccate quando non vengono utilizzate per lunghi periodi.