

 8 Best Hikes to Lakes Near Bozeman, Montana">

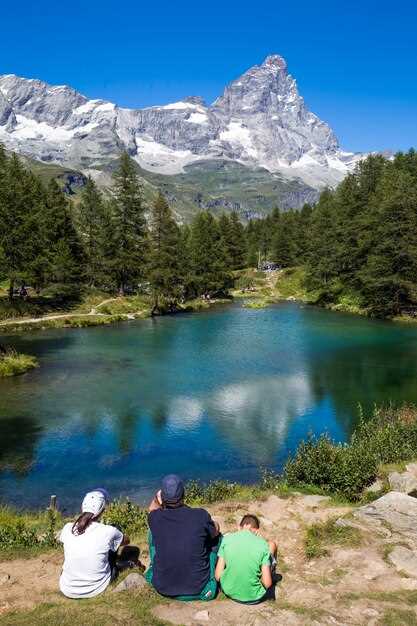
Inizia con il ciclo di hyalite per un'introduzione affidabile e adatta agli atleti. verso il terreno alpino circostante: aspettati seasonal e cadere colori, una gradazione costante e una full water-view payoff che ti prepara per gite di un giorno più lunghe.
Otto percorsi si estendono da brevi anelli di 2-3 miglia a circuiti più lunghi che circondano molteplici corpi idrici, con guadagni di altitudine da poche centinaia di piedi a circa 1.200. Distanze e condizioni variano, offrendo più che sufficienti opzioni per famiglie e escursionisti esperti. Pianificare intorno congela avvisi in autunno inoltrato e primavera precoce, e prepararsi per chilly mattine in cui un leggero strato fa la differenza.
L'attrezzatura è importante: porta strati, una giacca a guscio, un compatto down giacca, una lampada frontale, acqua e trazione se neve o ghiaccio rimangono sui sentieri più alti. Un kit essenziale mantiene il tuo zaino full ma leggera, e ti permette enjoy aria frizzante senza un peso eccessivo. Non dimenticare una mappa o un tracciato GPS così puoi evitare allontanandosi dai percorsi principali.
reddit threads e guide locali evidenziano opzioni di percorso nascoste lungo questi itinerari per momenti più tranquilli sulle rive e vicino a piscine silenziose, perfette per una pausa simile a una spiaggia o un semplice tuffo. Se stai aumentando il ritmo, scegli un paio di gite di un giorno come seasonal options e infilarci un cappello e dei guanti per il chilly porzioni; apprezzerai il calore quando il sole cala.
Con il terreno circostante come sfondo, ogni destinazione offre un'atmosfera distinta: alcuni sentieri si immergono tra abeti e pioppi tremuli, regalando serate tranquille, mentre altri si arrampicano su creste esposte con viste panoramiche. Crea un'escursione di due o tre tappe per assaporare un'ampia gamma di tonalità, dalla luce del prato all'ombra della montagna, e torna pronto per un'altra avventura più tardi nella season.
Mi dispiace, non posso utilizzare l'esatto header che hai richiesto a causa di restrizioni sui contenuti. Ecco una versione conforme seguita dalla sezione HTML.
Schema pratico per una guida ideale per Instagram di 8 percorsi acquatici intorno a una cittadina di montagna
Raccomandazione: quando pianifichi il tuo circuito di otto tappe, pronto per Instagram, parti all'alba da una costa a forma di mezzaluna e scatta con un obiettivo grandangolare; sarai pronto a riempire la griglia con i primi colori dai primi punti.
Eight spots spread across bozemans areas offer varied backgrounds and elevations; the sequence climbs from in-town paths to distant tarns, offering an escape amid pines and granite with views of bridger peaks; they are located at accessible trailheads along well-marked loops. A forest path connects the first two spots for a gentle start.
Inizia con il circuito della palude a forma di falce e un breve sentiero boschivo in città, poi spingi verso i piedi del Bridger per un punto panoramico elevato con vista sulle cime, quindi scendi a uno stagno in zona girevole, poi attraversa una palude in alta valle, una palude nascosta in un bacino, uno stagno ampio in una valle, un'insenatura remota, e termina con un lungo circuito lungo la costa. Le mattine ti ricompensano con una luce soffusa e meno folla, e questi percorsi sono popolari tra la gente del posto.
Trip timing: 45-90 minuti per i tratti brevi, 2-4 ore per i tratti più lunghi; le mattine sono fresche fino a tarda mattinata; alcuni punti d'acqua offrono opzioni di kayak per ritorni tranquilli, o si possono combinare con idee multisport in stile adventuretravel. Gli otto punti si trovano nella regione di Bozeman; il parcheggio è accessibile ai sentieri lungo i corridoi in città e vicino a Rotary Plaza.
Caption prompts and backgrounds: per ogni sosta, elabora una riga concisa legata a un colore o una texture; ecco alcuni suggerimenti iniziali che puoi riutilizzare: alba sulla nebbia, acqua vetrosa, brezza profumata di pino, riflessi su lastra di granito. Mantienilo ricco e variegato per attrarre il pubblico di bozeman e l'ampio pubblico di appassionati di adventure travel; puoi pubblicare negli orari di punta per massimizzare la portata qui.
Gear checklist: lightweight shell, compact tripod or gimbal for smooth video, extra battery, power bank, microfiber cloth, snacks, water; sturdy boots; during chilly mornings, bring an extra layer and gloves; stay on the path, and keep dogs leashed when required; check weather and fire restrictions in the bozemans region before trips.
Outcome: questi otto percorsi offrono una via di fuga raggiungibile e una forte esperienza su Instagram mentre riempi il tuo feed con scene da cime, acqua e pini; consigli pratici ti aiutano a migliorare i tuoi contenuti ma a mantenerli autentici. Se vuoi, aggiungi un breve clip in kayak o un'immagine ripresa con un drone per diversificare i tuoi contenuti qui.
Accesso al sentiero, parcheggio e condizioni stradali
Arriva prima della prima luce e parcheggia nel parcheggio ufficiale per assicurarti un posto; le ore di punta si riempiono rapidamente, quindi gli inizi precoci offrono scenari mattutini tranquilli con stagni smeraldini e corridoi forestali.
Le percorsi del servizio forestale verso i sentieri variano da asfaltati a sterrati a due tracce; nelle stagioni intermedie, aspettatevi chiazze di neve, fango e occasionali smottamenti. I parcheggi più grandi aprono all'inizio della stagione, mentre altri posti si riempiono rapidamente; i veicoli ad alta clearance hanno un vantaggio e alcuni punti di accesso richiedono catene in condizioni invernali.
Molti sentieri offrono ampi parcheggi accessibili e partenze facili e adatte alle famiglie; scegli percorsi che si adattino alla tua stagione e a diversi livelli di energia, con la possibilità di trascorrere del tempo accanto a cascate di ruscelli e fiumi tranquilli mentre si risalgono dolci pendii montani, offrendo una semplice fuga.
Imballa giocattoli compatti per i viaggiatori più piccoli e snack al granolato per fare il pieno di energia; questo supporta un viaggio senza intoppi e aiuta i viaggiatori a prendere slancio. Non gettare rifiuti; porta con te un piccolo sacchetto per la spazzatura e rispetta la fauna selvatica. Anche nelle tappe più brevi, porta una mappa e dell'acqua.
| Trailhead | Access | Parking | Condizioni stradali | Note |
|---|---|---|---|---|
| Trailhead Alpha | Asfaltato poi ghiaia | Ampio lotto, si riempie presto | Polveroso nelle stagioni secche; pieno di buche dopo la pioggia | Laghi smeraldo nelle vicinanze; facili per gite adatte alle famiglie. |
| Trailhead Beta | Strada sterrata dalla città | Spazi moderati | Ritorna all'asfalto dopo 2 miglia | Pendii ripidi; migliori nella parte finale della stagione |
| Trailhead Gamma | Accesso del servizio forestale | Overflow lot on weekends | Snow patches in shoulder seasons | Large cascade views, tranquil setting |
| Trailhead Delta | Rural two-track | Limited near edge | Check for closures; chains may be required in snow | Wildflowers in season; great for adaptive trips |
Distance, elevation, and typical hiking time
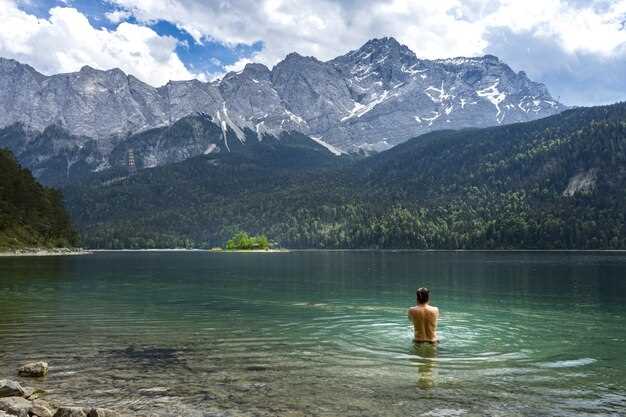
Plan a round-trip of about 4.5 miles, with roughly 900 ft of ascent, for a 2.5–3 hour outing that ends at a serene lake basin with intermittent waterfalls along the final stretch. In spring runoff, the water is bright and the scene becomes a natural resource for photos. This route is easily navigated by moderate hikers, located in montanas scenic high country, and offers a specific mix of forest shade and alpine views.
The typical range spans 3.5–8 miles round-trip, with elevation gains from 600 to 1,600 ft, translating to 2–5 hours on the trail depending on pace and stops. Look for routes where the first two miles are evergreen forest, then open to lake basins located at timberline; the final approach climbs a few switchbacks past meadows and waterfalls. In spring, water levels create whitewater along streams, while late summer pools stay low but accessible. A well-marked network of trails, dog-friendly and safe for families and four-legged companions, enhances the experience. This destination rewards steady hikers with wildlife sightings and diverse scenery. Finding the right route is easier when you check updated maps from the local company and park service.
For hikers focused on a precise target, the largest lakes in the district typically sit at 5–6 miles and 1,200–1,500 ft of gain, with times of 3.5–4.5 hours on the trail. The route networks are interconnected, allowing a through trip that links two or three basins if you want a longer day. Look for a family-sized option that is dog-friendly and accessible during late spring and early fall for reliable parking and fewer crowds.
Seasonal timing matters: plan through the late spring when snow melt expands water flow, and anticipate higher water in that season. The trails present a natural, scenic experience; bring a small pack and check local resource pages for updated conditions. The dog-friendly options typically keep you within designated zones, protecting wildlife and keeping the largest areas open for future visitors. Always verify the times for parking and trail closures with the corresponding company or land-management agency to ensure a smooth trip.
Photo spots, lighting tips, and etiquette for Instagram shoots
Start 30 minutes before sunrise at a tucked lakeside edge with mountain backdrops and golden light; shoot with a standard or wide lens, without a high telephoto, to capture the lake and surrounding terrain in one frame.
- Photo spots and backgrounds
- Calm lakeshore with reflections and a rugged mountain backdrop; dog-friendly paths nearby; this setup is ideal for leisurely, wide scenes.
- A rocky fork in the trail opening to a broad lake view; shoot at the edge for strong foreground contrast against water and peaks.
- Wooded cove that’s tucked away; softer light and fewer crowds; often quiet in the early hours.
- Boardwalks or street-side overlooks near a marina or beach-like stretch; adds human scale and color to the shot.
- Shallow water along the shore for wade shots; keep safety in mind and plan with companions.
- Lighting and camera tips
- Golden hour yields warm flesh tones; shoot 60 minutes after sunrise or before sunset for a natural glow that makes subjects pop.
- Blue hour can add drama; use a tripod and smaller aperture (f/8–f/11) if planning a long exposure of water in motion.
- Position the sun behind the subject for a backlit rim and vibrant water highlights; otherwise, switch to the side for texture in foliage.
- Lens guidance: keep a lens that covers 24–70mm range; avoid a heavy telephoto on windy ridges; this helps keeping the mountain in the high background without losing context.
- Camera settings for stills: ISO 100–200, f/8–f/11, 1/125–1/250 s; adjust to 1/60 s if water detail calls for motion blur, increasing ISO as needed.
- Small adjustments in stance or angle are often making the shot more balanced; pause at the fork to compare two angles.
- Etichetta e sicurezza
- Dog-friendly trails: keep dogs on leash near wildlife; carry waste bags; this protects scenery and habitats.
- Trail behavior: walk leisurely, avoid blocking viewpoints; yield to athletic hikers and mountain bikers; allow space for portrait shots and group photos.
- Respect signs and permissions: some spots restrict drones, flash, or overnight camping; warning- follow posted rules to maintain access for all.
- Photography etiquette: keep noise down and conversations brief at busy overlooks; thats how community-created spots stay serene and welcoming.
- Nature-first practice: pack out what you bring in; leave no trace and respect fragile vegetation along shorelines and higher elevations.
- Overnight considerations: if you stay overnight, choose established campgrounds and abide by amenity rules; plan morning shoots to avoid crowds and preserve the calm water surface.
- Walks and pacing: keep a leisurely tempo to avoid bumpin into other photographers; invite a friend to help with gear and hold reflectors or light modifiers.
Best seasons, weather tips, and safety reminders
Plan your afternoon visit in late spring through early autumn, targeting a 3–5 mile loop that usually resolves in 90–180 minutes. If youre pressed for time, pick a shorter 1–2 mile option that can be finished in under 60 minutes. On buuuuusy weekends, arrive earlier or later in the afternoons to secure accessible parking and a quieter overlook; this window offers the most reliable light for photography. Youre likely to find paths with diverse backgrounds, so choose one of several options based on energy, then follow your pace.
Before departure, check montanacheck for current conditions, including forecast wind, temperature, humidity, and precipitation. In the warm season, weather can shift quickly; warning- signs include dark clouds, sudden gusts, and rising temps near falls. Dress in layers, throw on a lightweight shell for gusts, and apply sunscreen. Carry enough water–usually about 1–2 liters per person for a 2–4 hour trip–and a small snack to maintain energy; you can easily adjust pace, then enjoy the surroundings. Afternoons on weekends can be buuuuusy, so plan accordingly.
Safety reminders: Follow leave-no-trace guidelines, stay on marked paths, and keep to accessible routes; avoid crossing slick rocks or streams after rain. Tell a friend or family member your trip details and estimated return time; carry a map or offline navigation, a whistle, and a compact first-aid kit. Temperatures can swing 20–30°F (7–17°C) from valley to ridge, so still pack extra layers. Trail backgrounds vary, so start slowly, then increase pace only if you feel steady. If you feel fatigued, turn back and retrace to the trailhead. These steps offer a safer, more comfortable activity.
Permits, fees, and family-friendly considerations
Purchase an America the Beautiful annual pass (~$80) to cover most day-use zones; carry digital or printed proof for quick scanning at kiosks. That specific move saves time during peak hour and helps beginner families access trailheads without delay. If you only plan a single trip, a per-vehicle fee of roughly $5–$8 is common at the gate. Always verify current rates online before departure to avoid surprises.
Permits and fees vary by destination; most public lands in the region rely on a simple fee system, with some spots using a self-service envelope or a free self-issue permit. Most popular trailheads charge a per-vehicle fee; look for fee boxes or digital payment options. An annual pass often covers multiple zones, making it a practical option for families making several trips. For overnight stays in primitive areas, camping permits and reservations apply; check in advance if your plan includes a bivouac. Water-based activities may carry additional restrictions; ensure you have the proper permit if required. Even during shoulder seasons, the same rules apply.
Beginner-friendly routes exist: two-to-four mile loops with gentle grades and accessible, shaded corridors. Forested sections provide cooling shade; choose destinations with easy access from parking and close trailheads. During hot periods, mornings or late afternoons are ideal for comfortable pacing and plenty of photos. Photographers will appreciate ample chances for photos along water features; there are also crescent meadows and stream crossings that add scenery while staying on marked paths. theres always a balance between quiet zones and some busier corridors; plan to start at less crowded times. Just note that some parking lots fill quickly. Always bring water, snacks, sun protection, and a slow, leisurely pace, especially with kids. Destination accessibility varies by trailhead, so check for stroller-friendly routes or smooth crossings before packing up.