

 A Guide to Life Jacket Safety – Essential Tips for Safer Water Activities">

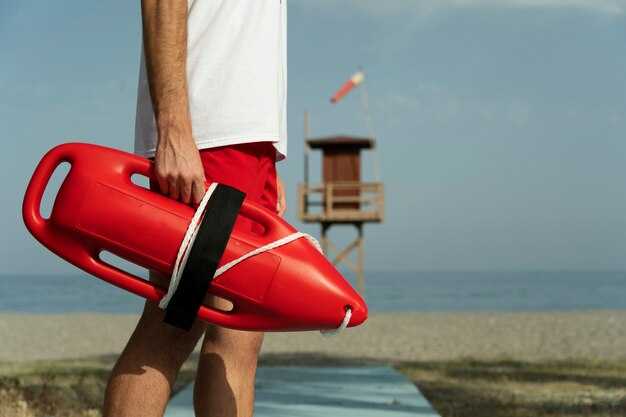
Always wear a properly fitted life jacket whenever youre near or on the water. A correct fit boosts buoyancy, reduces fatigue, and improves survival odds in rough conditions, making these activities safer for more people in your group.
Choose jackets that are approved by the relevant authority and purchase models sized for your weight and chest measurement. Check that the strap fasteners attach securely, the zipper or buckles function smoothly, and the vest fits snugly without restricting breathing. The basic rule is simple: test the jacket in shallow water before moving farther from shore.
Inspect the jacket’s buoyant material and seams for wear, and replace any damaged pieces. In conditions with wind or chop, a compact, well-maintained vest is easier to move in and reduces the chance of tragedy for the entire group. These checks keep mind focused on safety above all else.
Keep jackets clean and dry between uses. Dry them fully, store away from heat and direct sun, and regularly inspect seams and buoyant material. When you encounter wear, replace the life jacket promptly. This habit extends life, protects your purchase, and helps more people stay safe when conditions change.
Before you set out, assign a quick safety plan: designate a lead in the group, ensure everyone knows how to attach and fasten their vest, and practice a simple drill for helping others. Mind the basic steps and keep equipment within reach above all else to reduce risk and create a calmer, more confident water experience.
Life Jacket Safety: Practical Plan
Selecting lifejackets that fit snugly on every user, are appropriate for the activity, and are securely fastened lowers risk on the water.
These steps provide a practical plan that you can apply to every trip: verify damage, adjust straps, and ensure each person has a whistle attached to the jacket, like a quick daily checklist.
Inspect each vest for damage, cracks, or torn straps and replace worn units before you launch. Confirm shoulder straps stay aligned and buckles stay secure when pulled.
For children, use lifejackets sized for their weight and chest measurements. Selecting kid models, adjust shoulder and waist straps to keep the jacket from riding up and to prevent the chin from sliding under the buckle. Ensure the jacket remains securely fastened during movement.
In swiftwater and other rough conditions, choose high-buoyancy jackets with quick-don features and robust, watertight seams. Keep plenty on board for guests and crew, and ensure each one has a whistle attached.
Keep a throwing line within reach for quick assists, and attach a knife to your belt or lifejacket to cut entanglements if needed. These tools can save a life in entanglement or snag scenarios.
Your crew, including boaters and guests, should perform a quick gear check before departure. Before launch, each person should confirm their jacket is selected, securely fastened, and within reach. Assign a person to oversee the safety kit and to verify gear during changes in conditions.
Maintain plenty of size options on board; designate jackets for adults and for children, and store extra lifejackets in dry, shaded locations to prevent damage and ensure quick access.
Maintain a routine: wash, dry, and store gear after trips; run a quick drill on how to throw a line, how to signal with a whistle, and how to switch to a different lifejacket if wear is detected.
By following these actions, you build a smart habit that rests on solid gear, a plan for swiftwater or calm water, and a culture where every boater looks out for others, especially children, on the water.
A Guide to Life Jacket Safety
Wear a properly fitted, USCG-approved vest before you enter the water, and test the fit by raising your arms; make sure the fit is snug and secure, and it should keep your chin above water when you lean.
Choosing vests depends on waters and activity. For paddleboarding on calm waters, select a snug vest with low bulk for freedom of movement; for swiftwater, pick a high-flotation model with secure buckles and quick-access panels. In many cases, consider reflective panels for visibility and an idea of how your gear performs under stress.
Keep a small kit with extra items accessible: a whistle for signaling, a compact knife in a sheath for rope or line work, and a light or mirror if you paddle at dawn or dusk. Local rules may require additional gear, so check with a local shop or guide and tailor your setup to the day’s plan.
- Inspect each vest for damage, signs of wear, holes, or torn seams; replace any compromised unit.
- Check straps and buckles; ensure all fasteners secure quickly and stay in place during movement.
- Test buoyancy in shallow water before heading into deeper waters; if a vest sinks noticeably, retire it.
- Keep space in pockets for signaling items while avoiding overstuffing; attach a whistle to the shoulder strap for easy reach.
- Mind the weather and water conditions; plan a buddy system and know the local exits and safe zones.
Heading into any trip, treat life jacket safety as a constant habit, not a one-time check. By choosing the right vests, keeping gear ready, and following a simple plan, you raise safety for many waters activities, including paddleboarding and other leisure trips.
Choosing the Right PFD: Type III vs Type V by Activity

Recommendation: For most daytime trips on calm water, Type III pfds are the go-to. For high-demand activities or overnight expeditions, use Type V PFDs as labeled and with the activity-specific instructions. If you plan an overnight trip with a raft, Type V often provides the best protection when worn correctly and kept attached to your gear with extra straps and accessories. There are cases where you want to choose pfds that match the conditions, and you cannot rely on a one-size-fits-all option.
Type III pfds deliver dynamic float while keeping mobility high, making them ideal for being active in various conditions. They fit well on a range of body shapes and work great with jackets that have accessible pockets. Look for models with adjustable straps so you can reach everything you need without restricting movement. If you want to carry smart items, choose jackets with pockets and attachment points so you can keep gear handy.
Type V pfds are case-specific and must be used exactly as labeled. They can provide extra float or gear integration when you are in the activity they’re designed for, but you cannot rely on them outside that use. There are times there are many things to consider: choose Type V options with attached pockets, harnesses, or other accessories if you want a smart way to carry items on the water. In high-energy days or when you want to manage gear on an overnight trip, Type V becomes a practical choice–just follow the case, attach the proper straps, and keep important items close. Always pay attention to fit and straps, and use helmets where conditions demand them. There are pfds that must be worn for safety, so attention to the labeling is essential; pfds provide protection that can be tailored to the activity. When you deal with the cases, remember to consider child paddlers and the need for a snug fit with extra straps and attachments.
| Activity | Type III suitability | Type V suitability | Megjegyzések |
|---|---|---|---|
| Calm water day trips (lake, slow river) | Best balance of float and mobility | Optional; use if labeling supports the activity | Most paddlers start with Type III; ensure jackets stay secure with straps |
| Whitewater rafting / rapid runs | Not ideal for high-energy moves | Javasolt támaszok rafting vagy gyors folyású víz jelölésekor | Kövesse a tevékenység jelölését; sisak használata javasolt; a mentőmellényeket megfelelően rögzítse |
| Egynapos kirándulások vagy expedíciós napok | Nem elég önmagában a hosszú napokra. | Jó választás hosszabb lebegéshez és felszerelés szállításához | Használja a plusz pántokkal és kiegészítőkkel; gyakran ellenőrizze az illeszkedést |
| Gyerek evezősök | A megfelelő illeszkedés fontos; ügyeljen a megfelelő méretezésre | Csak akkor használja, ha gyermekek számára készült terméken szerepel. | Mindig győződjön meg a szoros illeszkedésről; rögzítse őket és ellenőrizze a pántokat |
Hogyan vedd fel helyesen a mentőmellényt: illeszkedés, rögzítés és ellenőrzés
Vedd fel a mellényt, cipzározd be, és húzd meg a pántokat, amíg szorosan nem illeszkedik a törzshöz, megfelelően megtámasztva a mellkast és a hátat. Ez az egyszerű sorrend hasznos a helyes illeszkedés biztosításához, és a biztonsági útmutatók is ajánlják. Rövid gyakorlás során ez a rutin ösztönössé válik.
Először a vállpántokat állítsa be, majd az oldalsó pántokat, hogy a mellény magasan maradjon a mellkason, és ne csússzon fel, amikor mozgatja a fejét. A cél egy kiegyensúlyozott illeszkedés, amely stabilan tartja őket a háborgó vízben, ahol ez a legfontosabb.
Rögzítse elöl a záródásokat és az esetleges ágyékszíjat; győződjön meg arról, hogy a cipzár vagy a kapcsok teljesen be vannak zárva a biztonságos viselet érdekében. Ha mindent megfelelően rögzít, az csökkenti az elmozdulást lovaglás vagy úszás közben.
Futtasd le a becsípés tesztet: nem szabad több, mint két ujjnyi helynek maradnia a pánt és a mellkasod között. Ha több van, húzd meg újra, különösen, mielőtt a vízben aktív lennél.
Ellenőrizze a megfelelő illeszkedést a karok felemelésével, hajolással és csavarással. Ha a mellény elmozdul vagy felcsúszik, húzza meg a hevedereket egy kicsit jobban, és ellenőrizze újra egy rövid csobbanás vagy utazás után.
Pozícionálás: az alsó szegélynek a derék közelében kell lennie, a mellénynek pedig a fejet a víz felett kell tartania úszás közben és hullámverésben. Ez az elhelyezés csökkenti a fáradtságot és növeli a viselő és a közelben lévők nyugalmát.
Mielőtt a vízbe menne, végezzen egy gyors ellenőrzést, hogy a hardver sértetlen-e, és a felhajtóanyag nincs-e kifakulva a napfénytől vagy összenyomódva a használat során.
Csónakokon és más vízi járműveken a mellényre rögzítsenek sípot vagy jelzőeszközt; a sípok, akárcsak más jelzőeszközök, segítenek abban, hogy zajos körülmények között is meghallják őket, és nyugalmat biztosítanak másoknak.
Néhány régebbi vagy olcsóbb mellény veszíthet a felhajtóerejéből; ellenőrizze a címkén a csere dátumát, és cserélje ki, ha kopás, szivárgás vagy szakadás jelei mutatkoznak. Ne tartson késeket vagy más éles tárgyakat a zsebekben a mellény viselése közben. Forró nyári napokon gyakrabban ellenőrizze, és cserélje ki, ha elhasználódott.
A nyári kirándulások során használat után tárold az árnyékban a mellényt, és alaposan szárítsd meg, hogy sok évszakon át használható maradjon. Tartsd tisztán a pántok területét, és rendszeresen ellenőrizd a rögzítéseket, különösen, ha a zsebekben tárgyak vannak.
A 5 legjobb kiegészítő mentőmellényhez: dobózsákok, kötelek, folyami kések, sisakok és sok más
Válassz egy élénk színű, kompakt dobózsákot, és tartsd készen a mentőmellényeden; azonnal növeli a biztonságot hullámok és gyorsfolyású vízi mentések során.
Dobózsákok: válassz 20–30 m hosszú kötéllel, neon színnel és szoros szövésű anyagból készült zsákot; rögzítsd a zsákot egy zárható karabinerrel a mentőmellényedhez, hogy mindig elérhető és bevetésre kész legyen. Gyakorolj nyugodt vízen, célozz egy stabil, térd és mellkas magasság közötti pontot, és mindig legyen egy partnered, aki húzza a kötelet, miközben időzíted az elengedést a maximális irányítás érdekében.
Kötél: vigyél magaddal egy statikus mentőkötelet, 8–10 mm átmérőjű, 20–30 m hosszú, száraz zsákban tárolva; tekerd fel gondosan és csíptesd egy D-gyűrűhöz a gyors hozzáférés érdekében. Tanuld meg a pruszikokat, hogy kapaszkodót szerezz a kötélen úszás közben vagy úszó vezetésénél, és a vágott végeket rögzítsd megfelelően, hogy megakadályozd a rojtosodást megfelelő korbácsolással vagy egy kis sapkával.
Vízparti kések: válassz egy kompakt, összecsukható, zárható pengéjű kést, 75–100 mm-est, plusz egy tokot vagy zsebtartót; tárold lábon vagy övtáskában, hogy egy kézzel elérd, miközben a másikat szabadon tartod. Használd a kést az összegabalyodott zsinórok, hálók vagy horgászeszközök elvágására, és kerüld a felszerelés vagy a partnered által használt kötelek átvágását, hacsak nem feltétlenül szükséges. Minden futam előtt ellenőrizd a pengét és a tokot, hogy biztosítsd a használatra való készséget.
Sisak: válasszon CE minősítéssel és szoros állszíjjal rendelkező vízi sport sisakot; viselje vadvízi evezéskor és SUP-ozáskor, hogy megvédje a fejét a szikláktól és az evező ütéseitől. Keressen kényelmes illeszkedést, állítható méretet és könnyű héjat; használat után szárítsa meg a sisakot, és tárolja száraz zsákban, hogy meghosszabbítsa az élettartamát.
Plusz: tegyél be egy kompakt sípot a figyelem felkeltésére, egy kis vízhatlan zsákot az értékeidnek és tartalék elemeket a fejlámpádhoz vagy jeladódhoz. Fontold meg egy üleprögzítő pántot a mentőmellényedre, hogy ne csússzon fel a háborgó vízben, és gyakorolj egyszerű csomókat, hogy gyorsan tudj hámot vagy kikötést kötni, amikor az idő kritikus.
Elsősegély, tűkészletek és orvosi készletek: Összeállítás és használat
Csomagolj külön elsősegély dobozt, tű készletet és orvosi készletet minden vízi tevékenységhez, és rögzítsd őket a vízi járműre a fedélzetről elérhető távolságban, hogy a gyors folyású vízen való evezés során is kéznél legyenek.
A gyermek és felnőtt lovasok számára egyaránt megfelelő alkatrészek kiválasztása segít csökkenteni a kockázatot. Tartalmazzon életkor szerinti kötéseket, fertőtlenítő törlőkendőket és egy kompakt kést, valamint egy Z-húzót mentési helyzetekhez. Minden elemet megfelelően fel kell címkézni és használat előtt ellenőrizni kell, és felcímkézett tokban kell tartani.
Tartsa a felszerelést a kézműves terület szerint rendezve: a készletet rögzítse egy erős vállpántra vagy egy közeli nyílásra, és helyezzen el a közelben mentőmellény javítóeszközöket, hogy gyorsan kezelhesse a heveder vagy pánt problémáit. Egy személy felügyelje. Ez biztosítja, hogy egy pillantással tudja a tok tartalmát, és gyorsan megragadhassa, amire szüksége van.
Sérülés esetén alkalmazzon közvetlen nyomást tiszta kötszerekkel, rögzítse a töréseket, ha szükséges, és csak akkor használjon szorítókötelet, ha a vérzés életveszélyes. Ha a vérzés eláll, dokumentálja a történteket, és pótolja a felhasznált eszközöket, hogy a készlet készen álljon a következő tevékenységre. Vad vízen Z-húzást csak képzett csapattársakkal és engedélyezett felszereléssel végezzen. Ellenőrizze a tasakok és tömítések sérüléseit, és azonnal cserélje ki azokat.
Minden út után tartsa karban és vizsgálja át a készletet: cserélje ki a felhasznált vagy lejárt szavatosságú elemeket, zárja le újra a tasakot, és ellenőrizze, hogy a kés éle éles, a z-húzó kötél sértetlen, és a mentőmellény javítókészlet elemei a helyükön vannak és működőképesek. A fedélzeten lévő mindenki tudja, hol találhatók a készletek és hogyan kell használni őket, a gyakorlatok pedig segítik a gyors és biztos reagálást.
Gyakoroljatok a legénységgel a tok kinyitását, kötözést és szükség esetén a Z-húzást. Ezzel mindenki magabiztosabb lesz, és a fedélzeten lévőknek ismerniük kell a készletek helyét és használatát, hogy a reagálás gyors és zökkenőmentes maradjon.
Zúgóvízi mentők képzése és felszerelése: Tanfolyamok, felszerelés és felkészültség
Mielőtt bármilyen mentési munkába kezdenél folyóvízben, végezz el egy tanúsított gyorsvízi mentőtanfolyamot. Az ajánlott program lefedi a gyorsvízi dinamikát, a csónakkezelést, a dobózsákokat és a csoportos kommunikációt, hogy felkészülj a helyzetekre, amikor nő a nyomás.
Megfelelő felszerelés: sisakok és mentőmellények minden viselő számára, megfelelően rögzített pántokkal. Tartsa arcát védve, és kerülje a laza ruházatot a mozgó pántok közelében. Sok mentőmellény tartalmaz CO2-palackot; minden út előtt ellenőrizze a palack töltöttségét és a felfújó mechanizmust. Tartson magánál mentőkést vagy zsinórvágó eszközt, és rögzítse a késeket övre vagy hevederre a viselő számára a gyors hozzáférés érdekében.
A kiképzés hangsúlyozza a kezdeményezést és a mentési terv egyértelmű irányítását. Osszatok ki szerepeket a csoporton belül, hogy a kommunikáció még a permet alatt is személyes maradjon. Gyakoroljátok a kötelek és zsákok dobását a partról vagy járműből, sok kísérlettel, hogy stressz alatt is eltaláljátok a célt.
A felszerelés elrendezése biztosítja, hogy a legfontosabbak kéznél legyenek: dobózsákok, mentőkötelek, karabinerek, csigák és egy tartalék kötél szakasz. Ellenőrizze a hevederek épségét a beülőn és a sisakon; győződjön meg arról, hogy a vállpántok biztonságosan ülnek, és a karabinerek zökkenőmentesen működnek. Használjon vízhatlan zsákot az elektronikai eszközöknek és tartalék sípot a jelzéshez.
A felkészülés lépései közé tartozik a belépés előtti kockázatfelmérés és a társellenőrzés. A hajósoknak a csapattársak közelében kell maradniuk, kerülniük kell a felszerelésre való túlzott támaszkodást, és biztonságos távolságot kell tartaniuk a hidraulikától és a szűrőktől. A sisak a fejen marad, és minden viselő szemmel tartja a célt, miközben követi az irányt és a tervet.
Az edzés utáni értékelések segítenek a technika finomításában: jegyezd fel, mi tűnik nehéznek, igazítsd meg a hevederek fogását, és ügyelj arra, hogy az arcod a mentési útvonal felé nézzen. A folyamat elsődlegesen a biztonságot tartja szem előtt, miközben alkalmazkodik a különböző vizekhez és áramlási viszonyokhoz. Ha a csoport közös kezdeményezéssel cselekszik, az eredmények javulnak.