

 The Only Boat Safety Equipment Checklist You Need for Safe Boating">

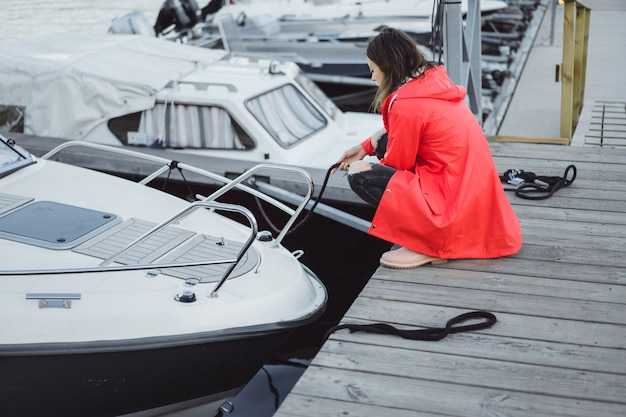
Start with a single, compact safety kit you can build and check before every outing. Label each item for quick access, and store the kit in a waterproof box so you can ensure readiness on busy waterways. Include a bottle of water for each person, a compact blanket, and at least one signaling device–these essentials create a unique, reliable baseline for any trip.
For the core gear, include three categories: PFDs for everyone, a battery-operated light or beacon, and a medical kit with bandages, antiseptic wipes, and pain relievers. Label these items clearly and keep them in a single pouch, so you can grab the kit manually if conditions deteriorate. Usually, a compact first-aid kit plus a small flashlight covers most on-water medical needs.
Next, add signaling and flexible gear you can tailor to your route. Include a whistle, a compact signaling mirror, and a small patch kit for quick fixes. For longer trips, coordinating with other boats helps: outline who carries what and where to meet if trouble arises. In rocky conditions, pack a dry bag with extra clothing, a blanket, and a spare battery to keep radios and lights running through the range of weather. Carry cost considerations for replacements and upgrades into your april planning.
Before launch, perform a quick operating check of all electronic gear, including navigational devices and battery levels. A simple checklist on paper–or a small notepad–helps you run through items manually and avoid relying on memory. With proper maintenance, you usually avoid surprises and are ready for a smooth ride along the waterways.
Vinkki: Treat this kit as a living setup–update labels, swap expired items, and adjust for new boaters and routes. A unique approach keeps you prepared for april trips, long weekends, and sudden weather changes, while keeping overall costs predictable and low.
Comprehensive Boat Safety Equipment Checklist for Safe Boating and Emergency Lighting
First, perform a pre-departure check that covers lighting, signaling, life-saving gear, and communications to manage hazards and ensure coverage through offshore passages aboard any craft. Do this every trip to keep operations safely within planned limits and to promote peace aboard.
For nighttime operations, verify that at least two working forward navigation lights are visible, plus a bright handheld light for crew tasks. Keep a spare shelf of batteries and a charged device to respond immediately if visibility drops. This practice reduces risk when weather turns, and it supports visual signals when passing ships or offshore platforms.
Table below divides items by category and notes recommended types of equipment, including chemical extinguishers and a range of signaling types.
| Category | Recommended items and notes |
|---|---|
| Emergency Lighting and Power | Two working LED flashlights, one headlamp; one waterproof lantern; spare batteries; portable power bank; check before departure; shelf storage near exits; ensure the devices allow hands-free operation when needed; verify backup power covers hours of operation. |
| Signaling and Rescue | VHF radio (handheld or fixed), charged and within reach; registered EPIRB or PLB with current position registration; signaling aids: flares of different types for day and night; signal mirror; whistle; EPIRB positioned for rapid access; replace expired flares; keep visual signals ready for offshore and international operations. |
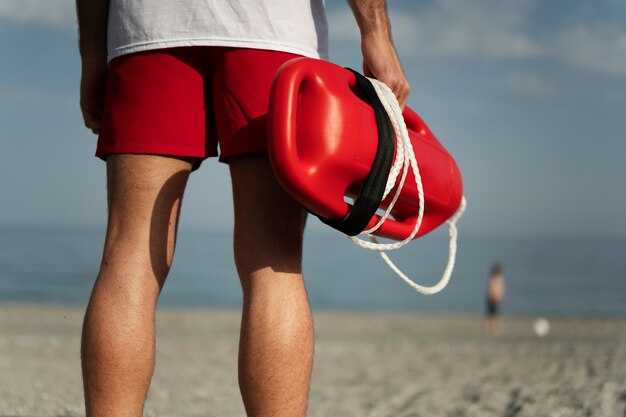
| Lifesaving Equipment | Personal flotation devices for all aboard; throwable flotation device; rescue line or throw bag; boarding ladder; immersion suit for offshore trips; ensure every piece remains accessible and in good condition. |
| Paloturvallisuus | Chemical extinguishers (ABC or equivalent) with current inspection, pressure gauge in correct range, mounting brackets, and a suppression plan; train crew on use; replace after expiry and keep near the galley and engine space. |
| First Aid and Medical | First aid kit with CPR mask; antiseptics, bandages, burn treatment, pain relief; waterproof medical guide; times to review contents and refresh supplies; assign a lead responder aboard. |
| Navigointi ja turvallisuus | Charts (paper and electronic), compass, depth sounder or depth navigator, and GPS; spare bulbs and fuses; keep a current position fix and update navigation gear; maintain awareness for international routes and coastal coverage. |
| Tools and Spares | Rope, fenders, knife, multi-tool, duct tape; spare parts for safety gear; battery tester; keep on a shelf or in a lockable box for quick access during repairs. |
| Maintenance and Documentation | Maintenance log with test times and replacement dates; manuals aboard; EPIRB/PLB registration up to date; keep records of inspections and compliance with international and local regulations; set a yearly review cadence to maintain coverage and readiness. |
PFDs and Throwable Devices: fit, inspection, and quick-access storage
Fit every PFD snugly and keep a throwable device within arm’s reach of the helm on every trip. Size the vest or jacket to the wearer, adjust all straps, and test by lifting the wearer’s chin slightly while you move to mimic boat motion. If you can slide more than two fingers between the strap and chest, tighten; if you can’t insert fingers at all, loosen slightly. Ensure bottoms of belts sit flat and don’t ride up when bending or reaching for lines.
Regular inspections prevent failure under pressure. Check foam integrity, seams, and buckles for signs of cracking or loosening after exposure to sun, salt, and spray. For inflatable PFDs, verify the status indicator, inflator cartridge seal, and valve operation; replace cartridges as recommended by the manufacturer and perform a manual test in a controlled environment. Keep a testing log and schedule servicing through authorized centers before the boating season begins.
Store throwable devices where they deploy quickly while staying dry and ventilated. Mount ring buoys or throw bags in accessible compartments near the cockpit and at the bottoms of seating areas, not behind bulky gear. Use marine-grade containers or pouches that allow ventilation to reduce moisture buildup and odors. Do not stack gear in a way that blocks access to the device; designate a dedicated list of locations and a second set of hands for deployment if needed during an overboard incident, so responders can reach a device without delay.
Selection and maintenance require ongoing training. Keep a ready-to-grab kit that includes PFDs, a throwable device, a compass, and a simple list of steps for quick checks–these are key for regular courses and drill practice. In busy tourism operations, assign a specific crew member to respond to gear checks, verify enough devices are on board, and document replacement dates. Victoria crews and other boaters benefit from practicing deploying a throwable device during drills, reviewing the removal process from storage, and confirming that all equipment remains ready for action.
Unique, well-ventilated storage supports preparedness and helps you get enough air and visibility while checking gear. Make sure every boater understands the quick-access locations, and incorporate a short training loop into every course or refresher session. By testing, adjusting, and documenting, you maintain a reliable arsenal for responding to an overboard situation and protect everyone aboard with confidence and calm.
Navigation Lights: battery checks, bulb replacements, and power sources
Start with a simple rule: test navigation lights before you depart and replace any dim or flickering bulb immediately. This action creates excellent visibility in choppy conditions and helps persons on deck notice your vessel quickly in all weather.
- Battery checks
- Test resting voltage with a multimeter; a healthy 12V battery reads about 12.6V, while charging may show 13.8–14.4V. This source quality indicates the bank is ready to support the lighting division across the boat.
- Inspect terminals for corrosion; clean with a baking soda solution, rinse, dry, and reseat firmly. Ensure all connections are labeled for easy maintenance.
- Look for bulges, leaks, or foul odors in the case; replace weathered batteries without delay to prevent sudden failures open to the atmosphere.
- Verify charging sources–engine alternator, shore power, or solar panels–are delivering current; use a surge arrestor on the circuit to shield lights from spikes.
- Document the battery type and capacity (Ah) on the labeled shelf or panel so this knowledge travels with the crew, not just one person.
- Bulb replacements
- Prefer LED navigation bulbs labeled for marine use; they draw far less current and offer longer life, allowing excellent reliability in real-world trips. Keep a spare set in a labeled division near the galley or cockpit for quick access.
- Ensure compatibility with color-coded classifications (red, green, white) and replace in matched pairs if the fixture design requires balanced illumination.
- When replacing, open the fixture, remove the old bulb, insert the new one without touching the glass with bare fingers, and test with the switch on. If a bulb flickers, it’s a sign to replace the fixture or the entire circuit.
- Test each light after replacement to confirm uniform brightness across all open housings; revisit connectors if a lamp shows dimming while others stay bright.
- Power sources and backups
- Maintain at least two sources: a starting battery for the engine and a house battery for electronics; keep a spare battery registered within the system for emergencies. This practice helps when moderate loads occur under open-water conditions.
- Use a solar charger with a proper controller to sustain a steady trickle charge when you’re away from shore power; monitor the charge state to avoid overcharging the source.
- Install a surge arrestor on the nav-light circuit to guard against voltage spikes from switching or regulator faults.
- Carry extra lighting options: a compact emergency lantern and a headlamp; place these in an accessible location in the galley so the crew can respond quickly during an emergency.
- Keep spare bulbs, fuses, and a small tools kit in a labeled shelf; verify they are marine-grade and compatible with your registered lighting fixtures.
- In real-world use, test the full system during a controlled drill to confirm the atmosphere on deck remains safe and the open cabin stays lit under varied conditions, including a simulated smoke scenario or other alerts.
Emergency Lighting: battery-powered lamps, glow sticks, placement, and run times
This being straightforward to manage for most fleets, use battery-powered lamps as your primary emergency lighting, with glow sticks as backup. This setup clearly helps locate lighting during outages and wont replace a complete signaling plan. Always verify you comply with legal requirements and keep a detailed plan for inboard motorboats and other craft.
- Lamp selection and run times: Choose robust, marine-grade LED lamps designed for cabin use (40–80 lumens) with a brighter setting for exits. Run times run about 8–12 hours on low and 2–4 hours on high; plan for extended use by carrying spare batteries and allowing USB-C recharge. Store units in a dedicated compartment near the helm or crew areas, and label each with its power state so the crew can locate them quickly.
- Glow sticks, flare substitutes, and labeling: Maintain a supply of glow sticks rated for 12+ hours of visibility. Use category 20-b labels on each package to simplify recognition. Glow sticks can serve as a non-flare signaling option when power is out and help locate a path in rough seas. Keep cases in accessible locations so you can locate them fast, and note their expiration dates annually.
- Placement and mounting: Install lamps in every compartment and along main walkways inboard areas of motorboats. Use robust, corrosion-resistant brackets; ensure a secure shank attachment to a solid surface. Avoid placing units near motors or heat sources to prevent damage; position lamps to minimize glare and to support quick sightlines during drills.
- Damaged equipment and maintenance: Inspect for damaged housings, seals, or batteries during each voyage. If a unit shows cracks or corrosion, remove it from service and replace it. Maintain a compact repair kit and log replacements in the craft maintenance folder.
- Legal compliance and annual reviews: Stay compliant with local regulations governing emergency lighting. Update your logs annually and adjust the system as laws or vessel category changes occur. Document drills and actual use to improve future responses, and ensure labels and case locations reflect current layouts for all fleets.
Flares, Whistles, and Signaling Gear: expiration checks and proper storage
Check all signaling devices before every trip and replace anything past its expiration date. This first step increases reliability and keeps you compliant with regulations that govern boating safety. Read the label or guide to confirm the exact month and year of validity; many items show an expiration such as July 2025, which means replacement is required by that date.
Inspect each item’s packaging, seals, and overall condition. Look for dampness, corrosion, or obvious damage to the case. If a flare’s shape is distorted or a whistle’s mouthpiece is cracked, remove it from service. For electronic signaling gear, verify the output by checking the wattage rating on the device; a visible indicator or test mode should confirm operation without discharging the unit. This second check helps boaters assess reliability and ensures you have a visible signal when needed.
Keep which items you carry simple and accessible: carry a combination of non-pyrotechnic and pyrotechnic signaling tools, and ensure you can reach them while seated in the cockpit. For pyrotechnics, never test or ignite devices onboard which could endanger crew or fuel systems; rely on certified tests and replace expired units. Maintain välttämättömät within reach so you can act quickly if a distress situation arises.
Store signaling gear in a dedicated, dry, cool location away from fuel, solvents, and direct heat. Use an extended, clearly labeled container or case positioned off the floor to avoid moisture and splash. Keep these items away from outboards and exhaust to prevent heat exposure that can degrade the materials or degrade the visible glow. Store pyrotechnics in their original packaging with seals intact and separate from non-pyrotechnic gear to reduce cross-contamination risk.
Legal requirements vary by jurisdiction, but a best practice is to increase readiness by rotating stock at least once per year and performing a quick ensimmäinen ja second check before any trip. Refill or replace items as needed and document expiration dates in your boat’s safety log for easy reference during July inspections or at the dock. By keeping signaling gear visible and properly positioned, you improve luotettavuus and ensure you can carry the right devices when you head offshore in nature or at the marina.
First Aid Kit and Medical Supplies: contents, rotation, and access
Keep a compact, reliable first aid kit aboard and implement a strict rotation schedule. Inspect stored items monthly, replace expired goods, and log changes in your checklists; youve built a safer routine for every voyage.
Contents should cover wound care, infection prevention, and basic meds, plus tools to help you respond quickly. For wound care, stock sterile gauze pads, assorted bandages, medical tape, triangular bandages, and adhesive dressings. For infection prevention, add antiseptic wipes, povidone-iodine or chlorhexidine solution, and antibiotic ointment. For medications, include analgesics suitable for your crew, oral rehydration salts, and a compact digital thermometer. For tools, include disposable nitrile gloves, a CPR barrier device, scissors, and tweezers. Include an arrestora AED if available, with current batteries and electrode pads; store in a b-11 bracket inside the kit to keep small items organized. Label the kit with acma-compliant tags or a checklist sticker so it remains traceable.
Access and placement ensure fast reach during activity. Position the kit in a weatherproof bracket mounted near the helm or main cabin entry, at hand height for rapid access. Keep the container closed and stored away from heat, solvents, and liquids that could spill nearby. Assign one person to regularly verify that the kit is intact and accessible on every trip. Keep these ones visible and within easy reach.
Rotation and expiry management keep items fresh. Set a monthly verification to log expiry dates, and rotate items by earliest expiry first. Maintain a rotating shelf or digital log that notes date replaced and next replacement due. Include inflatable items like an inflatable splint to stabilize a limb when needed; inspect the device and inflate only during use or training scenarios. For meds stored on board, replace items that reach shelf life limits within a 12– to 24-month window depending on the label, and remove any that show leakage or tampering. Keep known hazards in mind and separate liquids from medications in the kit.
Training and access drills ensure everyone can act. Run brief drills before long trips to practice locating the kit, retrieving items, and following step-by-step actions to respond to common incidents. Keep a short, practical guide with the checklists and ensure all crew know where the kit lives and how to access it in under 30 seconds. Review the arrestora AED readiness and verify same-day battery checks as part of the acma label process.
Liquids and side pockets: Do not store liquids near electronics or medications; keep a separate side pocket for liquids like sterile saline or antiseptic solutions to minimize spills. Ensure each item has a known location so you can retrieve it fast during an unexpected event. Use a protective outer bag to contain leaks and protect stored items from seawater spray.
On maintenance: Keep a sealed, stored backup kit at a second location so you can respond even if primary kit is compromised. Use the checklists to track usage, expiry, and restocking needs to avoid gaps in availability.