

 Proper Reefing Procedures – A Step-by-Step Guide to Safe Sail Handling">

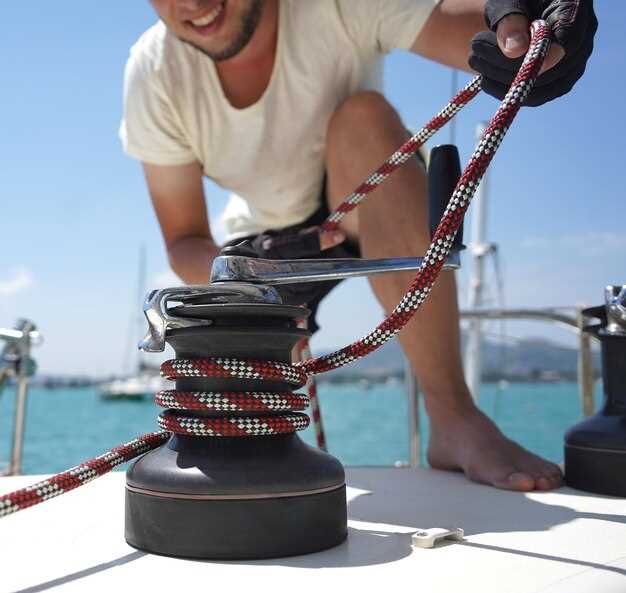
Begin with securing the craft and preparing the working cloth. Secure the boat to a stable stance, crew to leeward, and clear the deck of loose gear. Check the halyard path: lowering the cloth area should travel smoothly through the ring on the halyard, through a block, and over the sheaves. Use the winch to take the initial load; watch for blue tags indicating line strength. Ensure all hardware is intact, and that lines are secured to cleats before moving to the next step.
With the load established, proceed to a controlled sequence: apply gradual tension on the halyard via the winch, aiming to have the cloth area lowered evenly. This action reduces flutter and shaking of the fabric, while the increased tension on the line helps keep the luff smooth. Monitor the weight on the line; when the weight rises you should back off slightly to avoid overloading the halyard. If the line shows signs of strain or the hardware shows wear, stop and inspect. Prolong the life of the system by keeping a clean path and avoiding sharp bends. This sequence works on most boats.
Guide the line through the ring and into the block, then toward the cleat. Keep hardware rated for the loads, and distribute weight evenly to prevent back strain on crew. Use multiple wraps on the winch to keep the line under control; verify the system remains secured. Use much care, as misalignment can cause flutter and increase fatigue on lines. This helps maintain a steady cloth surface and reduces risk during gusts.
Consult the sailmakers for recommended reduction ratios based on rig, fabric, and conditions. In typical boats, start with a cloth area reduction of 25–30%, then test in light gusts; for heavier conditions use up to 40% if the hardware holds and line angles stay clean. Always measure the impact on balance, helm, and center of effort; this increased lift can shift the back of the boat, so adjust the backstay or weight accordingly. Review the line travel path to avoid friction points; a dirty path increases breaks risk and prolongs operations. Keep the halyard in blue color-coding to quickly confirm the correct line is being used. Notes from sailmakers and thoughtful weight distribution help you maintain a great attitude and reduce shake.
Pre-reefing readiness: safety checks, crew roles, and gear
Inspect all lines and hardware before any move: onto the deck, verify the area is clear, and ensure the vang, shackle, and ring are pinned correctly to prevent unexpected movement. Confirm full tension on the primary control lines and check for rough wear on sheaves that could bind under load.
- Safety checks
- Clearance around winches, cleats, and candidate haul points; secure loose gear and stow any items that could snag during the procedure.
- Inspect hardware: check shackles and pins for corrosion or looseness, verify the ring on the vang is intact, and confirm the shackle is snug before any load goes through the line.
- Line condition: look for frays, glazing, or stiff spots; replace or hand-pick line segments that show signs of wear to reduce the risk of failure under pressure.
- Winch readiness: ensure the winch brake works, handles are secure, and the area around the drum is free of obstructions; test a light rotation to avoid binding when the full load comes on.
- Communication and watch protocol: establish a clear call-and-response system, nominate a lead on deck, and define who calls the turn or stop if something goes wrong.
- Crew roles
- Helm: maintains course and tempo, calls turns and speed changes to keep the operation on track.
- Line handlers: two dedicated crew on the windward and leeward sides, assigned to cleats and blocks; they manage hauls smoothly to prevent jerks and reduce snag risk.
- Winch operator: coordinates line take-up and release, monitors tension, and communicates any surge to the helm.
- Auxiliary watcher: watches for signs of overload, entanglement, or gear misalignment; ready to stop or re-sequence if needed.
- Selection approach: hand-pick the most capable crew member for critical roles, ensuring the most experienced hands handle high-load tasks.
- Gear readiness
- Lines and leads: verify that the mainsheets, control lines, and halyards are rigged onto the proper sheaves and winches; confirm routing avoids sharp bends and reduces friction.
- Rigs and fittings: confirm vang alignment onto the correct winch, validate the ring and shackle pins are secure, and ensure the cleats are free of paint or debris that could inhibit secure mooring.
- Hold and haul points: check that the leeward area has ample space for a controlled haul; ensure all turns around blocks are correct and that the redirections are clean to prevent snagging.
- Tension control: plan how pressure will rise as load increases; prepare for a faster take-up on the initial haul and a controlled, slower movement as the sail becomes taut.
- Coordination tools: use video or quick reference signals to verify technique and timing; this helps crews on deck stay synchronized and increases overall efficiency.
- Securement and lines: tie or cleat lines neatly when not active; avoid loose tails that can create trip hazards or snag during a maneuver.
- Documentation and readiness checks: run a quick visual check and note any anomalies; a short video review later can reveal missed steps and help prolong reliability.
Deck and rig inspection for reefing readiness
Comience con una pasada ligera y metódica sobre la cubierta y a lo largo del aparejo. Marque cualquier desgaste en los bordes, deshilachado o marcas blancas en escotas y drizas. Asegúrese de que el lugar donde las líneas pasan a través de los canales esté despejado y seco; limpie la sal y la espuma que podrían ocultar daños. Identifique puntos peligrosos, como estrobos sueltos o cornamusas mal colocadas que podrían engancharse durante una maniobra de rizado.
Inspeccione los aparejos y la jarcia firme: revise los estays y obenques en busca de corrosión o cabos retorcidos. Confirme que las conexiones del vang y del carril se alinean con el mástil; pruebe la segunda capa de línea a través de los pasacables. Pase los dedos por las líneas para sentir si hay puntos ásperos; varias líneas pueden mostrar desgaste en los tambores de los winches o en las poleas. Si ve desgaste, etiquételo para su revisión o sustitución antes de cualquier operación de rizo.
Drizas y jarcia de labor: pasar cada cabo por sus roldanas con una tensión moderada; asegurarse de que las estachas queden bien ajustadas y sin torsión. Comprobar la seguridad de los terminales y el estado del empalme. En sistemas de rizado de sable, confirmar el recorrido de las escotas y la opción de tomar rizos con una tensión uniforme; verificar que las poleas sobre cubierta se muevan libremente. Si los cabos muestran rigidez u obstrucción, sustituir o lubricar según sea necesario.
Herrajes de cubierta y puntos de control: pruebe las cornamusas aplicando tensión deliberada; asegúrese de que muerdan y liberen limpiamente. Inspeccione los pasacables, poleas, grilletes; elimine la suciedad o la corrosión. Compruebe los topes secundarios y los frenos; asegúrese de que el aparejo de labor no se sacuda bajo carga. Documente los problemas de los barcos de los clientes o de su propio proyecto.
En embarcaciones utilizadas por tripulaciones bohemias, verifique el acceso a los pañoles y la alineación de los canales; una mala colocación aquí puede causar un enganche peligroso durante una operación.
Procedimientos de seguridad y prueba: realizar una prueba de descenso controlado en la driza para verificar que se puede llegar a los puntos de rizo mientras el barco permanece por encima de las olas. Realizar una prueba de espuma debajo de la cubierta para confirmar que no hay puntos blandos. Si los mamparos o las losas muestran movimiento, solucionar antes de continuar; no proceder con ningún rizo completo o pesado hasta que se resuelvan los problemas.
| Area | Inspección visual | Prueba operacional | Criterios de aceptación |
|---|---|---|---|
| Superficie y líneas de la cubierta | Sin partes blandas; sin deshilachados; marcas blancas visibles; canales despejados | Las líneas pasan libremente a través de las pistas y a través de los pasacables bajo una ligera tensión | Sin corrosión ni piezas sueltas; las líneas se deslizan sin engancharse. |
| Standing rigging | Estays y obencadura libres de corrosión; sin hebras retorcidas | La tensión se mantiene bajo una carga suave; la contra y la inclinación se alinean con el mástil | Todos los accesorios seguros; sin movimiento bajo carga moderada. |
| Aparejo de labor y poleas | Estrobos intactos; sin tramos torcidos o deshilachados | Las escotas y drizas corren suavemente por las poleas, sin atascarse. | Las poleas giran con facilidad; sin bordes afilados que generen calor o desgaste |
| Cornamusas y herrajes | Las calas muerden y se liberan limpiamente; sin holgura. | La carga aplicada se mantiene; el mecanismo de liberación rápida funciona. | Hardware instalado; sin corrosión; mantenimiento periódico. |
| Especificidades del rizo con matafiones | Carril y herrajes del sistema de rizos alineados; escotas despejadas | El punto de rizo entra parejo; sin sesgo bajo tensión | Sistema listo para rizar con tensión uniforme y sin ataduras |
| Material de seguridad | Puntos de arnés, líneas y dispositivos presentes | Líneas de liberación de emergencia y respaldo probadas. | Todos los sistemas de seguridad funcionales y accesibles. |
Elegir los rizos y determinar la reducción de vela
Recommendation: Empiece con el primer rizo cuando el viento aparente sea de 18–22 nudos en mares moderados; despliegue el segundo rizo alrededor de 28–34 nudos, o antes si las ráfagas exceden regularmente los 25 nudos y el yate muestra una mayor deriva o una tendencia a orzar. Inspeccione las marcas blancas en los ollaos para verificar la alineación, y utilice el extensor si está disponible para mantener la tensión de la driza limpia; amarre firmemente con un nudo de tope y mantenga las líneas ordenadas. Esto reduce la tela expuesta en aproximadamente un 15–25% con el primer rizo y alrededor de un 25–40% con el segundo, dependiendo del corte de la tela. La ganancia en el control se traduce en un manejo más suave y un timón más firme durante condiciones difíciles.
Concepto y criterios de decisión: decidir si es mejor quedarse en el primer rizo o pasar al segundo en función de la tendencia del viento, el estado del mar y la preparación de la tripulación. El navegante valora si las ráfagas empujarán el yate hacia la boya o provocarán un exceso de deriva. Si el viento aumenta en ráfagas, una pequeña reducción ahora mantiene la potencia constante en lugar de esperar una caída drástica más adelante. Muchos capitanes prefieren mantener un ritmo suave aplicando el cambio gradualmente; los que rizan pronto consiguen un mejor equilibrio del timón y reducen la deriva. Si el viento empuja el yate por encima de los 25 nudos y la vela muestra una torsión excesiva, avance al segundo rizo. A continuación, vuelva a comprobar el trimado con la escota mayor para evitar una torsión innecesaria y mantener una cabeza de vela plana.
Notas de implementación: Paso 1 – calcule el punto de rizo según el pronóstico y el historial de ráfagas; Paso 2 – durante la maniobra, afloje las escotas y luego tire de la driza al ollao elegido; detenga la torsión alineando el gratil. Paso 3 – amarre la línea de rizo al ollao y asegúrelo con un nudo de tope; Paso 4 – si es necesario, baje la línea de rizo y ánclela con lazos adicionales; Paso 5 – ajuste la escota de mayor para mantener un arco suave y verificar que no haya torsión excesiva. Estos pasos ayudan a que la carga se mantenga manejable y reducen el riesgo de rotura o atasco. En la práctica, se gana fiabilidad y una plataforma más tranquila al usar el extensor para afinar la tensión.
Asignación de tareas, señales y criterios de aprobación/denegación
Recomendación: asignar roles claros y confirmar criterios de aprobación/rechazo antes de cualquier reducción de lona para mantener el propósito y la coordinación después de las ráfagas.
- Roles y responsabilidades
- El timonel sigue al mando de la dirección; el segundo tripulante maneja los cabos y verifica los cierres en el cuello de cisne y el prolongador, asegurándose de que sus acciones estén sincronizadas.
- Otros miembros de la tripulación realizan tareas de elevación, descenso y sujeción según las indicaciones, garantizando la plena preparación y que las manos se mantengan alejadas de los puntos de pellizco.
- El proceso implica un breve ensayo para que las tareas se realicen correctamente e implica la verificación de la tensión radial a través de las líneas; después de la práctica, la coordinación del equipo mejora y el riesgo de falta de comunicación disminuye.
- Señales y comunicación
- Las señales verbales y visuales preestablecidas reducen la mala interpretación cuando las líneas se sacuden; la sacudida indica la necesidad de reducir la velocidad y reevaluar.
- Entre señales, mantén una cadencia calmada y rítmica; las señales deben ser reconocidas, evitando así una interrupción en el flujo.
- Utilice tanto la radio como las señales manuales para cubrir el ruido y la distancia; esto aumenta la fiabilidad en condiciones meteorológicas adversas y produce mucho a partir de la redundancia.
- Criterios de aprobación/rechazo
- Go criteria include: sufficient crew able to complete tasks, and all hardware secured, including the gooseneck and extender assembly; if not, wait.
- No-go criteria arise when any cause increases risk, such as excessive weather, gear slack, or miscommunication; between youre and the rest, youre expected to stop and regroup.
- Third, timing matters: actions must occur in-time; thus evaluate the gain versus risk and proceed only when conditions allow a full reduction and the crew is able to manage the workload.
Weather timing: when to reef and how to monitor gusts
Reef the main before gusts hit 25–28 knots; because reducing boat load early keeps balance and avoids damage to hardware. The move helps the boat track more predictably and prevents the mast from bending under loads that can become dramatically high.
Monitor gusts by tracking short-term wind shifts: use a handheld anemometer or observe the cloth’s shape and the water; the navigator on deck should have been watching for sudden shifts and recording gusts in the place they occur, so you know where the next change will appear; gusts can become fierce quickly.
Keep the reef point secure with cringles and lines; trim the main efficiently and quickly; keep weight low and away from the rail to prevent reduced maneuverability; if gusts rise, ease the topping and vang to maintain shape while you tack and adjust the load.
Balance is a portion of successful handling: shift weight to the lee side, limit draft, and move crew in the area where the boat remains stable on bohemia-like seas. In a gust, another tack may reduce load on the main and keep the boat from pinching forward.
Utilize a method that includes forecast tracking, real-time observation, and a quick check of hardware condition; friction in halyards should be minimized by keeping lines clean and away from block edges; this will help the main stay trimmed and the cloth hold its shape properly.
Always plan ahead: know where to place the reefed point and how much area to reduce; prepare to tack and move weight with care to avoid sudden heeling; keep topping and vang in the right range and remember cringles for secure attachment; your track record will improve as the wind shifts and the boat moves more efficiently.
Tools, lines, and knot knowledge for quick reefing
Keep a dedicated shortening kit within arm’s reach at the cockpit for swift reductions of the mainsail. Use two 8–12 ft lines, each with a robust thimble end, stored in a small, waterproof pouch. A third line can be added for gusts, enabling a reduction quickly if winds rise unexpectedly, keeping the mainsail shape intact.
Route the shortening lines through the mains reef points or luff grommets and into cockpit blocks; keep them tensioned and aligned with the boom and deck channels. If you have a furler installed, feed the line to the furler drum to avoid wrapping and to maintain smooth operation.
Knots to master: figure-eight on a bight as a stopper; bowline for secure cleat hitches; clove hitch for quick attachment to reef points; a slip knot or half-hitch for adjustable tension. Practice tying each knot with gloves on, so you can make it without looking, which supports precision during quick adjustments.
Check equipment before setting out: inspect line wear, keep lines above the side of the boom, and ensure channels and blocks are free of debris. When making adjustments, use both hands to control the cloth and avoid entanglement with the furler or furled sheet. Being mindful of needs, this setup works for both sails and rig and remains balanced as winds go up or down. If a gust breaks the edge, ease tension and re-trim.
For forecast winds up to 25 knots, deploy the third line as part of the method; the result is earlier sail reduction and reduced load on the rig. This helps prevent damage to hardware and protects ourselves from unnecessary strain. In florida channels and harbors, practice under calm conditions to build muscle memory and ensure the actions were smooth.
Designed for efficiency, this approach relies on precision: instead of yanking, ease tension and hold the line steady to keep the cloth in the desired shape. The line is held steady during adjustments on both sides of the rig, and the process goes quickly when shifts left or right. It is purpose-built for fast deployment.