

 Canoe Camping Guide – How to Safely Plan and Execute a Paddling Trip">

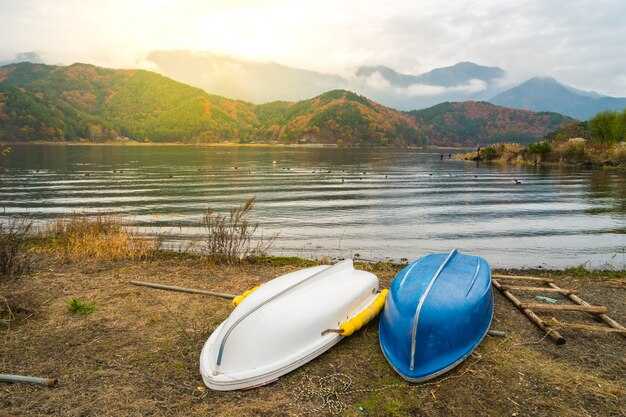
Pack a backup paddle and a compact repair kit for every excursion. Before you push off, check your gear, distribute loading evenly, and pick a pace that keeps you comfortable as wind shifts along the route.
Use your guide to lay out a route with two options: a primary path and another safe backup in case wind or water levels change. Having a spare map in your guide, note locations of camps along the river, and record water levels to share with others.
When cargando gear, distribute weight evenly across seats and keep heavier items low. For less seasoned paddlers, assign clear roles and practice loading on shore.
On the water, keep pace with the sun and wind, and rotate paddlers so fatigue is shared. If wind climbs above 15 mph, aim for sheltered sections or shore breaks; always have a turnaround plan and maintain radio or cell communication where coverage exists. In wilderness trips, keep your backup plan in mind and share it with others in the group. Practice how to execute a simple safety drill if someone capsizes.
After the excursion, record notes for your company and others about camps, wind days, and spots that worked well. Use this data to refine your minnesota or maine routes, and to help another crew repeat the trip with confidence again.
Comprehensive Planning for a Safe Canoe Trip
Plan a point-to-point route with a backup option, set a realistic daily mileage, and confirm enough daylight to reach each camp or shore before dark.
- Route planning and timing
- Choose a point-to-point course along their rivers or a Maine segment, with a side excursion option if conditions allow.
- Estimate paddling time using maps and a conservative pace; add 20–30% margin for weather, currents, or portages.
- Identify launch and take-out points, park access areas, and campsites; mark a backup day if you need to shorten the trip.
- Gear and cargo
- Balance your load by loading gear evenly and using side straps to secure dry bags; keep essential items accessible in the front of the boat.
- Packs waterproof bags, a back-up dry bag for extra clothes, and a repair kit for the canoe.
- Bring a kitchen kit, a stove or compact fuel, food, a camera in a waterproof case, and a flashlight with spare batteries.
- Choose rental boats through an outfitter and verify boat fit and seating before departure.
- Store critical items in waterproof containers to protect them outdoors and on the water.
- Safety, communication, and training
- Review water safety basics with their guides or an outfitter; carry a cell phone directly for emergency contact, and a power bank or handheld radio if service is limited.
- Plan direct communication methods with your group, establish a retreat point if conditions worsen, and know how to signal for help.
- Keep a first-aid kit, a whistle, and a small flashlight or headlamp accessible at all times.
- Logistics and local resources
- Book in advance with a Maine-based outfitter or park service; verify rental gear availability near your launching point.
- Check parking, permit needs, shore access, and restroom options; map out a plan to arrive early for launch windows.
- Custom considerations and experience
- Accustomed paddlers can tackle multi-day trips, but beginners should start with shorter runs or guided sessions.
- Always keep a backup plan and a clear exit route in case conditions change or problems arise.
Pre-Trip Route, Permits, and Risk Assessment
Secure permits and finalize your route at least four weeks ahead of departure to lock in launch times and camping zones. This plan will help you start paddling with a clear map and a backup in case weather shifts.
Seasoned paddlers map a line that stays within established paddling zones, aiming for 4–8 miles per day and leaving time for weather shifts. Having a flexible day-by-day outline keeps you from overloading a single stretch and makes it possible to leave the route and switch between canoe and kayaks if conditions demand.
Create a list of required permits by land manager: state parks, tribal lands, and private shoreline access; apply through official portals, and save digital copies. This plan makes it straightforward to secure permits. Keep copies at camp and also in your home email for quick access. If you rent gear, verify the rental includes coverage for the chosen route and that the permit details align with your plan.
Risk assessment should directly identify hazards along the route: water levels, rapid sections, wind, fog, cold nights, and remote shorelines. For each item, estimate likelihood and consequence, then add mitigations such as adjusting start times, choosing safer channels, shortening days, or portaging around risky sections. This process keeps you prepared without overcomplicating the plan.
Before you leave, include a compact kitchen kit, sleeping gear, and repair items. Pack a spare paddle, patch kit, pump, and basic tool set, plus portable power for navigation devices. Make sure paddling gear is accessible to all accustomed members of the group, and store items in dry bags that float. Double-check weight distribution and secure gear with double-bunged dry bags to keep your canoe or kayaks balanced and ready to move, even after a capsize.
With the plan in hand, verify accessibility at the launch site and potential campsites; check water availability, wind forecasts, and expected temperatures for the planned nights. Directly coordinate a simple communication plan with a home contact or lodge, including a rough itinerary, daily mileage, and expected check-in times. Leave a note about where you will exit the route if conditions require a change, and be prepared to adjust or shorten the trip as needed.
Clothing System: Patagonia R1 Air Fleece Crew 99 as Your Core Layer
Start with Patagonia R1 Air Fleece Crew 99 as your core layer for most paddling trips. It will deliver lightweight warmth, quick-dry performance, and breathability, making it ideal for mid-layer use on multiday backcountry trips.
Choose a snug, athletic fit that allows a base layer underneath and a light shell over without pinching the shoulders or chest. Look for long sleeves and a torso length that tuck under a PFD and stay comfortable when you reach for your rudder during fast water.
Build your three-layer system: a moisture-wicking base layer, the R1 as your core, and a waterproof outer shell for rain and spray. The R1 breathes well and moves with you, so you won’t feel restricted between sections of rivers and rapids.
When weather shifts, keep the core layer close at hand; the fleece dries quickly after a splash and breathes well between rapids. In a backcountry area without a laundromat, having this layer plus a backup heavy layer will reduce downtime.
Backcountry planning means packing the R1 in a small dry bag inside the boat and carrying a backup layer in your top pocket along with essentials like rain gear and bottles. The gear stack should stay organized so you can trade heat with the next move rather than rummaging under your seat.
Care and maintenance: wash cold and air dry, avoid heat to preserve loft and shape. Filter odors by occasional airing on a rope or gear line, and keep the fabric away from direct sun when drying.
Multiday trips demand two core layers if you’ll be off-water for long stretches; rotate, always drying one on the boatline so it’s ready for the next stretch along rivers with changeable weather. Those trips benefit from a simple, reliable system that pairs the R1 with a lightweight shell and a compact insulated layer.
Solo paddlers will appreciate fast changes and quick layering in rough water; with company, you can coordinate gear around shared rain gear and a single spare core fleece thatll stay warm in a dry bag. Keep a few essential bottles of water handy and share the load so everyone stays comfortable.
Rudder work and moves through whitewater demand quick adjustments; keep the core layer accessible when you stop for a moment, and drop the outer shell if you need to shed heat. Between sessions, dry the fleece and store it ready for the next run down the area’s rivers.
In short, the Patagonia R1 Air Fleece Crew 99 is a dependable core that works well with a compact outer layer, a reliable base layer, and a small dry bag for multiday backcountry trips along varied rivers and rapids.
Gear Hygiene and Dry Storage: Dry Bags, Bivy, and Water Exposure
First, wipe down your gear after paddling, dry it thoroughly, and seal items in dry bags to prevent moisture from sneaking in during spray or rain. Think of this as your baseline and do it again after every trip to protect your vessel and gear.
Yourself benefits from a simple checklist: inspect dry bags for cracks, verify roll-top closures seal cleanly, and decide which bag holds which things. For a multi-day paddle, use about 5–10 L for maps and odds and ends, 20–30 L for clothes, bivy, and a spare jacket, and 60–120 L for the tent, spare parts, and extra layers. Packs labeled clearly save time during a windy or wet re-pack, and always consider how the vessel is loaded to avoid water intrusion into critical gear like the rudder and water filter.
The bivy serves as a dry shelter for overnight gear and as a secondary dry hold for damp items during long waits ashore. When rain or spray is likely, store damp items inside a dry bag within your pack, and ventilate the bivy to prevent mold buildup. A dry bivy helps keep boots, gloves, and socks ready for the next session on the water.
Cuando la exposición al agua es un factor, coloque el equipo para que se mantenga alto y seco: coloque el filtro, los tubos de repuesto y la electrónica en bolsas secas separadas; mantenga los pasadores y las líneas del timón sellados en una bolsa impermeable; y tenga una bolsa seca de repuesto dentro de la mochila principal para cambios rápidos si una bolsa tiene fugas. Dependiendo del viento y las olas, es posible que desee descargar los artículos más sensibles al agua primero, para que tenga espacio para reorganizarse sin exponer todo a las salpicaduras.
En las rutas populares, algunos equipos consideran una configuración robusta de almacenamiento en seco como una regla sagrada. Algunos guías incluso apodan a los kits resistentes “Ringo” por su rendimiento confiable. Independientemente del nombre, el objetivo sigue siendo minimizar la humedad, evitar la contaminación cruzada y mantener tu chaqueta y otras capas secas para que te mantengas abrigado y listo para la siguiente palada. Hay muchas cosas pequeñas que puedes hacer para mejorar la higiene, desde filtrar y limpiar previamente los charcos en el campamento hasta volver a sellar cada bolsa antes de pasar al siguiente sitio.
Seguridad en la naturaleza: Ajuste del chaleco salvavidas, conceptos básicos de rescate y comunicación
Asegúrate de que tu chaleco salvavidas te quede ajustado: abrocha todas las hebillas, cierra la cremallera delantera, ajusta las correas laterales y realiza la prueba del dedo hasta que solo puedas deslizar un dedo entre la correa y tu pecho. Comienza en tierra firme, luego prueba en el agua, observando cómo se sostiene cuando levantas los brazos y te mueves.
En los conceptos básicos de rescate en la naturaleza, aplica el método Alcanzar, Lanzar, Remar, Ir para cada excursión en kayak. Para asegurarte de actuar rápidamente, memoriza el orden: alcanzar, lanzar, remar, ir. Si alguien cae por la borda, alcanza desde la orilla o arrodíllate para extender la pala hacia su ubicación, lanza una ayuda para la flotación o una línea improvisada asegurada en una bolsa ziplock, rema hacia ellos y ejecuta un autorrescate si puedes después de estabilizar tu embarcación. Esta secuencia funciona siempre y te ayuda a hacer un plan claro bajo presión.
La comunicación importa: lleve un silbato, use tres pitidos largos para señalar y mantenga un plan grupal. Para distancias más largas, un teléfono resistente al agua dentro de una bolsa ziplock en el bolsillo de su chaleco salvavidas puede recibir actualizaciones de alguien en la costa, dependiendo de las condiciones del agua.
Planifica y equilibra: traza tu ruta por zonas salvajes, elige tramos tranquilos y deja espacio para los cambios climáticos. Haz nudos para las líneas de rescate y asegurar el equipo; atar anclajes y ligaduras te ayuda a mantener los kayaks y los utensilios de cocina bien organizados.
Practica con propósito: a lo largo de los años, los viajes y los simulacros se ejecutan eficientemente; los simulacros de ejemplo incluyen el autorrescate, la asistencia a un compañero y la señalización con una luz o un silbato al anochecer. Conclusión: mantente alerta, mantén tu PFD en buen estado y ensaya estos pasos antes de cada excursión.
Takeaway: El ajuste del PFD es la primera línea de defensa; los principios básicos de rescate mantienen a las personas seguras; una comunicación clara evita la confusión. Cada excursión se vuelve más segura cuando empiezas con una carga más ligera, equilibras tu equipo y no dejas nada al azar.
Elección del Campamento y Montaje en la Orilla del Río: No Dejar Rastro y Manejo de Residuos
Elija un campamento a la orilla del río que sea plano, seco y esté al menos a 60 metros de la línea de agua. Primero, evalúe la exposición al sol y la protección contra el viento, y busque una repisa natural que drene hacia el río para evitar que se acumulen charcos durante la lluvia. Tenga en cuenta los sedimentos y evite los bancos socavados; cada vez que se instale, mantenga su área para dormir por encima del borde del agua y protégela de las olas. Si está utilizando equipo de canoa de alquiler, coloque el área de lanzamiento de manera que pueda moverse rápidamente sin pisotear la vegetación. Antes de instalarse, estudie los mapas de navegación para confirmar las rutas de acceso y salida; en los momentos en que los barcos pasen la curva, elija un lugar que ofrezca espacio para que pasen los remeros. Su objetivo es un sitio equilibrado que minimice el impacto y respete la vida silvestre local. Verifique las reservas para asegurar los sitios permitidos y proteger el acceso para los demás. Si ha acampado aquí antes, utilice esa experiencia para refinar su elección y cree una base tranquila y de bajo impacto que pueda utilizarse para dormir y comer.
Leave No Trace comienza con el plan de residuos: empaca cada pedazo de residuo, no solo envoltorios de alimentos, sino también tubos de protector solar, botes de combustible y embalaje. No tires basura al río ni a la orilla. Mantén una bolsa de basura dedicada y un contenedor sellable a prueba de olores para reciclables si está disponible. La cocina debe ocurrir en una superficie estable no combustible; usa una estufa con botes de combustible en lugar de construir un fuego, y almacena el combustible lejos de las tiendas de campaña y el equipo para dormir. Para los residuos humanos, cava un agujero de gato a al menos 60 metros del agua y los campamentos, de 15 a 20 cm de profundidad, luego cúbrelo con tierra y material natural. Si las reglas locales lo permiten, puedes empacar papel higiénico; de lo contrario, empácalo en una bolsa impermeable. Después de las comidas, limpie los platos con agua de enjuague mínima y barre los restos en un área designada para su rápida extracción a su mochila. Finalmente, guarda el protector solar y el repelente de insectos en un recipiente separado y sellado y evita dejarlos donde la vida silvestre pueda alcanzarlos; mantén un área limpia y organizada para apoyar a futuros visitantes.
Piensa en el equilibrio: establece un campamento compacto y eficiente que ofrezca privacidad y seguridad. Los piragüistas aventureros aprecian las instalaciones claras y de bajo impacto. Utiliza una sola zona de cocina, mantén el equipo para dormir alejado de la orilla del río y evita pisotear la vegetación cercana. Mantén tu conciencia de la navegación conservando mapas y una brújula o la navegación del smartphone sin conexión para evitar la pérdida de señal; practica una navegación segura alrededor de las curvas y los remolinos para reducir el riesgo. Si llueve, ten un plan: refúgiate bajo una lona o un poncho, guarda los sacos de dormir en bolsas secas y deja el calzado fuera de la tienda para que se seque rápidamente. Al final del día, barre la zona, empaca cada elemento y crea una impresión final que otros apreciarán; este enfoque genera confianza con la comunidad local y ayuda a conservar el río para futuros viajes.