

 Outboard Steering Tiller – Mechanical Hydraulic Systems Explained">

Recommendation: Use a cable-driven control linked to a cylindervalve inside a compact fluid circuit to achieve a quick and predictable maneuvering on outboards, as the easiest option for reliable handling.
For kind users evaluating an installation at home, measure the travel on each side of the control head; determine whether the cable turns smoothly without binding and whether the circuit preserves symmetry when the captain has turned to port or starboard; the simplest check is to test straight-ahead responsiveness first, then a quick side-to-side sweep.
However, in larger boats or rough locations, consider a dual-cable arrangement so the controls remain linear across extended travel, however keeping the routing clean over the deck helps avoid snagging; this reduces play and avoids overshoot during high-wind maneuvering.
Home installations post a quick checklist: ensure that the cylindervalve function remains consistent when the handle is turned; inspect the circuit cross-connection for any leakage or slack; verify that the outboards respond quickly to handle input, and that the controls have a clear, quick return to center, even in calm conditions.
Note: This approach simplifies maintenance, reduces the risk of jammed handling in a storm, and provides a single, dependable option for most mid-sized craft; avoid overcomplication by sticking to clean routing of the cable and protecting the cylinder valve from salt spray with a simple housing.
Hydraulic layout and control concepts for outboard tiller steering
Recommendation today: adopt a dual-cylinder, fluid-power layout with a proportional valve near the helm to enable on-demand flow and precise position control.
Layout features: the core signal path runs from the helm through the control element to two dual-acting cylinders via short, rugged hoses. Cables link the helm to the valve; the flow path ensures a decisive pull and stable response. Will this arrangement function through load changes? Yes, through a pressure-balanced return and a common reservoir. Today, for freezing climates, route hoses away from bulkheads and insulate the return line.
Control concepts: favor a proportional or digital module and a return path to a pressure-balancing block. Position feedback lets the operator select the desired angle without overtravel. A clear comparison with electric actuation helps determine next steps: electric provides remote feel; this arrangement delivers direct, tactile control.
Installation notes: features to check include valve calibration, cylinder bore consistency, and hose routing through a protected channel. Capacity of the core reservoir should cover peak demand; using standard fittings simplifies maintenance. For boats aiming at durability, select materials resistant to corrosion and temperature swings to ensure longevity.
| Component | Role | Key specs / notes |
|---|---|---|
| Control valve | Directs fluid to cylinders | Proportional or 2/3-way, ports 1/4″–3/8″; operating pressure 100–150 bar; electric or manual drive |
| Cylinders | Convert fluid flow to linear actuation | Dual-acting, bore 16–25 mm, stroke 60–100 mm; materials aluminum or stainless; load ratings aligned with vessel size |
| Reservoir | Stores fluid and accommodates thermal expansion | 0.5–1.5 L per 5–10 kW of power; fill port accessible; temperature-tolerant |
| Hoses / lines | Carry flow between helm, valve, and cylinders | IDs 4–6 mm; lengths 0.5–1.5 m; rated to 100–150 bar; routed away from sources of heat |
| Cables (helm linkage) | Transmits control input to the valve | 2–3 m typical; shielded to prevent wear; compatible with handle motion |
| Return line / filtration | Recovers and cleans fluid back to reservoir | Fine filtration (25 μm) optional; ensure loop can vent air and bleed |
| Temperature management | Prevents viscosity shifts that affect flow | Ambient routing and, if needed, minimal heating in extreme climates |
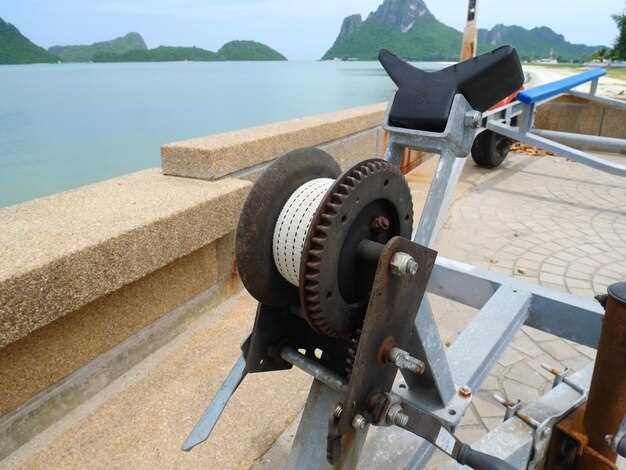
Positioning of tiller, rudder, and helm components
Position the helm wheel so its axis aligns with the rudder linkage, yielding zero rudder travel when centered and limiting any play to 1–2 mm. This setup minimizes fatigue and the effort becoming heavy in rough weather.
Layout around the control area must consider engines, heavy loads, and a variety of boats. Keep space clear on each side for maintenance, sportfishing gear, and home access; this arrangement helps you check and adjust components quickly.
electric actuators offer quick response and reduce manual load, with advantages like compact layouts and constantly ready operation. For higher torque, fluid actuation provides increasing stiffness through controlled pressures; check the kind of actuator to ensure it operates reliably under the expected flow and pressures. Whether you pick electric or fluid actuation, understand the trade-offs and how each affects space, weight, and power draw. This choice will operate reliably with proper installation.
Installation and validation hinge on clean flow and precise link geometry. Measure travel with the wheel at full left and full right, and confirm that parameters stay within a narrow band; ensure pressures in the actuation lines stay within safe ranges, and that the flow remains smooth under load. Check for friction, backlash, and binding; route cables and hoses to minimize snag points and heat buildup. If the setup require adjustment, perform it with the engine off.
Maintenance plan: inspect joints each season and after heavy use; replace worn components; keep a home spare parts kit; log each adjustment and link to the service history; constantly monitor performance to catch issues before loss of control.
Power path: pump selection, reservoir, and line routing
Choose a compact gear-type pump powered by a 12V motor, delivering roughly 0.8–1.4 L/min at 800–1000 psi; pair with a 2–3 L on-board reservoir and a relief valve set around 1000 psi. This combination yields fast response times, reduces wheel and tiller motion, and keeps the power path compact for smaller boats.
Basic layout: mount the pump close to the helm on a stable board or bulkhead, connect a nearby reservoir, and route lines along bulkheads or under the floor to minimize bends. Use 6–8 mm bore lines for the main runs and protect them with abrasion sleeves; keep these cables and hoses away from heat sources and sharp edges. Keep the reservoir accessible for quick top-ups and checks, and use a breather cap to prevent air traps during heavy motion or freezing conditions.
Line routing and sizing: route with the shortest practical distance between pump, cylinder, and helm wheel; avoid long parallel runs and sharp 90-degree bends that introduce pressure losses. Use proper bend radii to prevent cracking or kinking; secure lines at fixed positions with sturdy clamps and weatherproof grommets. If you run multiple lines, keep the return path distinct to avoid circuit interference and ensure a smooth, constant motion in steering or tiller actions.
Checks and safety: inspect for cracks, wear, or oil leakage before every trip; verify marks and certification on hoses and fittings; perform a low-pressure leak test after installation and again after any maintenance. Confirm the reservoir has enough freeboard and venting, so air cannot be drawn into the line during heavy motion. Ensure the system pressure trims correctly with load, and set a conservative relief value to protect lines in heavy seas.
Electrical and on-board integration: wire the pump to a dedicated circuit with proper fusing and a manual disconnect; run cables in protected channels and use color-coded connectors for easy troubleshooting. Use a compact switch at the helm to avoid extra handling times, and keep the circuit isolated when the boat is not in use. Place the control near the wheel or tiller for a comfortable direction change, nice and handy for regular operation.
Step-by-step setup: Step 1 select these components with certification from a reputable board or supplier; Step 2 mount the pump and reservoir on the same station; Step 3 fill the reservoir with the recommended fluid and bleed air; Step 4 test at low motion and monitor for any leaks; Step 5 apply a light load and verify steady, predictable response; Step 6 perform a final check for heat buildup during extended use.
Maintenance and environment: consider the ideal fluid for freezing conditions to prevent gel points; in freezing climates, use a non-freezing additive or drain the system when boats sit idle for extended times. For safety, keep a buddy tool kit and a spare hose ready; smaller, lighter lines reduce weight and friction, while heavier lines provide durability in long runs. If you must operate either in calm water or rough seas, ensure the power path remains available, and test under both motion and still conditions to confirm dependable performance for tiller or wheel control on boats of all sizes.
Pressure control: relief valves, accumulators, and helm feedback
Recommendation: set a conservative relief-point, install a correctly sized accumulator, and tune helm feedback to provide smooth, predictable response under moving water. This combination increases safety, reduces wear on parts, and improves maneuverability in boating conditions.
-
Relief-valve function: prevents overpressure in the control circuit by opening when the line pressure exceeds the set-point. For most boats, aim for a set-point that protects the cylindervalve and inner passages without delaying full input. Typical ranges span from 1000 to 1900 psi, with adjustments guided by gear load, helm effort, and autopilot interaction. Use a professional to verify the pop-off curve and ensure the association between line pressure, cylinder response, and lever effort is balanced.
-
Accumulator role: dampens flow surges, reduces hammer on quick helm moves, and maintains steady pressure during gear changes or heavy motion. Size and pre-charge must match the normal flow and peak demand of the system. A general rule is to select an accumulator in the 0.3–3 L range for mid-sized packages, with a pre-charge around 0.6–0.7 of the relief setting to keep the inner gas charge active through the cycle.
-
Helm feedback and control loop: accurate feedback back to the control manifold improves stability and reduces oscillations in changing sea states. Use pressure feedback alongside position sensing to create a reliable second-form loop that the autopilot can use for smoother moves. This enhances safety and reduces the time the crew spends fighting heavy lever inputs.
-
Components and layout: keep lines short and well supported, isolate high-pressure portions from low-pressure return paths, and place the accumulator close to the helm manifold to minimize delay. Use a dedicated isolation valve for testing, and ensure the gear train that drives the rudder or rudder-link remains free of contamination. The arrangement should be compact yet capable of handling the peak flow without excessive pressure drop.
-
Maintenance and testing: inspect the cylindervalve seats for wear, verify the inner sealing rings, and confirm that the relief device responds within the expected time window during a simulated load increase. Check for leaks along heavy lines and fittings; confirm that the autopilot can command pressure changes without introducing instability into the feed lines.
- Measure baseline flow and pressure with the helm in a neutral position. Record range, and compare with expected values for your boat size and load.
- Set relief valves to conservative defaults, then incrementally increase while monitoring response time, line noise, and lever effort. Stop if there is any hammering or excessive drift.
- Charge the accumulator to the recommended pre-charge (roughly 0.6–0.7 of the relief setting). Verify that the stored energy supports at least a second full-tilt maneuver without pressure drop.
- Test helm feedback by executing a series of controlled moves at different speeds. Ensure the autopilot receives a clear, consistent signal and that the line pressure returns to the baseline quickly after each command.
- Document each modification, noting the association between pressure, flow, and feedback, so future work can reproduce the same strength and safety margins.
Bleeding, priming, and air removal techniques
Recommendation: Mount the reservoir securely, position the bleed point at the highest location on the lines, and move the control through a full round of cycles to push trapped air toward the escape port. The operator should keep the tiller in a neutral position, their grip steady, and watch the fluid for color change as air exits; repeat until the liquid is clear and free of foaming. This establishes a stable baseline for follow-up steps.
Bleeding technique: loosen the bleed screw by a quarter turn and allow fluid to flow while you gently move the control through a number of cycles. Observe the number of cycles until steady, bubble-free fluid appears. If the line contains heavy air pockets, tilt the reservoir to keep the fluid level high and reduce the chance of air reentry; inspect for wear on seals and replace worn parts.
Priming step: ensure the assembly is filled to the correct level, then prime with several deliberate moves of the control to push air toward the bleed point. Keep the space around the mounting free from twists; a straight, smooth path reduces micro-air pockets and helps related components stay in proper alignment.
Air removal technique: if air returns after the first pass, perform a second round, focusing on the uppermost bleed port and returning fluid through the lines until a steady, pulsation-free stream is achieved. This course, like proven approaches in field work, follows a tradition and aligns with modern technology for reliability.
Maintenance check: after bleeding, tighten fittings to minimize wear and keep mount bolts secure; inspect line clamps and if any stiffness arises, rotate the assembly to equalize load and reduce lead on joints. Keep lines routed with minimal bend radius to avoid fatigue and maintain stability.
Expert tip: adopt a smaller, deliberate stroke to minimize surge; keep the spirit of careful procedure and document the number of rounds as your baseline course for future work.
Self-check: position yourself to observe the sequence, keep your body aligned, and ensure space around the work area. Through consistent practice, these techniques lead to a smoother move and easier maintenance.
Diagnostics for leaks, sluggish response, and lost steering feel
Perform a controlled leak test and purge air to restore feel; seal all joints, apply UV dye into the reservoir, and pressurize to a safe test level; verify no damp traces within 5 minutes. This upfront step reduces the number of disassembly steps and helps locate the root cause faster.
-
Leaks: quick identification and fixes
- Visually inspect every hose end, clamp, cap, and the pump housing for dampness, staining, or crusty residue. Clean the area so you can see any new seepage from the next test.
- Use a dye-tracer method: add dye to the reservoir, run the system for a short cycle, then inspect all joints with a UV light; dye in the housing or fittings confirms the leak path.
- Check reservoir fill level and cap seal; replace worn O‑rings and gaskets, and use manufacturer‑specified torque on clamps and fittings. After replacement, re‑test with dye to verify a clean path.
- Document the leak source, the part number, and the flow path; a clean basis for ordering parts and scheduling repair is essential.
-
Sluggish response: diagnosing flow and power
- Measure supply voltage at the power unit; voltage below the rated value reduces pump flow and increases response time. Clean and tighten all wire connectors; check the battery and ground straps for corrosion.
- Inspect the intake and return paths for restrictions: kinked hoses, crushed lines, or debris in the reservoir can limit flow and increase air ingestion.
- Evaluate the pump itself (pumps and rotary elements): worn rotors or degraded seals reduce output; if the unit cannot meet the requested flow, replacement is cheaper than repeated repairs.
- Review the control electronics: verify that the software is current and correctly calibrated; check for fault codes and verify sensor readings against the parameters shown on the display.
- Run the test with no load, log flow rate and response time; if there is a persistent lag, there is either a restriction, air, or an internal leak that the dye test might miss.
-
Lost feel: air, wear, and linkage issues
- Purge air from the actuation loop: loosen the bleed point slightly, cycle the handle to move fluid and push air out; retighten the bleed point once the bubbles stop.
- Check mechanical linkage that translates input to the valve or motor drive: worn pivots, loose pivots, or excessive play in the handle path creates dead zones and a vague response.
- Inspect the valve body and seals for wear; replace worn seals and verify that the rotary or linear valve movement matches input smoothly. If there’s significant play, the basis of control has degraded and should be repaired or rebuilt.
- Validate that the wiring harness and sensor connectors are clean and secure; a loose wire can cause intermittent electronic faults that mimic mechanical looseness.
Diagnostics workflow: track flow, pressure, and response times in a dedicated log; compare to the manufacturer’s parameters and update the on‑board software if needed. If you are dealing with a system that is powered by a compact electronics module, a video guide from the OEM can shorten the troubleshooting path. For any repair, aim for a cost that reflects the single‑source replacement versus multiple labor cycles; certification‑level service ensures safe operation and reduces the risk of repeat issues.
- Recommended practice: perform the checks with the system clean and energized only after all safety steps are complete; a clean workspace lowers the chance of missing a subtle leak or small air pocket.
- Follow‑up steps: after repairs, repeat the dye test and the functional test under load in the actual boating application to confirm that the response is consistent, there there is no residual air, and that the flow meets the expected parameters.
- Maintenance note: schedule periodic inspections; this approach reduces downtime and helps you detect issues long before they become safety risks, which is essential for safe, enjoyable boating.