

 Live Bait Basics – Hook’em Right Techniques for Successful Angling">

Use circles-style hooks to secure mouth hookups and reduce gut-hooking. This approach keeps the bait intact longer, so you can fish deeper and last longer on the water without constant replacements.
Choose live bait such as scad, skipjack, piper, and yabbies because they move easily and stay lively in a livewell or livewells. Keep them healthy by circulating water and replacing stale stock every 5–8 minutes on bright days; maintain 50–65°F water when possible to keep yabbies and scad robust. Yabbies can be finicky in cold water, so an extra aerator helps. Maintain depth by using the right weight, so scent and movement reach the strike zone.
Rigging matters: run light riggers and keep the bait aligned with the mouth for natural swimming. Thread through the mouth or lip, not the gills, to maximize the odds of a clean bite. If the action stalls, tinker with hook position or weight; small shifts can keep the bait longer and reduce struggle on the rod, making hookups easier, not harder.
Use circles-style hooks to encourage a steady take. With circles-style hooks and a slow retrieve, you’ll see the line tick and then tighten as the fish mouths the bait. Don’t yank; instead, feel the bite and lift into it to avoid tearing free. Adjust the leader length to control depth and avoid spooking wary fish.
For different species, tailor the bait: piper works well on the surface or mid-depth, skipjack keeps a stronger swimming action, and scad can attract larger mouths. Have another rig ready and be prepared to switch to another target bait when the water column shifts. Keep livewells stocked and clean to prevent odors that spook finicky fish and reduce drama on long trips.
Know how conditions shift year after year, then keep a simple routine you can repeat. Log the bait and rig that worked last year, adjust for current patterns, and switch quickly when the depth changes. With steady practice and clean gear, you fish longer, strike more often, and leave the struggle behind as you gain confidence.
Live Bait Mastery: Practical Guide for Hook’em Right Angling
Start with this concrete recommendation: use live prawns for mulloway and keep them in a livewell with steady aeration; refresh water every forty minutes to maintain vitality and give them room to move.
- Bait selection and handling
- Selection: choose prawns gathered from healthy schools, kept cool and hydrated so they stay active when you cast. Bait made fresh yields better bites.
- Handling: avoid overmanipulation; if a bait goes sluggish, swap it for a fresh one. A fussy target bites only when the bait looks natural.
- Storage: use a light mesh bag or a small cooler with damp seaweed to keep them fresh until you head to the boat.
- Rigging and tackle
- Lines and leaders: run a sturdy main line and a forty-pound fluorocarbon leader to withstand head shakes from mulloway. This setup allows you to keep tension without splitting the line.
- Sinkers: place the sinker to keep the bait at the correct depth; if current runs strong, use a heavier sinker to prevent line slap.
- Hook and presentation: use a small, robust circle hook sized for the prawn; thread the bait so the tail quivers without tearing.
- Presentation and targeting
- Depth: present the prawn above bottom structure but within reach of predators; in deeper water, a slow drift often increases taps.
- Targeting: when targeting mulloway, set up along deeper channels and ledges; striped species nearby often respond to the same bait.
- Timing: the moon can shift bite windows; many sessions improve around tide changes near dawn or dusk.
- Location and gear tips
- Spot picks: in Florida, look for passes, docks, and submerged shelves where current concentrates bait schools.
- Depth transitions: move from above structures to deeper pockets as the tide falls; often the best strikes occur at a point where current shifts.
- Line management: keep lines clean and free of tangles; a tidy setup reduces missed strikes and increases landed fish.
- Catch, release, and ethics
- Caught fish: when you hook a fish, reel smoothly and keep tension steady; avoid ripping the hook out when the fish turns.
- Released: handle with wet hands, revive if needed, and release until the tail flicks away; this keeps populations good for future trips.
- Record keeping: note the location, conditions, and bait used so you can refine your selection for the next trip.
Plus, a consistent routine improves results: station yourself, check baits, adjust depth, and you’ll see more bites and more landed fish. Gathered knowledge from trips informs every cast and keeps your sessions efficient and enjoyable. Something as simple as adapting to the current and the moon can push your success from good to great, whether you’re fishing the shores of Florida or chasing mulloway above deeper channels along striped hotspots.
Catching and Caring for Live Baits: Where to Find Them, How to Handle, and Livewell Storage
Find live bait at first light along florida jetty walls and drop them into a 20-40 gallon livewell with a dedicated aerator; this keeps them active for casts onto your mark and boosts successful bites.
Commonly, the best options are mackerel, bunker, and mullet. In deep channels and along jetty drop-offs they school up, especially in florida estuaries year-round. Look for tails flashing and wakes as they move with the current, then cast nets or scoop them up for immediate use.
Handle with care to reduce stress: keep baits wet, use a soft net or bait scoop, and minimize air exposure; without steady water exchange they sag quickly; deploy a Smith rig so hooks stay oriented and bait remains aggressive.
Livewell storage basics: Butler pumps provide reliable aeration; set water temperature around 65-75°F and maintain salinity close to sea water for bunker and mackerel; keep the tank clean and avoid overcrowding; treat the tank like a club bouncer who won’t let stress climb; check water clarity and oxygen every hour on hot days.
Active scenarios: when you target black drum, striped bass, or other active species, match the bait to the target and switch if needed; they would bite sooner if the bait stays lively; this approach helps you stay in the field all year and share the same water column with confidence.
General tips for care: monitor arrival health, separate species when possible, and use a dedicated livewell line so you do not contaminate other gear; just a small maintenance routine saves many baits a day. Ensure a continuous flow and regular checks to prevent the disadvantage of oxygen depletion.
Chickens as chums: Some pier anglers use chicken necks to draw in scavengers near the surface, but keep them away from your livewell; they can act as secondary attractants while you deploy, but don’t rely on them for the live bait you plan to fish with. They would be better used to attract crabs or pin fish for local patterns.
Rigging Live Baits: Hooks, Leaders, and Setups that Minimize Evasion
Use a compact live-bait rig with a 20–40 lb fluorocarbon leader, a small circle hook in the 1/0–2/0 range, and a Palomar or improved clinch knot. Keep the leader 12–24 inches (30–60 cm) long so your bait can move naturally while staying secured. A light sliding or running-sinker rig helps the bait sit near the bottom without hindering its natural kick, which thats key for a confident take wherever you fish.
For prawns, thread the hook so the prawn’s head sits ahead of the hook point and the tail remains free to kick. Run the line through the tail base to the hook, then pass the leader to your main line with a short 1–2 inch drop. This presentation maintains the prawn’s natural movement in estuaries and weed-choked zones, increasing your chances of a solid hold when a fish taps the bait.
Shad respond best to a forward-facing presentation: hook through the upper lip with a circle hook, using a 24–36 cm leader. This keeps the head oriented toward the target species, reduces gut hooking, and improves the probability that a strike sets the hook instead of releasing the bait. If you fish in cooler water, shorten the leader a touch to improve sensitivity; in warmer water, you can extend the leader for a steadier pull.
Squid live baits benefit from a stronger connection: choose a stiffer fluorocarbon leader (30–60 lb) and run the line to a small swivel, then attach the hook so the mantle sits close to the hook’s point. Keep your rig weed-friendly by adding a light weed guard or using a slightly larger circle hook so you can push through weed without losing the bait. In weed-dense channels, a tiny dropper can help the squid stay oriented while the main line stays clear of snags.
In drifting setups, a running-sinker rig keeps your baits resting near the bottom while still allowing natural movement. Use a weight that places your bait about a foot or two off the bottom in clear water, and increase weight gradually if the current speeds up. Rods should be stiff enough to feel subtle takes, yet balanced so you can lift quickly when you sense a bite–this helps you hold the bait steady and not lose it to weed or snags.
Temperature and current shape your choice of hook and leader. In warmer months, you can use slightly lighter leaders and smaller hooks because baits move more vigorously and fish bite more readily. Since estuaries vary with tides, adapt the setup to the sound of the water and the depth; wherever you fish, a well-balanced rig with a solid hold reduces the odds that a fussy fish will release your offering. Always test your rig before casting: give your live bait a small head start, check the hold, and adjust if the bait seems stressed or the line shows excessive slack from weed growth or current change.
Assisting your buddy Kevin with field notes, you’ll see that a kept-on-rig approach pays off year after year. You must think through the bait’s natural behavior and then craft a setup that lets it swim with enough head room to stay alive. When you release a bait after a failed strike, do it smoothly and quickly so the line remains ready for your next drift. If a fish might evade the rig, switch baits, adjust the leader length, or swap to a stiffer rod and a slightly heavier weight to improve sensitivity and control–that simple change often increases your strike rate and reduces wasted drifts.
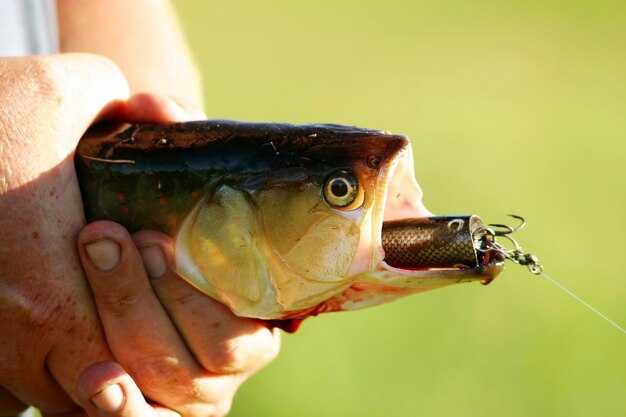
Positioning Live Bait: Upper Lip, Behind the Dorsal, and Vent Placements for Hookups
Hook live bait in the upper lip to maximize hookups and keep the bait oriented toward predatory strikes. This placement works true to the bait’s natural movement and allows a quick, decisive hookset even when wind and current push the line. Your first step is to read the needs of the day: what depth in feet, what predators hunt this spot, and how your line will load the rod.
Τοποθέτηση στο άνω χείλος: Περάστε το άγκιστρο μέσα από το άνω χείλος, κοντά στην μπροστινή άκρη, και βγάλτε το ακριβώς μέσα στο στόμα προς τα πίσω. Κρατήστε το στέλεχος κατά μήκος της άνω γνάθου, έτσι ώστε το δόλωμα να κάθεται όρθιο και το άγκιστρο να κινείται κατά μήκος της πίσω άκρης. Μια καθαρή έξοδος μειώνει την οπισθέλκουσα, προστατεύει τα στόματα σε μεγαλύτερα ψάρια και σχεδόν πάντα αποδίδει ένα σταθερό κράτημα.
Πίσω από το Ραχιαίο: Εάν το τσίμπημα είναι ανεπαίσθητο ή τα ψάρια είναι καχύποπτα, σπρώξτε το αγκίστρι λίγο πίσω από το ραχιαίο πτερύγιο. Αυτό επιτρέπει στο δόλωμα να κολυμπά πιο φυσικά και επιβραδύνει το αρχικό χτύπημα, αυξάνοντας τις πιθανότητες για ένα σταθερό κάρφωμα. Ένα κοντό παράμαλλο διατηρεί την αρματωσιά σταθερή και σας επιτρέπει να παραμείνετε στη θέση σας. Ο έλεγχος του βάθους επιτυγχάνεται με το βάρος και την τάση της πετονιάς.
Τοποθετήσεις εξαερισμού: Για μεγαλύτερα δολώματα ή όταν το στόμα είναι σκληρό, περάστε το αγκίστρι μέσα από τον εξαερισμό για να αγκυρώσετε το δόλωμα χωρίς να μπλεχτεί. Σε μια αρματωσιά σταγονόμετρου, μπορείτε να παρουσιάσετε ένα δεύτερο δόλωμα ή βάρος ισορροπίας – αυτή η εκλεπτυσμένη προσέγγιση βελτιώνει το κράτημα και μειώνει την πιθανότητα το δόλωμα να συρθεί.
Σενάρια μώλου και Φλόριντα: Στις άκρες των μώλων ή στα νερά της Φλόριντα, το βάθος και το ρεύμα υπαγορεύουν πού να τοποθετήσετε το δόλωμα. Ξεκινήστε σε βάθος περίπου τεσσάρων μέτρων και τοποθετήστε τον στόχο κοντά σε κοπάδια δολωμάτων που σχηματίζονται από σχολεία bunker που παραμένουν κοντά στην κατασκευή. Για μεγαλύτερα bunker, χρησιμοποιήστε τοποθετήσεις πίσω από το ραχιαίο ή τον εξαερισμό για να αντισταθείτε στο ρεύμα. για μικρότερα δολώματα, το άνω χείλος παραμένει η καλύτερη επιλογή. Η σωστή τοποθέτηση σάς βοηθά να διατηρείτε το δόλωμα στη ζώνη χτυπήματος και μειώνει τα μπερδέματα κοντά στους βράχους. Ταιριάξτε το μέγεθος με το άνοιγμα του στόματος και τη διαύγεια του νερού για να διατηρήσετε το δόλωμα να λειτουργεί σωστά.
Γρήγορες συμβουλές και νοοτροπία: Γνωρίστε το είδος που στοχεύετε. αφιερώστε λίγα λεπτά δοκιμάζοντας κάθε τοποθέτηση και μετακινούμενοι μεταξύ τους ανάλογα με τις ανάγκες. Διατηρήστε την απλότητα και την ακρίβεια, ταιριάζοντας πάντα το μέγεθος του δολώματος με το άνοιγμα του στόματος. Μια καλή, ισορροπημένη αρματωσιά θα σας επιτρέψει να νιώσετε κάθε χτύπημα σταθερά και θα γνωρίζετε πότε ένα τσίμπημα είναι αληθινό. Να γνωρίζετε πάντα τι θέλει το ψάρι και να προσαρμόζεστε στις συνθήκες. Εάν αντιμετωπίσετε συγκρίσεις με κομμένα δολώματα, όπως λαιμούς κοτόπουλου, θυμηθείτε αυτόν τον οδηγό και επιστρέψτε πρώτα στις τοποθετήσεις ζωντανών δολωμάτων. Βάσει του ρεύματος και της δομής, προσαρμόστε το βάθος και την απόσταση από την κάλυψη για να μεγιστοποιήσετε τα αγκιστρώματα.
Κύκλοι έναντι J-Hooks: Πότε να χρησιμοποιήσετε κύκλους και πώς να τους επιλέξετε κατά μέγεθος
Οι κυκλικοί γάντζοι χρησιμοποιούνται ευρέως για στησίματα ζωντανού δολώματος· ξεκινήστε με μεγέθη 1/0 έως 3/0 για τα περισσότερα μεσαίου μεγέθους είδη και μεταβείτε σε 4/0 ή 5/0 για μεγαλύτερους στόχους. Αυτή η απλότητα διατηρεί τα καρφώματα σταθερά και μειώνει τη ζημιά στο έντερο, ενώ εσείς παραμένετε συγκεντρωμένοι στο τσίμπημα. Να ελέγχετε πάντα το βάθος και το ρεύμα και, στη συνέχεια, να προσαρμόζετε το μέγεθος του γάντζου για να διατηρείτε μια σωστή ισορροπία μεταξύ τσιμπήματος και συγκράτησης· χρησιμοποιείτε στιβαρά καλάμια και διατηρείτε μια σταθερή βολή για να διατηρείτε την τάση κατά τη διάρκεια του χτυπήματος. Καθώς περνάτε τη μέρα με τα πανιά υψωμένα, το τσίμπημα έρχεται συχνά σε κύματα, οπότε να είστε σε εγρήγορση.
Πότε να επιλέξετε κυκλικό ή J-hook: Τα κυκλικά αγκίστρια υπερέχουν όταν αφήνετε το δόλωμα να κάνει τη δουλειά και απλά περιμένετε ένα διακριτικό τράβηγμα. η αιχμηρή άκρη τείνει να κάθεται στο στόμα, συχνά στο μπροστινό μέρος του ψαριού, μειώνοντας την πιθανότητα βλάβης στο έντερο ή το ραχιαίο πτερύγιο και προσφέροντας ένα πραγματικό, υγιές κράτημα. Εάν χρειάζεστε ένα γρήγορο, πιο βαρύ κάρφωμα ή ψαρεύετε με ένα άκαμπτο παράμαλλο, ένα J-hook θα μπορούσε να είναι το σωστό, αλλά πρέπει να ρίχνετε με έλεγχο και να παρακολουθείτε την πετονιά για να αισθανθείτε πότε τσιμπάει το αγκίστρι, ακόμη και με οτιδήποτε δοκιμάσετε.
Οδηγίες και κόλπα μεγέθους: Οι κυκλικοί γάντζοι χρησιμοποιούν 1/0–3/0 για τα περισσότερα θηράματα 2–15 lb, 4/0–5/0 για 15–40 lb, 6/0–9/0 για μεγαλύτερα ψάρια αλμυρού νερού. Οι J-hooks συνήθως χρησιμοποιούν 2–3/0 για μεσαίου μεγέθους πέστροφα ή redfish, 5/0 για μεγάλο λούτσο ή υπεράκτιους στόχους και 7/0 για μεγάλο τόνο ή καρχαρίες. Σε βαθύτερα νερά, ανεβείτε ένα μέγεθος για να διατηρήσετε το βάθος και να αποτρέψετε το δάγκωμα να αποτύχει. Για ψάρια που ψαρεύονται με κομμένα δολώματα ή ζωντανά δολώματα, ο κύκλος παράγει συχνά ένα πιο τέλειο δάγκωμα. Εάν χρησιμοποιείτε ένα suicide rig σε βραχώδεις περιοχές, κρατήστε τις συστροφές στο ελάχιστο και χρησιμοποιήστε έναν μικρότερο οδηγό για να μειώσετε τα σκαλώματα και να θυμάστε ότι τα άγκιστρα που χρησιμοποιούνται σε αυτά τα rigs πρέπει να ταιριάζουν με το δόλωμα και τον στόχο.
Πρακτικές συμβουλές για τη βελτίωση των αποτελεσμάτων: να δοκιμάζετε πάντα μερικές βολές, να ελέγχετε ότι η αιχμή του αγκιστριού είναι κοφτερή και όχι στραβή και να διατηρείτε την πετονιά ίσια κατά τη διάρκεια του τσιμπήματος. Να προσέχετε την περιοχή της ράχης κατά την προσγείωση και να αποφεύγετε οτιδήποτε μπορεί να σκαλώσει το στόμα ή τα βράγχια. Οι μεγαλύτερες βελτιώσεις προέρχονται από τη συνεπή χρήση του καλαμιού και τον σωστό συγχρονισμό. Υπάρχουν διάφοροι τρόποι για να ρίξετε πιο μακριά όταν φυσάει ο άνεμος και να διατηρείτε την αίσθηση της πετονιάς – οτιδήποτε αντιστέκεται είναι σημάδι για να προσαρμόσετε το μέγεθος του αγκιστριού ή την πίεση του καλαμιού. Αυτή η προσέγγιση σάς βοηθά να διατηρείτε τα ψάρια υγιή και να μειώνετε τις βλάβες, ενώ ψαρεύετε πιο σκληρά και πιο έξυπνα.
Κοινά Ζωντανά Δολώματα και Είδη-Στόχοι: Αντιστοίχιση Δολώματος με Θηραματικά Ψάρια
Ξεκινήστε με γεωσκώληκες για τα περισσότερα ψάρια παν και πολλά λαβράκια σε ήρεμα νερά. διατηρείτε το δόλωμα ζωντανό και παρουσιάστε το αργά για να προκαλέσετε τσιμπήματα.
Η επιλογή δολώματος ανάλογα με το στοχευόμενο είδος βελτιώνει την επιτυχία: για μεγάλα, κινητικά ψάρια κατά μήκος των άκρων κινούμενων υδάτων, χρησιμοποιήστε μικρά γριβάδια ή βδέλλες σε ελαφρύ εξοπλισμό· για λευκά και κοπαδιαστά τηγανόψαρα, ένα συμπαγές γριβάδι κάτω από ένα φελλό κοντά σε γραμμές φυκιών τείνει να παράγει σταθερά τσιμπήματα.
Το γουλιανόψαρο και η πέστροφα ανταποκρίνονται σε ζωντανά γριβάδια κάτω από φελλό κατά τη διάρκεια περιόδων χαμηλού φωτισμού ή σε αρματωσιές βυθού με ελαφρύ βαρίδι για να κρατούν το δόλωμα κοντά σε δομές.
Συμβουλή αρματωσιάς: στερεώστε το δόλωμα με έναν απλό κόμπο σε ένα ελαφρύ παράμαλλο. βεβαιωθείτε ότι η σύνδεση επιτρέπει στο δόλωμα να κολυμπά φυσικά και παραμένει ασφαλής κατά τη διάρκεια της ρίψης.
Φροντίδα και χειρισμός: διατηρείτε το δόλωμα σε αεριζόμενο δοχείο, ξεπλένετε περιοδικά και απορρίπτετε το απόθεμα που δείχνει σημάδια στρες. το δόλωμα που κινείται ελεύθερα προσελκύει περισσότερα τσιμπήματα.
Περιβαλλοντικές ενδείξεις: προσαρμόστε την επιλογή δολώματος στη διαύγεια και το βάθος του νερού· σε θολά νερά, προτιμήστε μεγαλύτερα ή φωτεινότερα γριβάδια· σε καθαρά νερά, τα γριβάδια σε φυσικούς τόνους τείνουν να παράγουν περισσότερα τσιμπήματα.
Τήρηση αρχείων: οι ψαράδες καταγράφουν τον τύπο δολώματος και την τοποθεσία για να βελτιώσουν τις τακτικές τους με κάθε ταξίδι και εποχή.