

 How to Water Ski and Wakeboard in Cold Weather – Essential Tips, Gear, and Safety">

Ξεκινήστε με έναν απλό κανόνα: εάν η θερμοκρασία του νερού είναι κάτω από 10 βαθμούς Κελσίου ή ο άνεμος κάνει τη λίμνη πιο ταραγμένη, αναβάλετε τη συνεδρία σας. Build a checklist για να επιβεβαιώσετε την ταχύτητα του ανέμου, τη θερμοκρασία του αέρα και τη διαύγεια του νερού πριν μπείτε στο νερό. Θα θέλετε ένα σχέδιο που σας κρατά ασφαλείς και αξιοποιεί κάθε λεπτό, διατηρώντας τους πιθανούς αποτελέσματα στο οπτικό σας πεδίο.
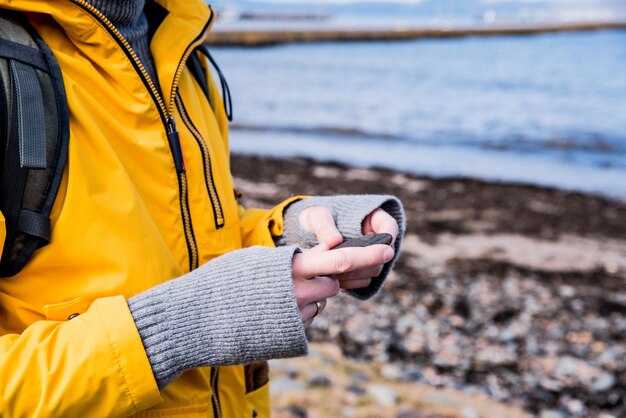
Εξοπλισμός και ρύθμισηΝτυθείτε με μια στεγνή στολή ή μια στολή βουτιάς 4–6 mm με κάλτσες, γάντια και ένα αδιάβροχο εξωτερικό στρώμα. Μια seat στην αποβάθρα ή το σκάφος σας σας βοηθά να μπείτε και να βγείτε ομαλά, και ένα cable Το ρυμουλκό παρέχει σταθερή έλξη στη λίμνη. Βεβαιωθείτε ότι τα άκρα του ρυμουλκού σχοινιού είναι closed και επιθεωρήστε για φθορές. Σχεδιάστε για αρκετά minutes καθώς και ένα εφεδρικό ζευγάρι γαντιών σε κοντινή απόσταση.
Τεχνική σε κρύο νερόΞεκινήστε από μια ρηχή περιοχή με χαμηλή, ελεγχόμενη στάση, αφήνοντας τη λαβή να κάνει τη δουλειά. Για τα σκι, κρατήστε το βάρος σας στο κέντρο και το αριστερό σας πόδι μπροστά για σταθερές απογειώσεις· για το wakeboard, μείνετε ψηλά και ευθυγραμμισμένοι με τη λαβή. Σε κρύο καιρό, μειώστε λίγο την ταχύτητά σας αν αρχίσετε να νιώθετε μουδιασμό ή μυρμήγκιασμα και κάντε ένα σύντομο minutes-μεγάλη παύση για να ζεσταθούν τα χέρια και ο πυρήνας. Κρατήστε τις κινήσεις σκόπιμες και μην αναγκάζετε ποτέ μια τράβηγμα.
Διαφορετικές ρυθμίσεις για σκι και wakeboards: Τα σκι απαιτούν ασφαλή δέσεις και μια σταθερή ακμή, ενώ τα wakeboard χρειάζονται στενές δέσεις και σωστή στοίχιση των ποδιών. Εάν χρησιμοποιείτε ένα cable σύστημα, δοκίμασε different courses για να βρείτε την ευκολότερη διαδρομή σε χαμηλό φωτισμό. Ζητήστε από τον προπονητή ή τον συμπαίκτη σας review το έντυπό σας μετά από κάθε εκτέλεση και κρατήστε ένα checklist υποδείξεων για την ενίσχυση της καλής τεχνικής.
Safety and planningΣε κρύες λίμνες, ο κίνδυνος κρυοπαγησης είναι πραγματικός? φορέστε ένα σωσίβιο γιλέκο, γάντια κατάλληλα για κρύο και ένα κράνος όπου απαιτείται. Παρακολουθήστε την ταχύτητα του ανέμου και την επιφάνεια του νερού? αν μια λίμνη γίνει closed ή μια κοντινή περιοχή δείχνει ένα rule αλλάξτε, μεταβείτε σε μια κλειστή προπόνηση ή σε μια προστατευμένη τοποθεσία. Σε μέρη όπως Αυστρία, σχεδιάστε εκ των προτέρων για νερό που ψύχεται γρήγορα και διατηρήστε μια πρόγνωση του καιρού review πριν από κάθε εξόρμηση.
Λίστα ελέγχου και βελτίωση: Αφού τελειώσετε, εκτελέστε ένα γρήγορο review ορισμένων συνθηκών και απόδοσης. Διατηρήστε ένα απλό αρχείο καταγραφής: θερμοκρασία νερού μέσα celsius, θερμοκρασία αέρα, άνεμος και minutes of active skiing. Use the checklist να δημιουργήσουμε ένα εκατομμύριο μικρές βελτιώσεις με την πάροδο του χρόνου, και να λάβουμε υπόψη courses ή μια συνεδρία coaching για να ωθήσει την πρόοδο ακόμη και σε κρύο καιρό.
Πώς να κάνετε θαλάσσιο σκι και wakeboard σε κρύο καιρό: Συμβουλές, εξοπλισμός και ασφάλεια
Εδώ είναι μια συγκεκριμένη αρχή: πάρτε μια ολοκληρωμένη στολή γυμναστικής με καλή μόνωση, μποτάκια, γάντια και ένα καπό αν οι συνθήκες το απαιτούν. Φυσικά, αυτό το σετ διατηρεί το σώμα σας ζεστό και έτοιμο για οδήγηση. Εάν ψωνίσετε εξοπλισμό τώρα, θα βρείτε επιλογές που μειώνουν την κόπωση κατά τη διάρκεια μεγαλύτερων διαδρομών και σας βοηθούν να παραμείνετε περισσότερο στο νερό όταν ο αέρας είναι δροσερός.
Πριν μπείτε στο νερό, ελέγξτε τις συνθήκες και την πολιτική ακύρωσης. Ανάλογα με τη θερμοκρασία του αέρα και του νερού, τον άνεμο και το κύμα, ενδέχεται να μειώσετε τη διάρκεια των συνεδριών ή να ακυρώσετε εντελώς. Σημειώστε ότι υπάρχει κίνδυνος το γρήγορα μεταβαλλόμενο νερό λιπάδωσης να σας κρυώσει γρήγορα, επομένως σχεδιάστε μικρότερα διαλείμματα και παρακολουθήστε πώς αισθάνεστε κατά τη διάρκεια της βόλτας.
Η στρωματοποίηση των ρούχων είναι σημαντική: ξεκινήστε με ένα στρώμα βάσης που απομακρύνει την υγρασία, προσθέστε μόνωση νεοπρέν, και μετά ένα εξωτερικό στρώμα αντιανεμικό. Αυτή η προσθήκη σας κρατάει ζεστούς ακόμα και όταν η θερμοκρασία της λίμνης πέφτει και σας βοηθά να διατηρήσετε την κινητικότητα στους ώμους και τα πόδια σας για περισσότερα λεπτά στο νερό.
Η θερμότητα των ποδιών και των χεριών είναι το κλειδί: επιλέξτε μπότες με καλή πρόσφυση και κουβαλήστε θερμάστρες χεριών για διαλείμματα ανάμεσα στα τρεξίματα. Η χρήση μονωμένων γαντιών σχεδιασμένων για θαλάσσια σπορ προστατεύει το κράτημά σας και μειώνει την κόπωση, ενώ οι μπότες αποτρέπουν το σπασμό από τα κρύα πόδια.
Ο εξοπλισμός ασφαλείας πρέπει να υπάρχει σε κάθε βόλτα: φορέστε ένα κατάλληλα εφαρμοζόμενο PFD (σωτηριακή γιλέκο) και να έχετε μια σφυρίγδα ή συσκευή σηματοδότησης εύκολα προσβάσιμη. Μια στενή εφαρμογή μειώνει τον κίνδυνο ανύψωσης και η ορατότητα παραμένει υψηλή σε συννεφιασμένες συνθήκες.
Η περιοχή και η απόσταση είναι σημαντικά: επιλέξτε μια ήρεμη περιοχή της λίμνης, μακριά από βάρκες και δραστηριότητα στην ακτή, με σαφή απόσταση από άλλα σκάφη. Η τήρηση μιας ασφαλούς ζώνης σας βοηθά να ανακάμψετε γρήγορα ανάμεσα στις βόλτες και μειώνει την πιθανότητα απότομων στάσεων από την κίνηση.
Η τεχνική παραμένει απλή και σε κρύο καιρό: κρατήστε τον κορμό σας σφιχτό, τους ώμους ίσια, τα γόνατα λυγισμένα και τα μάτια σας στο σκάφος. Το κρύο νερό μπορεί να επηρεάσει τον χρόνο αντίδρασης, επομένως διατηρήστε ομαλές εισόδους και επικοινωνήστε καθαρά με τον παρατηρητή πριν από κάθε ρυμούλκα.
Η προθέρμανση στην ακτή είναι απαραίτητη: εκτελέστε μια δυναμική προθέρμανση 5 έως 10 λεπτών που στοχεύει στους γοφούς, τους αστραγάλους και τους ώμους· αυτή η φυσική προετοιμασία μειώνει τον κίνδυνο τραυματισμού και καθιστά το πρώτο τρέξιμο πιο άνετο. Ξεκινήστε αργά, στη συνέχεια προσθέστε μικρές επαναλήψεις για να αυξήσετε τη ροή του αίματος και την ευλυγισία.
Έτοιμοι για την προπόνηση; Ξεκινήστε με μικρότερες διαδρομές για να αξιολογήσετε πώς νιώθουν οι συνθήκες, στη συνέχεια αυξήστε σταδιακά καθώς το σώμα σας προσαρμόζεται στο κρύο. Εάν μια διαδρομή φαίνεται περίεργη, επιστρέψτε σε μια ασφαλέστερη απόσταση και ταχύτερη ταχύτητα για να ανακτήσετε την αυτοπεποίθηση στο νερό.
Πού να ψωνίσετε εξοπλισμό; Ελέγξτε ένα αξιόπιστο κατάστημα με επιλογές για κρύο καιρό και μια ξεκάθαρη πολιτική επιστροφών, και εξετάστε τα σχόλια των χρηστών σχετικά με τη ζεστασιά και την εφαρμογή. Πιθανότατα θα βρείτε πακέτα που συνδυάζουν μια στολή γυμναστικής με γάντια, μπότες και μια αδιάβροχη κουρτίνα κατάλληλη για τις συνθήκες της λίμνης.
Ο σχεδιασμός της τοποθεσίας είναι επίσης σημαντικός: επιλέξτε μια τοποθεσία με προστασία από τον άνεμο και προβλέψιμη ποιότητα νερού, και βεβαιωθείτε ότι η περιοχή εκτόξευσης έχει εύκολη πρόσβαση για αλλαγή εξοπλισμού. Δεν υπάρχει λόγος να βιαστείτε· αφιερώστε χρόνο για να ρυθμίσετε προσεκτικά ώστε να μπορείτε να παραμείνετε περισσότερο στο νερό.
Μετά από κάθε συνεδρία: σημειώστε τι λειτούργησε, τι δεν λειτούργησε και τυχόν προσαρμογές στο layering, τον εξοπλισμό ή την απόσταση. Μια γρήγορη απολογισμός σας βοηθά να χτίσετε αυτοπεποίθηση και να παραμείνετε συνεπείς σε διάφορες συνθήκες και αθλητική εστίαση.
| Item | Purpose | Recommendation |
|---|---|---|
| Μόνωση στολής γυμναστικής (mm) | Θερμική προστασία, ευκαμψία | 4/3 ή 5/4+ mm ανάλογα με τη θερμοκρασία του νερού· προσθέστε μπότες (2–4mm) αν χρειαστεί |
| Μπότες | Κράτημα, ζεστασιά, προστασία ποδιών | 3–4mm with sticky sole; consider 2mm if land temps are mild |
| Gloves | Hand warmth, grip | 3–5mm neoprene or lobster style for dexterity |
| Hood | Head insulation, heat retention | Thin neoprene hood for water under 60°F (15°C) |
| PFD (life vest) | Buoyancy, chest warmth | Firm fit, high-visibility color; ensure proper certification |
| Base layer | Moisture transport, warmth | Long-sleeve synthetic or wool underlayer |
| Windproof outer layer | Protects against wind chill | Light shell or wind breaker over wetsuit |
| Hand warmers | Between runs warmth | Disposable packets in gloves or pockets |
| Sun and eye protection | Glare and wind safety | Polarized sunglasses; wraparound style |
Wake Area FAQ and Practical Guidance
Use a pre-session checklist to cover gear, weather, and safety before you head out. youll confirm that your suits fit, check that neoprene is thick enough, and verify a certified PFD, rope, and hardware. Choose thick gloves for wind chill and bring a little spare gear for cases of cold hands. Sip coffee on shore between runs to stay warm.
FAQ: How cold is too cold? The rule is to reassess gear when water temperature falls below 60F (15C) and the wind adds chill. In most cases, you should consider a drysuit below 50F (10C). fall sessions on alpine lakes or in austria camps can drop to near 40F (4C). In any case, listen to your body: shivering, numb fingers, or loss of dexterity signal hypothermia risk. Then take a break and warm up.
Gear setup: wear a thick wetsuit or a drysuit with a minimum of 3/2 mm for cool weather and add booties, gloves, and a helmet if you ride near fixed hazards. Use a snug vest and inspect the seams; replace worn parts. For extra warmth, layer under a hood or fleece. Where possible, test different suits at camps to find the fit that stays comfortable during long sessions.
Steps for cold-water sessions: 1) survey the wake area and check below water for hazards, 2) set a safe exit and clear line, 3) establish a clear hand signal with the operator, 4) keep turns shallow at first to avoid overexertion, 5) if you fall, roll away from the line and glide to the boat, 6) drink a warm beverage between runs.
Hypothermia awareness: watch for shivering that climbs from mild to intense, numb lips, mental fog, and slowed movement. If you notice signs, cut the session short, head to shore, remove wet gear, and warm up gradually with dry clothes and a hot drink. Do not rely on caffeine alone; use a proper warm-up, and if symptoms persist, seek medical care.
Where practice matters: pick designated wake zones, stay with a buddy, and avoid high-traffic hours. In colder regions, early morning light helps; many camps run practice blocks and warm-up sessions. austria lakes near salzburg or tyrol offer reliable cold-water training in fall.
Wear Guide: Layering, Accessories, and Fit for Cold Water
Start with a snug base layer that fits tight against the skin, then add a mid-layer and outer shell to stay warm and dry. This arrangement reduces heat loss and helps you enjoy a longer ride in cold water.
- Base layer: choose a synthetic compression top and bottom or a lightweight merino set. Fit should be tight but not restrictive, with cuffs that seal wrists and ankles to block water entry. This right fit keeps warmth close to your core as you move.
- Mid-layer: fleece or lightweight insulated layer that breathes. A zip-front option helps vent heat toward the chest during breaks or when the sun warms the lake toward sunset.
- Outer shell: waterproof, windproof shell with taped seams. Ensure a full range of motion for the arms and tight cuffs to prevent drafts during throws or landings.
- Bottom protection: consider a 4–6 mm drysuit or 3–5 mm neoprene pants for water around 50–60 fahrenheit; for 50–60 fahrenheit, a 2–3 mm wetsuit with booties is comfortable for many riders.
- Accessories: gloves or mittens (3–5 mm), a thermal beanie, and neoprene booties with good grip. Use chemical hand warmers or battery-powered warmers inside gloves for long sessions; toe warmers work well with booties to preserve mobility.
- Rope and equipment setup: check that the rope and skis align straight, with the rope staying taut but not tight during starts. Beginners should start with a shorter rope distance of 50–60 feet and work up toward 60–75 feet as balance improves; this difference makes a big impact on control and safety.
- Fit and mobility: ensure the base and mid-layers don’t ride up when you bend knees or reach toward the handle. Arms should move freely; cuffs at wrists and ankles should seal without restricting circulation; torso layers should feel snug at the level of the ribs but not crush the chest.
Weather-Ready Gear: Wetsuits, Drysuits, Neoprene Boots, Gloves, and Hoods
Start with the basics: wear a 4/3 wetsuit, 3–5 mm neoprene boots, and 3–5 mm gloves for wakeboarding in cold water. If air is icy or wind is strong, add a 2–3 mm hood and consider a drysuit over that base. Thickness choices may vary, depending on water temperature. A drysuit with a thermal layer gives you extra freedom to stay warm during acceleration.
Fit matters: look for a snug seal at wrists and ankles, flexible knees, and smooth cuffs; looseness drains heat and slows you. For stability, choose a snug wetsuit with a slightly firm boot wedge that keeps the ankle aligned during turns. If a suit fits poorly, it can affect grip and control, so try before you buy. They adjust layers to balance warmth and mobility depending on wind and sun, which helps every wakeboard session.
Layer choices: underlayers made of moisture-wicking fabric improve comfort; avoid cotton. When wearing a drysuit, add a light fleece underlayer to prevent sweating. Since the body works harder in cold, consider using a thin tank top under the base layer to manage moisture. This approach helps if you also surf or try surfing in similar conditions.
Gear care and checks: rinse after the session, dry thoroughly, and store flat. Inspect seams and zippers; replace worn gloves before the next ride. Basic steps like these reduce irritation and extend gear life.
Safety planning: check the forecast and wind; cancellation risk rises with squalls or heavy frost. Plan a flexible schedule with your camps or group; bring snacks for energy between runs and keep everyone warm.
Who wears what: everyone is different; participants with lower tolerance to cold should start earlier with extra layers. Kids and beginners may need tighter fits and easier-access zippers; wearing a drysuit often helps longer sessions.
Wakeboarders in austria train at camps and use weather-ready gear; coaches like Miller emphasize that gear choice affects performance as much as technique.
Maintenance plan: after a season, assess boot wear, seam integrity, and glove thinning; replace as needed.
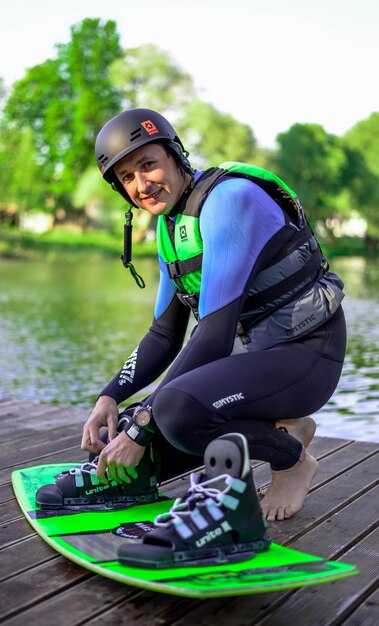
Cold-Weather Equipment Setup: Skis or Board, Bindings, and Rope Length
Choose wakeboard for cold-season boating; this isnt the time to chase skis if you want easier lift and quicker control on freezing water, since a single board with snug bindings simplifies the steps to get up. This also helps you lift cleanly when you ride through light chop.
In winter conditions, wakeboards stay more forgiving than skis on chop, helping you keep a lower center of gravity and better level edge control. The combination of board and bindings reduces the learning curve and speeds up getting through the steps. If you insist on skis, you’ll face more difficult starts, longer setup, and less predictable planing when water is freezing. When downhill chop appears, stay compact and lift with the knees.
Bindings: pick warm, snug wakeboard bindings and set a practical stance. If you have wakeboards, check binding compatibility across boards to keep the needed grip. For riders, aim for a lower level setup with the front foot toward the boat and the rear foot closer to center to guide the foot into a secure position as water is slick.
Rope length: for beginners, start around 50–60 ft; as you gain confidence and the water remains cold yet predictable, you can move to 60–65 ft. A shorter rope reduces acceleration and keeps you in the wake, which helps you stay dry and focused.
Before you ride, run through the steps: verify bindings are tight, rope is secure to the boat, and the board is dry. Practice a gentle stand-up in shallow water to reduce exposure time, and ensure you’re wearing a wetsuit or drysuit with gloves and booties. Keep the block of spray away from your face by edging smoothly and lifting the board early.
Season safety: hypothermia is a real risk in freezing water, so keep moving between sets, pick a warm layering system, and limit total time on the water. In common cases, riders find that a quick rewarm between bouts helps performance and mood. Boating operations should stay within a safe speed and follow local rules to avoid added stress on riders.
Safety Protocols in Cold Water: Hypothermia Prevention, Rescue Procedures, and First Aid
We recommend wearing a drysuit or a full 4/3 wetsuit with booties and gloves before entering cold water to keep the core warm and reduce hypothermia risk.
Hypothermia prevention
- Check temperatures before tow day: temps and conditions on the lake determine needed protection. If temperatures are near or below 60°F (15°C), tighten your clothing layers and prepare for shorter sessions; at lower values, rely on a drysuit and insulated accessories.
- Choose the right gear: base layer, mid-layer insulation, and an outer shell; suits or drysuits must fit snugly without restricting movement. Ensure boots are sealed and gloves provide grip for handling rope and cable.
- Plan pre-tow safety: pre-tow checks include rope and cable inspection, knot integrity, and confirming the wedge and handles are secure; review spots and safe entry points here and at the left and right shore areas.
- Control exposure time: limit continuous immersion to 15–20 minutes depending on gear and skill; alternate with warm rests in a sheltered, heated spot or a vehicle when season demands it.
- Fuel and snacks: bring snacks and warm drinks for energy and warmth between runs; maintain steady energy to support body heat in cold conditions.
Rescue procedures
- Spotters must stand at ready: assign a left and a right observer to watch participants and communicate with the operator via the cable system.
- Respond to signs of distress: shivering that stops, numbness, confusion, or clumsiness indicates rapid cooling; the person must be moved to shore immediately.
- Use appropriate rescue tools: deploy a throwable flotation device or rope, and if needed, a reach tool or wedge to bring the rider into a safe zone without forcing movements into the water.
- Move to warm surroundings: once on land, remove wet clothing and wrap in dry clothing; apply blankets first to the trunk to protect the core, then arms and legs.
- Call for medical help when risk persists: tickets or course leaders should contact local emergency services if there is any concern about core temperature or altered mental status.
First aid and recovery
- Assess basics: check airway, breathing, and circulation for every participant; begin CPR if there is no pulse and no breathing, and there is no other responder ready to assist.
- Gradual rewarming: replace wet clothing with dry garments, place warm (not hot) blankets around the trunk, and use warm drinks if the person is fully conscious; avoid direct heat on limbs or chest.
- Monitor after rewarming: keep the person lying flat if possible, monitor the skin color and responsiveness, and observe for rewarming shock or sudden changes in condition.
- Document and learn: note what conditions and temperatures were present, what gear was used, and any differences between wetsuit and drysuit performance; share lessons in the next school or course so another group benefits.
- Return to activities with caution: once fully recovered and cleared by a supervisor, reassess ability to rejoin the course or resume water sports on the lake; if there is any doubt, pause and reassess before continuing.
Drills for Cold Weather: Balance, Edge Control, and Safe Exits
Plan a 2-hour cold-weather block with a checklist focused on balance, edge control, and safe exits. Dress in closed-toe wear and add warmers for hands and feet; bring a spare layer for transitions and stay hydrated. Have a buddy observe from shore and note cues that signal fatigue or technique drift.
Balance drills: on dry land or a calm shoreline, stand on a board or balance pad with feet shoulder-width apart, knees soft, and spine neutral. Hold 30 seconds, then transfer weight to the downhill edge for 5 seconds, back to center for 10, and repeat for 4 rounds. When you move to the water, maintain a quiet upper body and a steady gaze to reduce wobble, then add a light tow to feel the same load without rushing the turn.
Edge control drills: approach the wake with controlled speed and practice a deliberate carve from heel to toe, keeping hips over ankles and shoulders aligned with the skis. Do 3 sequences of 6–8 seconds each, focusing on smooth arc progression and finished edge hold. Include a wedge drill for beginners to reinforce early speed management, then progress to a fuller edge as balance improves.
Safe exits: after finishing a run, release the handle, tuck the chin, and push with the right foot to stand and clear the line. Step away from the wake toward a calmer, right-hand side if possible, using a 2-step motion to avoid entangling with lines or waves. Reference towers or buoys for spacing and keep eyes scanning for incoming chop so you can re-enter safely or call a break if needed.
For Dylan and everyone, adapt the field cues to conditions: free water, small waves, and moderate wind demand shorter, tighter drills, while calmer mornings allow longer holds and bigger edges. A stronger body and better balance come from consistent, progressive reps in this structure, turning a routine into solid readiness that stays practical in real water.