

 How to Take a Great Photo on a Boat – Pro Tips for Stunning Seascapes">

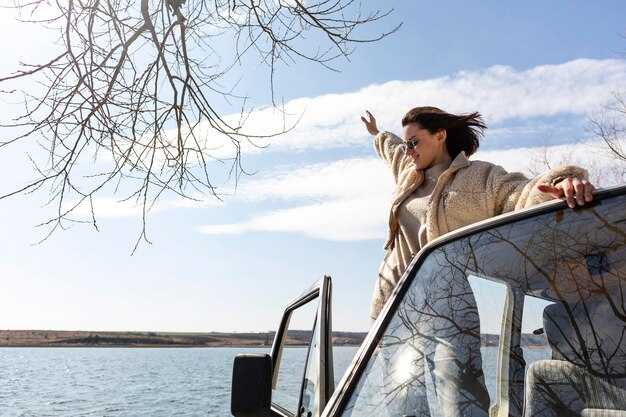
Η σταθερότητα στο κατάστρωμα είναι η πιο σημαντική.Τοποθετήστε τα πόδια σας στο άνοιγμα των ώμων, λυγίστε τα γόνατά σας και αφήστε τους αγκώνες σας να ακουμπήσουν στο σώμα σας. Σε αντίξοες συνθήκες, χρησιμοποιήστε ένα μονοπόδι ή στηριχτείτε σε μια ράγα για να κρατήσετε την κάμερα σταθερή. Για θαλασσπρέι και ρίψεις, αυξήστε το κλείστρο σε 1/1000s ή πιο γρήγορα για να καταγράψετε τις πιο καθαρές κυρτώσεις των κυμάτων. Εάν πέσει το φως, ρυθμίστε σε 1/500s αλλά στοχεύστε προς ταχύτερο ταχύτητες όταν οι κινήσεις επιταχύνονται.
Τεχνικές για εστίαση και πλαίσιο: αλλάξτε σε χειροκίνητη λειτουργία ή χρησιμοποιήστε single-point AF, εστιμώστε την εστίαση σε μια άκρη υψηλής αντίθεσης, στη συνέχεια ανασυνθέστε. Σε ένα σκάφος, η κίνηση του νερού δημιουργεί κινήσεις της σκηνής· προβλέψτε πού θα παρασυρθεί το σκάφος και ακολουθήστε το με την εστίασή σας. Εάν δεν μπορείτε να κλειδώσετε, αλλάξτε σε συνεχή AF σε έντονο φως, αλλά επιστρέψτε σε single-shot AF όταν εντοπίσετε έναν καθαρό, ανοιχτό ορίζοντα για να διατηρήσετε τη σκηνή ευκρινή. Δεν θα χάσετε τη στιγμή αν εξασκήσετε την παρακολούθηση και το χρονοδιάγραμμα.
Η σύνθεση έχει σημασία σε κάθε λήψη. Τοποθετήστε ένα στοιχείο πρώτου πλάνου (σχοινί, γρύλος ή σημαδούρα) για να προσθέσετε βάθος και να οδηγήσετε το βλέμμα στο σκηνή. Use contrast μεταξύ του σκοτεινού κύτους και του λευκού κύματος για να αναδείξει το θέμα. Διατηρήστε τους ορίζοντες οριζόντιους· μια λοξή γραμμή σπάει τον ρυθμό της εικόνας σε θυελλώδη θάλασσα και σταματάει το φωτογραφικός value of the frame. If you face a δύσκολος γωνία, κουνήστε το σώμα σας με την κλίση του σκάφους για να πλαισιώσετε σκούρα σιλουέτες καθώς ο ήλιος δύει και τα σύννεφα λάμπουν, μια στιγμή που μπορείτε να συλλάβετε με εξάσκηση και να δημιουργήσετε κάτι αξέχαστο.
Φωτισμός και έκθεση: Σε συνθήκες έντονου, μεσημεριανού συνθήκες, χρησιμοποιήστε έναν πολωτή για να μειώσετε τις αντανακλάσεις και να σκουρέψετε τον ουρανό· τραβήξτε σε χειροκίνητη λειτουργία ή aperture priority για να εξισορροπήσετε τη φωτεινότητα του ωκεανού. Χρησιμοποιήστε μια μικρή αντιστάθμιση έκθεσης (+/- 0.3 έως +0.7) για να διατηρήσετε τις λεπτομέρειες του νερού και να αποφύγετε την υπερέκθεση των φωτεινών σημείων. Καθώς το φως έρχεται και φεύγει, speed η σημασία της αντίδρασής σας; συνεχίστε speed και contrast στο μυαλό καθώς μετατοπίζεται το φως του ήλιου. Αν θέλετε ένα unforgettable σκηνή, να είστε έτοιμοι να πατήσετε το κλείστρο όταν το σκάφος γλιστράει από τη σκιά στο φως.
Ο χρονισμός κερδίζει την τύχη. σε ένα σκάφος. Παρακολουθήστε την ακολουθία του κινήσεις τόσο με ένα σπάσιμο κύματος και πυροβολήστε σε ριπές για να πιάσετε μια κορυφαία στιγμή. Χρησιμοποιήστε μια ταχύτερη λειτουργία ριπής εάν η κάμερά σας την προσφέρει· μια φωτογραφικός μια ακολουθία μπορεί να αποδώσει μια χούφτα καρέ όπου το ψεκασμένο είναι καθαρό και η υφή της επιφάνειας δείχνει βάθος. Στο δύσκολος φωτισμό, τραβήξτε μερικά καρέ σε έκθεση περιχαρακωμένο για να διατηρήσει την λεπτομέρεια τόσο σε έντονες λάμψεις όσο και σε σκιώδεις χαράδρες.
Safety and gearκρατήστε μια αδιάβροχη τσάντα για την κάμερα, στεγνώστε το φακό σας συχνά και consider ένα αδιάβροχο για ζώνες ψεκασμού. Χρησιμοποιήστε ένα καπάκι φακού για να τιθασεύσετε τις αντανακλάσεις και ξεπλύνετε τον εξοπλισμό μετά από κάθε συνεδρία για να αποφύγετε τη συσσώρευση αλατιού. Για μεγάλο, exhilarating sessions, plan your συνθήκες και να έχετε μαζί σας επιπλέον μπαταρίες για να αποφύγετε την απώλεια ισχύος κατά τη διάρκεια της διαδρομής· οι μπαταρίες μπορεί να αδειάσουν γρήγορα. Ένα ξεκάθαρο σχέδιο σας βοηθά να αποφύγετε να χάσετε την καλύτερη σας σκηνή στιγμές και διασφαλίζει ότι οι αναμνήσεις σας παραμένουν unforgettable.
Βήμα 2: Ρυθμίστε τις Ρυθμίσεις της Κάμεράς σας για Υπέροχες Θαλάσσιες Τοπιογραφίες
Ρυθμίστε την βασική έκθεση σε χειροκίνητη λειτουργία και ξεκινήστε με 1/1000 δευτερόλεπτα για να παγώσετε την κίνηση σε άγριες θάλασσες. Εάν ψεκασμός χτυπήσει τον φακό, αυξήστε το ISO σε 400–800 και διατηρήστε το f/8–f/11 για να διατηρήσετε τις λεπτομέρειες. Για μεταξένια νερά, σχεδιάστε να φωτογραφίσετε από μια σταθερή επιφάνεια στα 1/4–1/8 δευτερόλεπτα, χρησιμοποιώντας ένα μονοπόδι ή μια ράγα ως στήριγμα ενώ ακολουθείτε την κίνηση μέσω μιας σειράς πλαισίων. Αυτή η προσέγγιση βελτιώνει τις εικόνες σας και σας βοηθά να συγκρίνετε επιλογές αργότερα.
- Selecting exposure and ISO: In bright sun, use aperture around f/8–f/11 and ISO 100–400; shoot RAW to preserve detail; if you’re using a smartphone, enable Pro mode and capture DNG when possible; for mixed light, auto white balance is acceptable and can be tweaked later in post; this here helps keep color consistent across different scenes.
- Motion and focus: Use AF-C (continuous) with a tracking focus area; employ back-button focus to lock on the subject and recompose; for spray, use 1/1000–1/2000 s to freeze motion; for a trace of motion, try 1/250–1/500 s and pan slightly to show movement through the frame.
- Stability and grip: Everyone should tuck elbows down toward your torso and keep the camera close; brace against the boat rail or use a monopod; on smartphones, two-handed grip and chest support helps; waterproof housing protects gear from spray.
- Perspective and space: Explore different perspective angles to emphasize space and depth; shoot from knee height or lower to exaggerate waves; plan a quick succession of frames to capture the subject under changing light and waves.
- Equipment and protection: If you have rugged cameras or a waterproof housing, you’re better prepared for rough conditions; having a spare battery and memory card helps; smartphone users should enable Pro mode and keep the lens clean and dry.
- Post-process and workflow: Import images as RAW, check the histogram, and adjust white balance and highlights to keep water color natural; batch process similar frames for a cohesive look; store images with consistent metadata to simplify selection later.
White Balance on a Boat: Presets and Custom WB for Blues and Sunlit Water
Set the white balance to 5500K manually for most coastal, sunlit days to keep blues accurate and sunlit water balanced; shoot RAW to refine WB later and preserve multiple frames from the start, so you can compare options without losing detail.
On a boat, presets help you respond to changing light quickly. Use Auto WB as a baseline, then switch to Daylight (about 5200–5500K) when the sky is clear and the blue water reads true; Cloudy adds warmth for calmer days and more natural skin tones; Shade pushes more warmth for late afternoon light. For night scenes or the glow after sunset, Tungsten can cool the scene, but expect a cooler water cast. Work to stabilize WB across a sequence so colors stay harmonious as the deck moves and there are movements in the frame.
From the start, a custom WB method gives you the most control. Place a neutral gray card (or a clean white shirt) in open shade on deck and shoot a reference frame. In RAW, set WB to a target around 5500–6000K to keep blue water true while preserving the sunlit warmth. If a card isn’t available, use a bright gray area in the scene, then adjust WB in post to prevent casts on the water. This approach helps stabilize exposure and WB, especially when you switch between still life moments and sweeping seascapes.
To minimize shifts when the boat rocks, lock WB and exposure and shoot in a burst with a steady shutter, then pick the frames where the water and sky share a similar cast. A polarizing filter helps reduce glare and gives you more distinct blue tones, while keeping the sun’s shine on the surface. If you must shoot with limited reference, shoot a short sequence and fix WB in post; that saves space in editing and keeps the sequence coherent for a coastal shoot.
During sunset, temperatures swing and blues can look richer or cooler. Try WB around 6000K for a crisper, cooler water tone, or push toward 5200–5600K to enhance warmer skies while preserving blue water. For night, Auto WB with careful post adjustments works, but always keep a reference shot for continuity. Here, WB is a tool to shape the vastness of the sea and sky, not a fixed rule–the right preset or custom value lets you photograph them in calm, expansive moments, from ordinary to spontaneous, and then the shine appears.
Metering Modes: Evaluative vs Spot for Balanced Sky and Sea
Recommendation: Use Evaluative metering as your default on a boat for balanced sky and sea. Depending on the scene, this mode analyzes the frame and offers a reliable exposure for the blue water and the sunny sky, providing a solid photographic taking that serves their interests. The advantage is it adapts to dynamic light across the frame, so you can enjoy the moment without constant tweaks. If the sky becomes very bright or highlights on water look small and blown, switch to Spot metering to lock exposure on a precise area. Once you lock it, shoot a quick bracket or check the histogram to verify results.
On a moving vessel, stay prepared. Keep your gear handy, plant your feet securely, and stabilize against a rail or the deck. Always monitor the horizon and know your vantage: Evaluative handles a broad scene, Spot helps when a small bright area dominates. If you want to emphasize texture in the water or cloud patterns, use Spot on a small area and then return to Evaluative to resume balance. During shooting, shoot in RAW to preserve latitude, and check the histogram frequently to avoid clipping. If exposure pushes too far, the sky wont recover in post, so use exposure compensation as needed and keep your shots aligned with the light direction to make the best use of their photographic potential.
Practical scenarios and tips: In sunny conditions with very bright sky, start with Evaluative and apply -0.3 to -1 EV if the sky clips; in ordinary daylight you can stay near 0 to -1. For high-contrast moments, bracket across 2-3 frames to capture both sky detail and water texture. In blue-water scenes where interest lies in reflections, Spot metering on the sky can control glare while Evaluative preserves water tones. In scenes with limited dynamic range, Evaluative often balances tones, but bracketing remains a smart move to ensure you capture the full spectrum. Once you establish a reliable workflow, you’ll enjoy quick, repeatable results and a clean transition from sky to water across your sequence of shots.
Shutter Speed Tactics: Freezing Waves vs. Capturing Long Exposure Motion
Set your shutter speed to 1/1000s to freeze the most dynamic waves when the boat rocks. If light is limited by overcast weather, raise ISO to 1600–3200 and still preserve detail in spray, then adjust exposure to keep the depth in your photograph intact. Do this carefully to avoid blowing highlights and to maintain color; avoid taking careless frames and focus on the core motion. This approach yields crisp edges along foam and salt, enhancing the scene in a single frame.
For motion, switch to long exposure to capture smooth water and trailing spray. Start at 1/4s and move to 2s if the light permits; use a stable rail or a compact gimbal, and keep your feet planted to limit body rocking. A mindful technique helps avoid blur and yields a unique texture in the waves. If renting gear, be mindful about weight and balance.
Before you pick mode, check weather and scene: overcast can flatten contrast; bright sun may create glare; beware problems such as reflections off railings or a moving sail; then decide which approach will most enhance the scene and your photograph. In this article, you’ll find practical steps to apply at sea.
Gear note: renting a lightweight setup with minimal gear often pays off on a boat. Use a remote trigger for long exposures, secure your drinks and other items, and maintain a mindful stance to protect your body and your shot. Have a spare battery and a small memory card on hand to stay ready for changing conditions.
| Mode | Scenario | Shutter Speed | Tips |
|---|---|---|---|
| Freezing Waves | Rocking boat, spray visible | 1/1000s – 1/2000s | Plant feet, brace body; keep horizon level; shoot in bursts to lock crisp edges |
| Moderate Motion | Waves breaking softly, foam detail | 1/250s – 1/500s | Pan with movements; use a longer lens to compress depth; avoid rolling framing |
| Long Exposure | Silky water, light trails | 1s – 2s | ND filter optional; tripod or solid rail; remote shutter for stable capture |
Aperture Choices: Depth of Field for Horizon Details
Set aperture to f/11 as your default for horizon details; this high DOF keeps near white foam and the distant horizon sharp, offering a great sense of depth. Use hyperfocal distance at your focal length so youre not chasing focus on a moving boat, and the frame may move. If youre shooting wide and want more water texture, stop down to f/16; if light is tight, open to f/8 and compensate with ISO or shutter speed.
On overcast days, contrast drops; maintain edge-to-edge sharpness with f/11–f/16. To freeze spray and keep the horizon crisp, use shutter speeds in the range of 1/500–1/2000s εξαρτάται από τον άνεμο και το ύψος των κυμάτων. Εάν θέλετε πιο ομαλά νερά στο προσκήνιο, μπορείτε να βυθιστείτε σε 1/60s, αλλά θα χρειαστείτε μια σταθερή πλατφόρμα ή αδιάβροχο κάλυμμα και ένα α strap για να μην κινείται η κάμερα. Πειραματιστείτε με πολλαπλές ταχύτητες για να εξισορροπήσετε τη δράση και την ευκρίνεια του ορίζοντα. Όταν τραβάτε φωτογραφίες here σε πιο ήρεμες στιγμές, μπορείς ακόμα να στοχεύσεις σε έναν πιο καθαρό ορίζοντα.
Τεχνικές: open το φακό σε ένα ευρύτερο πλαίσιο αν θέλετε να τονίσετε τον ορίζοντα· χειροκίνητη εστίαση χρησιμοποιώντας ζωντανή προβολή, κάντε ζουμ στον ορίζοντα για να κλειδώσετε μια καθαρή γραμμή, στη συνέχεια ορίστε την υπεραπόσταση για τη εστιακή σας απόσταση. Αυτές οι τεχνικές σας βοηθούν να σχεδιάσετε τη λήψη και να διατηρήσετε τη συνέπεια των λεπτομερειών του ορίζοντα. Τραβήξτε multiple λήψεις με μικρές παραλλαγές στο διάφραγμα και στο ISO για να καλύψουν τη στιγμή. Στο editing, μπορείτε να εξισορροπήσετε white και μπλε αποχρώσεις για ένα φυσικό αποτέλεσμα.
Σημειώσεις εξοπλισμού: strap ασφαλίστε την κάμερα στο σώμα ή στη ράγα σας· χρησιμοποιήστε waterproof καλύμματα σκόνης ή ένα αδιάβροχο όταν το ψεκασμός εντείνεται· κρατήστε ένα μικροϊνών πανί πρόχειρο για να σκουπίσετε το αλάτι και το νερό από το φακό· ρυθμίστε setting για τον άνεμο και τη λάμψη, και να φέρετε μια εφεδρική μπαταρία.
Επόμενα βήματα: εξάσκηση κατά τη διάρκεια spontaneous στιγμές· αυτό το άρθρο here προσφέρει περισσότερα tips· δοκιμάστε ένα unique κοίτα με οριοθετώντας f/11 with different speeds, στη συνέχεια σύγκρινε σε editing. Είσαι έτοιμος να μετατρέψεις έναν απλό ορίζοντα σε κάτι memorable.
ISO και Θόρυβος: Διαχείριση του ISO σε Ένα Κινούμενο Σκάφος
Ορισμός Αυτόματης ISO με ανώτατο όριο 1600 και έναρξη με κλείστρο 1/1000s, διάφραγμα περίπου f/8 για να διατηρείται καθαρό το θέμα ενώ παγώνει ψεκασμούς. Στην μπλε ώρα, αυξήστε στα 3200 και προσαρμόστε για να διατηρηθεί ο έλεγχος των αναλύσεων. Αυτή η ισορροπία διατηρεί την λεπτομέρεια και ελαχιστοποιεί τον θόρυβο ενώ σας δίνει ένα καθαρό πλεονέκτημα στο θέμα καθώς το σκάφος κυλά.
Σταθεροποιήστε τοποθετώντας τους αγκώνες, χρησιμοποιώντας μια λωρίδα και κρατώντας την κάμερα κοντά στο σώμα σας. Σταθείτε με σταθερή στάση για να απορροφήσετε την συνεχή κίνηση και χρονομετρήστε την πίεση σας για τη στιγμή που το σκάφος γέρνει προς ένα κύμα. Μια μικρή κλίση προς την κατεύθυνση της κίνησης μειώνει στο ελάχιστο τον χρόνο αδράνειας· αποκτάτε καλύτερο έλεγχο και περισσότερο χώρο για να καταγράψετε καθαρό χρώμα και υφή.
Τα σημεία έχουν σημασία: Το Manual σας δίνει τον έλεγχο· το Shutter Priority λειτουργεί όταν μεταβάλλεται το φως. Εάν χρησιμοποιείτε Auto ISO, να έχετε υπόψη σας ένα όριο και να ρυθμίζετε την έκθεση με αντιστάθμιση έκθεσης ώστε ο ουρανός να μην ξεθωριάσει. Για μια ευρεία θέα, δοκιμάστε ένα μεγαλύτερο διάφραγμα με έναν μικρότερο κλείστρο· για μια ζωγραφική εμφάνιση, κάντε κίνηση μαζί με το σκάφος χρησιμοποιώντας μεγαλύτερο εστιακό μήκος.
Μετα-επεξεργασία: τραβήξτε RAW, συγκρίνετε καρέ σε ISO 400–800 και 1600–3200· επιλέξτε τη καλύτερη λήψη και εφαρμόστε μείωση θορύβου μόνο όπου χρειάζεται για να διατηρήσετε την υφή στο σπρέι και το ύφασμα στο θέμα. Μην υπερβάλετε με την εξομάλυνση· ενισχύστε τη λεπτομέρεια στις κόρες αφρού και τα πανιά. Διατηρήστε μια θέση παρατήρησης πάνω στο φως ώρας· αν το χάσετε, η επόμενη ώρα προσφέρει μια άλλη ευκαιρία να βελτιώσετε το χρώμα και τη διάθεση.