

 From Stern to Bow – A Complete Guide to Boat Parts">

Recommendation: Start with a focused checklist and inspect the mast first. For a beginner, this quick check helps you assess parts above and below the deck, and sets a baseline for the rest of the guide. On every vessel, the mast και keel anchor the system; inspect fittings, standing and running lines, and hardware for wear. Keep a small store of spare hardware on board to reduce downtime when something breaks.
Then map the parts by area: hull, deck, rigging, electrical, and propulsion. In various areas the parts behave differently, so documentation helps: for example, navigation gear sits above the dash, while the keel and rudder connect to the hull below. For a μικρό crew, keeping a compact inventory improves efficiency; depending on voyage length, you may carry extra fuses, spare bulbs, clamps, and a few fasteners.
Prioritize parts that provide everyday safety and basic function. For a vessel, the keel και mast are critical; check fasteners, bolts, cotter pins, and vital hose connections on a cadence that matches usage. Once you establish baseline wear, you can plan maintenance around the sailing season, and you’ll see improved navigation reliability. This wont take long to implement for most boats.
Keep a parts store organized and labeled. A simple approach: categorize parts by their location on the boat–above deck, midships, or below the waterline. This helps crew members find what they need fast, and reduces difficult decisions during a storm or quick repair. When you buy, consult trusted sources and record that information in your log; it makes future replacements straightforward, whether you order from a shop or a store.
Tailor the guide to your vessel’s needs. Depending on size and type, a μικρό sailboat differs from a larger motor vessel; this guide provides a framework for evaluating equipment, from stern to bow and from lines στο navigation electronics. Always begin with safety-critical systems and then expand to comfort parts; this structured approach keeps maintenance practical, and the crew confident on every voyage.
From Stern to Bow: A Practical Boat Parts Reference
Always verify the winches, halyards, and sheets before you take the helm to ensure smooth operation and safe tacking.
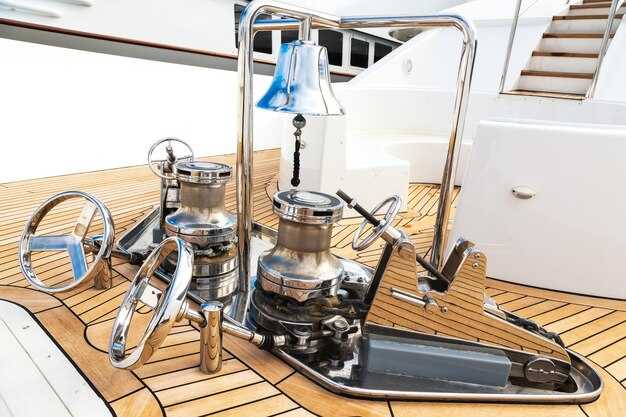
At the stern, the transom hosts the cleats, swim platform, and the self-bailing cockpit drain. Check the tiller or wheel alignment, inspect the rudder stock, and note the photo left showing the typical arrangement. A clean lazarette keeps spare parts handy for overnight stays, and an unforgettable difference when you need a quick fix.
Midship deck hardware powers your tacking and sailing: winches, cleats, blocks, traveler car, and the mainsheet system. Learn to adjust the main halyard tension with the winches to shape the sail. When tacking, make smooth, deliberate turns and stop the line at the cleat to secure it. Keep spare lines and gear stowed left in the cabin lockers for quick access.
Inside the cabin, the kitchen (galley) keeps fuel for cooking during a voyage. The bathroom (head) should be ventilated and dry, with a small mirror and cleaning supplies. Small, organized storage under bunks helps the crew sleep better by keeping gear out of the way, and it supports a curious, relaxed environment on long passages.
Foredeck and bow area: inspect the anchor chain, windlass, bow roller, and the hatch. Check the forestay, stays, and the headstay turnbuckle to prevent a surprise during a rough breeze. A simple photo sketch or checklist helps the skipper stay exact about what to test before every sail. whats critical: exactly verify that the anchor rode is not fouled and the chain locker stays dry.
This article serves as a practical guide you can reference before every voyage. It highlights the fundamental parts and practical checks that keep a boat predictable on the water. Learn from each trip, take notes, and build a routine that makes sleep more comfortable, the breeze steadier, and every voyage unforgettable.
Hull and Keel: Practical Inspection and Replacement Triggers
Inspect the hull and keel at the next docking and plan replacement if you find cracks, movement, or corrosion.
Key signs to check during the process include:
- Cracks in gelcoat or structural cracks along the keel root, with measurement of width and length to document changes.
- Delamination or soft spots in core material around the keel or hull interfaces that affect stiffness.
- Keel bolts showing corrosion, rounded heads, or looseness when you gently move the keel; treat any looseness as a replacement trigger.
- Visible water intrusion near the keel seam or hull bottom, including dampness in bilge or adjacent cabins; check after a splash or rain.
- Osmosis blistering on the hull surface, especially within the waterline zone; map the blistered area and monitor growth over time.
- Unusual swing, wobble, or play in the keel during handling or lifting; stop work and consult a yard if you detect movement beyond a small amount.
- Evidence that prior repairs failed and new issues emerged during docking or after rough seas; break in several spots is a clear alert.
- Moisture or damp spots in the bathroom or nearby interior areas that correlate with hull fittings or ballast movement.
Replacement triggers you should act on now include:
- Structural cracks wider than 0.25 inch (0.6 cm) or cracks that run across multiple seams.
- Keel bolts with advanced corrosion, signs of thread loss, or any detectable movement during a lift or manual check.
- Delamination with persistent moisture in the core despite repair attempts.
- Extensive osmosis blistering affecting a large portion of the hull or water intrusion that returns after resealing.
- Repeated repairs that fail within two seasons, indicating the backbone of the hull-keel assembly is compromised.
How to proceed, practically, to handle replacement:
- Document measurement data: capture keel bolt pattern, bolt length, and hull thickness; photographic records help when building a replacement plan.
- Coordinate with the boatyard; during the haul-out, use winches and lifting gear to stabilize the hull and avoid bending or twisting.
- Choose a keel option based on load, center of gravity, and hull design; ensure compatibility with existing foundations and fasteners.
- Follow torque specifications and rebed the keel shoes with fresh sealant; verify gaskets and shims are correctly positioned to prevent water ingress.
- After installation, perform a slow test load and inspect for any movement, water leakage, or misalignment; confirm the hull tracks true with no swing.
- Maintain a clear communication log with crew and yard staff; this involves sharing findings, decisions, and next steps to keep everyone aligned.
Practical tips to ensure ongoing reliability:
- Build a routine inspection cadence during docking and at seasonal transitions; good documentation supports current and future maintenance decisions.
- Communicate findings promptly to all stakeholders, including current crew and future owners; their input can highlight areas you may miss in solo checks.
- Learn basic handling checks you can perform safely on deck; use small measurements to flag changes before they escalate.
- During long waits between surveys, monitor the hull visually from the waterline and inside the cabin for any new damp spots or odours.
- Understand that prevention saves money: addressing minor signs early is far more manageable than repairing large breaks later.
Bottom line: a proactive, measurement-driven approach keeps the hull and keel functional and lets you handle larger tasks safely, effectively, and with confidence.
Deck Hardware: Fastening, Longevity, and Wear Checks
Always tighten deck fasteners to the manufacturer’s torque specs and replace any corroded fittings. The term deck hardware involves fastening, longevity, and wear checks, and it spans winches, cleats, padeyes, chainplates, fairleads, and anchor rollers that the crew rely on every day.
Fastening practice keeps the deck solid whether youre in a dinghy or at a spot with a breeze. When moving from the saloon to deck, perform a quick check on the most accessible fasteners. Use through-bolts with backing plates for deck-mounted items on boats with solid cores, and avoid thin-fastener layouts that crush soft decks. Apply marine-grade sealant between fittings and the deck, add a washer and a lock nut, and tighten to the printed torque. Clean and dry threads before the final pull; if a spec isn’t printed, log the need for professional guidance. These steps involve planning and time, and youre ready to enjoy smooth handling in wind and spray.
Longevity depends on material and environment. Use AISI 316L stainless for deck fittings in saltwater, bronze for fittings near the bow roller, and avoid mixing dissimilar metals without protective barriers. Expect 10–15 years from high-quality stainless fittings with regular inspection in temperate seas; chainplates and stanchions can reach 15–20 years if protected from crevice corrosion. Outdoor cycles, UV exposure, and heavy loads shorten life, so inspect more often in hot climates or near salt spray, and replace any pitted or cracked items promptly. Keep coatings intact and reapply marine-grade sealant every 2–4 years or after heavy seas.
Wear checks should become a routine part of every trip. Look for loosened fasteners, corrosion pits, thread wear, and bent or cracked fittings. Check depth of thread engagement, ensuring at least 1.5x the bolt diameter is engaged; if threads are damaged, replace the part and re-tap if allowed by deck material. Inspect backing plates for deformation, verify that locknuts still lock without spin, and test for deck movement by applying a firm hand twist. Inspect deck penetrations for water ingress; reseal as needed. Maintain a spare parts kit with common sizes so you can swap a part quickly and keep youre crew enjoying the voyage, especially after a long watch when fatigue lowers vigilance.
Planning and roles matter. Designate a lead for wear checks, keep a quick checklist, and assign a crew member to carry spare bolts, washers, and locking nuts. Do a fast walk-through at each dock or anchor spot, tagging parts that show wear and logging the torque and date. Whether youre on a dinghy or at the helm of a tall vessel, these habits protect depth of deck integrity and reduce repair time, letting you stay relaxed and focused on the breeze and the view.
Rigging and Control Lines: Selection, Tuning, and Common Fixes
Start with a concrete recommendation: choose braided polyester lines for halyards and sheets, sized by your boat length (under 30 ft: 3/16–1/4 in, 30–40 ft: 5/16 in, 40–50 ft: 3/8 in). Pair with nylon for downwind loads and reserve low-stretch options like Dyneema for critical control lines when weight saving matters. Add chafe protection at masthead, fairleads, and around blocks, and label each rope by function to stay abreast of what runs where on deck.
- Selection
- Materials: Polyester means low stretch and long life; Nylon cushions loads but stretches more; Dyneema/Spectra delivers very low stretch for high-load control lines.
- Construction: Braided lines resist snagging; kernmantle designs offer long run strength with a durable sheath. Reserve kernmantle for long runs where you must protect the core.
- End fittings and terminations: Favor stainless fittings and reliable knottings. Whipping and proper splices reduce unraveling after miles of use.
- Size guidance by boat length: under 30 ft 3/16–1/4 in; 30–40 ft 5/16 in; 40–50 ft 3/8 in. For fleets or larger ships, plan for slightly larger diameters to handle gusts and waves.
- Color coding and labeling: Distinguish halyards, sheets, and control lines at a glance to speed handling during busy days on water or holiday crossings.
- Rope vs line: Use rope for flexible runs where you need grip and ease of tying; reserve dedicated lines for anchoring and docking to prevent cross-use at the helm.
- Tuning
- Line routing: Keep lines away from sharp edges, and ensure fairleads are aligned to minimize friction. When a line sits on a winch, check contact points every few weeks to avoid wear.
- Halyard tension: Apply enough tension to remove sail wrinkles without overloading the mast hardware; verify tension with a wind shift and recheck after gusts.
- Sheets and control lines: Set fair lead angles to keep line stays near 15–25 degrees at the winch, reducing slip and heat. For downwind winds, a bit more bend helps control.
- Cleat and winch health: Inspect cam cleats and drum grooves. Clean corrosion and grease moving parts; replace worn components before a long passage.
- Interior and exterior coordination: Keep interior lines free of cargo and place spare rope in a dedicated reel or bag so you can grab it without slowing down for repairs.
- Common fixes
- Frayed rope at wear points: cut back to clean rope and re-terminate with a splice or whipping; replace if fray continues; this prevents sudden failure on deck.
- Chafe and abrasion: install protective sleeves or hose around lines where they contact hard edges; re-seal sleeves after seasons of use to keep moisture out.
- Δυσκίνητος ή κολλημένος εξοπλισμός: καθαρίστε τα μπλοκ και τους δίσκους, λιπάνετε τις περιοχές χαμηλού φορτίου και αντικαταστήστε τα φθαρμένα ρουλεμάν για να αποκαταστήσετε την ομαλή λειτουργία.
- Αδύνατα τερματικά: επανατερματίστε με σωστούς κόμπους ή αρμούς· βεβαιωθείτε ότι τα δακτυλήθρα παραμένουν άθικτα και τα άκρα των σχοινιών παραμένουν κρυμμένα και μαστιγωμένα.
- Αλλαγές στο φορτίο: προσθέστε επιπλέον μήκος σχοινιού όπου χρειάζεται και αποθηκεύστε εφεδρικό σχοινί στο εσωτερικό για γρήγορες επισκευές. Η διατήρηση ενός μικρού επιπλέον μήκους μπορεί να σώσει στιγμές όταν οι άνεμοι ενισχύονται και τα κύματα υψώνονται.
- Σχοινιά πρόσδεσης και αγκυροβολίας: ελέγξτε για γυάλισμα και αντικαταστήστε τα όταν παρατηρήσετε σημαντική φθορά. Η προσθήκη προστατευτικού περιβλήματος στα σημεία τριβής παρατείνει τη διάρκεια ζωής του σχοινιού κατά τη διάρκεια μακρών περιόδων στο λιμάνι ή στην αγκυροβολία.
Η εφαρμογή αυτών των πρακτικών βοηθά τους σκαφάτους να διατηρούν μια ασφαλή και αξιόπιστη αρματωσιά σε έναν στόλο σκαφών, από ένα μικρό γιοτ έως ένα μεγαλύτερο πλοίο. Με προσεκτική επιλογή και τακτικό συντονισμό, θα αντιμετωπίσετε το νερό, τα κύματα και τις ριπές με αυτοπεποίθηση, αφήνοντας περισσότερο χρόνο για να απολαύσετε κάθε αργία στη θάλασσα και να διατηρήσετε τις αλλαγές πληρώματος στο εσωτερικό ομαλές. Οι τακτικοί έλεγχοι, οι άμεσες διορθώσεις και οι σαφείς όροι για τους ρόλους των σχοινιών θα πρέπει να γίνουν μέρος της ρουτίνας σας, διασφαλίζοντας ότι η αρματωσιά σας παραμένει ισχυρή από το πρώτο μίλι μέχρι την τελευταία προβλήτα.
Στοιχεία Προώθησης και Πηδαλιουχίας: Ευθυγράμμιση, Συντήρηση και Αντιμετώπιση Προβλημάτων
Ευθυγραμμίστε τώρα τον άξονα προπέλας και τον σύνδεσμο διεύθυνσης: τοποθετήστε έναν χάρακα στις φλάντζες ζεύξης για να επαληθεύσετε την πραγματική ευθυγράμμιση της επιφάνειας. Εάν είναι ορατή η κακή ευθυγράμμιση, χαλαρώστε ελαφρώς τα μπουλόνια, μετατοπίστε τα εξαρτήματα σε μικρές αυξήσεις και σφίξτε ξανά με σταυρωτό μοτίβο. Αυτό το περιθώριο προσαρμογής διατηρεί το σύστημα μετάδοσης κίνησης ευθυγραμμισμένο για κάθε ιστιοφόρο σκάφος και μειώνει τους κραδασμούς που αισθάνονται οι σκαφάτοι στο σκάφος.
Η συντήρηση περιλαμβάνει την προστασία του στυπιοθλίπτη, τη λίπανση του άξονα του πηδαλίου και τον καθαρισμό των επιφανειών μετά από κάθε ταξίδι. Αφού ξεπλύνετε το αλάτι από την περιοχή της πρύμνης, εφαρμόστε ελαφρύ θαλάσσιο γράσο στον άξονα της προπέλας και στα ρουλεμάν. Διατηρείτε ένα μικρό κιτ μπάνιου στο σκάφος για γρήγορο καθαρισμό διαρροών και για την αποθήκευση κουρελιών και καθαριστικού. Ελέγχετε τα σχοινιά και τις γραμμές κοντά για να παραμένουν τοποθετημένα μακριά από κινούμενα μέρη. Αντικαταστήστε τη στεγανοποίηση σύμφωνα με το σχέδιο του σκάφους, συνήθως μία φορά ανά σεζόν ή μετά τις πρώτες 200 ώρες λειτουργίας.
Σενάρια αντιμετώπισης προβλημάτων: εάν αντιμετωπίζετε δυσκολία στο χειρισμό, ελέγξτε τη θέση του πηδαλίου και την ευθυγράμμιση της επιφάνειας και επιθεωρήστε τη δεξιά ζεύξη και τις υδραυλικές γραμμές για τσακίσματα ή διαρροές. Ακούστε για τρίξιμο ή θόρυβο από το κιβώτιο ταχυτήτων. Σε δύσκολες καταστάσεις, δώστε μια ήρεμη εντολή, ακολουθήστε το σχέδιο, καθοδηγήστε το πλήρωμα για να επανελέγξει τα εξαρτήματα και δοκιμάστε σε μια σύντομη, ασφαλή διαδρομή. Εάν η λειτουργία παραμένει δύσκαμπτη, σταματήστε και συμβουλευτείτε έναν επαγγελματία.
Σχεδιάζοντας για κοινές καταστάσεις εν πλω, κρατήστε ένα συμπαγές οδηγό στο κατάστρωμα που να καλύπτει ελέγχους, λίστα εργαλείων και βήμα-βήμα ενέργειες. Συμπεριλάβετε μια απλή ροή: αξιολόγηση, ρύθμιση, επαναευθυγράμμιση, δοκιμαστική διαδρομή. Εάν τα προβλήματα επιμένουν, απευθυνθείτε σε έναν επαγγελματία. Εμπλέξτε έναν φίλο ή μέλος του πληρώματος, ακολουθείτε πάντα τους κανόνες ασφαλείας και δώστε το καλό παράδειγμα για να προσφέρετε μια καλύτερη εμπειρία πλεύσης σε σκάφη και ναυτικούς.
Ηλεκτρικά Συστήματα και Διάταξη Μπαταρίας: Ασφαλείς Πρακτικές Καλωδίωσης
Εγκαταστήστε έναν ειδικό πίνακα διανομής μπαταρίας με σαφώς επισημασμένα κυκλώματα και έναν κύριο διακόπτη για να συγκεντρώσετε τον έλεγχο και να αποτρέψετε την χαοτική εξάπλωση των γραμμών.
Δρομολογήστε τα χειριστήρια και τα καλώδια ρεύματος μέσω προστατευμένων σωλήνων κατά μήκος των διαφραγμάτων, διατηρώντας θετικές και αρνητικές διαδρομές μαζί και μακριά από τις τροχιές του μαΐστρου. Σχεδιάστε περιοχές όπως το σαλόνι, το πιλοτήριο και τις κουκέτες έτσι ώστε τα καλώδια να μην εμποδίζουν την κίνηση ή τις πόρτες, ειδικά όταν τα κύματα σπρώχνουν το πλοίο. Βεβαιωθείτε ότι η δρομολόγηση διευκολύνει την καλή ορατότητα των ετικετών και των διακοπτών, επιτρέποντας γρήγορους ελέγχους χωρίς να απαιτείται υπερβολικός χρόνος κατά τη διάρκεια μιας θαλάσσιας δοκιμής ή σε κακοκαιρία.
Επιλέξτε αγωγούς ναυτικού τύπου με επιστρωμένο χαλκό και μόνωση κατάλληλη για θερμότητα και κραδασμούς. Χρησιμοποιήστε τις κατάλληλες κλέμες, τα καουτσούκ και την εκτόνωση καταπόνησης. Μην εκθέτετε τους αγωγούς σε επιφανειακά πάνελ όπου μπορεί να πιτσιλίσουν τα κύματα. στερεώστε τους σε προστατευμένες διαδρομές και ασφαλίστε τα σημεία εισόδου στο διάφραγμα. Μια τακτοποιημένη εγκατάσταση διευκολύνει τη συντήρηση και μειώνει την πιθανότητα βραχυκυκλώματος που θα μπορούσε να θέσει εκτός λειτουργίας κρίσιμα συστήματα σε μια κρίσιμη στιγμή.
Τοποθετήστε τη κύρια συστοιχία μπαταριών σε αεριζόμενο χώρο αποθήκευσης προς το κέντρο του σκάφους, μακριά από κουκέτες και χώρους διαμονής. Χρησιμοποιήστε έναν πίνακα διανομής τοποθετημένο κοντά στη σκάλα εισόδου και κρατήστε τις κύριες γραμμές σύντομες για να ελαχιστοποιήσετε την πτώση τάσης και την αντίσταση λειτουργίας. Επιλέξτε τον κύριο αποζεύκτη ώστε να αντέχει τουλάχιστον το 125% του μέγιστου συνεχούς φορτίου για να επιτρέψει την ασφαλή απομόνωση σε περίπτωση έκτακτης ανάγκης.
Προστατεύστε κάθε κλάδο κυκλώματος με μια ασφάλεια ή διακόπτη κατάλληλης ονομαστικής τιμής και τοποθετήστε τη συσκευή προστασίας κοντά στην μπαταρία, σε απόσταση 1,5 μέτρων. Επισημάνετε κάθε κύκλωμα με ετικέτες υψηλής ορατότητας για να βελτιώσετε την ορατότητα σε συνθήκες χαμηλού φωτισμού. Χρησιμοποιήστε μια αποκλειστική αρνητική διαδρομή επιστροφής για να μειώσετε τον θόρυβο και να αποφύγετε κοινούς ακροδέκτες που μπορεί να γίνουν χαοτικοί υπό έντονη χρήση, ειδικά όταν πλέετε με λέμβο ή βοηθητικό εξοπλισμό σε λειτουργία.
Η επιλογή επικεντρώνεται στην ημερήσια κατανάλωση και στο απόθεμα. Για πολλά σκάφη, ένα σύστημα 12V με συστοιχία 100–150 Ah καλύπτει τον φωτισμό, την πλοήγηση και τις επικοινωνίες. προσθέστε μια συστοιχία 200–300 Ah εάν χρησιμοποιείτε τακτικά έναν μετατροπέα για σύντομα χρονικά διαστήματα. Για μεγαλύτερα σκάφη ή μεγαλύτερα ταξίδια, μια διαμόρφωση 24V μπορεί να μειώσει το ρεύμα και τη θερμότητα, με το LiFePO4 να προσφέρει μακροζωία και ασφαλή φόρτιση εάν συνδυαστεί με ένα κατάλληλο BMS. Να σχεδιάζετε πάντα για τουλάχιστον δύο ημέρες αυτονομίας στα βασικά φορτία και να λαμβάνετε υπόψη τις μέγιστες καταναλώσεις από το βαρούλκο της μαΐστρας, τον αυτόματο πιλότο ή τον χαρτογράφο κατά τη διάρκεια θαλασσοταραχής.
Κατά τη λειτουργία, βεβαιωθείτε ότι η καλωδίωση δεν αιωρείται ή τρίβεται σε κινούμενα μέρη. Αποφύγετε την παρεμβολή των γραμμών στις ράγες της μαΐστρας, τα βίντσια ή τα καλώδια διεύθυνσης. Χρησιμοποιήστε μονωτικά δακτυλίους στα ανοίγματα και ασφαλίστε τα καλώδια στα διαφράγματα με δεματικά και σφιγκτήρες, αποτρέποντας την τυχαία επαφή με κραδασμούς ή υγρασία. Διατηρήστε καθαρή την πρόσβαση στην επιφάνεια του πίνακα ελέγχου, ώστε το πλήρωμα να μπορεί να ενεργήσει γρήγορα και να πραγματοποιεί περιοδικούς ελέγχους για να επιβεβαιώσει τη συνέχεια, τη μόνωση και την ακεραιότητα των ασφαλειών. Μια ελεγχόμενη, καλά τεκμηριωμένη διάταξη μειώνει τον κίνδυνο όταν προκύπτουν έκτακτες ανάγκες και καθιστά τους συνήθεις ελέγχους απλούς για οποιοδήποτε πλήρωμα στο πλοίο.
Η συχνότητα συντήρησης έχει σημασία: επιθεωρείτε τους ακροδέκτες για διάβρωση κάθε εποχή, σφίγγετε τις συνδέσεις σύμφωνα με τις προδιαγραφές ροπής του κατασκευαστή και βεβαιωθείτε ότι τα προστατευτικά καλύμματα παραμένουν άθικτα. Διατηρείτε εφεδρικά ασφάλεια, ακροδέκτες και ένα μικρό κιτ καλωδίων ναυτικού τύπου στο σαλόνι ή σε ένα ειδικό ντουλάπι για να επιταχύνετε τις επισκευές στην προβλήτα ή όταν αλλάζουν τα σχέδια – ειδικά μετά από ένα μακρύ ταξίδι ή όταν αποθηκεύετε μια βοηθητική λέμβο μετά την πρόσδεση.
| Περιοχή Κυκλώματος | Φόρτωση (A) | Μήκος διαδρομής (m) | Μετρητής Καλωδίου | Προστασία (Α) | Σημειώσεις |
|---|---|---|---|---|---|
| Φωτισμός & πρίζες σαλούν | 4 | 5 | 16 AWG | 10 | Αποσυνδεδεμένο· διατηρείται ξεχωριστά από τα κυκλώματα του κινητήρα |
| Φώτα ναυσιπλοΐας | 2 | 4 | 18 AWG | 5 | Κρίσιμη για ορατότητα· διαδρομή κοντά στην γάστρα |
| Bilge pump | 8 | 6 | 14 AWG | 15 | Αυτόματος πλωτηροδιακόπτης· διατηρείστε το αρνητικό κοινό |
| VHF radio | 3 | 2 | 14 AWG | 5 | Διατηρήστε την εκτέλεση όσο το δυνατόν συντομότερη |
| GPS/Plotter & ηλεκτρονικά | 4 | 3 | 18-16 AWG | 10 | Αποκλειστικό κύκλωμα διακλάδωσης |
| Εξοπλισμός καταστρώματος μαΐστρας | 5 | 4 | 16 AWG | 15 | Προστασία από σταγονίδια νερού· σύντομες διαδρομές |
| Φορτιστής λέμβου | 4 | 2 | 16 AWG | 5 | Απομονωμένο από κρίσιμα φορτία |
| Μίζα κινητήρα | 40 | 2 | 2/0 AWG | 100 | Προστασία κοντά στην μπαταρία· μεγάλο μήκος καλωδίου βαρέως τύπου |