

 Top 10 Paddleboard Safety Tips to Follow for a Safe Ride">

Prüfen Sie die Vorhersage, die Windgeschwindigkeit und die Temperatur, bevor Sie auf das Brett steigen. Ein kurzer Blick auf die Felsen am Ufer und eine Küstenkarte hilft Ihnen, Strömungen zu lesen und eine sichere Route mit Ihrer Gruppe und Ihren Freunden zu wählen.
Stehen Sie mit einer starken Haltung: Füße schulterbreit auseinander, Knie leicht gebeugt, Hüfte quadratisch, Rumpf angespannt; dies bewahrt die Stabilität und stärkt die Bein- und Rückenmuskulatur. Eine Experte check bedeutet, einen Mitpaddler einzuladen, deine Technik zu beobachten und sicherzustellen communication Flüsse, die Gruppe koordiniert hält und die Sitzung glättet, wodurch jeder Paddleboarder selbstbewusster wird.
In offenem Wasser ist eine vorbereitete Haltung beizubehalten, nach Gefahren wie Felsen, Treibgut oder flachen Bereichen Ausschau zu halten und die Gruppe im Blick zu behalten. Wenn sie neu in der Sportart sind, sollten sie sich mit einem Freund zusammentun und das Drehen und Abfangen üben, bevor sie der Route weiter folgen.
Tragen Sie eine gut sitzende persönliche Schwimmweste, befestigen Sie eine Leine am Brett und haben Sie eine Pfeife dabei; diese Maßnahmen erhöhen die Sichtbarkeit und die Bergungsoptionen, insbesondere in der Nähe von Küstenbrechern oder Felsen.
Diese article umreißt die nächsten Schritte: Routenplanung, Übungen im offenen Wasser und Partnerkontrollen, mit konkreten Zahlen und Bedingungen, auf die man achten muss.
Überwachen Sie die Temperatur von Luft und Wasser während des Fortschritts; wenn kalte Winde aufkommen, verkürzen Sie die Sitzung und wechseln Sie in eine geschützte Bucht, die die Stabilität erhält und einen schnellen Rückzug bei Erscheinen von Müdigkeit ermöglicht.
Top Paddleboard Sicherheitstipps für eine sichere Fahrt
Tragen Sie immer eine Leine und ein PFD, und halten Sie es wasserdicht phone in einem versiegelten Koffer in greifbarer Nähe.
Die meisten Vorfälle beinhalten both beginners and surfers die unterschätzen Ströme und winds; Überprüfen Sie die Wasserbedingungen, bevor Sie eintreten, bleiben Sie anfänglich innerhalb von 50–100 Metern vom Ufer.
Benutze eine stabile, tiefe Haltung: Füsse schulterbreit auseinander, Knie gebeugt, Knöchel alignment.
Geschwindigkeit wird durch Drehung des Schlägers gesteuert; lenken durch Anwinkeln; das Stoppen üben durch Schwungschläge; das lets Sie passen an speed schnell, wenn ein Hindernis auftaucht.
Equipment check: Leine, Flossen, Pfeife, wasserdichte Tasche; usually führen Sie einen 2-minütigen Rundgang durch die Ausrüstung durch.
Wetter und Wasserbewusstsein: überwachen Ströme, Böen und Wellenhöhe; meiden Sie Gebiete mit schneller Strömung oberhalb von 3-4 Knoten oder Winden oberhalb von 20 mph; sagen Sie sich selbst, dass Sie sich zurückziehen sollten, wenn sich die Bedingungen ändern. Diese Lernkurve kann increase confidence und strong balance.
Halte einen Partner in Sichtweite; signalisiere mit einer Pfeife; wenn Probleme auftreten, verwende deine phone um Hilfe zu rufen.
Persönliche Schutzausrüstung: Schwimmweste, Leine und wettergerechte Kleidung
Tragen Sie eine von der Coast Guard zugelassene PFD unmittelbar vor dem Betreten des Wassers, und festziehen die Gürtel und Schultergurte, damit die Weste flach an Ihrer Brust sitzt; eine bequeme PFD minimiert Flotationverlust während der Immersion.
Befestigen Sie eine Leine an Ihrem Knöchel und am Fluggerät; halten Sie die Schlange eng und außerhalb Ihres Körpers; in der Nähe von Kais oder sheltered Wasser, stellen Sie sicher, dass die Leinenlänge Sie im Falle eines Sturzes stets in Armescherung hält.
Wetterangepasste Kleidung bedeutet Schichten: eine feuchtigkeitstransportierende Basis-Schicht, eine isolierende Zwischen-Schicht und eine winddichte Außenschale; bei kaltem Wasser fügen Sie einen Neoprenanzug oder Trockenanzug mit Überschuhen hinzu; an sonnigen Tagen tragen Sie ein UV-schützendes Hemd, eine Kappe und Sonnencreme.
Bevor Sie losfahren, prüfen Sie die Wettervorhersage, die Gezeiten und Strömungen; wählen Sie Routen, die in der Nähe bleiben. sheltered Wasser bei Bedarf; erstellen Sie einen Plan mit einem heading in Richtung eines bekannten Wahrzeichens und einem realistischen Zeitplan zur Rückkehr.
Das Stehen hilft, das Gleichgewicht bei unruhigem Wasser zu halten; ; staying calm matters: an Experte paddler uses a smooth, controlled stroke um die Ausrichtung des Körpers zu erhalten; improved Stabilität entsteht durch ruhiges Atmen und einen gleichmäßigen Rhythmus; wenn Probleme auftreten, steuere auf das Ufer zu und fasse dich wieder.
Packen Sie wichtige Gegenstände um Ihren Gürtel: Wasser, Snack, Pfeife, eine Ersatzleine und ein kompaktes Reparaturset; eine wasserdichte Tasche schützt Elektronik und persönliche Gegenstände.
Innerhalb von Paddlezone-Kreisen vergleichen Paddler und Kajakfahrer Ausrüstung, Wetterpläne und Kursauswahl; sie teilen Strategien zur Anpassung und wissen, wann sie sich zurückziehen müssen; das Erkennen der Signale Ihres Körpers und das Bleiben bei anderen reduziert das Risiko, wenn sich die Bedingungen ändern.
Pre-Paddle Checks: Wetter, Wasserbedingungen und Gezeiten
Überprüfen Sie die Wind-, Strom- und Gezeitenfenster 60–90 Minuten vor dem Start. Die Vorbereitung beginnt gut im Voraus; ein starker Start erhöht die Stabilität und das Selbstvertrauen auf einem aufblasbaren Deck, wie ruhiges Wasser – eine perfekte Bedingung für Anfänger.
-
Wetter und Wind: Verwenden Sie zwei Quellen – lokale Wettervorhersage und Live-Winddaten. Wenn der anhaltende Wind 15 mph (24 km/h) überschreitet oder Böen 20 mph (32 km/h) erreichen, verschieben Sie den Termin. Normalerweise treten ruhige Zeitfenster früh am Morgen oder spät am Nachmittag auf; wählen Sie eines, das dem Können von Anfängern entspricht. Ein sanfter, gut getakteter Start hilft Ihnen, in der Nähe eines nahegelegenen Ausgangs zu bleiben, wodurch Drift und Risiko reduziert werden. Wenn der Wind später am Tag nachlässt, überprüfen Sie erneut Wellen und Strömungen, um die kontinuierliche Eignung zu bestätigen.
-
Currents and waves: Inspect currents near entry points and narrows; currents above about 1.5 mph (0.7 m/s) can push you offline on an inflatable platform. If waves reach 0.4–0.6 m (1.3–2 ft), delay. In choppy conditions, stay shallow until balance and technique improve; wearing a life jacket improves staying power in rough water.
-
Tides and route planning: Check local tide tables. A rising tide can widen channels while a drop may expose hazards near shoals. Pick a route that stays within sight of shore and nearby landmarks; choose an exit point aligned with the tide to increase your margin of error and staying options later in the session.
-
Equipment and setup: Inspect deck area, waterproof bag, leash, and pump. Ensure inflation pressure matches maker guidance, verify deck pad integrity, and confirm waterproof protection for devices. Have a spare leash, a small repair kit, and a life jacket fastened before heading out. youll also confirm hydration levels and physical readiness, staying well fueled to support balance and reaction time. If conditions change, wont hesitate to shorten the session.
-
Advice and routine: Put a simple plan in place–identify nearby shorelines, know how to signal for help, and keep a buddy within shouting distance. A quick waterproof check of equipment and a route backup increases confidence and reduces risk; this advice helps you stay calm even when wind or currents shift.
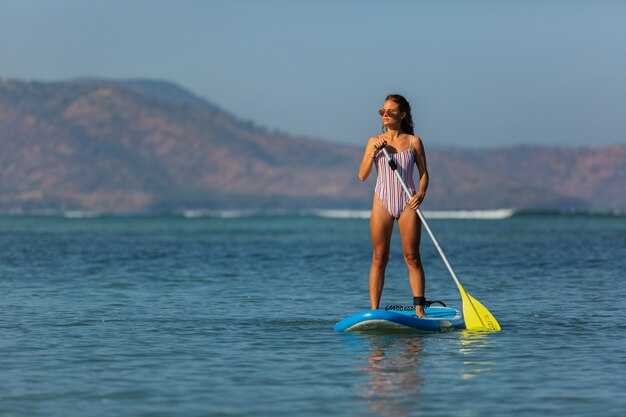
Board and Gear Setup: Correct Rail Contact, Paddle Length, and Leash Use
Set paddle length at approximately your height plus 20–30 cm to ensure a clean, efficient stroke and smoother recovery.
Stand with feet shoulder-width apart, knees soft, hips centered over the midline; press your outside rail lightly to maintain contact between edge and board, keeping shoulders squared toward your heading.
Attach leash to ankle and choose 6–8 ft length in sheltered zones; in currents or wind, step up to 8–10 ft; secure strap, avoid twists, and verify the leash is clear of line twists before each session.
Preparation includes dry-land checks, a light warmup, and a sheltered-water test to dial in balance; gradually increase exposure as learning progresses, since changes in stance, weight, and paddle angle will come with time and confidence.
Use a simple system: stand tall, lock rail contact, angle the blade about 10–15 degrees to your heading, and maintain a smooth stroke with full recovery; perform the motion properly and keep contact consistent, and Talking cues help you stay in rhythm.
However, if you notice fatigue in specific muscles or a wobble in your hips, cut the session short, head to sheltered waters, and practice slow, controlled reps until your technique remains even; this yields easier transitions between strokes.
More experienced paddlers tune their setup by adjusting stance width, fine-tuning paddle length within recommended ranges, and practicing a steady, reliable stroke in currents; this builds muscle memory, confidence, and potential to handle tougher conditions. Roots of balance lie in preparation, discipline, and good habits, and you yourself can drive this progress with steady practice, gradually building strength and impeccably timed movements; theyyll grow more capable as your system consolidates, and heading becomes more intuitive, with better stroke control and less waste energy.
Entry, Exit, and Self-Rescue: Safe Mount, Dismount, and Re-Entry Steps
Begin with a quick craft check: no broken parts, seals intact, leash attached, fin secure, and a clear landing zone away from rocks. Note water and air temperature to gauge exposure risk, and adjust layers accordingly.
Entry prep: place the board in calm water near open access to a shallow edge. Stand with feet shoulder width, knees soft, hips squared, gaze forward. Place the leading hand on the nose rail and the other on the paddle, then step the leading knee onto the deck and shift weight to rise to a stable stance. Boarder stability matters; theyyll adjust stance with practice. If help is available from land, let them steady the board as you begin.
Dismount: reverse the sequence with control. Bend the knees, lower the trailing knee to the surface, pivot away from the edge, and step onto land. If the shore is rocky, aim for sand or mud; avoid abrupt slides toward the rocks to stay balanced.
Self-rescue: if you tumble, stay calm, reach for the board, grab the leash, and kick toward the center to return within reach. Roll to a belly position, press up on the rails, then stand and resume paddling. In crowded waterways, give space to others and signal for help Regeln: - Geben Sie AUSSCHLIESSLICH die Übersetzung an, keine Erklärungen - Behalten Sie den ursprünglichen Ton und Stil bei - Behalten Sie Formatierung und Zeilenumbrüche bei, wenn nötig.
Practice plan: run these sessions on flat water or in gentle river sections. These sessions offer improved balance and quicker re-entry, reducing fatigue during real trips. These drills can be repeated in sessions; theyyll reduce risk during unexpected current changes. Carry a compact repair kit and a dry bag, monitor temperature, and stay within your ages and abilities while keeping open access to shore. In challenging conditions, stay near land, keep a low stance, and move next to a safe area when tired. These routines are essential to handling currents and maintaining control in the sport, especially when weather shifts or water levels change.
Core Engagement: 9 Techniques for Stable Paddling
Technique 1: Core brace and stable stance Begin by bracing the midsection and establishing a symmetrical stance: feet shoulder-width apart, knees slightly bent, weight centered over the board. This setup gives immediate stability and makes each stroke smoother, plus it reduces the chance of sudden wobble when watercraft wake passes. Here, the boarder feels control, and even ages or first-timers gain confidence to keep paddling without falling.
Technique 2: Hip-to-torso rotation on every stroke Initiate movement from the hips, then drive through the torso while keeping the core braced. This method transfers power efficiently and keeps the craft level, reducing the chance of falling when currents shift. Alternate sides to sustain a straight course, a staple habit among surfers and watercraft enthusiasts alike.
Technique 3: Look ahead, not down, to keep balance Direct the gaze to a fixed point on the horizon here, whenever possible. A steady sightline maintains a stable spine and helps anticipate turns or subtle shifts in the water. This advice helps the boarder stay balanced and reduces drift, enhancing endurance during longer sessions.
Technique 4: Even weight distribution and small ankle adjustments Keep weight centered and distribute pressure across both feet; avoid leaning into a single edge. Micro-movements of the ankles help you modulate tilt on a calm lake or in light chop, reducing the risk of falling. This balance approach contributes to a smoother glide and longer endurance.
Technique 5: Cadence rhythm and alternate-side strokes Establish a consistent cadence: short, controlled strokes on the inside edge during turns, then longer strokes to drive straight lines. Alternating sides evenly keeps the craft tracking true, makes turning predictable, and prevents uneven wear on the shoulders. This approach builds skills across ages and levels.
Technique 6: Breathing and lung endurance Inhale through the nose, exhale through the mouth in a steady rhythm. Controlled breath supports long sessions and reduces fatigue during windy conditions. A relaxed jaw and shoulders keep you from tensing, which contributes to steadier tracking.
Technique 7: Adapting to colder water and shifting conditions In colder lakes, wear a jacket or thermal layer; buoyancy helps, yet movement matters more. Monitor water temperature and current; watch for sudden gusts or chop. When that happens, shorten strokes and drop hips to lower center of gravity. Awareness here plus practice builds endurance across ages.
Technique 8: Pre-ride checking and gear readiness Inspect the watercraft, leash, and paddle before stepping on water; verify fin alignment if applicable. Check the jacket and apparel for proper fit, and confirm the leash is secured. These checks reduce mishaps when wind shifts and watercraft pass by, especially along lake shorelines with traffic and rowers.
Technique 9: Situational awareness and clear signals Maintain awareness of boarders, surfers, and other watercraft in the area; use a light, predictable turn when crossing paths. Verbal signals or visible gestures help prevent collisions and protect beginners in mixed conditions. Their presence adds confidence as crowd activity increases.