

 How to Anchor a Dinghy – A Step-by-Step Guide to Safe Mooring">

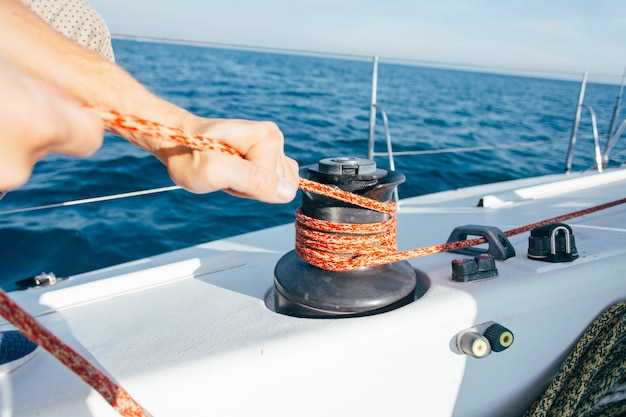
Place a buoy ball on one line and secure two ropes to the bow and stern cleats; done before conditions worsen.
Knowing your capacity and water depth helps you choose line length and slack to counteract wind and current; lines placed through the bow cleat and through the stern cleat provide stable control, with a controlled lead to a fixed point.
On occasion when near shore, test tension by gently hauling the lines; when wind gets stronger, this sets the boat’s position tight enough to reduce drift without stressing hardware.
Even if your craft is a kayak, apply the same principle: keep lines parallel to the water, use a ball on the line to mark the position, and avoid the line running free in waves and wakes.
In local harbours, follow the description from the harbor master; a note from john says starting with a short line from the bow, a longer line from the stern, and a third to a permitted point if allowed; some setups exist, but this one is simple, reduces risk, and saves money.
short checks: ensure the ropes pass through fairleads cleanly, keep the lines free of knots, and confirm the ball remains free to ride with water movement; nothing has gotten loose, this lowers risk and makes post-docking checks faster.
Anchor a Dinghy: Practical Mooring Techniques and Etiquette
Ever-present risk of drift demands disciplined handling; use robust anchoring gear with a kellet and keep a spare line folded neatly on deck for rapid deployment. Excellent control starts with planning, proper weight and length of line, and readiness for a period of unsettled weather.
Assess the area before deploying: coast exposure, wind direction, and current. In marina slots or along the coast, select a spot with adequate shelter and space to avoid swinging into other vessels. If a kayak or other craft is nearby, give them a wide berth and communicate your plan if possible.
- Prepare lines and hardware: attach a lanyard to a prominent deck cleat; run two warps to bow and stern cleats; keep any extra line folded and stowed to prevent trips; ensure the line isn’t stretchy beyond control so it doesn’t spring loose.
- Deploy and weight: lower the line with a kellet or a bucket filled with stones as a temporary counterweight in case a proper weight isn’t available; keep the weight low and central to counteract lift and to prevent the rode from snagging on the hull.
- Set depth and length: aim for 5–7 times the depth in metres as a baseline, and add 2–3 metres for gusts and tidal changes; verify the height of the line above the water to ensure it won’t snag on fittings or chafe.
- Secure and tidy: pull the line snug but avoid excessive tension; this will help keep the craft stable; stow the outboard and life jackets so they don’t interfere with the lines; keep fenders ready and the area clear, especially for a busy marina afternoon when hours of traffic are likely.
- Etiquette in practice: join local rules and marina etiquette; give space to yachts and other vessels; if someone is really struggling with their lines, offer help only when asked; spend time learning the harbor flow and signals, and keep noise to a minimum to respect neighbors.
Retrieval and inspection: when you went back to shore, pulled the line slowly to avoid jarring the boat; inspect the kellet, stones, and warps for wear; rinse the lines and store them in a dry bucket or locker; if the slip is empty, maintain an orderly setup so you’re ready to deploy again; a likely risk is line fatigue from repeated use, so replace any component that shows wear.
Choose the Right Anchor and Ideal Rode Length
Start with a holding weight featuring broad, flat flukes sized for the craft and the local seabed. A stein of 2–4 kg works well for many small boats, paired with a running line of fibres 8–10 mm in diameter. This combination delivers adequate bite and lowers shock loads during gusts. Secure the line to a cleat with a strong hitch so the crew can handle it during a trip, andor keep a backup moodle of rope ready for quick changes.
Rode length should be planned from depth: target a scope of 5–7x the water depth in calm to moderate conditions; increase to 8–10x in current or windy weather. For example, at 6 m depth aim for roughly 30–42 m; in stronger current or near shore, 45–60 m provides better stability. If you expect a longer ride, carry spare rope and pre-splice end loops. Keep the line running clean and untangled to avoid drag and to be able to lock quickly when needed.
Seabed type drives choice: soft sand or mud yields good hold with broad flukes, while weed or rocky patches reduce bite. If the seabed is mixed, a mid-range length with a heavier stein weight helps maintain grip. When the structure is rocky, verify the fibre line remains flexible and resistant; a cable end can improve protection against abrasion over time. The objective is to avoid excessive dragging while you’re on a short local trip.
Handling and safety: whether solo or with crew, practice retrieval and line management before the water; in rough conditions keep a secure lock on the rode and have a spare length coiled on deck. Use a simple hitch that’s easy to undo under load, and ensure you can life the line safely if needed. A well-placed, easy-to-grab loop keeps you able to board without stumbling.
Local knowledge matters: in Varjord or near the north coast, currents, seabed patterns, and boat size vary by local school and season. Record findings from each outing and adjust size and length for future trips. The whole solution is a balanced setup: matching the weight to the seabed, selecting fibres with enough stretch to absorb shock, and carrying enough extra length to counter current and wind while keeping life safety at the forefront.
Assess Bottom Type and Set the Anchor Correctly
Assess bottom type before deployment and select holding gear accordingly.
- Bottom type assessment: Drop the dink a few meters from the hull and drag a short line along the seabed to feel texture. Sand or silt yields a slick, slippery surface; mud can grab the line; rock gives a hard bite; weed slows the line; debris and plastic fragments signal snag risks. Varjord harbour bottoms often mix sand and gravel with rubble, so expect a mixed bed and adjust deployment times accordingly. Usually you’ll find one of these: sand, mud, rock, weed, or debris.
- Gear selection for seabed: For sand or mud, use a broad-fluke hook with ample rode; for rock, choose a heavier grapnel or hook with stout konstruktion; for weed, pick longer-fluked gear or a plow-type option if available. Attach to the boat’s Ronstan hardware and avoid looped lines around cleats when docking. If debris is likely, carry a spare line and a cable to upgrade the setup; this simpler approach is usually more reliable.
- Deployment technique: From the dink, drop the holding gear toward the bottom and back the yacht slowly to set. Keep the rode near the surface to avoid debris snag and water-tight the line to prevent snags. Take your time and avoid rushed moves; ensure the line isn’t looped around the rudder or prop. Attach the line with a firm knot at the cleat, handle within reach, and keep control as you position above the debris field.
- Verification and adjustment: Wait a few minutes and observe drift. If gets pulled by windcurrent, perform a gentle reverse to test hold. If the hold isn’t solid, reposition or add a second unit depending on depth and current. Check for debris and snag; if you tried different angles and it still slips, redeploy with more cable and adjust to the new bottom type. Possibly you’ll spend extra time finding a solid bite.
- Docking readiness and retrieval: Once anchored securely, approach docking area slowly and keep a safe distance from other craft. Attach fenders and prepare to depart; after use, recover gear, ensuring deployment remains clear of the dink and above deck hardware. Do not leave lines looped; attach them neatly and store the holding gear for future use. Example: Varjord harbour workflows show how to attach lines, secure the handle, and withdraw without snagging debris or plastic on the way back to the harbour quay.
Deploy, Set, and Verify the Ground Tackle in Calm Water

Recommendation: In tranquil, low-wash conditions, deploy the ground tackle with a single, longer rode to reduce drag and provide predictable bite. The setup should be equipped with a robust shackle or ronstan block, and the line should be tied to a cleat with a reverse turn for quick release if needed. Fold spare line and have it ready for any wayward snag. Beds differ in texture and depth; adjust length and padding to keep the tackle seated firmly on the bottom.
Choose a beds of sand or mud behind the hull where the bed absorbs shock; avoid weed, rock, or debris. If cruising on a wide bay near a beach, ensure space is clear of other craft and swimmers. Once in position, feed the rode through chocks and fairleads, check that it runs free through the hawse and through the fairlead. Make sure the goal is to minimize churn in the water through calm conditions.
Set scope with calm water: from bow, measure a longer length of rode relative to water depth. A common rule is 3:1 under calm water; for larger boats or deeper water you may use 5:1. If the freeboard is high, add more length to keep the line taut but not over-stretched. Snug the bitter end to the cleat, test the hold by a gentle tug and verify the rode doesn’t twist; the drag should be reduced.
Verify: With the small boat quiet and night conditions calm, observe the line as the tide shifts. If you see the line creeping through the chock, adjust length or alignment. Look for a consistent bed of water; check for chafe and inspect the single line for wear. If any signs seen of wear appear, replace immediately. After performed, record the check; login isn’t necessary but you may keep a note in the logbook anyway.
In longer cruises the mother vessel crew often uses the same approach for the tender, ensuring that equipment remains aligned and tied, so any awkward twist is detected early and corrected.
Last checks: verify that the rode length keeps the hull off the beds; confirm the cleat bite holds with a quick tug; ensure the line runs through guides without snag; this reduces the chance of drag or release during night ops or changing sea states.
| Stage | Action | Anmerkungen |
|---|---|---|
| Pre-check | Inspect rode, line, and hardware; verify wear; confirm ronstan or equivalent fittings | Exclude damaged pieces; replace before deployment |
| Deployment | Lower in calm water; feed line through fairleads and chocks; tie to cleat with a reverse turn | Ensure free movement through guides |
| Setting | Set scope (3:1 to depth, adjust for conditions); snug end; verify lack of twist | Drag reduced by correct alignment |
| Verification | Observe under tide/current; test pull; inspect for chafe | Repeat checks if water changes or night falls |
Maintain Position: Handling Wind, Current, and Drift
Set two lines: a primary line loaded to a cleat and a backup line to a buoy, join the two if you need extra security; this keeps you well oriented when wind shifts from the north and current crosses the bayona area, minimizing drift and keeping the crew happy.
Equipment and procedure: ensure the line is equipped, loaded, and ready. Use a single length of fibres rope, sized to the boat, and fitted to fairleads; verify it fits through blocks and cleats with minimal wear. When tensioned, the line is pulled and kept tight; ensure it’s well seated. Keep a spare length in reserve for when things become slippery or gusts surge.
Drift management: boats sailed into gusts respond differently; maintain control by steering to place the rode at an optimum angle to the wind. Take up slack slowly; tried configurations show that a snug, parallel rode reduces drift. Look for a position where the keel rides the current smoothly, where the boat sits well into the wind rather than being pushed sideways, and note where small adjustments make big differences.
Night and visibility: use a buoy with lights to mark position; bayona area benefits from a larger buoy with reliable lights. theres a version of practice that works: keep beds dry and clean, hull pristine, and lines dry to reduce slip on a slippery deck. In a case study named Dick, sailors found that a larger length of rode improved control in gusts.
General note: sailing teams should rehearse this routine on calm days, then scale to conditions as needed; theres always a reliable version that fits your craft and crew. For large craft, use longer lines and bigger beds to absorb gusts, and always monitor wind and current so adjustments take effect before drift grows out of hand.
Retrieve, Inspect, and Store Gear for Longevity
Retrieve all gear within 15 minutes of returning to shore, especially on exposed beach days, since salt exposure accelerates wear, and move it to a dry, shaded spot to prevent buildup.
Inspect items methodically: check rope and line for frays; plaited lines should be clean and free of nicks; verify locks and clips for corrosion; if any lock is stiff or the mechanism locks, remove the item from service.
Rinse with fresh water to remove salt, then simply shake excess water and air-dry away from direct sun to protect fiber; keep climbing gear separate from coastal items to avoid contamination.
Store in a dry, locked container or bag; use storage options such as wall bins or overhead lockers; keep each item described with a brief tag for quick checks; store plaited rope separately to avoid tangling.
Adopt a seasonal routine: in february, review wear on gear and rotate items; replace worn hardware every 1–2 years depending on exposure; monitor times of heavy use and adjust replacement sooner.
Practice etiquette at the dock: keep space clear, return items to their line, and coordinate with people nearby; use a whistle to signal when you need to move gear; when the crew celebrates with beers after a trip, maintain discipline and tidy storage.
Plan where to store items so they stay accessible: north-facing shelves near the exit reduce sun exposure; if you hike along the coast after boating and the vessel rode at the dock, as the tide gets high, carry a compact bag for quick transfers; ensure loaded gear is secured to prevent shifts.
Update the master inventory: note item type, last inspection, and replacement due date; keep a running tally so you know when to refresh a line or lock hardware.
Following this routine certainly keeps gear resilient, ready, and able to perform when needed.