

 Proper Reefing Procedures – A Step-by-Step Guide to Safe Sail Handling">

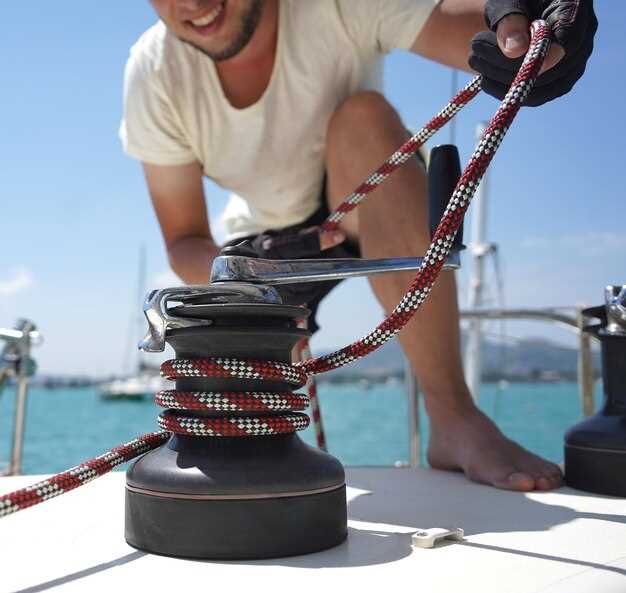
Begin with securing the craft and preparing the working cloth. Secure the boat to a stable stance, crew to leeward, and clear the deck of loose gear. Check the halyard path: lowering the cloth area should travel smoothly through the ring on the halyard, through a block, and over the sheaves. Use the winch to take the initial load; watch for blue tags indicating line strength. Ensure all hardware is intact, and that lines are secured to cleats before moving to the next step.
With the load established, proceed to a controlled sequence: apply gradual tension on the halyard via the winch, aiming to have the cloth area lowered evenly. This action reduces flutter and shaking of the fabric, while the increased tension on the line helps keep the luff smooth. Monitor the weight on the line; when the weight rises you should back off slightly to avoid overloading the halyard. If the line shows signs of strain or the hardware shows wear, stop and inspect. Prolong the life of the system by keeping a clean path and avoiding sharp bends. This sequence works on most boats.
Guide the line through the ring and into the block, then toward the cleat. Keep hardware rated for the loads, and distribute weight evenly to prevent back strain on crew. Use multiple wraps on the winch to keep the line under control; verify the system remains secured. Use much care, as misalignment can cause flutter and increase fatigue on lines. This helps maintain a steady cloth surface and reduces risk during gusts.
Consult the sailmakers for recommended reduction ratios based on rig, fabric, and conditions. In typical boats, start with a cloth area reduction of 25–30%, then test in light gusts; for heavier conditions use up to 40% if the hardware holds and line angles stay clean. Always measure the impact on balance, helm, and center of effort; this increased lift can shift the back of the boat, so adjust the backstay or weight accordingly. Review the line travel path to avoid friction points; a dirty path increases breaks risk and prolongs operations. Keep the halyard in blue color-coding to quickly confirm the correct line is being used. Notes from sailmakers and thoughtful weight distribution help you maintain a great attitude and reduce shake.
Pre-reefing readiness: safety checks, crew roles, and gear
Inspect all lines and hardware before any move: onto the deck, verify the area is clear, and ensure the vang, shackle, and ring are pinned correctly to prevent unexpected movement. Confirm full tension on the primary control lines and check for rough wear on sheaves that could bind under load.
- Safety checks
- Clearance around winches, cleats, and candidate haul points; secure loose gear and stow any items that could snag during the procedure.
- Inspect hardware: check shackles and pins for corrosion or looseness, verify the ring on the vang is intact, and confirm the shackle is snug before any load goes through the line.
- Line condition: look for frays, glazing, or stiff spots; replace or hand-pick line segments that show signs of wear to reduce the risk of failure under pressure.
- Winch readiness: ensure the winch brake works, handles are secure, and the area around the drum is free of obstructions; test a light rotation to avoid binding when the full load comes on.
- Communication and watch protocol: establish a clear call-and-response system, nominate a lead on deck, and define who calls the turn or stop if something goes wrong.
- Crew roles
- Helm: maintains course and tempo, calls turns and speed changes to keep the operation on track.
- Line handlers: two dedicated crew on the windward and leeward sides, assigned to cleats and blocks; they manage hauls smoothly to prevent jerks and reduce snag risk.
- Winch operator: coordinates line take-up and release, monitors tension, and communicates any surge to the helm.
- Auxiliary watcher: watches for signs of overload, entanglement, or gear misalignment; ready to stop or re-sequence if needed.
- Selection approach: hand-pick the most capable crew member for critical roles, ensuring the most experienced hands handle high-load tasks.
- Gear readiness
- Lines and leads: verify that the mainsheets, control lines, and halyards are rigged onto the proper sheaves and winches; confirm routing avoids sharp bends and reduces friction.
- Rigs and fittings: confirm vang alignment onto the correct winch, validate the ring and shackle pins are secure, and ensure the cleats are free of paint or debris that could inhibit secure mooring.
- Hold and haul points: check that the leeward area has ample space for a controlled haul; ensure all turns around blocks are correct and that the redirections are clean to prevent snagging.
- Tension control: plan how pressure will rise as load increases; prepare for a faster take-up on the initial haul and a controlled, slower movement as the sail becomes taut.
- Coordination tools: use video or quick reference signals to verify technique and timing; this helps crews on deck stay synchronized and increases overall efficiency.
- Upevnění a lana: pokud lana nepoužíváte, úhledně je svažte nebo zajistěte; zabraňte volným koncům, které by mohly způsobit zakopnutí nebo se zachytit během manévru.
- Kontrola dokumentace a připravenosti: proveďte rychlou vizuální kontrolu a poznamenejte si případné anomálie; krátká videorecenze později může odhalit vynechané kroky a pomoci prodloužit spolehlivost.
Kontrola paluby a lanoví pro přípravu na refování
Začněte lehkou, metodickou prohlídkou paluby a takeláže. Označte veškeré opotřebení hran, roztřepení nebo bílé skvrny na otěžích a halznách. Ujistěte se, že místa, kde lana procházejí kanály, jsou čistá a suchá; otřete sůl a pěnu, které by mohly skrývat poškození. Identifikujte nebezpečná místa, jako jsou uvolněná oka nebo nesprávně umístěné vazáky, které by se mohly zachytit během reefování.
Zkontrolujte úponky a pevné lanoví: zkontrolujte stěhy a vanty, zda nevykazují korozi nebo zauzlované prameny. Ujistěte se, že se spona ráhna a otěžové kování shodují se stěžněm; vyzkoušejte druhou vrstvu lana skrz průvlaky. Přejeďte prsty po lanech a hledejte drsná místa; různá lana mohou vykazovat opotřebení na bubnech navijáků nebo kladkách. Pokud zjistíte opotřebení, označte ho pro servis nebo výměnu před jakýmkoli refováním.
Výtahy a pohyblivé lanoví: protáhněte každé lano kladkami s mírným napětím; ujistěte se, že stropky sedí pevně a bez zkroucení. Zkontrolujte, zda jsou koncovky bezpečné a zda je spoj v pořádku. U systémů refování plachet potvrďte, že list prochází hladce a že je možné založit ref s rovnoměrným napětím; ověřte, zda se kladky na palubě volně pohybují. Pokud jsou lana tuhá nebo se zasekávají, vyměňte je nebo je promažte podle potřeby.
Palubní kování a ovládací body: zkušební klínky pod zatížením; ujistěte se, že se čistě zakusují a uvolňují. Zkontrolujte průvlaky, kladky, šekly; odstraňte nečistoty nebo korozi. Zkontrolujte sekundární zarážky a stopery; ujistěte se, že se pohyblivé lanoví pod zatížením nechvěje. Zaznamenejte problémy pro lodě klientů nebo pro svůj vlastní projekt.
Na plavidlech používaných posádkami Bohemia ověřte přístup ke skříňkám a zarovnání kanálů; nesprávné umístění zde může způsobit nebezpečné zadrhnutí během operace.
Bezpečnostní a testovací postupy: proveďte řízený test spouštění na výtahu, abyste ověřili, že je možné dosáhnout refovacích bodů, zatímco loď zůstává nad vlnami. Proveďte pěnový test pod palubou, abyste potvrdili, že zde nejsou žádná měkká místa. Pokud přepážky nebo desky vykazují pohyb, vyřešte to před pokračováním; nepokračujte s žádným plným nebo těžkým refováním, dokud nebudou problémy vyřešeny.
| Area | Vizuální kontrola | Operační test | Kritéria přijetí |
|---|---|---|---|
| Povrch paluby a čáry | Žádná měkká místa; žádné roztřepení; viditelné bílé značky; průchozí kanály | Lana volně procházejí kladkami a průvlaky při lehkém napětí | Žádná koroze, žádný uvolněný hardware; lanka kloužou bez zadrhávání |
| Standing rigging | Kotevní lana a stěhy bez koroze; žádné zalomené prameny | Napětí drží pod mírným zatížením; ráhno a naklonění se srovnávají se stěžněm | Všechny spoje jsou zajištěné; žádný pohyb při mírném zatížení. |
| Provozní lanoví a kladky | Provazy v pořádku; žádné zkroucené nebo roztřepené části | Lana a výtahy hladce kloužou kladkami; bez zadrhávání | Kladky se snadno otáčejí; žádné ostré hrany nevytvářejí teplo ani opotřebení |
| Kopačky a vybavení | Kopačky se čistě zakusují a uvolňují; žádná vůle | Aplikované zatížení drží; rychlé uvolnění funguje | Hardware na svém místě; bez koroze; pravidelně servisováno |
| Podrobnosti o refování s popouštěním plachty | Refovací kolejnice a hardware vyrovnány; otěže volné | Úpon útesu se rovnoměrně zatěžuje; žádné zkosení pod napětím | Systém připravený k refování s rovnoměrným napnutím a bez zadrhávání |
| Bezpečnostní výbava | Kotevní body, vedení a přítomná zařízení | Nouzové uvolnění a záložní vedení otestovány. | Všechny bezpečnostní systémy jsou funkční a přístupné. |
Výběr refovacích bodů a určení redukce plachet
Recommendation: Začněte s první refou, když zdánlivý vítr dosahuje 18–22 uzlů na mírném moři; použijte druhou refu kolem 28–34 uzlů, nebo dříve, pokud nárazy pravidelně přesahují 25 uzlů a jachta vykazuje zvýšený drift nebo tendenci k vyostřování. Zkontrolujte bílé značky na kroužcích a ověřte zarovnání a použijte prodlužovák, pokud je k dispozici, abyste udrželi čisté napětí výtahu; pevně zavažte zarážkovým uzlem a udržujte lana v pořádku. Tím se zmenší odkrytá plocha plachty přibližně o 15–25 % u první refy a asi 25–40 % u druhé, v závislosti na střihu látky. Zlepšení kontroly spočívá v plynulejším ovládání a stabilnějším kormidlu za obtížných podmínek.
Koncept a rozhodovací kritéria: zvážit, zda zůstat na prvním refu, nebo přejít na druhý na základě vývoje větru, stavu moře a připravenosti posádky. Navigátor zvažuje, zda poryvy větru zatlačí jachtu do obratu, nebo způsobí nadměrný boční skluz. Pokud vítr zesiluje v nárazech, malá redukce nyní udrží výkon stabilní, než čekat na dramatický pokles později. Mnoho kapitánů dává přednost plynulému tempu tím, že změnu provádí postupně; ti, kteří refují brzy, získají lepší vyvážení kormidla a sníží boční skluz. Pokud vítr tlačí jachtu přes 25 uzlů a plachta vykazuje nadměrné kroucení, přejděte na druhý ref. Poté znovu zkontrolujte vyvážení otěží hlavní plachty, abyste zabránili zbytečnému kroucení a udrželi plochou hlavu plachty.
Implementační poznámky: Krok 1 – Určete refovací bod na základě předpovědi a historie poryvů; Krok 2 – během manévru povolte otěže a poté zatáhněte výtah ke zvolenému oku; zastavte zkroucení vyrovnáním předního lemu. Krok 3 – uvažte refovací lano k oku a zajistěte zarážkovým uzlem; Krok 4 – v případě potřeby spusťte refovací lano a ukotvěte jej pomocí dalších smyček; Krok 5 – seřiďte hlavní otěž, abyste udrželi plynulý oblouk a ověřili, že nedochází k nadměrnému zkroucení. Tyto kroky pomáhají udržet zvládnutelné zatížení a snižují riziko zlomení nebo zaseknutí. V praxi získáte spolehlivost a klidnější platformu, přičemž pomocí prodlužovače můžete doladit napětí.
Přiřazování úkolů, signálů a kritérií pro postup/zastavení
Doporučení: před jakýmkoli zmenšením plachty přidělte jasné role a potvrďte kritéria pro schválení/zamítnutí akce, aby se zachoval účel a koordinace i po poryvech.
- Role a odpovědnosti
- Kormidelník zůstává velitelem řízení; druhý člen posádky manipuluje s lany a kontroluje zámky na husím krku a výložníku, přičemž dbá na synchronizaci svých činností.
- Ostatní členové posádky provádějí zvedání, spouštění a zajišťování dle pokynů a dbají na plnou připravenost a na to, aby se ruce držely mimo místa sevření.
- Proces zahrnuje krátkou zkoušku, aby byly úkoly prováděny správně, a zahrnuje kontrolu radiálního napětí napříč lany; po tréninku se zlepší koordinace posádky a sníží se riziko nedorozumění.
- Signály a komunikace
- Předem domluvené verbální a vizuální signály omezují nesprávný výklad, když se linky třesou; třesení signalizuje potřebu zpomalit a přehodnotit situaci.
- Between signals, maintain a calm and rhythmic cadence; signals must be acknowledged, thus preventing a break in flow.
- Use both radio and hand signals to cover noise and distance; this increases reliability in heavy weather and yields much from redundancy.
- Go/no-go criteria
- Go criteria include: sufficient crew able to complete tasks, and all hardware secured, including the gooseneck and extender assembly; if not, wait.
- No-go criteria arise when any cause increases risk, such as excessive weather, gear slack, or miscommunication; between youre and the rest, youre expected to stop and regroup.
- Third, timing matters: actions must occur in-time; thus evaluate the gain versus risk and proceed only when conditions allow a full reduction and the crew is able to manage the workload.
Weather timing: when to reef and how to monitor gusts
Reef the main before gusts hit 25–28 knots; because reducing boat load early keeps balance and avoids damage to hardware. The move helps the boat track more predictably and prevents the mast from bending under loads that can become dramatically high.
Monitor gusts by tracking short-term wind shifts: use a handheld anemometer or observe the cloth’s shape and the water; the navigator on deck should have been watching for sudden shifts and recording gusts in the place they occur, so you know where the next change will appear; gusts can become fierce quickly.
Keep the reef point secure with cringles and lines; trim the main efficiently and quickly; keep weight low and away from the rail to prevent reduced maneuverability; if gusts rise, ease the topping and vang to maintain shape while you tack and adjust the load.
Balance is a portion of successful handling: shift weight to the lee side, limit draft, and move crew in the area where the boat remains stable on bohemia-like seas. In a gust, another tack may reduce load on the main and keep the boat from pinching forward.
Utilize a method that includes forecast tracking, real-time observation, and a quick check of hardware condition; friction in halyards should be minimized by keeping lines clean and away from block edges; this will help the main stay trimmed and the cloth hold its shape properly.
Always plan ahead: know where to place the reefed point and how much area to reduce; prepare to tack and move weight with care to avoid sudden heeling; keep topping and vang in the right range and remember cringles for secure attachment; your track record will improve as the wind shifts and the boat moves more efficiently.
Tools, lines, and knot knowledge for quick reefing
Keep a dedicated shortening kit within arm’s reach at the cockpit for swift reductions of the mainsail. Use two 8–12 ft lines, each with a robust thimble end, stored in a small, waterproof pouch. A third line can be added for gusts, enabling a reduction quickly if winds rise unexpectedly, keeping the mainsail shape intact.
Route the shortening lines through the mains reef points or luff grommets and into cockpit blocks; keep them tensioned and aligned with the boom and deck channels. If you have a furler installed, feed the line to the furler drum to avoid wrapping and to maintain smooth operation.
Knots to master: figure-eight on a bight as a stopper; bowline for secure cleat hitches; clove hitch for quick attachment to reef points; a slip knot or half-hitch for adjustable tension. Practice tying each knot with gloves on, so you can make it without looking, which supports precision during quick adjustments.
Check equipment before setting out: inspect line wear, keep lines above the side of the boom, and ensure channels and blocks are free of debris. When making adjustments, use both hands to control the cloth and avoid entanglement with the furler or furled sheet. Being mindful of needs, this setup works for both sails and rig and remains balanced as winds go up or down. If a gust breaks the edge, ease tension and re-trim.
For forecast winds up to 25 knots, deploy the third line as part of the method; the result is earlier sail reduction and reduced load on the rig. This helps prevent damage to hardware and protects ourselves from unnecessary strain. In florida channels and harbors, practice under calm conditions to build muscle memory and ensure the actions were smooth.
Designed for efficiency, this approach relies on precision: instead of yanking, ease tension and hold the line steady to keep the cloth in the desired shape. The line is held steady during adjustments on both sides of the rig, and the process goes quickly when shifts left or right. It is purpose-built for fast deployment.