

 Category Diving in Hawaii – The Ultimate Guide to Top Diving Spots, Gear, and Safety">

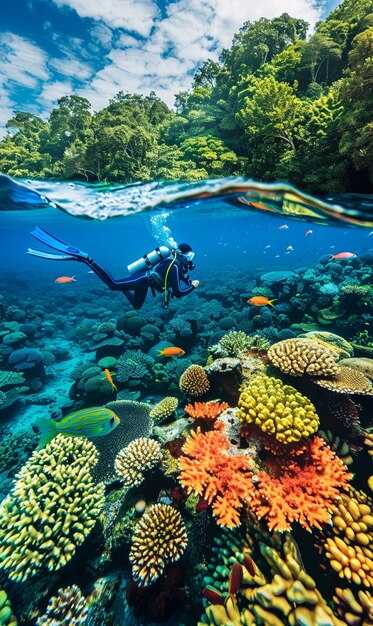
Recommendation: Start with a three-island itinerary that emphasizes the archipelago’s diversity, giving you a great balance of surface comfort and underwater exposure. If you’re getting into the gear mindset, this approach keeps momentum without overwhelming you. Focus on lava tubes, reef passages, and wrecks, then rotate through morning trips to maximize visibility and chances to observe feeding events and plankton blooms. This opportunity comes with a side of memorable adventures and helps you realize your dream of exploring Hawaii’s currents with confidence.
Molokini Crater, Maui: The crescent caldera delivers reliable visibility and calm conditions. Expect 30–100 ft views and depths around 20–40 ft in the inner reef, with sea life including schooling fish and occasional turtles. Operators run morning trips from Kihei and Maalaea, and the site is ideal for photographers who want a clean backdrop and easy entry. You’ll be near plankton hotspots during certain seasons, which can attract dramatic feeding events for larger pelagics nearby.
Kona Coast, Big Island: The night manta encounter is a signature adventure with a high probability of sightings; mantas reach 12–15 ft wingspan and glide through 70–100 ft visibility at night, in water around 72–78°F. Dress in a 3–5 mm wetsuit for comfort, bring a primary and backup light, and listen to your guide’s safety briefing on feeding areas and entry procedures. Lava-tube passages along this coast enrich the experience, offering surreal channels between molten formations–an opportunity to learn about the volcanic past while staying within your limits.
Wrecks, currents, and safety on Oahu and Kauai: On Oahu, several shallow wrecks lie in sheltered areas, offering accessible connections to ship history and vibrant reef life. When planning a trip, consult a licensed operator and follow depth limits; regarding currents, always plan an exit and keep an eye on air. Use a surface marker buoy to signal your side of the team and to aid safety. For Kauai, drift dives along the north shore require local guidance for the best visibility and experience.
Gear, planning, and safety basics: Start with a 4/3 mm or 5/4 mm full suit for year‑round comfort, a good mask and fins, a regulator with an alternate, and a computer with safety stops. Pack a surface marker buoy, whistle, and reel for entry-and-exit scenarios near lava shelves or wreck lanes; consider a small camera rig for adventures and keep a second light for night sites. For your itinerary, schedule two to three main dives per island and leave space for rest days to recover and getting used to Hawaii’s currents. These choices give you a steady rhythm and ensure you have enough energy for your best shots and most memorable moments.
Regional Dive Planner and Gear Checklist for Hawaii
Start with a practical plan: base in Honolulu as your hub, then schedule inter-island hops to kauais and other islands, limiting to three sites per trip to keep the pace comfortable. This approach keeps the feet moving and helps you manage dozens of options across the state while staying on top of changing conditions.
Gear for Hawaii action splits into personal items and operator gear. Personal kit should include a low-volume mask with tempered glass, a compact snorkel, fins, booties in 3-5 mm, a 3/2 or 4/3 wetsuit, a weight belt, and a buoyancy compensator with a reliable regulator and octopus. Rent tanks, weights, and other essentials from local ops when possible to stay flexible for inter-island moves. Carry a surface marker buoy, whistle, waterproof notebook or slate, and a compass. For night experiences, add a headlamp and spare batteries. Bring a safety reel for currents and a spare mask or dry bag for transitions between hubs.
Site selection tips: choose shallow, sheltered reefs when you base in Honolulu or kauais. Iconic spots often sit near calm bays with thriving corals and intriguing sea life. Start with dawn sessions to enjoy magic light and calmer seas, then switch to afternoon tours when winds pick up. Always check the latest conditions and wind map before departures.
Inter-island planning details: check flight and boat schedules; dozens of operators offer transfers between islands; book a buffer day after a long crossing to stay rested. If you stay on one island, concentrate on a handful of reefs that are easily accessible by boat or shore. This approach reduces fatigue and keeps you safe in populated anchorages with helpful crews.
Weather, seas, and safety tips: monitor forecast updates from a trusted source (источник local operators) and carry a simple weather card; Hawaii seas range from glassy to moderate chop, rarely exceeding moderate on most coasts. Winds shift with seasons; count on 70-80°F (21-27°C) water temps in summer and 68-76°F (20-24°C) in winter. Pack layers and a warm layer for post-experience. Consider a lightweight dry suit for winter nights when cruising coastal sites. Stay with a buddy, stay in daylight hours, and keep a clear plan at each site to prevent fatigue and maximize enjoyment.
Checklist quick-reference: mask, snorkel, fins, booties; wetsuit; weights; buoyancy compensator; regulator with octopus; surface marker buoy; signaling gear; underwater slate or notebook; compass; light and spare batteries; safety reel; dry bag; hydration. Store a digital copy of local operator contact numbers and emergency numbers. Mark each site with arrival times and currents, so you can adjust quickly during inter-island itineraries.
Oahu Beginner Dives: Region Access, Rental Gear, and Buoyancy Basics
Start with a guided, beginner-friendly outing from Waikiki and rent a basic gear set (mask, snorkel, fins) from a reputable shop. This approach is perfect for building comfort and planning a solid base for your oahus experience.
Region access centers on three practical options. Waikiki waters offer gentle, nearby entries for first sessions, while outside Waikiki you’ll find Hanauma Bay Nature Preserve with protected reefs and clear water, and Ko Olina’s calm lagoons that suit first-timers. Each location provides different landscapes, but all fit a category of beginner experiences with low current risk and straightforward exits.
Buoyancy basics start with a neutral stance about two to three feet (roughly 60 to 90 centimeters) below the surface. Breathe slowly, keep your breaths even, and make tiny adjustments with your chest and hips rather than big leg kicks. This slightly controlled method helps you stay close to the reef without touching life or stirring silt, which benefits everyone being in the water with you and improves comfort as you gain experience.
Rental gear should cover essential items: a well-fitting mask, a snorkel that clears easily, and fins sized for your feet. Add a lightweight exposure suit if the water feels chilly (April mornings can be cooler), and consider a small weight belt to help achieve neutral buoyancy at the surface. Check the shop’s gear for wear, mask seal, and valve function before heading out, and confirm any regulator or buoyancy aid options if you plan a longer session with a guide.
For beginners planning a Hawaii itinerary, a local susan, a trusted guide, can tailor the day to your pace and skill level. Her advice helps you maximize the advantage of calm mornings, choose a route that avoids heavy surf, and stay safe while exploring nearshore habitats. Many operators offer short, original routes around waikiki waters that emphasize gradual progression and clear safety briefings, which keeps your planning focused and realistic.
Be mindful of wildlife and reef life. Frogfish sightings exist in some pockets of Oahu reefs but are not guaranteed, so manage expectations and stay relaxed about outcomes. If you’re curious about hammerhead activity, know that those encounters are famous in Kona, not common around oahus, but you’ll still enjoy watching a diverse array of small reef fish and friendly reef structures on your region day. The goal is steady improvement, not chasing a single moment, and the right preparation will help you gain confidence with every session and with every new location you visit within the island’s waters.
With a clear plan, the right gear, and a patient guide, your first weeks as a beginner on oahus will feel approachable and rewarding. The category of beginner experiences on this island offers a practical path to build skills, enjoy calm conditions, and grow into more confident underwater moments as the months progress, especially when you align your outings with favorable weather and sea states.
Molokini Crater Dives: Visibility, Boat Access, and Marine Life Encounters
Book a morning boat charter from Maui to Molokini Crater and snorkel the crater rim for the clearest visibility and calmer currents.
Molokini sits about 2.5 miles off Maui’s southwest coast and is accessible from Lahaina, Kaanapali, or Maalaea Harbor. Plan a 2.5–4 hour excursion, including time at the site, with 30–45 minutes of cruising each way depending on wind and seas.
Visibility on ideal mornings reaches 60–100 ft (18–30 m) commonly, with peaks above 100 ft when trade winds are light. Surface temps hover in the mid-70s F, and water temps typically linger in the mid-70s to low 80s F–comfortable for a long session in a lightweight wetsuit or rash guard. The night sky over hawaiis oceans fades as dawn approaches, and the first light enhances visibility for the morning trip.
Marine encounters deliver an abundance of reef life: expect schools of tangs and surgeonfish, bright wrasses, parrotfish, morays in crevices, and green sea turtles cruising the outer shallows. Sightings of reef sharks are possible near the outer wall, and pelagic species may drift by the edge on calmer days. If youre lucky, you might even spot spinner dolphins skimming the channel at dawn.
Boat access is straightforward: multiple operators offer morning departures, with pickups from Maui resorts and nearby towns. Resorts and transfer services arrange convenient options for visitors; check-in times are typically 6:30–7:15 am to maximize visibility and wildlife activity. Remember that the outer rim can experience stronger currents; stay with your guide, use provided flotation, and avoid stepping on coral for an intriguing, respectful experience.
Practical tips: bring a waterproof camera, reef-safe sunscreen, a light layer for the chillier wind, and a small snack. Read the operator briefing ahead of time to understand zones to avoid and how to minimize disturbance to wildlife. Molokini’s location, combined with the neighboring lanai and nearby Oahu itineraries, makes a visit to this area part of thrilling adventures in hawaiis oceans and a must for any visitor to visit.
Kauai Night and Macro Dives: Lights, Photography, and Tiny Critters
Get a compact macro-lighting kit: a 60–100 mm lens, two compact strobes, a focused LED light, and a red-light option to preserve natural colors. Getting the most from Kauai’s night macro opportunities starts with patient, steady movements and a plan that keeps you close to the subject (about 8–15 cm) while youre getting the composition right. This setup is a great foundation for intriguing close-ups as the marine world wakes after sunset.
Great locations include caves along the Na Pali coastline, lava tubes, and sheltered reef flats where you see diverse tiny life. Those high-contrast walls offer abundance and a choice of subjects, including gobies, pygmy shrimps, nudibranchs, and small octopuses found in crevices. Expect endemic species such as the hawaiian reef goby and the Hawaiian bobtail squid to appear, plus the iconic hawaiian monk seal occasionally at the water’s edge–keep your distance and let those majestic animals pass. At sunset, a turtle glides by, offering a larger silhouette against the tiny world you’re documenting. These sites provide tropical color and plenty of options for getting close to them, and you may also catch the occasional flying reef fish skittering through the current.
Popřemýšlejte o osvětlení a technice: osvětlete objekt pomocí nastavení se dvěma blesky a osvětlujte mírně mimo osu, abyste snížili zpětný rozptyl. Můžete zachytit siluety mant poblíž hladiny, když jste po západu slunce blízko okraje útesu; vypadají jako ladné siluety na tmavě modrém pozadí a jsou skvělou připomínkou pelagické říše za útesem. Pro makro umístěte blesky pod úhlem asi 40–60 stupňů, použijte zaostřené světlo pro uzamčení ostření a fotografujte do formátu RAW s ručním vyvážením bílé. Doporučená nastavení: závěrka 1/125–1/200, clona f/11–f/16, ISO 400–800; upravte podle viditelnosti a zpětného rozptylu.
Očekávejte rozmanitou škálu subjektů: havajské chobotničky bobtail, endemické nahožábré plže a ty plaché kraby schované v jeskyních. Dostat se blízko vyžaduje trpělivost, ale odměna je skvělá: textury na ulitách, složité linie žaberních oblouků u drobných rybek a záblesk barev v tropickém útesu. Během fotografování můžete v pozadí slyšet písně útesu, zvukovou narážku na to, že zde něco žije. Záběry při západu slunce dodávají dramatické barvy a siluety želv poskytují měřítko mezi drobným světem, který dokumentujete. Pokud fotíte makro, držte se zpátky a nechte bohatství života, ať se samo odhalí. Na mořské noci je něco magického, co oživuje mikrosvět.
Bezpečnost a etiketa jsou při potápění klíčové: před vstupem zhodnoťte proudy a vítr; pohybujte se pomalu podél okraje útesu a vyhýbejte se kontaktu s divokou zvěří. Nikdy se nedotýkejte objektů zájmu ani je neprohánějte; dopřejte jim prostor a ustupte, pokud vykazují známky stresu. Dodržujte uctivou vzdálenost od tuleňů kuželozubých a dalších chráněných zvířat; jste tam, abyste je pozorovali, ne ovlivňovali. Udržujte si stabilitu ve vodě, abyste chránili křehká stanoviště, jako jsou jeskyně a vysoké stěny v lávových tunelech. Po návratu si přečtěte poznámky a katalogizujte nejlepší snímky pro budoucí výpravy.
Potápění u sopek na Big Island: Proudy, rizika a bezpečnostní instruktáže
Začněte precizní bezpečnostní instruktáží a ověřte si aktuální předpovědi přílivu, odlivu a vlnění; cestujte ve dvojicích a dodržujte plánované vstupní a výstupní body. Ve vulkanických pobřežních vodách se proudy mohou rychle měnit a tlačit směrem k okrajům útesů nebo do úzkých kanálů. Stanovte si s průvodcem jasnou maximální hloubku, ujistěte se, že je připraveno signalizační zařízení na hladině, a potvrďte si plán nouzového výstupu. Tento přístup chrání skupinu a snižuje riziko.
Mezi klíčová rizika patří náhlé změny proudu, omezená viditelnost kvůli rozvířeným sedimentům, ostrý čedič, uvolněná suť a zamotání do lan nebo vybavení. Vyvarujte se kontaktu s čerstvými skalními povrchy a ponořenými objekty; držte se trasy a respektujte vyznačené výstupní zóny. Indukované vlny mohou tlačit směrem do hlubších kaňonů, proto se držte plánovaného profilu.
Bezpečnostní instruktáže zahrnují partnerský systém, signalizační metody, plán výstupu a odchodu, tempo, hloubkové limity a kontrolu vybavení (BCD, regulátor, oblek, rukavice, ploutve). Provozovatelé z ostrovních měst tyto výlety zajišťují a plány přizpůsobují podmínkám. Vždy mějte u sebe signalizační zařízení pro hladinu a při vynořování používejte bójku pro označení hladiny. Pokud se viditelnost sníží nebo se zesílí proudy, přerušte ponor a vraťte se k výstupovému lanu. Po skončení zaznamenejte podmínky a případné problémy s výstrojí a před návratem proveďte instruktáž s průvodcem.
Sezónní okna: Nejlepší časy, počasí a plánování pro havajská podvodní dobrodružství
Rezervujte si včas u renomovaného provozovatele nabízejícího pozorování velryb a výlety na útesy; pro aktivitu keporkaků a vynikající podmínky na moři zamiřte na leden–březen.
Sezónní okna v kostce:
- Zima až začátek jara (listopad–březen) – keporkaci ovládají scénu a předvádějí nezapomenutelnou show; nejlepší pozorovací období je obvykle od prosince do března. Podmínky se liší podle pobřeží: klidnější na závětrných stranách, potenciálně větší vlny na exponovaných severních stranách. Teplota vody se pohybuje kolem 23–26 °C s viditelností běžně 18–30 m na útesech. Poohlédněte se po nabídkách, které kombinují pozorování divoké zvěře s průzkumem útesů; umělé útesové struktury a bohaté útvary přidávají na zajímavosti. Spojte se s průvodcem, abyste si přizpůsobili plán, který vyhovuje vašim zkušenostem, a vydejte se ráno za nejlepším světlem a klidnějším mořem.
- Léto až začátek podzimu (květen–září) – moře se často zklidní, což přináší lepší viditelnost a klidnější plavby na mnoha trasách. Toto období je skvělé pro delší potápěčské výlety a šnorchlovací dobrodružství na různých místech v blízkosti Maui, Oahu, Kauai a Big Island. Čas strávený na vodě může být intenzivní a setkání s delfíny, želvami a mantami je běžné. Průvodci často nabízejí itineráře s více lokalitami, které maximalizují setkání s divokou zvěří a zároveň udržují příznivé podmínky; také platí, že rána bývají nejlepší.
- Okrajové sezóny (duben, říjen–listopad) – přechodné podmínky a méně davů. Je to lepší doba pro nákup nových nabídek a testování různých provozovatelů, protože přímá srovnání odhalí, který obchod poskytuje největší hodnotu. Téměř všechny lokality zůstávají přístupné a průvodci mohou přizpůsobit výlety přesným preferencím a úrovním dovedností.
Upozornění: Podmínky se mohou rychle změnit; vždy si ověřte situaci u svého operátora večer předem a zkontrolujte nejnovější předpověď.
Plánování a kontrolní seznam bezpečnosti:
- Timeframe – rezervujte 6–8 týdnů předem v hlavních měsících; začátek jara a podzimu stále mohou vyžadovat plánování, ale poptávka mírně klesá.
- Operátor a vybavení – vyberte si operátora se solidními výsledky v oblasti bezpečnosti a vybavením, které odpovídá vaší úrovni pohodlí; informujte se o umělých útesech a dalších lokalitách, které odpovídají vašim ambicím.
- Itinerary flexibility – zeptejte se na možnosti přesunů mezi lokalitami podél pobřeží, abyste maximalizovali šance na pozorování divoké zvěře a vydrželi příznivé podmínky.
- Preparation – sbalte si ochranu proti slunci, opalovací krém bezpečný pro korály, tričko s dlouhým rukávem, ručník, vodu a svačinu; vezměte si vodotěsnou tašku a pevnou obuv pro přístup k lodím.
- Načasování v divočině – keporkaci jsou nejaktivnější brzy ráno a pozdě odpoledne; plánujte podle doporučení průvodce, abyste optimalizovali čas strávený se zvířaty.