

 The Ultimate Boat Tool Emergency Kit for the Holidays – Essential Gear &">

thats the core: keep a compact, waterproof multi-tool and a roll of marine tape onboard. This combo handles most quick repairs, saves you from expensive shore runs, and prevents small issues from hanging you up within distance of the helm. If something hangs, you fix it fast. This isnt about flashy gadgets; it’s about dependable gear. Modern gear, designed to resist salt and spray, takes less space and stays reliable when the boat rocks.
Beyond the core, assemble a kit with two hammers for light taps, a set of hose clamps in several diameters, spare O-rings and seals, repair putty, electrical tape, and zip ties. Add a compact flashlight, spare batteries, and a small battery pack so there is power for night fixes. Keep a clean spare bag that seals watertight, and مصممة to stay organized even when the deck down. Include fixing supplies so you can handle most clogs, leaks, and loose fittings without rushing.
For holidays, you need items needed to manage common failures: a broken hose, loose clamps, or corroded terminals. A portable air pump, spare terminals, and a few extra boat-friendly connectors keep you afloat while the weather or guests stay warm. This kit is relatively compact, yet modern enough to be trusted, and it takes only a few minutes to verify each item before a trip. Store them in a dry pouch so nothing sits around.
Turn the setup into an army of quick fixes by teaching family members where each tool lives. A husky rope for line repairs, a small saw for trim work, and a couple of spare fuses prevent a minor incident from turning into a big delay. The kit itself should be مصممة to stay compact and work there when it matters, and it should keep the boat clean and safe, not clutter the cabin. This kind approach ensures that even if something breaks, you can restore control fast.
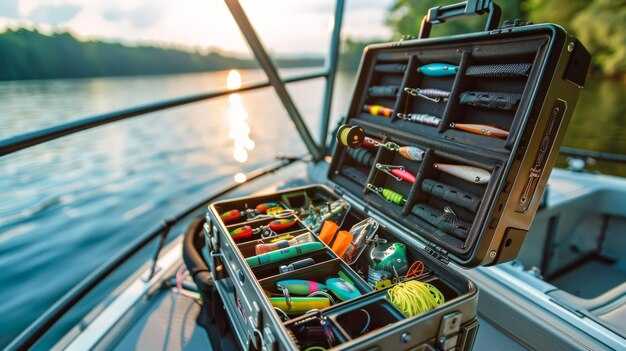
Boat Tool Emergency Kit for the Holidays
Get a compact marine-grade multi-tool with corrosion-resistant blades. This kind tool handles most on-deck repairs. For example, look for a model with 14–20 functions, a solid carrying case, and better corrosion-resistant blades. A little planning now saves time on deck when a fast fix is needed, and it frees room for a spare part in the kit.
Keep the kit organized with a layout that separates tools between the deck and the electrical box. Pair the multi-tool with a weatherproof box that holds spare fuses, a length of marine wire, crimp connectors, heat-shrink tubing, and tape. If you need to splice, the little wire helps; else keep a backup spare. It takes only a few minutes to replace a blown fuse or a damaged connector when you have the right components.
For rigging and deck gear, pack spare clamps, shackles, small spools of line, and a compact rigging knife. This setup gives you fast repairs between runs and reduces the need to improvise elsewhere. Label the components so you can grab what you need in a hurry and avoid mixing up sizes during a rush.
Stock a small block of parts that tend to wear first: O-rings, gaskets, hose clamps, thread seal tape, and patches for leaks. When items show wear, replace them before they fail; a little proactive replacement saves bigger hassles when seas are rough. Choose parts with a true marine-grade finish and a precise grade tolerance.
Carry the kit in a sturdy case and keep it within easy reach under a seat or in a dedicated locker. A compact screwdrivers set, spare screws in a labeled wallet, and a small tape measure improve reliability during repairs. A quality carrying solution helps you keep everything together, from fuses to rigging hardware, so you never search room for the wrong part.
Whether you sail near home or across a weekend cruise, limit content to what you actually use. Since space is limited during holidays, prioritize items with multi-function uses and quick-access pockets. Between electrical and rigging needs, ensure your system looks organized and ready, then do a quick test at the dock to confirm everything is secure and ready for the next leg.
When you are done packing, review the list and note any gaps for the next trip.
The Ultimate Boat Tool Emergency Kit for the Holidays: Glue and Sealants
Keep a compact two‑part marine epoxy kit and a neutral‑cure silicone sealant in a waterproof case. This pairing covers emergencies, from small hull cracks to deck leaks, delivering a strong bond and a flexible seal in salt water and sun.
Choose the right sizes: epoxy resin and hardener tubes in the 10–20 ml range provide enough material for little repairs, while a 30–50 ml tube of silicone or polyurethane sealant handles deck seams and fittings. For fabric work on sails or covers, add marine fabric glue designed for sailcloth and a seam sealant to protect stitching lines.
Electrical fixes need careful materials: include a small epoxy kit to secure loose terminals and a fast‑setting cyanoacrylate glue for tiny plastic components. Add heat‑shrink tubing in two sizes to wrap wire splices and protect connections during motion and vibration.
Fabric and sail repairs deserve dedicated glue: use marine fabric glue or contact cement for canvas and sailcloth, plus a seam sealant to weatherproof stitched areas. Always test on a scrap piece first to verify adhesion, flexibility, and color match before applying to the real fabric.
Application tips and curing times help you plan during emergencies: epoxy becomes tack‑free in roughly 20–60 minutes and reaches full strength in 6–24 hours depending on temperature; silicone cures slower but remains flexible, with tack‑free time around 1–2 hours and full cure in 24–48 hours. Use a small mixing tray and spread thinly to minimize squeeze‑out and skin formation.
Case placement and storage matter: keep the kit in a little waterproof box inside a cockpit locker or head cabinet, clearly labeling each item with its size and purpose. Store in a cool, dry area and check expiration dates seasonally to ensure it’s ready when needed, especially during holidays when cruising crowds and weather shifts demand quick repairs.
Boater guidance for cruisers: this article focuses on the selection of glue and sealants your boat can rely on during the holidays. Think about your sail size, fabric types, and typical repairs you encounter, so you can tailor the kit to your needs and have the right items ready there, when emergencies arise.
Quick-Access Adhesives for Onboard Repairs
Keep a compact kit with three go-to adhesives: marine epoxy, CA glue, and silicone sealant. For boating on a sailboat or any craft, this setup covers most fix-it jobs between checks and keeps the hull tight, thats why sailors rely on it.
For hull leaks and patching small punctures, mix a two-part marine epoxy and apply a patch flush with the surface. Clamp coverage with a ratchet strap or bar clamps until set. Working time runs about 5–15 minutes; handling in 2–4 hours; full cure in 12–24 hours depending on temperature.
Small electrical fixes, moisture seals around connectors, and cap repairs benefit from CA glue on clean, dry surfaces. Use a thin bead and hold for 30–60 seconds. Pair CA with a light mechanical hold if the area bears vibration, but reserve structural tasks for epoxy or silicone.
Silicone sealant offers flexible, waterproof joints for hatches, drains, and electronics enclosures. Apply, then cure for 24 hours; avoid oil-soaked surfaces that can degrade silicone bonding.
Epoxy putty fills gaps and serves as a quick hull patch or mounting pad when nothing else fits. Shape the putty, press it into place, and let it cure; this keeps bearings and small brackets stable on a rough sea. A husky epoxy putty tends to stay non-shrinking under load.
Store these adhesives in their labeled pockets of your gear bag and keep a log in your files after each fix, noting what was done, which materials were used, and cure times. That way, nothing gets missed if a towing call drags you toward port. Avoid pounding with hammers–use clamps or a ratchet to apply even pressure while curing. Keeping this setup simple helps corrosion stay at bay and ensures your equipment stays good for the next trip.
Marine-Grade Sealants for Deck, Hull, and Fittings

Use a polyurethane sealant for deck seams and a neutral-cure silicone for fittings to cover most tasks and environments in saltwater conditions.
Polyurethane seals deck seams, hull joints, cockpit profiles, and companionways; it tolerates movement, resists abrasion, and forms a tough, flexible film. Expect tack-free in 6–12 hours and full cure in 3–7 days at typical cabin humidity. If a job is expensive or critical, apply a larger bead and let it cure undisturbed for best protection. This ultimate approach will deliver reliable protection for many seasons.
Silicone-based sealants excel around through-hulls, head fittings, hoses, and deck access gates where long-term saltwater exposure occurs. They stay flexible, resist UV, and maintain watertight seals even as fittings flex. Handling time is shorter under dry conditions; full cure occurs in 48–72 hours at 20–25 C and moderate humidity.
تحضير السطح مهم: قم بإزالة المادة المانعة للتسرب القديمة، ونظف بفرشاة سلك حيثما يلزم، واغسل وجفف جيدًا، ثم امسح بالكحول الإيزوبروبيلي قبل التطبيق. استخدم قضيبًا داعمًا للمفاصل التي يزيد عمقها عن 6 مم، وقم بتغطية الحواف بالشريط اللاصق للحفاظ على نظافة الخطوط. بالنسبة لفتحات الأسلاك، قم بإغلاق حول السلك بحافة مستمرة ثم استخدم أداة للحصول على حافة ناعمة.
انتبه للتكوّر: ضع خرزة منتظمة حول كل وصلة، ثم قم بتنعيمها بإصبع مبلل أو أداة مثلثة. لا تضع طبقات سميكة، لأن ذلك يبطئ المعالجة ويمكن أن يحبس الرطوبة، مما يزيد من وقت التوقف عن العمل واحتمالية حدوث تسرب أثناء رذاذ البحر.
من ناحية التخزين، احتفظ بالخراطيش في عبواتها الأصلية، وضعها في كابينة باردة وجافة أو جيب حقيبة الظهر، واستخدمها قبل تاريخ انتهاء الصلاحية. إذا قمت باستبدال المخزون بعد موسم من الاستخدام المكثف للمياه المالحة، فتأكد من أن المخزون الجديد لم تنته صلاحيته.
الصيانة: افحص موانع التسرب بعد البحار الهائجة أو أثناء التجديد؛ إذا بدأت وصلة في الفشل أو ظهر عليها تشقق، قم بإزالة المواد المتشققة وأعد الإحكام. إذا تعطل مانع تسرب، خطط لتجديد سريع واستبدل بخرطوشة جديدة لاستعادة الحماية.
إن وجود مجموعة أدوات مدمجة في حقيبة ظهرك يضمن لك الاستعداد لمهام المقصورة؛ المواد المانعة للتسرب المناسبة ستنقذك من التوقف المكلف وتمنع التسربات في البيئات المالحة. في بعض الحالات، قد تحتاج إلى استخدام كلا النوعين للتعامل مع تركيبات الرأس المختلفة ومفاصل السطح، مع مزيج من الشريط اللاصق والمناديل المبللة وفرشاة سلك لتجهيز الأسطح.
حلول الترقيع: الشريط اللاصق ومعجون الإيبوكسي والرقع سريعة الجفاف
احتفظ بشريط لاصق مقاوم للماء، ومعجون إيبوكسي، ومجموعة رقع سريعة التثبيت في المقصورة للتعامل مع كل شيء بدءًا من القطرات الصغيرة وصولًا إلى الخدوش الأكبر في الهيكل خلال الظروف القاسية.
اختر مجموعة مدمجة تتكون من ثلاثة عناصر: شريط لاصق، ومعجون، وصفائح ترقيع. حافظ على سير أعمال الإصلاح دون تأخير عن طريق شراء مجموعة من أمازون بأحجام متعددة، وسكين أساسي، وورق صنفرة.
يحتفظ ديفيد، وهو بحار يقضي عطلة نهاية الأسبوع، بمجموعة أدوات الإصلاح الخاصة به في صندوق متين مقاوم للماء خلف خزانة المقصورة. وهو يعتمد على هذا المزيج لتغطية كل شيء بدءًا من الشقوق الدقيقة وحتى الثقوب الأكبر، وغالبًا ما يوفر رحلة إلى الشاطئ حتى يصبح الإصلاح المناسب ممكنًا.
المكونات الرئيسية المطلوب تضمينها:
- شريط لاصق مقاوم للماء: بعرض 2 إلى 4 بوصات، من النوع البحري ومقوى بالقماش، وبطول كاف لتغطية المنطقة المتضررة والتمدد إلى ما بعد الحواف.
- معجون إيبوكسي: معجون بحريّ مكوّن من جزأين، يتصلّب بسرعة ويلتصق جيدًا بالأسطح المصنوعة من الألياف الزجاجية والمعادن والمواد المركبة؛ يُخلط وفقًا للتعليمات الموجودة على العبوة ويوضع على المنطقة المُجهَّزة.
- بقع الإصلاح السريع: قطعة قماش من الألياف الزجاجية أو صفائح رقع بلاستيكية مدعومة بالراتنج أو المادة اللاصقة؛ ذات حجم مناسب لتغطية الثقوب التي يصل عرضها إلى بضعة بوصات وقادرة على الانحناء لتناسب الأسطح المنحنية.
- الأدوات والأجهزة: أداة متعددة الاستخدامات مدمجة، سكين حاد، ورق صنفرة، مشابك أو شريط قابل للتعديل، وأغلال احتياطية لتثبيت الرقع أثناء المعالجة.
- تخزين: حاوية صغيرة مقاومة للماء في المقصورة أو على سطح السفينة حتى تظل المجموعة المفضلة جافة ويمكن الوصول إليها.
خطوات التقديم:
- قيّم الضرر وقرر طريقة الإصلاح؛ بالنسبة لثقب في الهيكل، رقع من الداخل إذا أمكن للحصول على إحكام أقوى.
- تحضير السطح: جفف المنطقة، وأزل المواد السائبة، وخشّن الحواف لتحسين الالتصاق.
- ضع الشريط اللاصق: قصه ليناسب الحجم، وغطِ الموقع بتداخل، واضغط بإحكام للإغلاق؛ وقم بتمديده على الأقل 1 بوصة بعد الحافة المتضررة.
- اخلط معجون الإيبوكسي: اعجن حتى يصبح اللون موحدًا، وضع خرزة سميكة فوق الرقعة المثبتة بالشريط، وقم بتنعيم الحواف لدمجها مع السطح المحيط.
- تركيب رقعة الضبط السريع: ضع ألواح الرقعة فوق المعجون المتصلب، واضغط عليها لتتوافق مع المنحنيات، وأغلق الحواف بمعجون إضافي إذا لزم الأمر.
- التثبيت والاختبار: ثبت الرقعة بمشبك أو شريط لاصق أثناء معالجتها؛ بعد المعالجة، اختبر بتمرير الماء برفق ومراقبة أي تسرب، وأعد العملية برقعة أكبر إذا لزم الأمر.
تدعم هذه المقاربة إجراء الإصلاحات الطفيفة والإصلاحات الأكثر تطلبًا للأضرار الكبيرة التي تلحق بالهيكل أو السطح، مما يحافظ على إعداد عملك جاهزًا وموثوقًا عندما تكون على بعد أميال من الشاطئ.
الأدوات والتقنيات: الاستخدام الآمن للمواد اللاصقة ومانعات التسرب
اختر مادة مانعة للتسرب بحرية منخفضة المركبات العضوية المتطايرة (VOC) واستخدمها مع مسدس سدادة قابل للتعديل للتحكم في حجم الخرزة. إذا لم تتمكن من الحصول على المنتج المفضل، فاستبدل بمادة مانعة للتسرب من البولي يوريثين تتصلب بمرونة وتلتصق جيدًا بالألياف الزجاجية والمعدن والخشب.
قم بتجهيز المنطقة عن طريق التنظيف بالكحول الإيزوبروبيلي، والتجفيف الكامل، وتغطية الحواف. يحافظ هذا على الأجزاء نظيفة ويقلل الحاجة إلى التنظيف خلال عملية التجديد في نهاية الأسبوع. بالنسبة للبحارة في عطلة نهاية الأسبوع، فإن المجموعة الجاهزة للاستخدام تسرع عملية التجديد وتقلل من الخطوات الفائتة. يساعد هذا النهج أيضًا في الكتل الخشبية ووصلات سطح السفينة حيث الأختام المحكمة مهمة.
حدد المنتج المناسب للمهمة: المواد المانعة للتسرب تمتص الحركة والفجوات، بينما توفر المواد اللاصقة رابطًا. بالنسبة للمفاصل التي تتحمل الأحمال أو الاهتزازات، اختر مادة مانعة للتسرب مرنة؛ أما بالنسبة للروابط الدائمة بين الأجزاء، فيعمل لاصق قوي؛ ولا تخلط المنتجات أبدًا في مفصل واحد.
التقنية: قم بتحميل الأنبوب في المسدس؛ اقطع الفوهة بزاوية 45 درجة؛ أحدث ثقبًا في الختم؛ ضع المادة في شكل خرزة ناعمة ومستمرة، مع التحرك بثبات لتجنب التوقف. استخدم مسدس سد قابل للتعديل للحفاظ على الخرزة متساوية. بعد الانتهاء، قم بتنعيمها بإصبع مبلل أو مكشطة بلاستيكية.
السلامة والمناولة: قم بتهوية المنطقة؛ وارتدِ قفازات وواقيًا للعينين؛ وتجنب ملامسة الجلد. امسح المواد غير المعالجة بالمذيب الموصى به وخزنها في حاويات اقتصادية. واحفظها بعيدًا عن متناول الأطفال والحيوانات الأليفة.
نصائح خاصة: استخدم قضيب الدعم للفجوات العميقة؛ لتركيبات المرور عبر الهيكل أو أعمال التجديد، قم بالثقب باستخدام ريشة مناسبة ثم استخدم منشار ثقب لفتح مساحة، وقم بإحكام الإغلاق حول الحافة. الأسطح المُجهزة تتطلب وقت معالجة أقل؛ إذا كنت بحاجة إلى إعادة إحكام ربط الأجهزة، فأعد تركيبها وأعد إحكام إغلاقها حسب الحاجة.
| Task | نوع المادة اللاصقة/المانعة للتسرب | Tools | الملاحظات |
|---|---|---|---|
| الدرزات والوصلات | سيليكون بحري أو مادة مانعة للتسرب من البولي يوريثين | مسدس سيليكون، قابل للتعديل | ضع طبقة واحدة؛ واستخدم قضيب الدعم للفجوات الكبيرة |
| أجهزة الربط | لاصق صلب (إيبوكسي أو بولي يوريثان) | سكين سطح السفينة، قفازات | اتركه حتى يتصلب تمامًا؛ تجنب الحركة أثناء التصلب. |
| فتحات الهيكل والتجهيزات | مانع تسرب متوافق مع المعادن والزجاج | مِنشار ثقب، مثاقب | حافظ على تجهيز الأسطح؛ قم بتغطية الحواف |
| فجوات عميقة | قضيب الدعم + مادة مانعة للتسرب | مسدس السد، فاصل. | يمنع روابط النقاط الثلاث |
| التنظيف والتخزين | مانع التسرب المتبقي | Rags, solvent as per manufacturer | Keep in budget-friendly container |