

 Shallow Water Boats – 7 Essential Tips for Safe Boating in Shallow Water">

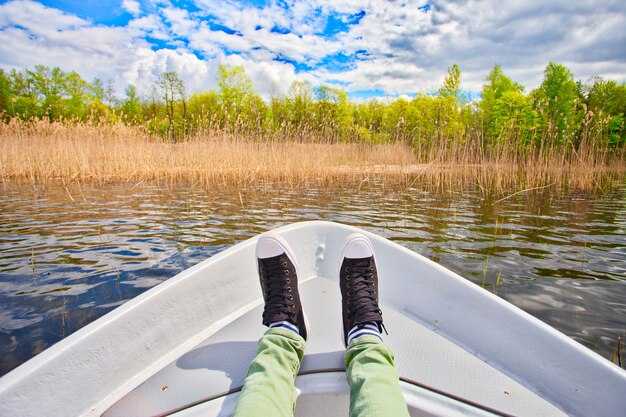
Step 1: تفقد العمق وملمس القاع وأنت تقترب من المناطق التي تحتوي على: عمق ضئيل; ؛ لاحظ الحواجز الرملية وجيوب الطمي؛ اختبر العارضة بانجراف بطيء واضبط السرعة؛ إنها أكثر أمانًا عندما يكون الحمل متوازنًا وتتجنب الميل المفاجئ بالقرب من مصب النهر.
Step 2: وزّع الـ load بالتساوي على طول خط المنتصف; ؛ تجنب تكديس المعدات الثقيلة على جانب واحد ؛ فالوزن المنحرف يزيد من خطر الانقلاب عندما تواجه تموجات أو رياحًا معاكسة أو ظل الأبراج البعيدة على طول الشاطئ، ومع ذلك، يظل المبدأ كما هو.
Step 3: حافظ على أقل قدر ممكن من الدفع في المناطق الضيقة؛ إذا لامس هيكلك القاع، فارجع ببطء؛ قد يؤدي التوقف المفاجئ إلى الغرق أو الاصطدام الشديد؛ حافظ على وضع الخمول عندما تكون على بعد أمتار قليلة من الضفة لتكون مستعدًا لـ float, ، ومع twin outboards بالتباطؤ، بالكاد سيكون لديك سيطرة.
Step 4: في مقاطع الصيد، احرص على تخزين الطُعم والمعدات بإحكام؛ وعند مد الخيوط، حافظ على الخيط أسفل حافة القارب لتجنب التشابك؛ وإذا كنت تستأجر معدات، فتأكد من الطفو وطول الخيط؛ وينبغي حفظ البوري والطُعم الآخر في حاوية محكمة الإغلاق للحفاظ على things منظم وجاهز للاستخدام.
Step 5: إذا كنت تنوي البقاء أقرب إلى مركز المسار، فتجنب العوائق على طول الهامش؛ وإذا ارتفع ضفة، ابتعد تدريجيًا وراقب الصخور المخفية والجذوع المغمورة؛ ال works تساعدك الفحوصات الروتينية على تجنب أن تصبح lost والبقاء away من الخطر.
Step 6: جهز معدات السلامة، وتحقق من أجهزة التعويم، وافحص مدى الراديو؛ وإذا كنت تستأجر قاربًا، فافحص الهيكل والمراسي، وضع خطة مع زميل في حال تغيرت الظروف؛; said الإجراءات تجعل طاقمك أكثر هدوءًا عندما تتحول الظروف وتنجرف نحو جيوب أعمق بالقرب من tower along the coast.
Step 7: إذا عَلِقتَ في رَصيفٍ رَمليّ، تَحَلَّ بالهُدوء؛ أبقِ الرُّكابَ بالقُربِ من خَطِّ المَركَز؛ قَيِّم الحِملَ والوَقود؛ أرسِل إشارةً لِطلبِ المُساعدة، وحافِظ على جَفافِ العَنبَر، وخَطِّط لِعودةٍ مُنَظَّمة عِندما يَسمَحُ المَدُّ والعُمق؛ هذا case تُظهِر أهمية الفحوصات الروتينية وقائمة التحقق قبل الإطلاق offer نسبة أفضل لضمان عودة آمنة، حتى عندما تكون على بعد أميال من الوطن وكل ما تراه هو تموجات حول الهيكل.
قوارب المياه الضحلة: 7 نصائح للإبحار الآمن في المياه الضحلة؛ ماذا تفعل عند الإبحار في المناطق الضحلة
Tip 1: تحقق دائمًا من العمق قبل دخول أي مناطق ذات عمق منخفض. استخدم عدة خرائط، وجهاز قياس عمق محمول، وتحقق بشكل مضاعف مع السكان المحليين كلما أمكن ذلك. إذا كان الخلوص المقاس ضيقًا، فابحث عن طريق آخر؛ عدِّل خططك وفقًا لذلك واستخدم الراديو لتأكيد الظروف. يقلل هذا النهج من خطر الارتطام بالأرض والأضرار.
Tip 2: خطط لعبورك مع وضع المخاطر المحددة في الاعتبار. إذا كانت القناة ضيقة، فابحث عن بديل أكبر أو خطوط حافة تحافظ على سلامة الهيكل. رتب الخيارات حسب هامش الأمان واحتفظ بعدة خطط احتياطية جاهزة في حالة تغير اتجاه الرياح أو التيارات. أثناء الإبحار، انتبه إلى المواقع التي يحذر منها السكان المحليون وقم بتعديل مسارك.
Tip 3: تمهّل لتقليل الضرر والحفاظ على التموجات صغيرة؛ يساعدك الوتيرة الثابتة على اكتشاف المخاطر المغمورة قبل الاصطدام. تجنب الاختراق عبر بقع الأعشاب والجذوع، وقلل الرذاذ الذي قد يحجب العوائق. استخدم قوة الدفع الخلفي باعتدال، وحافظ على حركة ثابتة ومتحكمة بالقرب من القاع لمنع التشابكات.
Tip 4: وازن المعدات لمنع الإمالة. انقل العناصر الأثقل إلى الخلف وحافظ على الوزن منخفضًا لتحسين الثبات في الأقسام غير المستوية. إذا لاحظت أي ميل، قم بالتشذيب تدريجيًا واستخدم المهارة للتوجيه عبر المناطق الصعبة دون مناورات مفاجئة.
Tip 5: عند الصيد بالقرب من القاع، استخدم المهارة واختر طعمًا يعمل في الجيوب الضحلة - يمكن للكركند أو جراد البحر أن يجذب لدغات في العديد من المواقع. افحص حواف العشب بحثًا عن ممرات أكثر أمانًا واقترب بضربات دقيقة ومنخفضة السرعة لتجنب التشابكات أو إخافة الأسماك.
نصيحة 6: في حالة حدوث مشكلة، حافظ على هدوئك وتواصل بوضوح. استخدم الراديو لطلب المساعدة، واصفًا المواقع التي دخلت إليها والعمق الحالي. سيقوم المستجيبون بتوجيهك إلى مخرج آمن وقد يقترحون طريقة مختلفة لتجنب الخطر. احتفظ بجهازين للإشارة جاهزين وانشرهما إذا لزم الأمر.
نصيحة 7: بعد كل أسبوع من الاستخدام، راجع المشكلات وحدث مخططاتك. لاحظ المواقع المخططة لتجنبها وشارك النتائج مع السكان المحليين والطواقم الأخرى. قم بفحص منتظم لخطة المعدات والوقود وعناصر السلامة لتقليل المخاطر وترتيب أي أدوات أو معدات مفقودة على الفور.
إرشادات عملية للإبحار في المناطق الضحلة
تحقق من خرائط الأعماق قبل المغادرة لمنع الشحوط؛ قارن المسار المخطط له مع المسطحات العشبية والقنوات القريبة؛ تأكد من توافق هذه العلامات مع مؤشرات خط الماء وتأكد من إحاطة الركاب علمًا قبل التحرك.
اختَر مسارات بهوامش أكبر وقم بقياس الأعماق في مواقع متعددة على طول المحيط؛ ويمكن تعديل المسار بإزاحات صغيرة وإعادة فحص القراءات؛ وضمِّن زوجًا من المراقبين لرصد الظروف الحقيقية.
اعمل بسرعات مناسبة للتصيد بالقرب من مناطق الأعشاب؛ حافظ على سطح ثابت وتجنب التسارع المفاجئ أو المنعطفات التي ترفع المؤخرة وتزيد من خطر اصطدام المروحة؛ حافظ على مراوحك خالية من الحطام واحذر من المناطق العمياء القريبة حيث قد تكمن المخاطر المغمورة في موضعها الحقيقي.
في المناطق المكتظة، قبل الدخول، ارسم مسارًا متحفظًا على الخرائط، وحدد بقع العشب والعوائق المعروفة، وخزّن الطعام بإحكام حتى لا يتدحرج؛ هذه الخطوات تساعد على منع اتخاذ قرارات في اللحظة الأخيرة والحفاظ على المركبة تحت السيطرة.
إجراءات الاستعداد: تخصيص اثنين من أفراد الطاقم للوقوف للمراقبة؛ إجراء فحوصات القياس بانتظام؛ إذا انخفضت القراءات عن الهوامش الآمنة، توقف وأعد التقييم قبل المتابعة؛ تقلل هذه الفحوصات من المخاطر وتحافظ على الظروف قابلة للرصد بشكل كافٍ للجميع على متن السفينة.
| Scenario | Action | Key Metric |
|---|---|---|
| الاقتراب من تجمعات الأعشاب الضارة والمساحات العشبية | خفض السرعة؛ راقب علامة خط الماء؛ حدث الخرائط | السرعة ≤ 6-8 عقدة؛ هامش العمق ≥ 0.6 متر |
| بالقرب من عوائق مغمورة تقريبًا | الحفاظ على المسافة؛ فحص القراءات באמצעות مقياس العمق المحمول باليد | المسافة ≥ 10 أمتار؛ هامش العمق ≥ 0.3 متر |
| وعلى متنها ركاب | عينوا زوجًا من المراقبين؛ وقوموا بإحاطتهم علمًا قبل إطلاق السفينة. | مراقبين متواجدين؛ تم الانتهاء من الإحاطات |
| في عمليات التصيّد | العمل بوتيرة محافظة؛ الحفاظ على مسار واضح خلف المراوح. | سرعة ثابتة؛ لا توجد حطام أو مخلفات في المسار. |
تحقق من مخططات الأعماق والتغييرات المحلية في العمق قبل الدخول
Recommendation: Pull authoritative depth charts and compare them with real-time mapping before entering zones with limited depth. If the chart shows a clear corridor, the navigator grinned and proceeded cautiously, keeping to deeper pockets.
When reading depth charts, note sections where depth dips below 4 feet; around lower-depth bars and bends, the lowest depth can drop rapidly, sometimes 2–3 feet within 20–30 feet. Here, mark the secure corridor and keep the route at 5–8 feet whenever possible. If the chart shows a falling gradient, take a detour to the outside edge of the bend before committing to the line, and never cross spots with less than 4 feet unless you have a plan and a heavy anchor ready.
Use a handheld depth finder, and consider renting one if your built-in unit doesn’t cover the area. Compare its live reading with the chart mapping, and look for discrepancies. This is particularly important near inlets where freshwater inflows create mapping anomalies and lures or craw habitats near structure.
Note how tide affects depth: larger tide cycles can increase depth around banks; a rising tide often helps when moving into pockets with greater depth, whereas a falling tide can leave you reading depths that are less deep. Plan a crossing during a higher tide window and be prepared to back out if you see depth approaching the lowest marked level on the chart.
Anglers should follow particular shoal lines: look for casts along the edge of a channel, where casting and trolling will still keep you within secure depth. When looking for catching opportunities, use close-range casting near the bank, but stay 2–4 body lengths from the edge and watch for submerged structures. If you’re using bait, choose small, slow-moving lures during the initial pass, then switch to heavier lures only if depth holds at least the lowest chart value.
Another idea is to map the route around the bend using a mapping circuit on your device. Theyre simple steps: compare chart data, then do live checks; take another pass to confirm, and if a depth reading sits around 4–5 feet, that area is safer to navigate at crawl or light trolling. Only when you confirm with real readings should you drift or cast into the target zone.
Choose Hull, Prop, and Load for Shallow-Water Use
Recommendation: Use an aluminum hull with a flat-bottom or mild-V and a short length-to-beam ratio, paired with a compact, high-thrust propeller. This setup dramatically improves maneuvering in confined, low-depth zones and lowers aground risk when moving near shoals. The design usually stays within the boat’s rated capacity, helping ones on board and passengers stay stable and avoid sinking in soft bottoms.
Weight and balance: aluminum hulls are forgiving, but load must stay within the manufacturer’s limits; dont ignore weight distribution when there’s much gear or several passengers. Balance forward and toward the center to prevent bow-down tilt. A forward bias usually reduces tilt and keeps the bow light, while a centered load improves maneuvering behind the wheel. Understand the effect of weight distribution; even small shifts can cause a case of unplanned movement, depending on how you stand or sit, and whether you’re moving bait or tools by hand. Always keep the load moving gradually to maintain control and avoid surprises for passengers.
Prop and electronics: choose a three- or four-blade aluminum prop with pitch matched to hull size and typical load. A smaller diameter helps prevent digging under soft bottoms and reduces the risk of sinking when you strike submerged hazards. If you’re carrying bait and gear for trout or other fish, ensure the setup allows quick adjustments without fouling lines, and that electronics remain functional under engine torque. Having electronics mounted securely helps you retain situational awareness and lets you adjust speed without losing control during moving operations.
Load distribution and trim: keep heavier items low and toward the center so the bow does not rise excessively and the stern doesn’t swing behind you. Usually avoid placing heavy gear behind the console; if there’s much weight behind, the tilt becomes huge and aground risk grows. Severely unbalanced loads severely limit maneuvering; fix by shifting toward the center and using tie-downs to keep gear under control. The effect of weight shifts is tangible, so plan longer trips with a mind to even balance. This approach allows safer operation and helps prevent sinking in soft bottoms or when encountering submerged obstacles.
Operational notes: bait boxes, tackle, and fish in boxes should be stored in accessible compartments to prevent shifting with passengers. whats more, longer trips with several stops demand steady load management so electronics stay visible and the craft remains stable. The approach to depth changes matters, so respect the terrain and avoid large, sudden moves that could trigger aground. With a robust aluminum hull, a matched prop, and disciplined load, you’ll enjoy fishing for trout and other species in tight spots while keeping the crew comfortable. This plan will allow safer operation and help prevent sinking in soft bottoms or when encountering submerged obstacles.
Keep Low Speed and Steer Strategically to Avoid Grounding
Reduce speed to idle in risk zones; steer toward deeper pockets shown on depth charts. This disciplined approach keeps you within margins and helps you traverse risk safely, as surface conditions shift, giving you reliable control.
- Aluminum hulls respond quickly to throttle and trim; maintain a slow, controlled pace to minimize bottom contact risk.
- Move the helm slowly with gradual corrections; avoid abrupt turns that push the keel toward soft bottoms.
- Plan moves using current, wind, depth information; next decisions reference these charts to stay mid-channel, within the deepest feasible trough.
- Keep at a longer stopping distance when approaching potential obstructions; this extra time helps you adjust without touching the bottom.
- When near platforms, baits, or lures, reduce speed further and keep a wide arc to avoid collisions; they present moving lines and moving fishs that demand extra clearance.
- If renting a vessel, confirm the operating area, known depths, and suggested routes with the operator; this prevents risky moves near unknown bottoms.
- Eastward and westward channel indicators vary; exploring maps and surface data, orient by charts and move toward the side with consistently deeper surface yields; exploration should stay within clearly marked routes.
- Understand that longer moves along conservative headings generally reduce grounding risk; sometimes taking these steps will deliver the gold-standard result and keep you moving.
Identify Bottom Type and Obstructions: Sand, Mud, Weeds, Rocks
Once you start, perform a quick bottom check in the channel using a finder and a hand probe to identify substrate type. The display should show sand, mud, weeds, or rocks; mark the result on your chart and note nearby features.
Sand beds look even, but texture can change with current; objects buried can shift as wakes pass; on sand, maneuver with steady throttle to avoid digging and to keep traction; if you see the sand edge, plan a route onto deeper spots in channels.
Mud offers soft support under load; it can trap the bottom and cause sudden loss of control; they tend aground if speed changes are abrupt.
Weeds wrap around prop and intake; they look natural but block flow; keep a weed edge on one side; if weeds are added beyond a patch, consider lifting or clearing to prevent injury and loss of steering.
Rocks create hard contact risk; they look like dark spots on the chart; submerged rocks require careful navigation along channels; use a finder and sonar to locate and keep off bottom.
Nearby johnson notes and local charts include buried objects placed nearby, dead trees, and man-made items; if you encounter a marked object, alter course accordingly; the lowest risk path tends to stay within clear channels. If something unexpected appears, treat it as obstacle and adjust.
Different substrate types demand different handling. Create a quick bottom type log: note sand, mud, weeds, or rocks; place a marker on the chart with the exact location; the finder can help you identify risk, and this help increases safety among boaters in competitive channels.
Balance Weight and Trim for Better Clearance
Recommendation: Achieve level trim by distributing load and ballast so the hull runs parallel to the bottom as tides draw toward shoal areas and reefs, improving clearance when venturing into restricted zones.
- Before launch, use a load card to log total mass, CG position, and expected trim; include notes from the manual and tides forecast; update after each week of operation or after any change in passengers or gear. Years of practice improve accuracy; keep a running record you believe you can rely on.
- Heaviest items go low and near midships; spread passengers along the side to avoid list; place gear along the centerline to create a balanced profile; adjust in craw increments to dial in the trim without overcorrecting while listening to hull feedback.
- Keep essential fuel and equipment as near the centerline as possible and balanced fore and aft; stay within the operator’s guidelines and the manual; if you venture into choppier waves, the trim response becomes more predictable and manageable, and this is highly beneficial.
- Approach shoal depths slowly; verify draft with depth gauges and tide information; if you draw near the bottom, pause and reassess load distribution and ballast before proceeding; avoid action that could strand you near reefs.
- Engage anglers and passengers in the plan; explain where to sit and how to move; theyre mindful of trim changes; local saltwater experience shows that weight spread along the length reduces lean and helps maintain clearance.
- Post-trip review: compare actual trim to predicted values, update the card and logs for the next outing; with practice over years and seasons, trim control becomes more precise and less guesswork.
Particular scenarios require quick adjustments: if you need to pass below a low edge or skim along a reef edge, move heavier items forward or aft by smaller amounts, staying within safe ranges; always prepare for changes in waves and winds, and keep stranded risk low with emergency action gear ready.
Grounding Response: Immediate Steps and Safe Recovery
Shut propulsion to idle, steer toward the shore in a controlled arc, and keep your weight quite low with knees bent to reduce tipping risk.
Once contact with the bottom is confirmed, step onto firm ground, naturally check hull integrity and traps, and remove entanglements; avoid standing in mud pockets that may trap ankles.
If the hull remains stuck, call assistance immediately because a damaged keel or bent fittings can worsen injuries; do not attempt to pull free from an awkward angle, instead secure lines to a nearby anchor and wait while recovery teams arrive.
In calm conditions, keep netbait or bait stowed and away from the hull; if a fishs sighting appears, note the kind and keep distance from the line to prevent damaging gear; a lightweight rig and even a gold lure should be secured to avoid snagging; this helps reduce additional damage while you wait.
Adjust course to the east if wind shifts, then come alongside the bank through channels nearby; draw toward the shore with an easy, steady motion; this only helps minimize longer exposure and prevents traps in soft places.
In morning checks, if you spot a Johnson twin anchor rig, verify it is secure before stepping away; the procedure called by guides lowers risk of further damage and helps anyone recover gear quickly; after release, move the boat gently to the dry area and recheck the hull for any imperceptible cracks.